An interesting question.... Like many of these obvious questions, there are some complicated reasons.... The first thing to realise is that these bearings run with full oil separation between the bearing surfaces rather than the modern theory of boundary lubrication where the oil doesn't always prevent metal to metal contact in the bearing under extreme loadings. Roller and ball bearings get away with this because of the extreme hardness of the bearing surfaces but are almost always used in applications which are purely rotative and even torque, they are not normally subject to reciprocating loading. In a bronze bearing there is enough separation between the surfaces to allow a wedge of oil to form in front of the direction of movement of the central element rotation. This means that in a well adjusted bearing the surfaces never touch as part of the wedge is always escaping between the two surfaces. Now recognise that in the steam engine there are two peaks in the torque at each end of the stroke on steam admission. After that, until the other end of the stroke is reached, the pressure on the bearing is reducing to zero. (This is why compound engines are set with the cranks at 90 degrees to each other so that the torque input is quartered during one revolution.) This is why, except in very specialised applications, the plain bearing is universally adopted even today. Think of the plain bearings on the crankshaft and con rods in the engine in your car.
As for ball and roller bearings.... When they became available in the early twentieth century some lineshaft systems in sheds were fitted with Timken self-aligning bearings. Read Newton Pickles transcripts for the problems that arose and the almost universal replacement of them with plain bearings.Think of the size and cost of them for large bearings on engines even when they were available. Than look at the excellent performance of plain bronze bearings. Almost all the engines scrapped were still running on their original bearings. The crank bearing on the LP side of the Bancroft engine had not been adjusted in over sixty years and is still perfect. When they scrapped the shafting at Bancroft I took particular notice of the plain bearings in the main lineshaft into the shed. They were all perfect, as good as the day they were installed.
Bearing material was important, it had to be stable enough to resist deformation under load and yet contain enough self-lubricating metal, like lead, to give some protection if there was ever point contact, usually when a foreign body entered with the oil. One little known fact is that Brook Motors at Huddersfield used to recommend storing unused electric motors on their ends if there was any vibration on the environment. The reason for this was that the vibration introduced point loadings in the bearings which led to a form of local corrosion at the contact points and destroyed the running surfaces.
Babbitt lining of the bearings was only used when very high loadings were encountered. The pedestal bearings on the flywheel at Ellenroad are Babbitt lined and in addition had water cooling coils in the left hand bearing because they got into trouble when they pushed it to the limit when only running one side. The wheel weighed 85 tons and so there was great pressure on the bearings simply because of the weight. When the engine was taken out of service there was a full set of new steps for these bearings in the cellar but someone pinched them. I never lifted the caps on the bearings but if you did you'd find that apart from the pockets in the bearing, they will have no Babbitt left in them.
So, to sum up, there was never any reason for trying to 'improve' the original bronze bearings. Adjusted and maintained properly they were virtually everlasting. If there was trouble, usually caused by bad adjustment of failure to fully lubricate, they would overheat and eventually seize but so would any bearing if mistreated like that. A roller or ball bearing could not be repaired, a bronze bearing could be scraped in again and would continue in service with no problem at all. Many times even this wasn't necessary, if you could still turn the engine a mixture of light oil and Victory Compound (a very soft abrasive like finely powdered rotten brick) would re-grind the internal surfaces and could be washed out with thin oil, it would not embed in the metal being too soft. The bearing surfaces would be roped but still perfectly satisfactory as the two surfaces matched each other. As long as the bearing ran quiet and cool it was doing its job. In extreme cases any competent fitter could machine a new bearing from a casting made locally.
So, the short answer is that there was never any need to replace bearings that were doing their job perfectly and economically.
SHED MATTERS 2
-
Stanley

- Global Moderator

- Posts: 90760
- Joined: 23 Jan 2012, 12:01
- Location: Barnoldswick. Nearer to Heaven than Gloria.
Re: SHED MATTERS 2
Stanley Challenger Graham
Stanley's View
scg1936 at talktalk.net
"Beware of certitude" (Jimmy Reid)
The floggings will continue until morale improves!
Stanley's View
scg1936 at talktalk.net
"Beware of certitude" (Jimmy Reid)
The floggings will continue until morale improves!

Re: SHED MATTERS 2
Thanks. Now I understand.
-
Stanley
- Global Moderator
- Posts: 90760
- Joined: 23 Jan 2012, 12:01
- Location: Barnoldswick. Nearer to Heaven than Gloria.
Re: SHED MATTERS 2
It's a pleasure China.... I've flagged this post up in Steam engines and waterwheels as well.
Stanley Challenger Graham
Stanley's View
scg1936 at talktalk.net
"Beware of certitude" (Jimmy Reid)
The floggings will continue until morale improves!
Stanley's View
scg1936 at talktalk.net
"Beware of certitude" (Jimmy Reid)
The floggings will continue until morale improves!
-
Stanley
- Global Moderator
- Posts: 90760
- Joined: 23 Jan 2012, 12:01
- Location: Barnoldswick. Nearer to Heaven than Gloria.
Re: SHED MATTERS 2
It's been a busy morning.... I started out with two ideas in mind, to drill and tap the cylinder for the lubricator (Now 1/4" Brass thread....) and the other, to address a small matter raised by the design committee this morning. During the night they decided that I need to take steps to bring the centre of the flyshaft inboard a bit, at the moment it's a bit too far forward. Or to put it another way my bed is a bit short but this was governed by the size of the bits of scrap I had. Two ways to do this, thread the end of the piston rod a bit more and gain an eighth of an inch there and shorten the brass on the end of the con rod. That comes later, I started with the piston rod.
No need to take the rod out, I extended the thread using the nut on the end of the rod to drive it.
After I extended the thread I stoned the face of the slide to take the original fitting marks less visible.
Extending the thread interfered slightly with the hole for the crankshaft pin so I filed it out and made sure the pin was an easy fit.
Next job was to drill and tap the cylinder for the lubricator. Notice the grease in the bore, an old Newton trick to catch the swarf from the tapping and make it easier to get out. Then I put the lid back on the cylinder with a bit of Stag compound in the joint, I don';t think it will have to come off again.
I wanted the VM bed free for adjusting the crankpin brass and when I got the engine off I found my studs were protruding a bit too far so I set the engine up upside down on the surface plate and ground them flat. It struck me that while I had the engine set like this and the angle grinder out this was a good time to groove the joint out and pop some weld in it.
I rugged everything up, I don't like welding in the shed.... Leather gloves at the back over the tools and everything else covered as best I could.
Not a pretty sight but a triumph for a blind man.
As I said, not pretty abut after grinding off I have enough metal in the right place to make sure the extension to the bed never moves again. They won't see it off the Ribble!
Close of play, the base is flat, the engine sits square on the surface plate. Tomorrow I can address the con rod brass and win some more out of the length. I don't foresee any problems there.....(hopefully!) Not a bad morning, we have solid progress.
Stanley Challenger Graham
Stanley's View
scg1936 at talktalk.net
"Beware of certitude" (Jimmy Reid)
The floggings will continue until morale improves!
Stanley's View
scg1936 at talktalk.net
"Beware of certitude" (Jimmy Reid)
The floggings will continue until morale improves!
Re: SHED MATTERS 2
Hi Stanley, looks like its coming on nicely, the welding looks ok, well it will not fall off anyway lol.
We have a new member to the Harrison owners guild ...................... John has bought a very clean fully tooled Harrison 140, just a L5 with squared off head stock and L00 spindle fitting , its from beside Leeds , we went down and looked at it yesterday and its getting delivered next Saturday so he is looking forward to polishing it all up and getting the bits and bobs fettled, should be on his next Sunday night cap.
I mentioned you had been trying to E mail him with no luck, he has been receiving mail ok so was puzzled ???
Cheers Mick.
-
Stanley
- Global Moderator
- Posts: 90760
- Joined: 23 Jan 2012, 12:01
- Location: Barnoldswick. Nearer to Heaven than Gloria.
Re: SHED MATTERS 2
He'll never regret it! Is it Imperial or metric? He must have got the last mail but the two before were chucked back at me as undeliverable. Never mind....
Con rod today. If I'm not satisfied with the length I'll make a new one... The welding was not good but it's stuck together OK and the way my eyes are that'll have to do.... It will never be seen......
Con rod today. If I'm not satisfied with the length I'll make a new one... The welding was not good but it's stuck together OK and the way my eyes are that'll have to do.... It will never be seen......
Stanley Challenger Graham
Stanley's View
scg1936 at talktalk.net
"Beware of certitude" (Jimmy Reid)
The floggings will continue until morale improves!
Stanley's View
scg1936 at talktalk.net
"Beware of certitude" (Jimmy Reid)
The floggings will continue until morale improves!
-
Stanley
- Global Moderator
- Posts: 90760
- Joined: 23 Jan 2012, 12:01
- Location: Barnoldswick. Nearer to Heaven than Gloria.
Re: SHED MATTERS 2
The first job today is to see how much I can shorten Newton's con rod. I started by punching new witness marks on the brasses because the old ones are going to get milled off.
I marked the brasses to what seemed to be a sensible depth. Set the vice up square on the VM table and set about the simple job of reducing the brasses and breaking the edges.
Newton's rod had quite a lot of meat in the foot so I pinched some of it! Every little helps.... By the way, if I don't get it short enough it isn't the end of the world, I'll just make a new one....
You can see how much I have won by the spare length on the clamp bolts.
Then I installed the shortened rod after re-marking the new centre on the top slide of the crosshead slide and spent a lot of time making sure I had the con rod mounted parallel to the bed and measuring it up. It's slow when you can't see! Eventually I was satisfied I had it right and the centre is well inside the outboard end of the rising blocks. I marked the face and for good measure put a punch mark on each side.
I need to modify the crankshaft and this will be best done within centres so I touched my dead centre up. I was a bot puzzled by the fact it wasn't dead in line with the tailstock centre but then found the reason, a milling chip under the tailstock where it mated with the lathe bed. Enough to throw the centre out. This has never happened to me before....
A bit of camera shake here, sorry about that. If you look on this side of the crank web newton has left a step in the shaft. It has do go for the shaft to work in my design.... I turned it off carefully and then polished the shaft. You can't see the join.
Close of play. The shaft is ready for mounting and the con rod only needs the clamping bolts trimming....
Not a bad morning's work.... I can go and enjoy a sleep now!
Stanley Challenger Graham
Stanley's View
scg1936 at talktalk.net
"Beware of certitude" (Jimmy Reid)
The floggings will continue until morale improves!
Stanley's View
scg1936 at talktalk.net
"Beware of certitude" (Jimmy Reid)
The floggings will continue until morale improves!
-
Stanley
- Global Moderator
- Posts: 90760
- Joined: 23 Jan 2012, 12:01
- Location: Barnoldswick. Nearer to Heaven than Gloria.
Re: SHED MATTERS 2
We'll be looking at bearings this morning. Haven't got the design straight in my head yet but I had a furtle in the treasure chest last night and found this block of cast bronze... Could be a good place to start!
A good walk cleared my head and I have changed my mind about the bearings. The block of cast bronze can go back into the treasure chest! I have decided to go dead simple, I've ditched the idea of a full split bearing with adjustment and am going to go for bushes pressed into steel rising blocks. That way I give them a greater bearing surface, more stability and a lot easier to do accurately. I have plenty of round bronze stock.... This is in no way a cop out as the smaller engines were often constructed with bushes instead of full adjustable steps. They tended to last longer and when worn were easily replaced, any competent fitter could turn another bush and they were small enough to be done on common lathes.
I've done all my jobs.... off into the shed now for more playing out!
Stanley Challenger Graham
Stanley's View
scg1936 at talktalk.net
"Beware of certitude" (Jimmy Reid)
The floggings will continue until morale improves!
Stanley's View
scg1936 at talktalk.net
"Beware of certitude" (Jimmy Reid)
The floggings will continue until morale improves!
-
Stanley
- Global Moderator
- Posts: 90760
- Joined: 23 Jan 2012, 12:01
- Location: Barnoldswick. Nearer to Heaven than Gloria.
Re: SHED MATTERS 2
First job was to have a furtle for materials. You've guessed it, into the treasure chests. The non-ferocious chest yielded a cast bronze bar and a piece of bronze bushing that will do for the larger bearing of the two. Then I wanted some steel heavy enough to get the two pedestals out of it. This block will do it just, a b it of a pinch on height but it will be all right. Then a solid hour of measuring and decisions.... The outcome was the need to cut the block of steel in two. Nowt to it..... The first thing to do was to square both ends of the block so I could hold it securely in Mick's big machine vice on the HM.
The milling of one end of the block was OK but I wasn't satisfied with the way the cutter was working. It's confession time here, I am a good man at touching cutters up on the T&C grinder but you can only touch up for so lo0ng. Then you have to rebuild the cutting edge by putting some back rake on it. This means altering the set up, not a big job but easily ignored when you are pushing to get on. So I ran the diamond over the face, reset the tool-holder to give about 9degrees of back rake and set about putting several of my 3/4" milling cutters in order. It all takes time but well spent.
I squared the other end of the block and it cut nicely...
My last job was to clean the HM off, re-orient the machine vice for the saw cut, change the slabbing cutter for the saw and get the block in place ready for cutting. I'm leaving that for the first job tomorrow.
So, not a lot of progress at first glance but a good solid morning that has left the shed and tools better than they were when I want in this morning. You can't ask for much more than that.
My mind has been running forwards. The reason I want to finish the pedestals and fit the bushes for the shaft is that I want to mount the flywheel and con rod in their bearings and clamp the pedestals down where I think they ought to be. Then I can rotate the shaft and ensure that I have the stroke right in the cylinder. When I have done that I will mark and fit the holding down studs. You can't check too many times!
Stanley Challenger Graham
Stanley's View
scg1936 at talktalk.net
"Beware of certitude" (Jimmy Reid)
The floggings will continue until morale improves!
Stanley's View
scg1936 at talktalk.net
"Beware of certitude" (Jimmy Reid)
The floggings will continue until morale improves!
Re: SHED MATTERS 2
Hi Stanley and All, another good day for you Stanley , I have been making a DTI holder today here it is, nice and simple but works.
Just made a small gadget that will make life easier, its a dedicated holder for a DTI that fits on the lathe toolpost. Nothing fancy but seems to work fine.
Its just a bit of square bar that fits into the quick change holder, I drilled and tapped it M6 at three points along the side and also on the end.
To space out the DTI so it clears the holder I had some stand off type bolts, its the sort of thing that is used to mount a circuit board or panel so its stood up off the base, all they are is a tall nut with a stud sticking out one end. I had 4 of these they just happened to be perfect size to space out the DTI and the last one acted as a nut to nip the lug on the DTI, to make it easier to get a hold of when tightening I screwed a M6 plastic knob into the nut.
I think all should be explained by the photos.
Mounted in this position its good for bar or the edge of a small disc type item , if you have a larger disc you run out of travel with the cross slide but you can then mount the DTI in the rear nut, in practice you will probably have to remove the front nut so it will give clearance for the DTI.
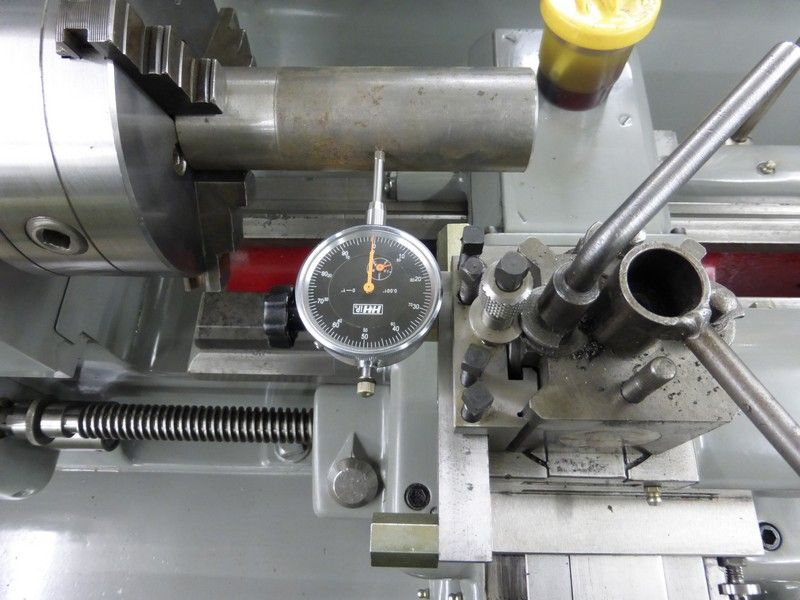
If its mounted on the end position its able to indicate the face of a disc.
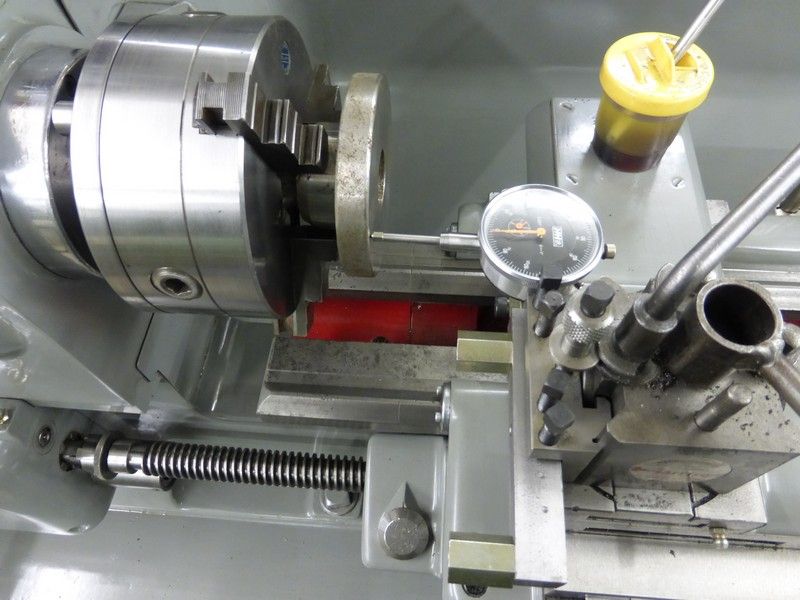
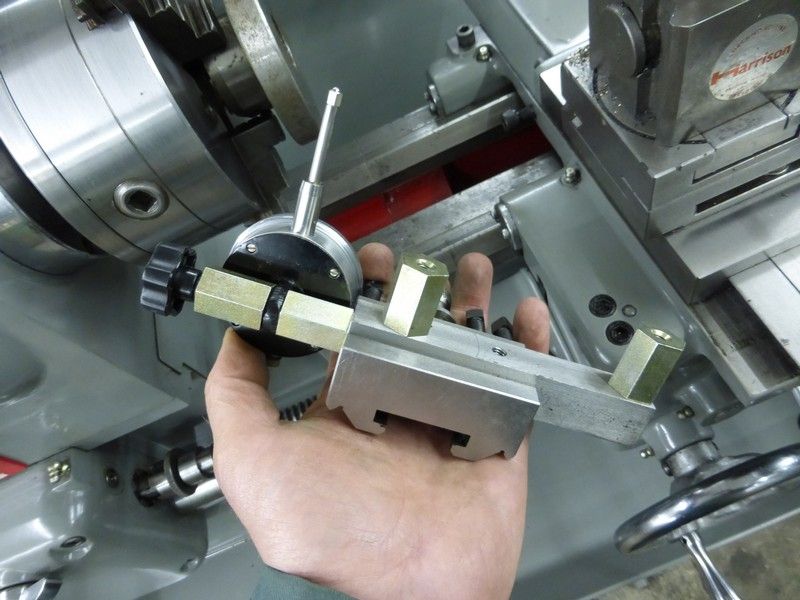
I actually drilled three holes just as it was set up but I don't think there is any need for the middle one.
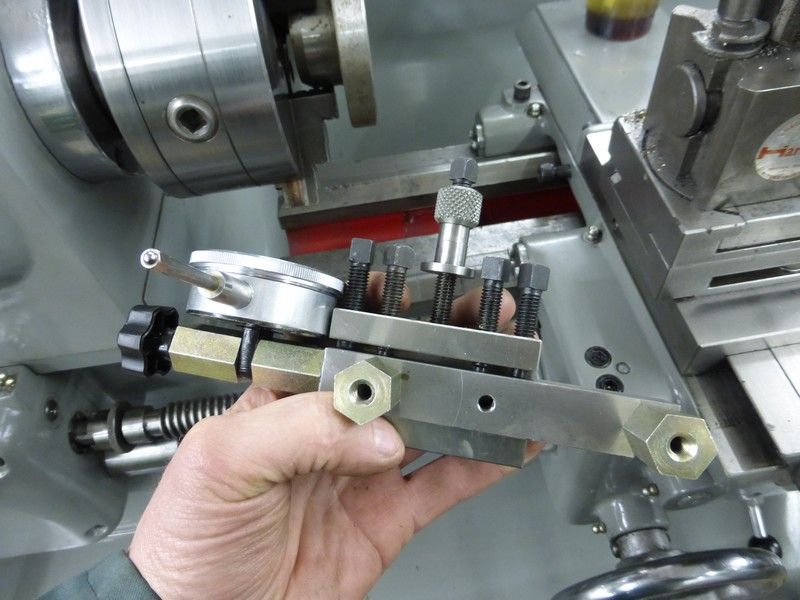
Its very quick to use , nice and solid with no faffing about with mag stands and all you need to make one is a bit of bar and 4 of the stand off nuts, then drill and tap 4 holes. If you wanted a smarter looking one or just wanted to make it into a bigger job , you could turn the spacer nuts and knurl the end etc.
Cheers Mick.
Just made a small gadget that will make life easier, its a dedicated holder for a DTI that fits on the lathe toolpost. Nothing fancy but seems to work fine.
Its just a bit of square bar that fits into the quick change holder, I drilled and tapped it M6 at three points along the side and also on the end.
To space out the DTI so it clears the holder I had some stand off type bolts, its the sort of thing that is used to mount a circuit board or panel so its stood up off the base, all they are is a tall nut with a stud sticking out one end. I had 4 of these they just happened to be perfect size to space out the DTI and the last one acted as a nut to nip the lug on the DTI, to make it easier to get a hold of when tightening I screwed a M6 plastic knob into the nut.
I think all should be explained by the photos.
Mounted in this position its good for bar or the edge of a small disc type item , if you have a larger disc you run out of travel with the cross slide but you can then mount the DTI in the rear nut, in practice you will probably have to remove the front nut so it will give clearance for the DTI.

If its mounted on the end position its able to indicate the face of a disc.


I actually drilled three holes just as it was set up but I don't think there is any need for the middle one.


Its very quick to use , nice and solid with no faffing about with mag stands and all you need to make one is a bit of bar and 4 of the stand off nuts, then drill and tap 4 holes. If you wanted a smarter looking one or just wanted to make it into a bigger job , you could turn the spacer nuts and knurl the end etc.
Cheers Mick.
-
Stanley
- Global Moderator
- Posts: 90760
- Joined: 23 Jan 2012, 12:01
- Location: Barnoldswick. Nearer to Heaven than Gloria.
Re: SHED MATTERS 2
Looks nice Mick! Petter than mine.... What a nice clean lathe.....
I have a supplementary report.... Remember I finished yesterday with the stock marked and set up in the HM for splitting? As I was making my tea I had it on my mind so I went in the shed and set the mill up for an auto cut (moved the stop on the table) started it up and carried on making my tea. This was the result!

Nice cut but I'd forgotten one thing, to check the saw was lined up with the cut! Result is a cock up, two unequal sizes! Moral, always check at least twice before you cut! Not only that, but when I measured up to see what I had got I found that I had made a mistake in my original calculations, both lumps were useless... Not good. But then my eye fell on a nasty lump of steel that has been cluttering the chip tray of the HM up for ten years. It has never been used for anything because it has two curved faces. A quick measure up and it was a better match than the piece I had buggered so I chucked it in the mill. I didn't bother measuring it, there are two holes in it that need to be lost so I cut through them.

Here's what I finished up with.

I can work with these and they will be a lot better than the original stock because I have more depth. So despite the original error, I finished up with a better result and one I'll be much happier with. Never let the sun go down on a mistake! Onward and upwards!
I have a supplementary report.... Remember I finished yesterday with the stock marked and set up in the HM for splitting? As I was making my tea I had it on my mind so I went in the shed and set the mill up for an auto cut (moved the stop on the table) started it up and carried on making my tea. This was the result!
Nice cut but I'd forgotten one thing, to check the saw was lined up with the cut! Result is a cock up, two unequal sizes! Moral, always check at least twice before you cut! Not only that, but when I measured up to see what I had got I found that I had made a mistake in my original calculations, both lumps were useless... Not good. But then my eye fell on a nasty lump of steel that has been cluttering the chip tray of the HM up for ten years. It has never been used for anything because it has two curved faces. A quick measure up and it was a better match than the piece I had buggered so I chucked it in the mill. I didn't bother measuring it, there are two holes in it that need to be lost so I cut through them.
Here's what I finished up with.
I can work with these and they will be a lot better than the original stock because I have more depth. So despite the original error, I finished up with a better result and one I'll be much happier with. Never let the sun go down on a mistake! Onward and upwards!
Stanley Challenger Graham
Stanley's View
scg1936 at talktalk.net
"Beware of certitude" (Jimmy Reid)
The floggings will continue until morale improves!
Stanley's View
scg1936 at talktalk.net
"Beware of certitude" (Jimmy Reid)
The floggings will continue until morale improves!
-
Stanley
- Global Moderator
- Posts: 90760
- Joined: 23 Jan 2012, 12:01
- Location: Barnoldswick. Nearer to Heaven than Gloria.
Re: SHED MATTERS 2
It all started so well.... I started the usual task of squaring faces. The time I spent on the cutters yesterday was not wasted!
No need to take it down past the old holes because I'm only going to use the piece in the middle of each block....
Once I had two square faces on each block I measured up and made the first cut down to size. I was getting careless and taking too much at one cut....
... and paid the price! It got worse, the next saw I put in went the same way! I have an idea there was a hard shop in the centre of the block, it milled strangely afterwards. Yet another saw in and from then on a succession of lighter cuts!
Then I realised that when I set the big vice to 90 degrees my eyes had let me down. Not quite a right angle so a quick adjustment of the vice and a pass across the end to square it up.
Once I had the sawing finished I gang milled the two to make sure I had them the same length.
I did the same thing to get uniform height.
Two blocks exactly the same size.
This where they are going. They will shrink. One blessing from the initial mistakes is that I have plenty of meat to play with now....
Must go and have a look to see how much 6" x 1/16" X 1" slitting saws are.......
Stanley Challenger Graham
Stanley's View
scg1936 at talktalk.net
"Beware of certitude" (Jimmy Reid)
The floggings will continue until morale improves!
Stanley's View
scg1936 at talktalk.net
"Beware of certitude" (Jimmy Reid)
The floggings will continue until morale improves!
-
Stanley
- Global Moderator
- Posts: 90760
- Joined: 23 Jan 2012, 12:01
- Location: Barnoldswick. Nearer to Heaven than Gloria.
Re: SHED MATTERS 2
The slitting saws have been bothering me, It was my fault, I had got careless. Cause of the breakage is to deep a cut, less than sharp saw and metal building up in the cut to the point where it jams the blade. I only found one replacement on the web and it would be cheaper to buy a cheap cut-off saw! I have some saws left in the treasure chest... Will just have to be less greedy in future! (Or use thicker saws with side clearance, I have some of them.... I'm thinking of making and adapter so I can use 1 1/4" bore cutters on the HM. I have some of them....
Stanley Challenger Graham
Stanley's View
scg1936 at talktalk.net
"Beware of certitude" (Jimmy Reid)
The floggings will continue until morale improves!
Stanley's View
scg1936 at talktalk.net
"Beware of certitude" (Jimmy Reid)
The floggings will continue until morale improves!
-
Stanley
- Global Moderator
- Posts: 90760
- Joined: 23 Jan 2012, 12:01
- Location: Barnoldswick. Nearer to Heaven than Gloria.
Re: SHED MATTERS 2
A funny morning.... I started with a clear task, mill these two blocks to the right thickness for my pedestals.
I put one under the slabbing cutter on the HM and while I ran it on auto, I started reducing the other in the VM.... Full production! One of the problems with working with scrap is that you are never sure what you are working with and you always have more meat to take off than you would with well chosen new stock. Yesterday I suspected hard shops in the lump I was using but today I came to the conclusion it's a very old piece of Bessemer steel. Newton always said that he didn't like the stuff, very soft and sticky when you're machining it. I think that's what the problem was yesterday with the slitting saws. Today I wasn't at all pleased with the way my milling cutters were performing on the VM. Then there was the funny jingling noise coming out of the HM. I took the cover off the gear train in the table feed and made sure there was plenty of grease in there...
At this point I hadn't got either of the blocks to size and was not pleased with the way it was cutting in the HM either so I decided to take radical action....
You may have noticed over the last few weeks that the splendid copy of the Clarkson T&C grinder instructions that Mick sent me when he printed one for himself has been sitting at the back of the bench behind the VM. I decided it was time I read the instructions! Years ago, when I first got the grinder I read up on all the grinding angles but when I reviewed them this morning I realised that over the years I've been making my own up. I had all the angles wrong and had stopped adjusting the angle of the table to give me concavity in the cut! In other words, just about every mistake you could make!
So I got six of my favourite 3/4" shank cutters out of the drawer and resharpened them all to the angles according to the gospel of Clarkson. This took me into overtime but just before I came out of the shed I put one of the kosher cutters in the VM and took a couple of cuts. I think we have an improvement!
So, an entirely different morning than the one I envisaged but I don't think I have been wasting my time.
Stanley Challenger Graham
Stanley's View
scg1936 at talktalk.net
"Beware of certitude" (Jimmy Reid)
The floggings will continue until morale improves!
Stanley's View
scg1936 at talktalk.net
"Beware of certitude" (Jimmy Reid)
The floggings will continue until morale improves!
-
Stanley
- Global Moderator
- Posts: 90760
- Joined: 23 Jan 2012, 12:01
- Location: Barnoldswick. Nearer to Heaven than Gloria.
Re: SHED MATTERS 2
It struck me that someone might like the angles... Primary back rake 6 degrees, secondary 15 degrees, concavity 3 degrees applied by the table swivel not the main unit swivel which should be set at 90 degrees. There's a mark on it for this....
Stanley Challenger Graham
Stanley's View
scg1936 at talktalk.net
"Beware of certitude" (Jimmy Reid)
The floggings will continue until morale improves!
Stanley's View
scg1936 at talktalk.net
"Beware of certitude" (Jimmy Reid)
The floggings will continue until morale improves!
-
Stanley
- Global Moderator
- Posts: 90760
- Joined: 23 Jan 2012, 12:01
- Location: Barnoldswick. Nearer to Heaven than Gloria.
Re: SHED MATTERS 2
The day started with housekeeping. First job was to empty Henry, the shop vac. He was getting short of suck. Before I did that I had a chip hunt round the millers and on the bench. Then I vacuumed the carpet, I was crunching through chips and they tread into the house. Once I'd got everything ship shape and reasonably clean I addressed my milling cutters again....

When I was describing my research into cutter sharpening yesterday I made a point of saying that the adjustment for concavity was via the graduated index built into the table itself rather than just off setting the main swivel itself. Only problem was that I realised this and told you after I had done it the wrong way! So this morning I put 3 degrees off set on the table, set the main swivel at 90 degrees, dressed the cup wheel and did all the 3/4" shank cutters again. I have to admit that I don't fully understand why one off set is good and the other bad but did it anyway. It took me an hour and a half of grafting before I got to the stage where I was cutting again.

Another improvement. Here's the result. Definitely not time wasted! Another good result was that I realised my cheap Taiwan mill is a better tool than I thought it was. When I've had bad results with a freshly sharpened cutter I have always tended to blame the mill. Totally unjustified, what I had seen as basic faults with it vanished and the cutting was sweet and clean with a good finish. I tried one heavy cut just for a laugh, chips changing colour as they came off the cutter. No problems but I'd rather have the sweeter shallower cut. I have plenty of time!

Back to engine building. Next job was to mark the centre height for the shaft and where it has to be to line up properly so a coat of marking blue.

The pedestals marked for correct centre of the flyshaft bearings. Then I reviewed my bush sizes and found that I needed different stock than the two pieces I got out previously. A trip to the non-ferocious treasure chest was indicated....

Close of play. I nice chunk of brass bar just right for the bushes. They will both be exactly the same externally, only the bore will be different. Enough metal for a flange on the inside to locate the crankshaft central.
The observant members of the congregation will have noticed that we have a stranger on the bench.... It was in the same drawer as the brass bar and I've been meaning to bring it down for a day or two. The reason why we need it is that I want to machine it before we get to the stage where I shall be building the shaft in. I want to use the shaft as a gauge when I bore the centre because I am not going to bugger about with keys and tapers, I am going to take the coward's way out, bore it plug fit and glue it on with shaft lock. I can remember the day I introduced Newton to the delights of the Loctite range of adhesives and the way he enthusiastically took to it for fixing the wheels on his big loco. The big problem with making them interference fit and pressing them on was that they tend to drift and this upsets the relationship of the crank pin on the wheel and the cranks. He thought it was wonderful! The benefit in this case is that if I finish the flywheel before boring it it will run perfectly concentric on the shaft. So I shall be doing a bit of cast iron turning soon. It will make a nice change from all this milling and fitting! Tomorrow I'll get into making the bushes and fitting them so that I can mount the shaft connected to the con rod and find the exact setting for bolting the pedestals down.
When I was describing my research into cutter sharpening yesterday I made a point of saying that the adjustment for concavity was via the graduated index built into the table itself rather than just off setting the main swivel itself. Only problem was that I realised this and told you after I had done it the wrong way! So this morning I put 3 degrees off set on the table, set the main swivel at 90 degrees, dressed the cup wheel and did all the 3/4" shank cutters again. I have to admit that I don't fully understand why one off set is good and the other bad but did it anyway. It took me an hour and a half of grafting before I got to the stage where I was cutting again.
Another improvement. Here's the result. Definitely not time wasted! Another good result was that I realised my cheap Taiwan mill is a better tool than I thought it was. When I've had bad results with a freshly sharpened cutter I have always tended to blame the mill. Totally unjustified, what I had seen as basic faults with it vanished and the cutting was sweet and clean with a good finish. I tried one heavy cut just for a laugh, chips changing colour as they came off the cutter. No problems but I'd rather have the sweeter shallower cut. I have plenty of time!
Back to engine building. Next job was to mark the centre height for the shaft and where it has to be to line up properly so a coat of marking blue.
The pedestals marked for correct centre of the flyshaft bearings. Then I reviewed my bush sizes and found that I needed different stock than the two pieces I got out previously. A trip to the non-ferocious treasure chest was indicated....
Close of play. I nice chunk of brass bar just right for the bushes. They will both be exactly the same externally, only the bore will be different. Enough metal for a flange on the inside to locate the crankshaft central.
The observant members of the congregation will have noticed that we have a stranger on the bench.... It was in the same drawer as the brass bar and I've been meaning to bring it down for a day or two. The reason why we need it is that I want to machine it before we get to the stage where I shall be building the shaft in. I want to use the shaft as a gauge when I bore the centre because I am not going to bugger about with keys and tapers, I am going to take the coward's way out, bore it plug fit and glue it on with shaft lock. I can remember the day I introduced Newton to the delights of the Loctite range of adhesives and the way he enthusiastically took to it for fixing the wheels on his big loco. The big problem with making them interference fit and pressing them on was that they tend to drift and this upsets the relationship of the crank pin on the wheel and the cranks. He thought it was wonderful! The benefit in this case is that if I finish the flywheel before boring it it will run perfectly concentric on the shaft. So I shall be doing a bit of cast iron turning soon. It will make a nice change from all this milling and fitting! Tomorrow I'll get into making the bushes and fitting them so that I can mount the shaft connected to the con rod and find the exact setting for bolting the pedestals down.
Stanley Challenger Graham
Stanley's View
scg1936 at talktalk.net
"Beware of certitude" (Jimmy Reid)
The floggings will continue until morale improves!
Stanley's View
scg1936 at talktalk.net
"Beware of certitude" (Jimmy Reid)
The floggings will continue until morale improves!
-
Stanley
- Global Moderator
- Posts: 90760
- Joined: 23 Jan 2012, 12:01
- Location: Barnoldswick. Nearer to Heaven than Gloria.
Re: SHED MATTERS 2
A clear task. Bore the two pedestals out to 1" ready for the bushes and go on from there. Dead simple start, pop a good centre hole in each of the pop marks.... The centres are offset to every dimension of the material so it was obvious that I needed to get them into a four jaw. The more I thought about it, the less I wanted to bury them in the jaws of the big four jaw on the Harrison and then I remembered that Johnny's Lathe had a very good, smaller 4 jaw that had seen very little wear.... Besides, it would be good to give that lathe a trip out.....
The Pratt type 55 6" chuck. Old but as tight as the day it was made. You wouldn't believe how long it took me the get the piece chucked in line with the tailstock centre! My eyes lie to me and it got quite frustrating but at last I had it somewhere near and started drilling.. The I hit another problem when I'd got up to the half inch capacity of this drill chuck. I don't often use 2MT drills and it took me a while to get a 7/8" drill in good enough condition. Again, it's the eyes! Eventually I got there and it drilled nicely. One thing that some people find hard to believe is how well a good drill works on a belt driven lathe. Drilling and boring are silky smooth and the motor is very quiet. Gentleman's turning even though there is no auto feed.
I soon had a sharp boring tool set up and knocked the bore out to a couple of thou over 1". Then the same story with the second pedestal.
It took far longer than it should have but I'm satisfied with the morning. A good clean up and I got the HM ready for the next operation....
Stanley Challenger Graham
Stanley's View
scg1936 at talktalk.net
"Beware of certitude" (Jimmy Reid)
The floggings will continue until morale improves!
Stanley's View
scg1936 at talktalk.net
"Beware of certitude" (Jimmy Reid)
The floggings will continue until morale improves!
Re: SHED MATTERS 2
Hi Stanley, looks like more good work being done . The treasure chest never fails to amaze me, there seems to be no end to what you manage to find in there.
John got his new lathe yesterday , he has it on his new video tonight, it is a metric version, I think he is going to get a DRO for it, it is still able to do imperial threads with the right change gears. Its a nice lathe and also has the 2000RPM twin speed motor on it.
The flywheel you have looks nice Stanley , you will be looking forward to machining that but maybe not the clean up after
Cheers Mick.
Re: SHED MATTERS 2
Hi Stanley and All , I have made a couple more small ' gadgets ' to make life easier when doing jobs on the lathe, again not my ideas, this is just the way I have done it but might give some others tips on how it can be done anyway.
The first item is a plain rod with a bearing locktighted on each end again mounted into a quick change tool holder so its nice and easy to use.
It can be used to true up a disc type object as shown here or maybe a flat disc inside the chuck jaws just nip the job in the chuck lightly then with the job rotating just lightly contact the bearing against the surface of the job until it runs true, then tighten up or if its something precise use the DTI to fine tune, just the bearing gets things pretty close anyway.
With it having a bearing on both ends the toolholder can be switched around and the other bearing used to true up a bar in the chuck as shown here.
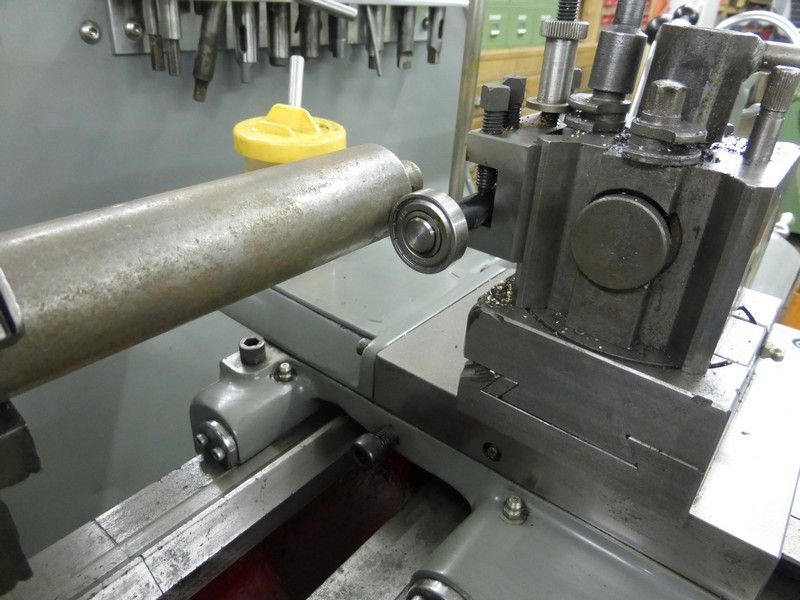
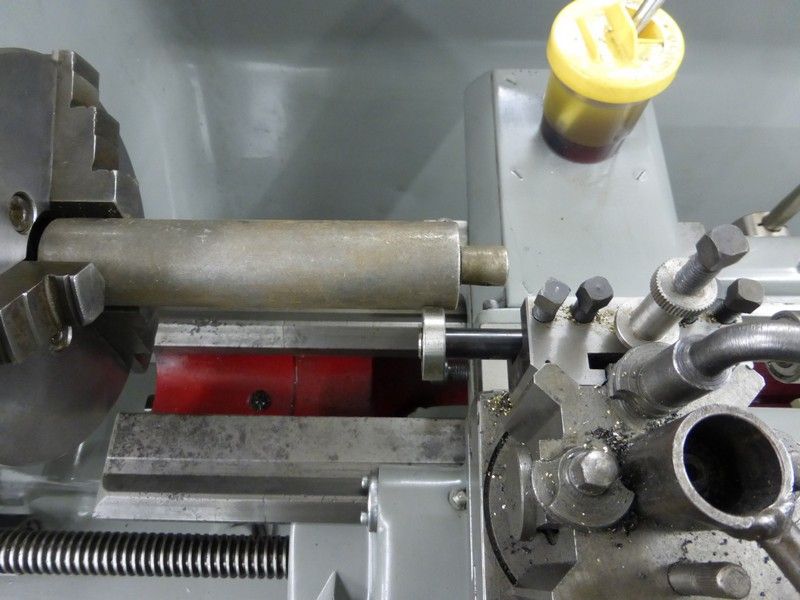
Again a really easy thing to make but very useful, any size bar that will not flex too much and any size bearing will do the job really too.
The other 'gadget ' is a DTI with a magnet stuck to the back so it can be used on the lathe bed, or any other surface on milling machine , drill press etc where it might be handy.
I had two matching Batty DTI's that I picked up cheap but with plain flat backs , the backs were made of plastic and when I held a magnet to the back it was binding up the spring return of the DTI. I cut a thin steel sheet into a circle and put this between the magnet and the back of the DTI which solved the problem. I used some strong magnets off Ebay 25mm round and 2mm think.
I used two part epoxy glue to stick the steel backing plates to the DTI's then a dab more to go between the magnet and the steel, works a treat and strong enough for the gauges not to move in use.
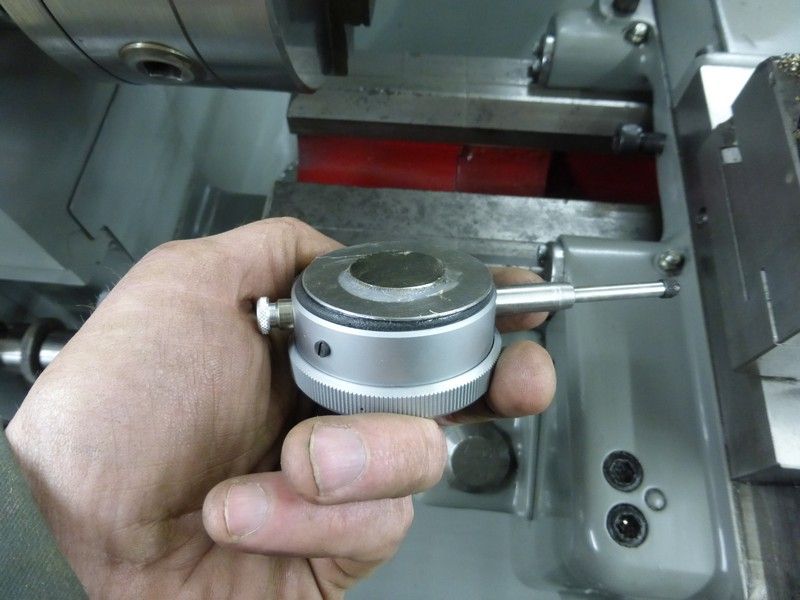
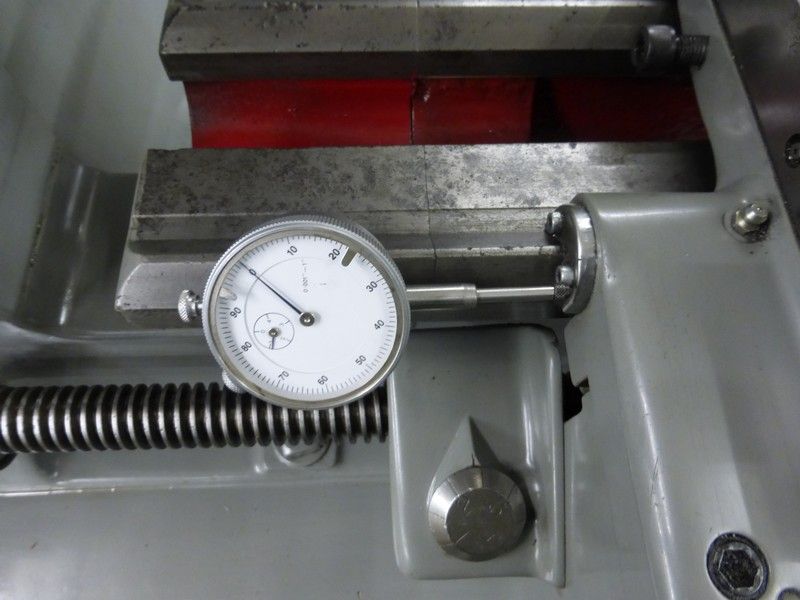
My lathe is metric micrometer collars so having the two imperial DTI's is handy if I want to use imperial, you could do this the other way around with Metric DTI's on imperial lathe too.
This is where they live when not being used, the back of the cabinet door, they just stick to any steel surface so nice and handy.

Cheers Mick.
The first item is a plain rod with a bearing locktighted on each end again mounted into a quick change tool holder so its nice and easy to use.

It can be used to true up a disc type object as shown here or maybe a flat disc inside the chuck jaws just nip the job in the chuck lightly then with the job rotating just lightly contact the bearing against the surface of the job until it runs true, then tighten up or if its something precise use the DTI to fine tune, just the bearing gets things pretty close anyway.


With it having a bearing on both ends the toolholder can be switched around and the other bearing used to true up a bar in the chuck as shown here.


Again a really easy thing to make but very useful, any size bar that will not flex too much and any size bearing will do the job really too.
The other 'gadget ' is a DTI with a magnet stuck to the back so it can be used on the lathe bed, or any other surface on milling machine , drill press etc where it might be handy.
I had two matching Batty DTI's that I picked up cheap but with plain flat backs , the backs were made of plastic and when I held a magnet to the back it was binding up the spring return of the DTI. I cut a thin steel sheet into a circle and put this between the magnet and the back of the DTI which solved the problem. I used some strong magnets off Ebay 25mm round and 2mm think.
I used two part epoxy glue to stick the steel backing plates to the DTI's then a dab more to go between the magnet and the steel, works a treat and strong enough for the gauges not to move in use.


My lathe is metric micrometer collars so having the two imperial DTI's is handy if I want to use imperial, you could do this the other way around with Metric DTI's on imperial lathe too.

This is where they live when not being used, the back of the cabinet door, they just stick to any steel surface so nice and handy.

Cheers Mick.
-
Stanley
- Global Moderator
- Posts: 90760
- Joined: 23 Jan 2012, 12:01
- Location: Barnoldswick. Nearer to Heaven than Gloria.
Re: SHED MATTERS 2
Spot the overtime at teatime! I'd left the pedestals ready for titivating and popped in at teatime to do them. It gives me a straight edge but also registers in my brain which way up they go and which is left and right hand....
You're right about the flywheel. Looking forward to turning it because I love CI but you're right about it being mucky. I don't go into a decline about CI chips on the bed like some, what I do is make sure the bed is clean and dry before I start and keep on top of the chips with the shop vac. My biggest problem is that the fine dust gets in my lungs and before you start, yes, I ought to wear a mask, gloves, face shield and safety boots!
Nice to see you doing things on the Harrison! Far be it from me to advise you but how about turning a test bar after levelling the lathe and making sure the tailstock is pointing towards the centre?
It looks like an operating theatre, I want to see some heavy swarf scratching the paint and the paint wearing off the near corner of the gearbox where you rest your hand on it......
Stanley Challenger Graham
Stanley's View
scg1936 at talktalk.net
"Beware of certitude" (Jimmy Reid)
The floggings will continue until morale improves!
Stanley's View
scg1936 at talktalk.net
"Beware of certitude" (Jimmy Reid)
The floggings will continue until morale improves!
-
Stanley
- Global Moderator
- Posts: 90760
- Joined: 23 Jan 2012, 12:01
- Location: Barnoldswick. Nearer to Heaven than Gloria.
Re: SHED MATTERS 2
I started the day by giving both pedestals a light skim in the milling machine to get a good machine finish all over. Where possible I gang milled them both together so I am now certain that they are as near as dammit identical. Last job was breaking all the edges, including the entry to the bore.
Then we had a brief interlude of multi-tasking. I opened the top drawer to get a pair of big outside callipers and it stuck. Problem was the dovetail at the back had broken away so I had to put my carpenter's head on and put it right. Dovetail re-glued and the drawer bottom re-pinned to the back rail. That cured it....
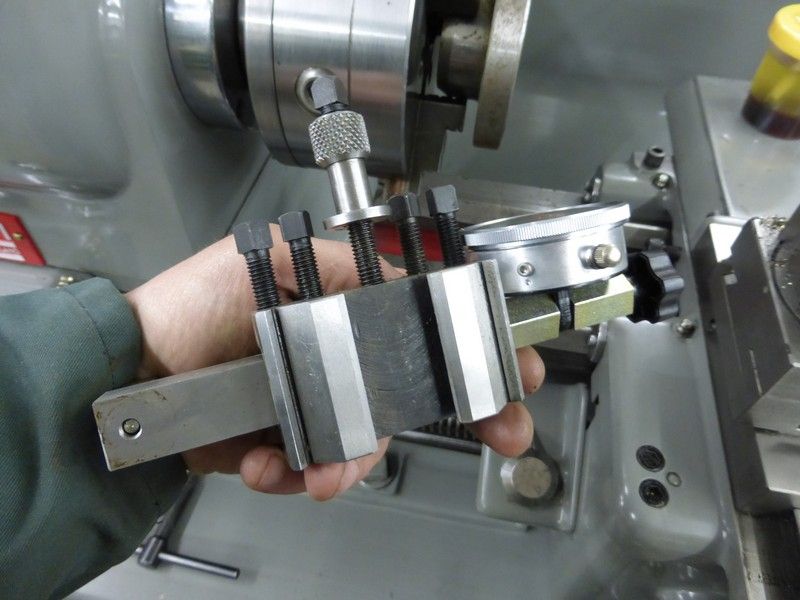
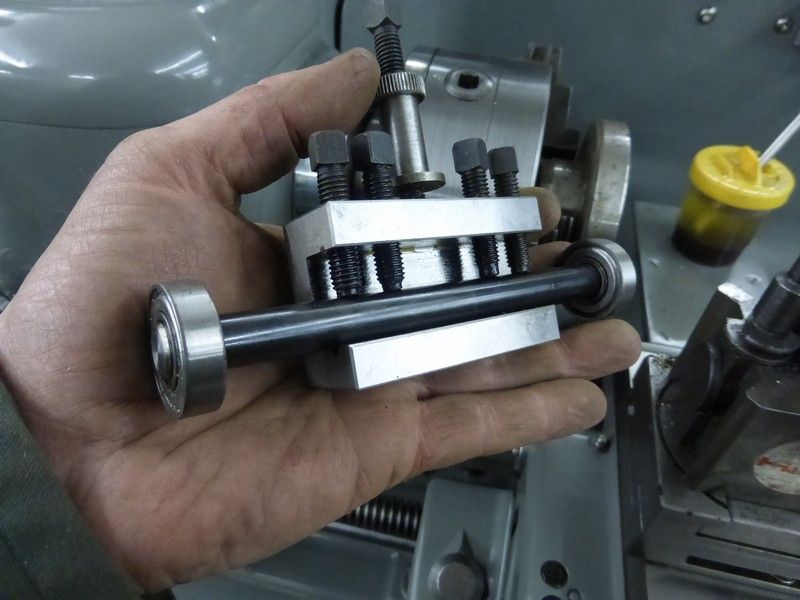
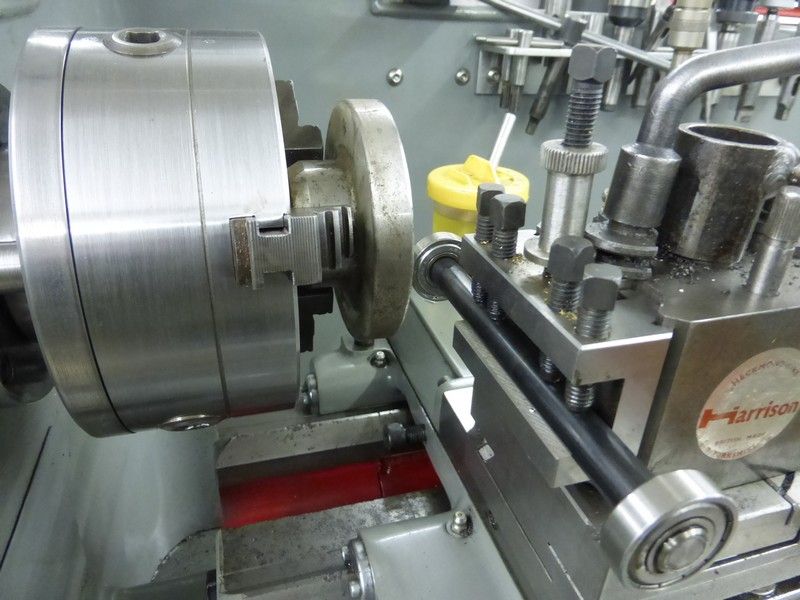
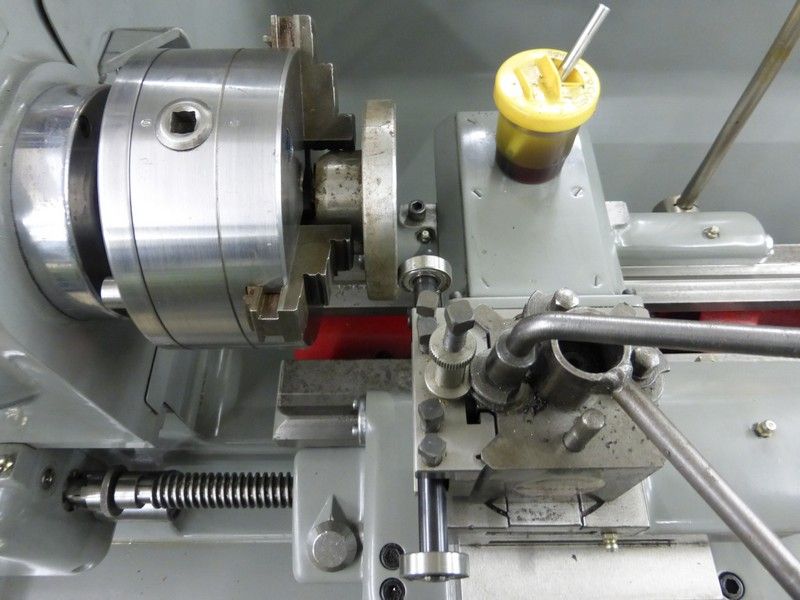
Trial fit of the crankshaft in the pedestals. I wanted to find out how much flange I had to put on the inside end of the bushes and at the same time get an idea of what I had to do to the flywheel to make it fit. At the moment it's 1 1/2" in the rim and the boss, it needs to be reduced to 1" and then it will fit nicely.... That's what I wanted the big callipers for....
The pedestals are looking good. You may have noticed that I haven't a lot of meat at the front end for the holding down bolts. I expected this but it's no problem because when the bushes are fitted there will be plenty of natal if I let the bore for the bolt interfere with the bush. This will be an advantage because it means that the bushes will be locked in position and won't be able to rotate. This means the oilway at the top will always be inline.
Then I turned to the bushes. I have the sizes exact now, All I have to do is make them.
As you can see I have done everything I can to make sure I do some accurate turning. I measured after every cut and finished up with the outside diameter within a thou of my target.
Close of play. A nice snug push fit into the pedestal. I shall drill it out to just below the finished size to fit the shaft so that it will part off easier. I shall finish bore them individually so that I can try them on the shaft for a final fit. When you can't see properly you have to check everything!!
Nice morning's work.... Not bad for a blind man!
Stanley Challenger Graham
Stanley's View
scg1936 at talktalk.net
"Beware of certitude" (Jimmy Reid)
The floggings will continue until morale improves!
Stanley's View
scg1936 at talktalk.net
"Beware of certitude" (Jimmy Reid)
The floggings will continue until morale improves!
Re: SHED MATTERS 2
Another good days progress Stanley I was noticing your steady , it looks more squared off and angular than the other Harrison ones I have seen...as long as it does the job , which it looks like it does
I can not win with the lathe Stanley , its has been deep in swarf and covered in cast chippings and if anyone sees it they say its a disgrace , get it cleaned, then when I clean it , someone always says , it should be covered in swarf lol ............ so some of the time it will be covered and some of the time deep in swarf, the main reason its had two proper good cleans is from doing te two backplates and getting covered in cast.
I have started making a trolley with castors for the Bridgeport mill today , its angle iron frame the mill sits in and bolts through. When the mill is in a spot its staying in there are four about 1 inch diameter bolts one in each corner used to jack up the mill so it is level and also off the castors. As usual I am making it from scrapyard materials so been scratting about trying to work out how to do it from what I have to hand , I think I have it planned now.
Cheers Mick.
-
Stanley
- Global Moderator
- Posts: 90760
- Joined: 23 Jan 2012, 12:01
- Location: Barnoldswick. Nearer to Heaven than Gloria.
Re: SHED MATTERS 2
If I had a bigger shed I'd have a Bridgeport.... Mind you, the Taiwan mill does its job and Newton made lovely stuff with his old Senior Mill which had so much wear on it he had to stop eventually and make new bearings for it.... I was thinking about you saying you thought John would put DRO on his Harrison. I suppose it will be a good thing but I don't think I'll be bothering..... I suppose I'm a dinosaur. The steady has no name on it and has a rising block under it so it wasn't made for this centre height..... Does the job.....
Stanley Challenger Graham
Stanley's View
scg1936 at talktalk.net
"Beware of certitude" (Jimmy Reid)
The floggings will continue until morale improves!
Stanley's View
scg1936 at talktalk.net
"Beware of certitude" (Jimmy Reid)
The floggings will continue until morale improves!
-
Stanley
- Global Moderator
- Posts: 90760
- Joined: 23 Jan 2012, 12:01
- Location: Barnoldswick. Nearer to Heaven than Gloria.
Re: SHED MATTERS 2
The task was clear, make the two bearing bushes for the pedestals... Everything was set up so off I went. I was only doing the outsides, I will bore the3m to finished size when I have them split off the stock so I bored 1/2" to ease the parting off. I used a narrow parting tool and this was the result. It veered off course and because of my eyes I never saw it happening. Bugger! Never mind, shan't make that mistake again, crash on and make two good ones.
The bush would have done the job but I want the flange on the end...
Nice fit and bored 1/2", ready to part off but with a more rigid tool!
That's better! Both ready to press in once they are bored to size.
Once bored I had to relieve the inboard ends because of the radius at the root of the shaft. I didn't realise this with the first and so did it in the pillar drill. I did the second one while it was still in the chuck.
Close of play. They fit ni9cely. By the way notice that by a miracle they also have 1/4" 26tpi holes drilled and threaded for the lubricators. I did these before I pressed the bushes in.
Stanley Challenger Graham
Stanley's View
scg1936 at talktalk.net
"Beware of certitude" (Jimmy Reid)
The floggings will continue until morale improves!
Stanley's View
scg1936 at talktalk.net
"Beware of certitude" (Jimmy Reid)
The floggings will continue until morale improves!
-
Stanley
- Global Moderator
- Posts: 90760
- Joined: 23 Jan 2012, 12:01
- Location: Barnoldswick. Nearer to Heaven than Gloria.
Re: SHED MATTERS 2
The design committee has been busy during the night. What I wanted to do is press on with finding the correct position for the pedestals and get the holding down bolts in but they have pointed out that if I use my head and do a couple of ancillary jobs first I can probably get away with not stripping this end down again.... We are a lot closer to a finished engine than you might think! The shaft turns beautifully in the bushes....
I've popped back in at 06:45, just before I go in the shed, to thank Mick and the lads for the care package of small Whitworth dies that arrived in the post yesterday. Nice!! Please pass my thanks on to the lads who contributed....
I've popped back in at 06:45, just before I go in the shed, to thank Mick and the lads for the care package of small Whitworth dies that arrived in the post yesterday. Nice!! Please pass my thanks on to the lads who contributed....
Stanley Challenger Graham
Stanley's View
scg1936 at talktalk.net
"Beware of certitude" (Jimmy Reid)
The floggings will continue until morale improves!
Stanley's View
scg1936 at talktalk.net
"Beware of certitude" (Jimmy Reid)
The floggings will continue until morale improves!