Kitchen Refurb

User avatar
PanBiker
Site Administrator
Site Administrator
Posts: 16556
Joined: 23 Jan 2012, 13:07
Location: Barnoldswick - In the West Riding of Yorkshire, always was, always will be.

Re: Kitchen Refurb

Post by PanBiker »

New vinyl flooring was fitted last week and I have been progressing with decorating aided here by Sally. I have finalised the new sockets for the peninsular and the extra one for the freezer. We have decided to swap out all the sockets and switch plates for new brushed steel finished units with black inserts, all of our appliances are a brushed steel finish or silver so these will be better in keeping, here is the finished pair of dual gangs for the peninsular, the one on the right has two integrated USB charging ports which operate independently of the switched sockets.

Image

I moved onto the peninsular next which consists of an 800 wide 3 drawer pan cabinet and two 150 wide vertical larders. I have installed the larders each side of the drawers to balance up the unit. Here it is with all three units built and joined together laterally.

Image

My old units did not have legs, the outside casings went all the way to the floor. This made fixing relatively easy as I just fastened it straight to the floor with right angled brackets. The new units are all elevated on adjustable legs and in this peninsular arrangement the only face I have for fixing is the side of the 150mm wide larder cupboard. As the unit is adjacent to the door, I have had to fit a packing piece to space the unit out from the wall, the equivalent depth of the door architrave. I used spare bits of 20mm panels from unused shelves from the corner unit. I fasted these to the wall to create the spacer and then drilled and screwed through the end panel of the 150 larder unit into the wooden spacer. Its not the same as fixing to the floor but the wall fixing at the end will be quite sufficient once it has it's 900 wide breakfast bar on the top which weighs the best part of 1cwt.

Image

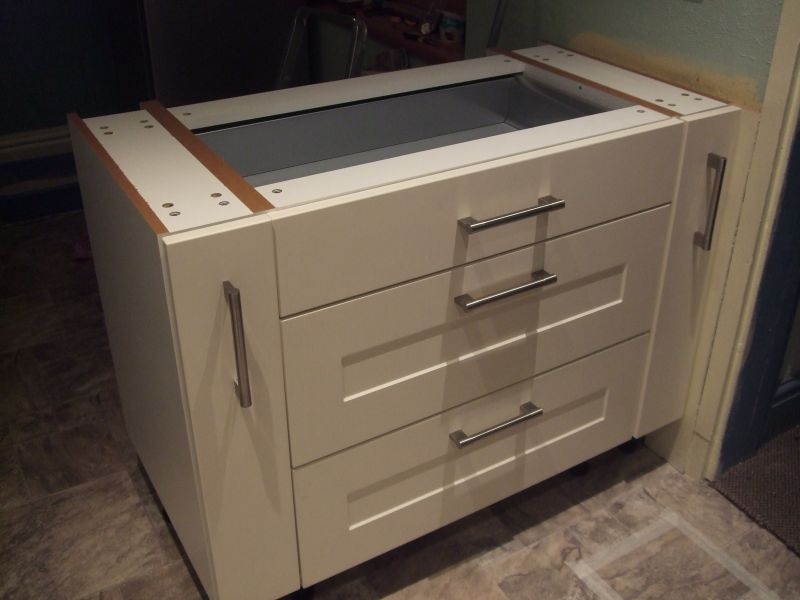
I drilled all the pilot holes for the soft close drawers in the side panels before I built the pan unit. This made fitting the drawer runners much easier than when I did the 500 unit. The drawer units themselves went together without any problems. Here they are fitted to the runners.

Image

Drawer fronts next, drawer fixings and drilling out for the handles. All the fronts and handles are on here and they have been adjusted for alignment with each other.

Image

The bottom two deep drawers have adjustable internal rails as in the 500 unit, these are mounted on a superstructure around the periphery of each drawer. Here is the unit in exploded view.

Image

All these units are designed to be fixed to the wall so they have the same stand off arrangement at the back as any other base units. The bare carcasses are finished in white so we have colour matched panels to clad the back and open side of the finished unit so that the finished peninsular will match the rest of the installation.
Ian
User avatar
Stanley
Global Moderator
Global Moderator
Posts: 90797
Joined: 23 Jan 2012, 12:01
Location: Barnoldswick. Nearer to Heaven than Gloria.

Re: Kitchen Refurb

Post by Stanley »

Coming on and looking tidy Ian.....
Stanley Challenger Graham
Stanley's View
scg1936 at talktalk.net

"Beware of certitude" (Jimmy Reid)
The floggings will continue until morale improves!
User avatar
LizG
Senior Member
Posts: 1010
Joined: 22 Mar 2012, 05:36
Location: Melbourne Australia

Re: Kitchen Refurb

Post by LizG »

Can't wait to see the end result now.
Liz
User avatar
PanBiker
Site Administrator
Site Administrator
Posts: 16556
Joined: 23 Jan 2012, 13:07
Location: Barnoldswick - In the West Riding of Yorkshire, always was, always will be.

Re: Kitchen Refurb

Post by PanBiker »

Continuing with my electrical installations. I think I have mentioned that I am swapping out all the white plastic sockets and switches for brushed steel versions. I broke into the ring and added my extra loop for the two new sockets I am adding along the back of the worktops but then ran into my first snag when replacing the units, the existing sockets (a mixture of MK and Crabtree for some reason) had all their terminals in line but central to the back of the socket ether laterally or vertically depending on the make. My replacements have the live and neutral at each end of the socket with adjacent earth connectors to each as in the photo.

Image

The problem is that some of the existing cabling within the back boxes has left either and odd live or neutral conductor too short to connect to the new dual gang sockets I am fitting. This has entailed extending the conductors using end to end crimp connectors to get the extra couple of inches required on any slightly short leads. I have got half way round the kitchen sockets but have broken off to move onto removing the existing light fitting at the other end of the kitchen so Sally can paint that section.

As I needed the mains off to do this I replaced the two way switches and checked for correct operation before taking the fitting down. Now we move onto problem number two. The existing fitting which is going to be replaced is a flat circular design with two 60w lamps in with a domed glass diffuser covering. the back plate that mounts to the ceiling has a recess to accommodate the connectors for the feed conductors. Taking it down has revealed that the heat radiated from it has burnt the ceiling behind and bubbled the previous finish and paint work. The ceiling has a textured finish and the damage is such that I can probably get away with some minor filling, sanding and re-texturing.

Image

The sheathing on both conductors has vitrified with the heat to some degree and will require careful paring back to see if I can get back to enough flexible conductors for the replacement fitting. This section of ceiling is underneath my flat fiberglass and resin section of the kitchen roof so there is no access from above. If the cables are toasted too much I will have to take a section of ceiling down to get back to usable conductors so I will look at the options here before any decorative repairs. The hook screwed into one of the previous fixings is for a temporary lighting arrangement. These things are sent to try us.

We have made an executive decision to get our joiner to do one or two of the fiddly finishing off bits, he will make a much quicker and better job than I can do. Boxing in the boiler flu with access for the annual inspection, a small shelf adding under the kitchen sink around the rather fussy but unavoidable pipework and cladding the peninsular with it's colour matched panels which will need a slight bit of "easing" to mate with the floor, wall and base units correctly. Oh and I nearly forgot, two planed up ready for painting stringers fixing to the boxed in RSJ which splits the two halves of the kitchen and holds up the bathroom. This is directly over the peninsular and we have some butchers rails with hooks to hang for regularly used utensils. We had a similar arrangement before and it worked quite well. Alan came yesterday to discuss the job and take some measurements, he will do them next Wednesday.
Ian
User avatar
Stanley
Global Moderator
Global Moderator
Posts: 90797
Joined: 23 Jan 2012, 12:01
Location: Barnoldswick. Nearer to Heaven than Gloria.

Re: Kitchen Refurb

Post by Stanley »

typical attention to detail Ian. Lots to be said for OCD at times!
Stanley Challenger Graham
Stanley's View
scg1936 at talktalk.net

"Beware of certitude" (Jimmy Reid)
The floggings will continue until morale improves!
User avatar
PanBiker
Site Administrator
Site Administrator
Posts: 16556
Joined: 23 Jan 2012, 13:07
Location: Barnoldswick - In the West Riding of Yorkshire, always was, always will be.

Re: Kitchen Refurb

Post by PanBiker »

I'm going to have a closer look at the cabling for the ceiling light and see if I can get enough flexible cable to terminate in a connector block. The fitting I want to put up will have no appreciable heat overhead. I will do a couple more of the sockets on the ring as well.
Ian
User avatar
PanBiker
Site Administrator
Site Administrator
Posts: 16556
Joined: 23 Jan 2012, 13:07
Location: Barnoldswick - In the West Riding of Yorkshire, always was, always will be.

Re: Kitchen Refurb

Post by PanBiker »

I have managed to strip down to usable conductors in both of the leads for the light fitting, one carries the integral earth within its outer jacket which is where the majority of the hardening of the cables had taken place. I had to strip a couple of inches back in each of the leads but I still have enough to terminate OK in the fitting. I have prepared the leads ready for termination and just taped them up for now. I have repaired the odd bits of plaster and finish that had been damaged by the heat with premixed filler which should be OK once dried and sanded over. I will give the area a light coating of the texture and it should then blend quite well once painted.

Moving on to the mains sockets, the one that supports the washing machine and dishwasher has a spur for a single socket behind the cooker which is gas but has an electric grill. So, there are three leads in the back box which is fortunately 35mm deep, even so one of the conductors was short so I had to extend it. Unfortunately after fitting the new socket I found that I could not tighten one side of it down as it looks as though the thread in the fixed tab of the back box is partially stripped. The fixing screw will not fully tighten down it jumps on the threads when you try to tighten it up fully. I shall come back to that one later, the last double gang replacement was fine so I now just have the single behind the cooker and the rogue thread to sort out. I knocked off at that point to make the tea so these are for another day. ILP AGM tomorrow morning at the Clarion so a break from the kitchen.
Ian
User avatar
PanBiker
Site Administrator
Site Administrator
Posts: 16556
Joined: 23 Jan 2012, 13:07
Location: Barnoldswick - In the West Riding of Yorkshire, always was, always will be.

Re: Kitchen Refurb

Post by PanBiker »

I finished off the minor repairs to the damaged ceiling and Sally painted it yesterday afternoon, it looks OK and the refurbished area will hardly be noticeable once the replacement lighting bar is fitted. I'm going to reuse the 4 spotlight bar that was previously fitted in the other half of the kitchen. This currently has four halogen spotlights in but I am going to replace them all with GU10 LED's. The new LED down lights at the working end of the kitchen are great but because of the central boxed in RSJ that supports the bathroom it does leave one third of the peninsular breakfast bar slightly in the shade. The central peninsular is heavily used as prep area so some kind of fill in lighting is required. With the 4 spotlight bar, I can angle one of the spots down to effectively back light that area, another onto the corner which will have the upright freezer, one on the bottom feature wall and the fourth down towards the door and laundry area. That bottom end of the kitchen will then run at about 32w bringing the total load for lighting the whole kitchen in at less than 100w if all lights are active, that is less than a third of the previous lighting arrangement.

I rang B&Q today to organise return of 3 items from my kitchen delivery. The CAD system that they run to work out the requirements of any particular design of layout theoretically works everything out to ensure you get all the parts you need to complete the job. It is not 100% foolproof, it gave us 7 colour matched end panels and I only actually required 5. Two to support the worktop over the washing machine and dishwasher and three to clad the peninsular. The system assumed I needed them for each end of the base units, one end of which ends where the cooker recess is and the other under the worktop where the larder fridge will go, the base units are finished in white and I can certainly live without using two extra Ivory panels at £25.00 each that will never be seen. The other item is the 2.5m length of Ivory cornice that was supplied for a 2.73m run on top of the cupboards, we have decided to use the thinner pelmet both top and bottom of the cupboards as this balances better aesthetically. I have already bought an extra length of pelmet to accommodate this so I will have the £21.00 back for the colour matched cornice.

I am installing a double row of 50mm deep strip tiles at the back of all the worktops and intend to set an 8mm deep brushed steel edging strip along the top edge of the tiles this will give a very clean edge to the tiles and match the brushed steel mains sockets above. The refunds from the items above will buy the edging strips required and go part way to a 3M length of LED strip lighting that will run the full length under the cupboards behind the pelmet to give down lighting to the back of the main worktop area.

We will take back the stuff we were oversold or don't need on Wednesday and buy the edging strip and lighting. I have B&Q's senior discount account (you qualify at 60) which means you can get a discount on stuff you buy each Wednesday. Last week we saved £7.66 on the adhesive, grout and another tub of paint that we required. With a bit of luck I may well get a similar discount on this batch of stuff.

Alan, my joiner has rung and he is coming tomorrow rather than Wednesday. We have a bloke coming to look at our dishwasher as well tomorrow. I don't think I mentioned that it has sprung a leak at the back. I discovered this after reconnecting and running a load through it before shoving it back under the worktop. I always run the appliances up this way to make sure all the hoses are secure, good job I did in this instance, it's not a hose problem, it looks more like a failed seal to me. We'll see what the guy says tomorrow.

Just going to run some silicone along the back edge of the worktops and any minor gaps to the wall, it will be fully cured then before I start the tiling.
Ian
User avatar
PanBiker
Site Administrator
Site Administrator
Posts: 16556
Joined: 23 Jan 2012, 13:07
Location: Barnoldswick - In the West Riding of Yorkshire, always was, always will be.

Re: Kitchen Refurb

Post by PanBiker »

Alan came on Wednesday and made short work of the four jobs I had for him, he found a way round of giving us a full shelf under the sink rather than the half I had envisaged due to the pipework. Gas flue is boxed in with two inspection cut outs which will be covered with louvered grills after painting. Central peninsular is fully clad in matching panels perfectly aligned and using a novel method of invisible fixing that I would not have thought of, the benefit here of a bloke who knows what he is doing. My central RSJ mounted stringers for the hanging stuff are up and were supplied finished ready for painting up. All done before dinner time at a reasonable price for the materials and expertise.

I rounded the corners on the breakfast bar last night, well, I made the first cut with the jigsaw from the top, I used a small plate to get the arc at each corner on top of masking tape. The jigsaw has cut on a slight angle (which is a trait of these tools on thick material) so I am going to flip the worktop over and repeat the arc on the underside so I have a proper line to cut / sand to. It will need to be square for the edging strip which is not self adhesive, I want the best finish I can get to the surface to get a good bond for the impact adhesive, only one shot with that, Alan gave me a tip to trim the edging as much as possible with it dry before moving to the gluing, I will remember that.

We took our returns back without problem this morning, we got £70.00 back, don't know where the extra quid went but I'm not arguing. We picked up the edging for the tiles, lighting and a few more odds and sods that you always manage to think up, the 13 items we eventually ended up with came to exactly £100 with our Wednesday senior discount of £11.13, so with our returns it has only really cost us £30.00.

Broken day today, we are interring Sally's mum's ashes this afternoon at Carleton followed by tea out so no kitchen work this afternoon.
Ian
User avatar
Stanley
Global Moderator
Global Moderator
Posts: 90797
Joined: 23 Jan 2012, 12:01
Location: Barnoldswick. Nearer to Heaven than Gloria.

Re: Kitchen Refurb

Post by Stanley »

You're right about jigsaws not cutting dead true. I was once fitting a new front door for a couple and adjusted the width with the jigsaw.... Disaster! I had to buy them a new door! I took the old one home, cut it straight, added a make up strip and hung it as my back door.
Did you miss my offer of the router for cutting the curve? If you want to borrow it you are welcome, the cutters are sharp.....
Stanley Challenger Graham
Stanley's View
scg1936 at talktalk.net

"Beware of certitude" (Jimmy Reid)
The floggings will continue until morale improves!
User avatar
PanBiker
Site Administrator
Site Administrator
Posts: 16556
Joined: 23 Jan 2012, 13:07
Location: Barnoldswick - In the West Riding of Yorkshire, always was, always will be.

Re: Kitchen Refurb

Post by PanBiker »

I totally forgot about that Stanley and thanks. Main cut is done so I will see how I get on with sanding.

Never used a router, I can see their advantages and all the stuff I have seen for worktop forming uses an additional jig to guide the cutter. I don't fancy risking it with an unknown tool on a £150 chunk of worktop, one chance to get it right and two chances to get it wrong but thanks anyway.
Ian
User avatar
Stanley
Global Moderator
Global Moderator
Posts: 90797
Joined: 23 Jan 2012, 12:01
Location: Barnoldswick. Nearer to Heaven than Gloria.

Re: Kitchen Refurb

Post by Stanley »

No sweat. Easier to use than they seem if you take the trouble to set them up right. Lovely finish but frightening beasts to use! Bit like the toolpost grinder on the lathe, I get quite edgy when something is doing 20,000rpm!
Stanley Challenger Graham
Stanley's View
scg1936 at talktalk.net

"Beware of certitude" (Jimmy Reid)
The floggings will continue until morale improves!
User avatar
PanBiker
Site Administrator
Site Administrator
Posts: 16556
Joined: 23 Jan 2012, 13:07
Location: Barnoldswick - In the West Riding of Yorkshire, always was, always will be.

Re: Kitchen Refurb

Post by PanBiker »

Four hours of hand sanding and I ended up with both corners looking like this. Not easy to see in this photo but all the worktops are Cappuccino Stone 38mm with 6mm rounded edges top and bottom. The Breakfast Bar worktop is 900mm wide rounded on both long sides.

Image

This profile looked OK to me I had managed to square the cut up and I was happy with the finish from 3 different grades of sandpaper. I cut the edging strip slightly oversize and then adjusted it to an exact fit on the length, it fitted perfectly dry so I moved on to applying the contact adhesive to both surfaces. I waited until both were dry and went for the fit. No problem in getting it on straight, the length was bang on and adhered OK, I rollered it down the best I could. After a couple of hours I started to sand down, starting on the rounded edge. It soon became apparent that because the curve transits from a round to flat profile the edging had not taken on the curve where it transits from the flat to the round. I sanded both curves and found the same effect on each one. The impact adhesive attains full strength in 24 hours so I elected to take the strip off while there was still a chance. If I left it on I would have to cut the worktop square again (losing about 6") before attempting the curve again. I had to use quite bit of force to get it off but it did come off clean with a bit of persuasion. The edging strip comes as a 3M coil in one length so I have enough to have another attempt. I cant see how you can get a flat edging strip to morph into the rounded profile required so I have elected to get Alan to do the job for me. He assures me it can be done so I will defer to his expert knowledge, particularly at about £10.00 a go to get it wrong. He is very busy but hopes to get to me sometime this week.

Stopped on this job I moved on to tiling at the back of the worktops I have completed. First job was to cut the edging strips to length and create the miters for the corners. The edging strip is extruded aluminium finished cunningly as brushed steel.

Image

It will create a 10mm straight edge to the top of the tiles.

Image

I cut all the strips including the 900mm one that I will need for the Breakfast Bar once that is sorted.

Image

The tiles strips are 50mm wide by 250mm and mounted on a nylon mesh backing strip. I am tiling two rows using 2mm spacers, top bottom and in between each strip. The edging strip is installed behind the top row and held in place by the tiling adhesive. I started on the short edge of the main worktop and worked into and then round the corner onto the long run.

Image

The tiles themselves are pre-sealed so I have just been wiping any excess adhesive that has pushed through the joints as I finish each double stack of strips. The adhesive is anti mould and can be used as a finishing grout once I have them all on the wall. I have created T's from the cross spacers for the 2mm spacers at the top an bottom of the run. I have put about 4 equally spaced along the bottom and the same at the top. Each tile strip is tied to it's neighbour and to the one above with the cross spacers.

Image

I have completed all the main worktop and behind the sink and the upstand above the washing machine and dishwasher. I have to grout them all up yet. I will make the bottom line of grouting flush with the face of the bottom row of tiles then finish with a bead of silicone where they meet the worktop. I had already run sealant round the back of the worktops up to the wall before installing the tiles.

Image

I will put another photo up when I have them all grouted up.

The window corner of the main work surface is where we have the kettle and toaster. The toaster sits under the cupboards so I bought a self adhesive heat resistant sheet designed to go under worktops. I have cut this up to the depth of the cupboards and stuck it to the underside of the full run, with extra worktop we may move the slow cooker onto here as well so the heat deflector will be useful here as well. I have fitted the pelmet to the underside front edge of the cupboards and installed 2M of the LED lighting strip behind the pelmet, the strip is only 5mm wide and 3mm deep but has individual white daylight LED's about every centimeter down it's length, the small driver transformer is screwed to the underside of the cupboard out of sight behind the pelmet. It will be plugged into the new socket I installed in the corner.

Grouting tomorrow morning then a short break for blood donors just after lunch.
Ian
User avatar
Whyperion
Senior Member
Posts: 3084
Joined: 23 Jan 2012, 22:13
Location: Stockport, after some time in Burnley , After leaving Barnoldswick , except when I am in London

Re: Kitchen Refurb

Post by Whyperion »

My preference to horizonal handles is to have bits that extend beyond the mounting bars, simply so I can hang stuff off them ( mostly carrier bags and oven gloves ), of course that spoils a nice kitchen view but when one is tight on space, its useful.
User avatar
Tripps
VIP Member
Posts: 8843
Joined: 23 Jan 2012, 14:56

Re: Kitchen Refurb

Post by Tripps »

Iain - did you get the 10% seniors discount on all the stuff you bought from B&Q on a Wednesday? I ask because I am looking to have a new bathroom, and I've just been to B&Q , and could probably get what I need there. However I just phoned them and I am told that the discount does not apply to large items such as kitchen and bathroom units - just small everyday items. I can't find any 'small print' on the website. I wonder how small is small.

If it seems too good to be true etc :smile:
Born to be mild
Sapere Aude
Ego Lego
Preferred pronouns - Thou, Thee, Thy, Thine
My non-working days are Monday - Sunday
User avatar
plaques
Donor
Posts: 8094
Joined: 23 May 2013, 22:09

Re: Kitchen Refurb

Post by plaques »

Tripps wrote:the discount does not apply to large items such as kitchen and bathroom units
This was the case when I bought a total bathroom unit about 4 years ago. When I was fitting the free standing sink unit I found that the pedestal base was out of square and similarly the back if the sink itself. Both Items had to be replace. The supplying warehouse was not B&Q but another firm. At first I felt as if I was being given a run-around but it turned out Ok in the end. I now have a spare (leaning) sink unit. If you do buy B&Q ask a few questions first.
User avatar
PanBiker
Site Administrator
Site Administrator
Posts: 16556
Joined: 23 Jan 2012, 13:07
Location: Barnoldswick - In the West Riding of Yorkshire, always was, always will be.

Re: Kitchen Refurb

Post by PanBiker »

The initial kitchen purchase was not subject to 10% seniors discount because the various ranges are already subject to range specific discount but did count towards points on the loyalty account. All subsequent purchases of other items on a Wednesday have qualified. So I got 10% on just about everything else that I needed for the project, paints, tiles, adhesives, trims, grout, screws, fixings etc. As long as you shop on a Wednesday and the item is not already on offer or part of a promotion you get the 10%. Apart from the odd contractor you generally only see seniors in the store on Wednesdays. My tiles alone were over £200 so the discount certainly not to be sniffed at.
Ian
User avatar
PanBiker
Site Administrator
Site Administrator
Posts: 16556
Joined: 23 Jan 2012, 13:07
Location: Barnoldswick - In the West Riding of Yorkshire, always was, always will be.

Re: Kitchen Refurb

Post by PanBiker »

Whyperion wrote:My preference to horizonal handles is to have bits that extend beyond the mounting bars, simply so I can hang stuff off them ( mostly carrier bags and oven gloves ), of course that spoils a nice kitchen view but when one is tight on space, its useful.
We have a boxed in RSJ which runs centrally from the front to the back of the kitchen. It's basically over the peninsular work area so our solution is to have butchers rails mounted here with sliding hooks. Smaller frequently used pans, strainers and most of the larger and often used kitchen utensils are hung from these. This gives quick and easy access and frees up drawer space. We put all the wooden utensils in a large jar on the worktop. We have a hook on the door casing for a carrier bag tidy and the oven gloves, aprons and stuff like that and a couple of towel grabs on the other side of the door mounted on the architrave. I'll put a picture up when we are fully deployed.
Ian
User avatar
Tripps
VIP Member
Posts: 8843
Joined: 23 Jan 2012, 14:56

Re: Kitchen Refurb

Post by Tripps »

Thanks for the help chaps. I've now found the small print.

"18.0 The discount is not available in relation to kitchen, bathroom or bedroom purchases (including associated accessories), installations, household appliances, carrier bags and gift cards. The discount applies to the store price, prior to any further adjustment that may be required to meet our price promise."

I guess tiles are not counted as 'associated accessories'.
Born to be mild
Sapere Aude
Ego Lego
Preferred pronouns - Thou, Thee, Thy, Thine
My non-working days are Monday - Sunday
User avatar
PanBiker
Site Administrator
Site Administrator
Posts: 16556
Joined: 23 Jan 2012, 13:07
Location: Barnoldswick - In the West Riding of Yorkshire, always was, always will be.

Re: Kitchen Refurb

Post by PanBiker »

Just checked my invoices and I did not get the discount on the tiles but did on everything else. The senior club card cost nothing to register and it's no problem picking up the extra stuff you need on a Wednesday. You get a small key fob with a barcode on and simply scan it at the checkout and it applies any applicable discounts before you pay for the goods.
Ian
User avatar
Stanley
Global Moderator
Global Moderator
Posts: 90797
Joined: 23 Jan 2012, 12:01
Location: Barnoldswick. Nearer to Heaven than Gloria.

Re: Kitchen Refurb

Post by Stanley »

My current cast iron improvement to the kitchen facilities has caused a small storage problem.... The big stewpot and the refurbished CI frying pan are sat on the hob pro tem.....
Stanley Challenger Graham
Stanley's View
scg1936 at talktalk.net

"Beware of certitude" (Jimmy Reid)
The floggings will continue until morale improves!
User avatar
PanBiker
Site Administrator
Site Administrator
Posts: 16556
Joined: 23 Jan 2012, 13:07
Location: Barnoldswick - In the West Riding of Yorkshire, always was, always will be.

Re: Kitchen Refurb

Post by PanBiker »

Not posted for quite while just been waiting for final touch items turning up and then cracking on quietly with the finishing off work.

I finished off all the tiling and grouting while waiting for our custom made Venetian Blinds to be made and delivered. We ordered the two different sizes we needed for our windows and they took about 5 days to arrive after ordering online from our selection of free samples we had been sent for colour matching. We originally intended to make the bottom wall a bold feature but once we started on the painting with the colour we had chosen neither of us liked it once it was on so we settled on all the walls the same and decided to go for a bolder colour for the blinds. I fitted the smaller window first as this was easiest to access from the worktop above the washing machine and dishwasher. Here it is fitted, not a particularly good picture as it is shot into the light.

Image

The other window is behind the sink and I had to put boards on top of the sink to provide a working platform.

The peninsular is now finished and we treated ourselves to a new stainless steel butterfly waste bin. It's 30L size and made by Simple Human. I did quite a bit of research online to find a decent one that would fit and be usable under the end of the peninsular worktop. It was not cheap but it is stain proof and has a 5 year warranty with a 100,000 step warranty on the pedal mechanism. The peninsular has turned out well and will become a well used work surface.

Image

Sally wanted a shelf unit for the wall at the end of the peninsular. I asked my mate Paul who manufactures custom up cycled furniture to come and measure up and make us a custom unit in keeping with the sideboard and cabinet we have on the bottom wall. While we were waiting for this to be made I decided to do a job that I have been meaning to do for quite a while. We have a 6 seat heavy pine dining table and chairs that we got not long after we moved into this house which is nearly 30 years ago. The table and chairs have a wax finish, the chairs have fared OK over the years but the table top needed a resurface. I spent a day removing the old wax finish from the surface, I used a plain wire pan scrub and spray bleach finishing off with soap and water and then 3 different grades of sandpaper once dry. I rubbed it down with white spirit and then gave it four coats of Ronseal clear matt finish varnish, final coat after wiping with a damp cloth. The varnish is water based and applying to a slightly wet surface gives a very smooth finish. Hard to see in the photo but the surface is now as good as it was when it was new.

Image

When Sally saw the result she had me give the small chunky pine coffee table we have in the front room the same treatment, that has come up really well and I managed to get rid of a lot of the dinks and chinks that it had inherited from our three kids and then three grandchildren.

I redeployed the 4 spot light bar that was originally fitted at the top of the kitchen that is now fitted with LED downlights. I have fitted it with 4 x 8W LED spotlights and it now provides back lighting for the peninsular, as well as the bottom end of the kitchen. The spots are the equivalent of 60w units so give 240W warm white light output for a 32w overhead.

Image

A photo of the under cupboard worktop lighting.

Image

Paul turned up last night with our custom shelf unit, Sally wanted this for her collection of cheese jars and other stuff. I fitted this today and you can see that it has already been populated. The photo shows our hanging arrangement with the butchers hooks over the peninsular.

Image

We are still getting used to the new units and how we are utilising them. It all seems to be working well with more functionality from our choice of units, we have more work space and the kitchen is much lighter and brighter, it should be the last time I have to do it. We just need a new washing machine as the one we are using is Jacks and he has just bought a house so will shortly be moving out and the washer will go with him.

The shelf unit was the final fit in the kitchen and I can now declare the job finished. The washing machine will be a straight swap out.
Ian
User avatar
Stanley
Global Moderator
Global Moderator
Posts: 90797
Joined: 23 Jan 2012, 12:01
Location: Barnoldswick. Nearer to Heaven than Gloria.

Re: Kitchen Refurb

Post by Stanley »

Nice job and up to the usual high standard. I shall not be ripping my kitchen out, I haven't worn it out yet.... Sue on the other hand will be going into a frenzy when she sees this.....
Stanley Challenger Graham
Stanley's View
scg1936 at talktalk.net

"Beware of certitude" (Jimmy Reid)
The floggings will continue until morale improves!
User avatar
LizG
Senior Member
Posts: 1010
Joined: 22 Mar 2012, 05:36
Location: Melbourne Australia

Re: Kitchen Refurb

Post by LizG »

Looks like a great job Ian. It interests me that you have the washing machine in the kitchen. Much more practical than here. We have a whole room dedicated to laundry, it's a bit ridiculous really.
Liz
User avatar
Stanley
Global Moderator
Global Moderator
Posts: 90797
Joined: 23 Jan 2012, 12:01
Location: Barnoldswick. Nearer to Heaven than Gloria.

Re: Kitchen Refurb

Post by Stanley »

Image

Quite usual here Liz in terraced houses where space is limited. Especially when the outshut is full of machinery!
Stanley Challenger Graham
Stanley's View
scg1936 at talktalk.net

"Beware of certitude" (Jimmy Reid)
The floggings will continue until morale improves!
Post Reply

Return to “DIY”