What type of bearing you use depends on what you're trying to achieve and what you're willing to pay. Rolling bearings have much lower running friction (about 1/2 to 1/3) and starting friction (1/5 to 1/30) than sleeve bearings and bicycle makers were early adopters back in Victorian times.
Likewise in steel mills for roller tables although some of the mill stands still had plain bearings for the greater load capacity and shock resistance. We used Orkot (from the coking plant at Orgreave) with water lubrication if I remember correctly.
SHED MATTERS 2
-
Stanley

- Global Moderator

- Posts: 90344
- Joined: 23 Jan 2012, 12:01
- Location: Barnoldswick. Nearer to Heaven than Gloria.
Re: SHED MATTERS 2
The engineers tended to stick with what worked and gave least trouble Bill. That's why even a modern F1 engine has plain bearings..... Just like the shafting in the mill but a bit more sophisticated!
No shed yesterday for various reasons. I am aiming to get in there today but up to now am busy catching up!
No shed yesterday for various reasons. I am aiming to get in there today but up to now am busy catching up!
Stanley Challenger Graham
Stanley's View
scg1936 at talktalk.net
"Beware of certitude" (Jimmy Reid)
The floggings will continue until morale improves!
Stanley's View
scg1936 at talktalk.net
"Beware of certitude" (Jimmy Reid)
The floggings will continue until morale improves!
-
Stanley
- Global Moderator
- Posts: 90344
- Joined: 23 Jan 2012, 12:01
- Location: Barnoldswick. Nearer to Heaven than Gloria.
Re: SHED MATTERS 2
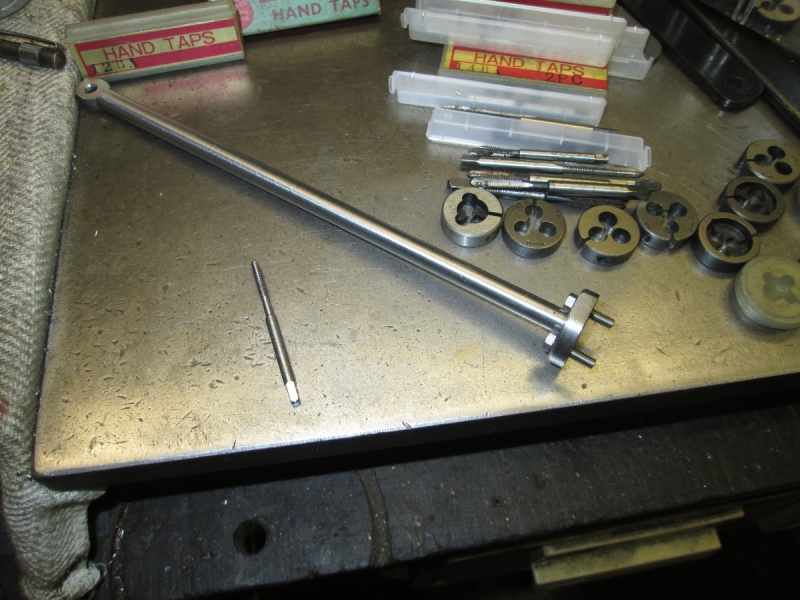
Things started so well..... I got a little parcel yesterday. I already have hard carborundum stones for wheel dressing and of course a diamond point. The have completely different characteristics and leave the wheel in a slightly different condition. The most open grain is achieved with one of these, a rotary wheel dresser with carbide teeth (or at least I think they are carbide, they're harder than the stone!) I tried it out, good result. So far so good.
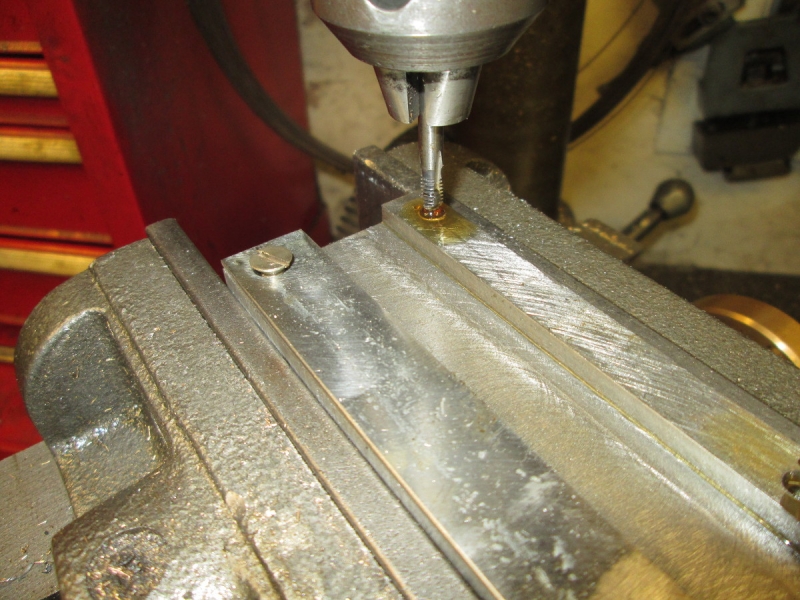
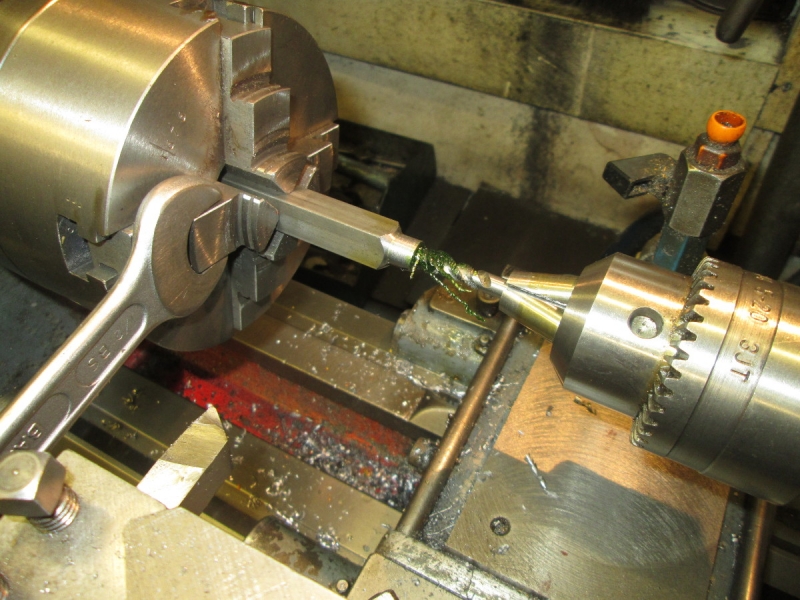
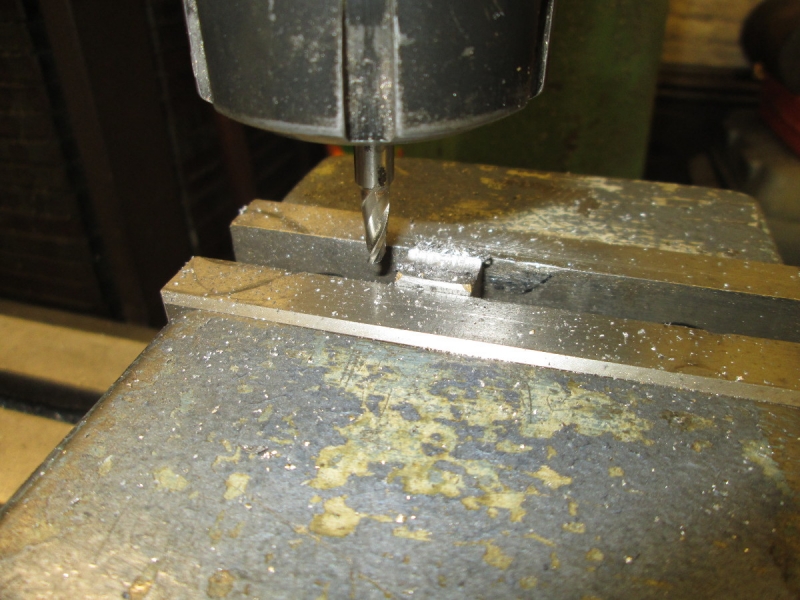
Then I addressed the matter of tapping the holes in my top plates. I decided that the safest way to do this was to do it under the pillar drill, turning the chuck lightly by hand for the best feel.
It all went splendidly! Here's the first screw fitted in the hole. Onward and upward!
Then disaster struck. I lost concentration for one second and broke my only 8BA tap off in the hole. No chance of extracting it. It was obvious that I had to withdraw, regain my composure and order a set of three 8BA taps from Kennions!
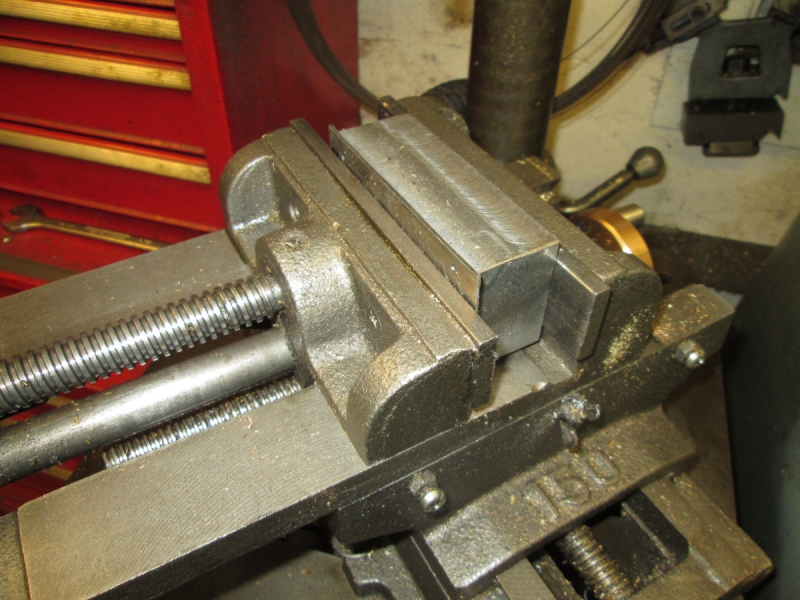
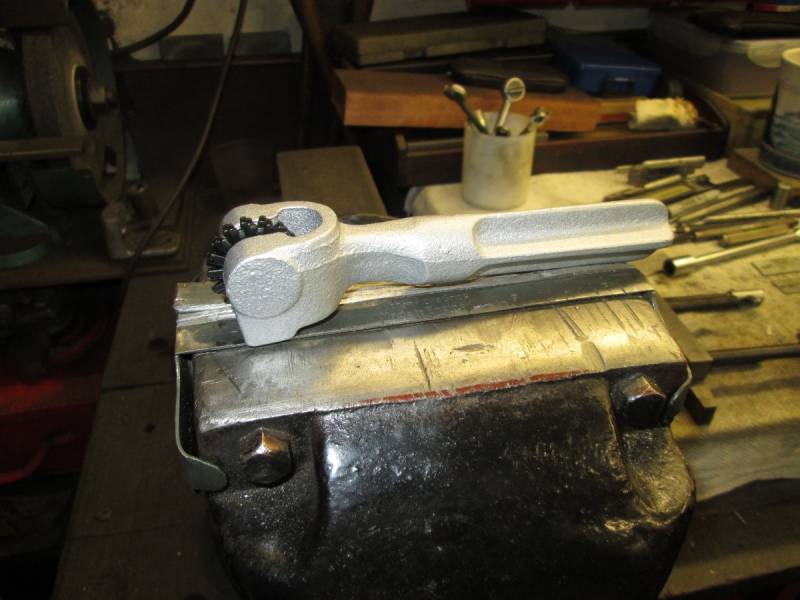
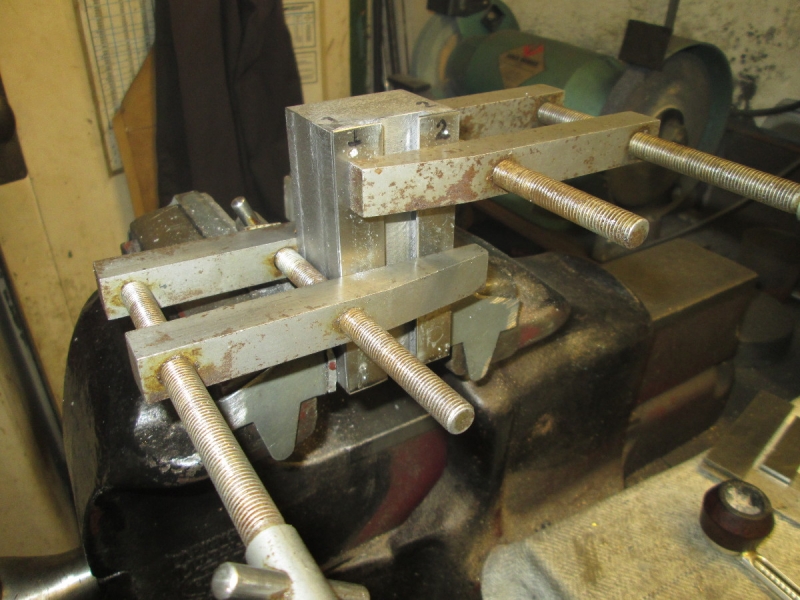
Then I started thinking..... These top covers are completely cosmetic, the engine would run fine without them. The most they have to do is exert slight restraint on the crosshead at very high speeds when the momentum of the con-rod could possibly encourage a bit of lift but even then the rigid positioning of the piston rod acts as a steadying influence. I don't like it but there is no doubt that super-glue will do all that is needed. So I polished all the parts, cleaned them thoroughly with brake cleaner, applied the top plates on a thin layer of glue with the crosshead in place and put the assembly in the vice on the pillar drill so I could apply some pressure. I shall leave it there until tomorrow. By that time I will have the maximum cure and the best chance of success. Sorry for the anti-climax but it knocked me back a bit. None of us like failure!
Stanley Challenger Graham
Stanley's View
scg1936 at talktalk.net
"Beware of certitude" (Jimmy Reid)
The floggings will continue until morale improves!
Stanley's View
scg1936 at talktalk.net
"Beware of certitude" (Jimmy Reid)
The floggings will continue until morale improves!
-
BillHowcroft
- Donor
- Posts: 102
- Joined: 19 Aug 2017, 17:39
- Location: Derby
Re: SHED MATTERS 2
We had a pump from a 'reputable German maker'. Years later we had to remove the cover for an unrelated fault and discovered the pressure was retained by seven of eight studs. The other one had a broken tap ground off flush with a fake part-stud and nut held by adhesive. Naughty fitters.
-
Stanley
- Global Moderator
- Posts: 90344
- Joined: 23 Jan 2012, 12:01
- Location: Barnoldswick. Nearer to Heaven than Gloria.
Re: SHED MATTERS 2
I can sympathise with them Bill. Broken taps have caused more grief to fitters than anything else. It always happens when you have put hours of work into a component. I their favour the pump worked OK without it! A similar thing is when the inspector's approval mark cracks the part......
Once of a day I used to try to get them out but these days, with a small tap I know better. You only make things worse! The only sure-fire way I know to get them out is spark erosion, very specialised and expensive but it's a cure.
Later, at 08:30. There won't be much, if any, shed today Lads. I have been immersed in a whirl of washing cooking and house-cleaning. I apologise but always remember I have to support my own sky! I don't have a live-in housekeeper and standards must be maintained!
Later after half an hour in the shed....
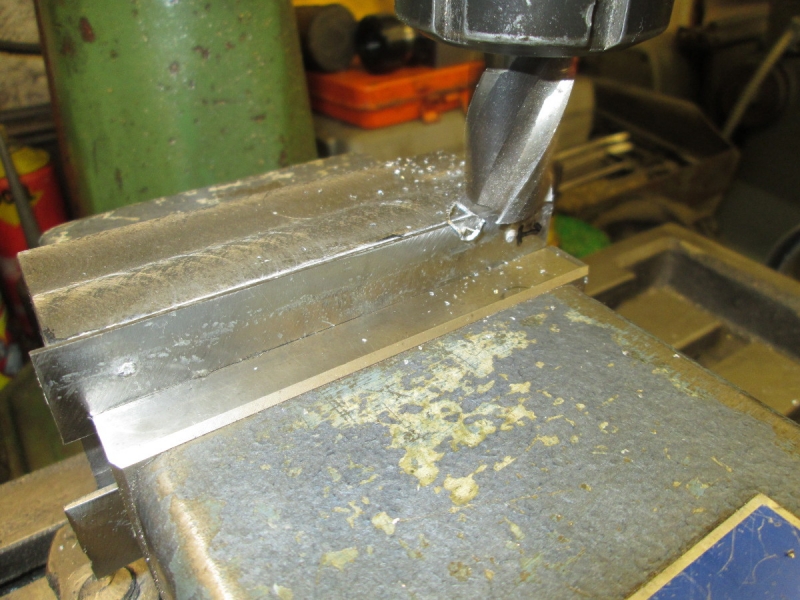
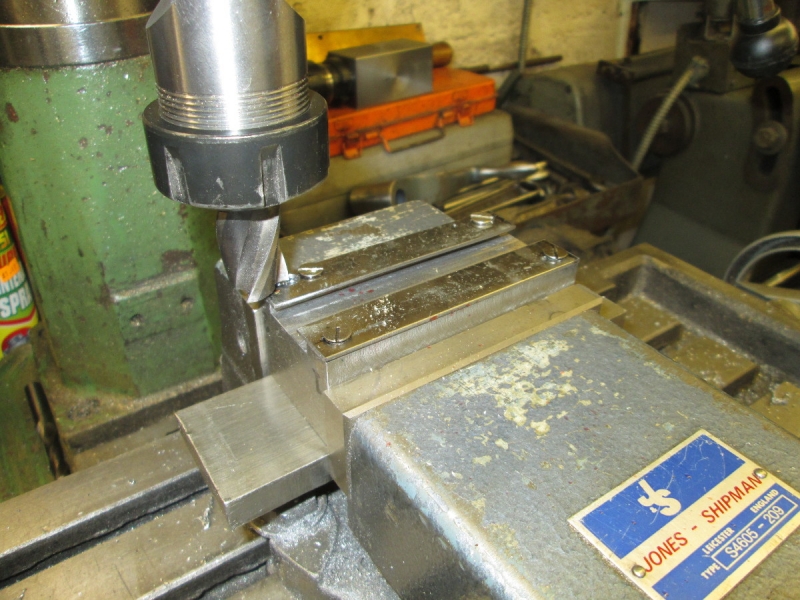
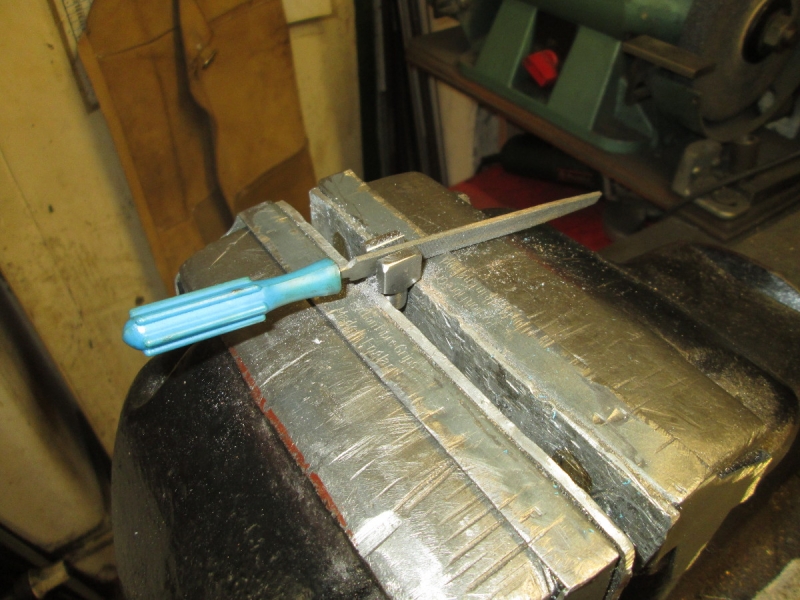
It all started so well! Apart from a domestic glitch, the only thing we didn't replace in the kitchen was the oven and and this morning it went AWOL! I have managed to get it going again but it all took time! However, I got in the shed and started by milling the excess off the top slides on the outside edge. I was very careful and managed that OK then I addressed the ends.....
Every picture tells a story! I was filing the end off and here's the result. The super-glue was a complete failure! I will have to have a rethink, this isn't going to beat me! I will find a different way! Onward and upwards.
Once of a day I used to try to get them out but these days, with a small tap I know better. You only make things worse! The only sure-fire way I know to get them out is spark erosion, very specialised and expensive but it's a cure.
Later, at 08:30. There won't be much, if any, shed today Lads. I have been immersed in a whirl of washing cooking and house-cleaning. I apologise but always remember I have to support my own sky! I don't have a live-in housekeeper and standards must be maintained!
Later after half an hour in the shed....
It all started so well! Apart from a domestic glitch, the only thing we didn't replace in the kitchen was the oven and and this morning it went AWOL! I have managed to get it going again but it all took time! However, I got in the shed and started by milling the excess off the top slides on the outside edge. I was very careful and managed that OK then I addressed the ends.....
Every picture tells a story! I was filing the end off and here's the result. The super-glue was a complete failure! I will have to have a rethink, this isn't going to beat me! I will find a different way! Onward and upwards.
Stanley Challenger Graham
Stanley's View
scg1936 at talktalk.net
"Beware of certitude" (Jimmy Reid)
The floggings will continue until morale improves!
Stanley's View
scg1936 at talktalk.net
"Beware of certitude" (Jimmy Reid)
The floggings will continue until morale improves!
-
PanBiker

- Site Administrator

- Posts: 16463
- Joined: 23 Jan 2012, 13:07
- Location: Barnoldswick - In the West Riding of Yorkshire, always was, always will be.
Re: SHED MATTERS 2
If you have new taps coming can't you just drill and tap in a different place?
Ian
-
Stanley
- Global Moderator
- Posts: 90344
- Joined: 23 Jan 2012, 12:01
- Location: Barnoldswick. Nearer to Heaven than Gloria.
Re: SHED MATTERS 2
That may be what I do Ian but at the moment I am favouring bigger screws. Still thinking about it.....
Stanley Challenger Graham
Stanley's View
scg1936 at talktalk.net
"Beware of certitude" (Jimmy Reid)
The floggings will continue until morale improves!
Stanley's View
scg1936 at talktalk.net
"Beware of certitude" (Jimmy Reid)
The floggings will continue until morale improves!

Re: SHED MATTERS 2
A Bodger cheat, attach the plates with three equally spaced screws in each and glue a dummy bolt in the damaged one, but then I had a reputation for getting out of mistakes, hence the name
-
Stanley
- Global Moderator
- Posts: 90344
- Joined: 23 Jan 2012, 12:01
- Location: Barnoldswick. Nearer to Heaven than Gloria.
Re: SHED MATTERS 2
Bodge.... You'll see I'm doing something similar but without hiding the cock ups!
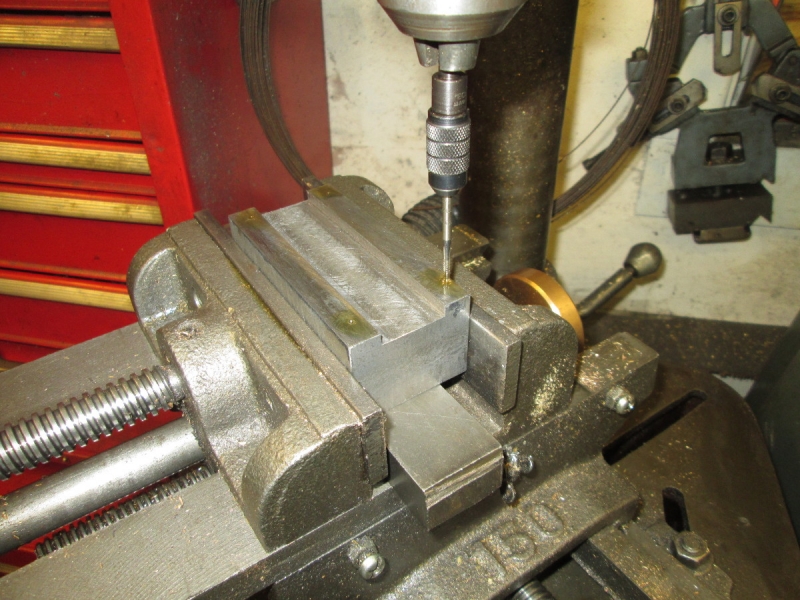
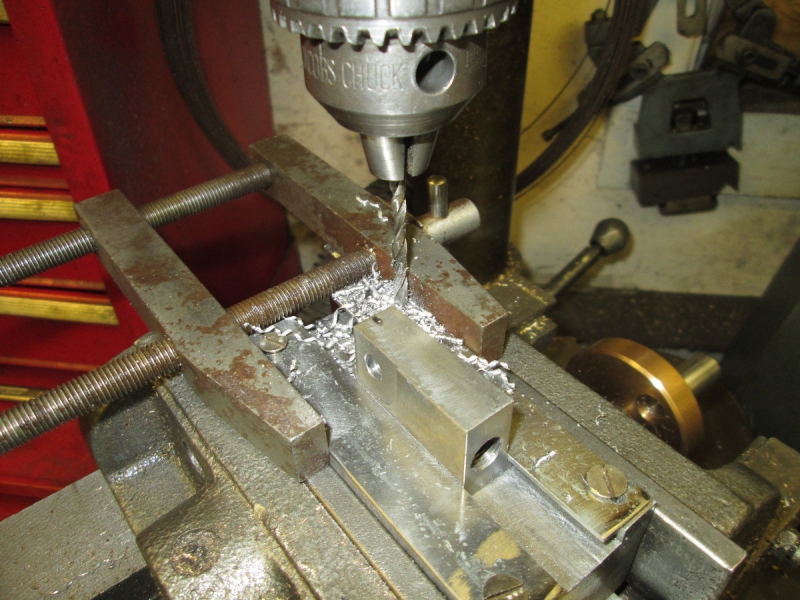
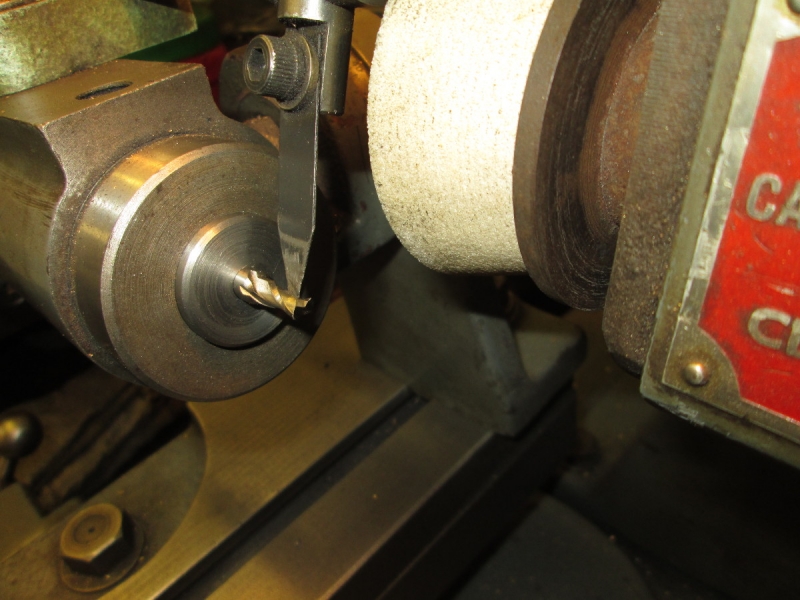
I decided to have another crack at it using the tap I broke, ground back to a cutting edges....The difference is I'm going to use a 1.9mm tapping drill instead of the 1.8mm.
I cleaned off all the old glue and set the plates up again in the vice. Four fresh holes started in fresh locations....
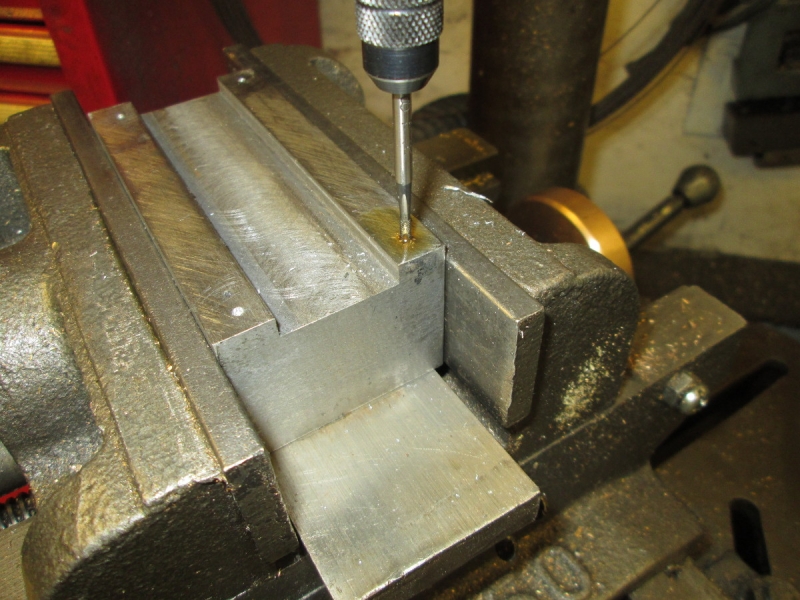
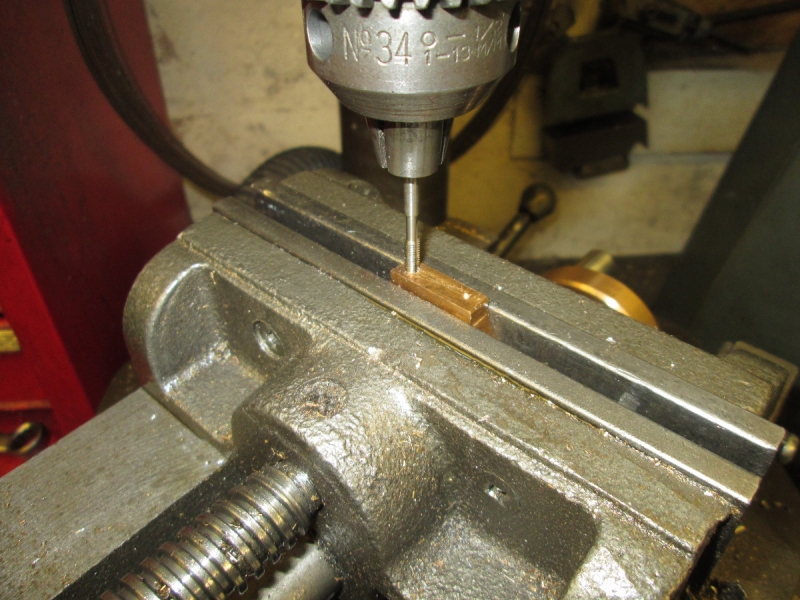
Here we go again. Maximum care. Just turning the tap with my hand on the chuck.....
And here's my reward.... broke the bloody tap again!!

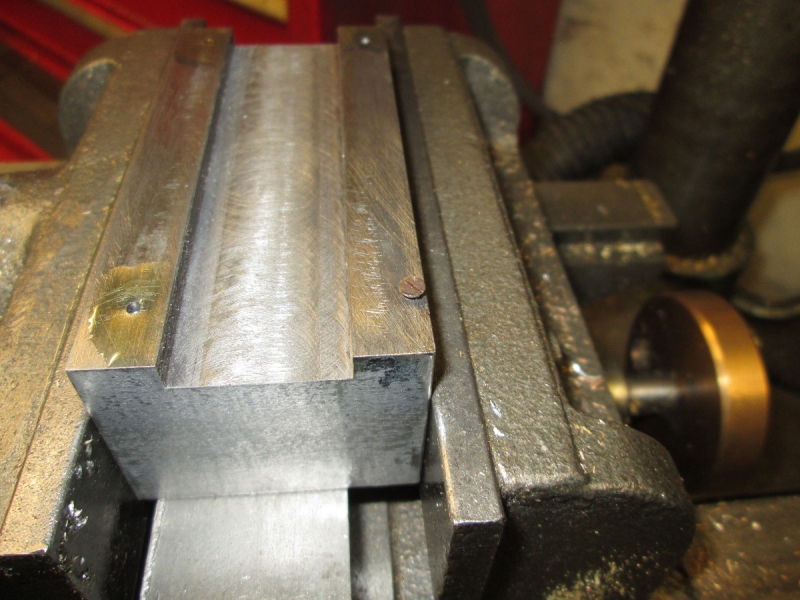
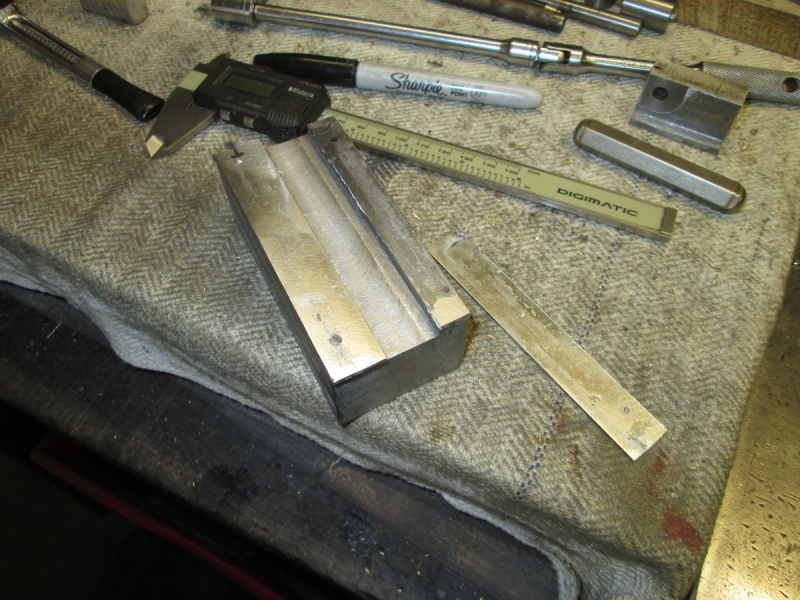
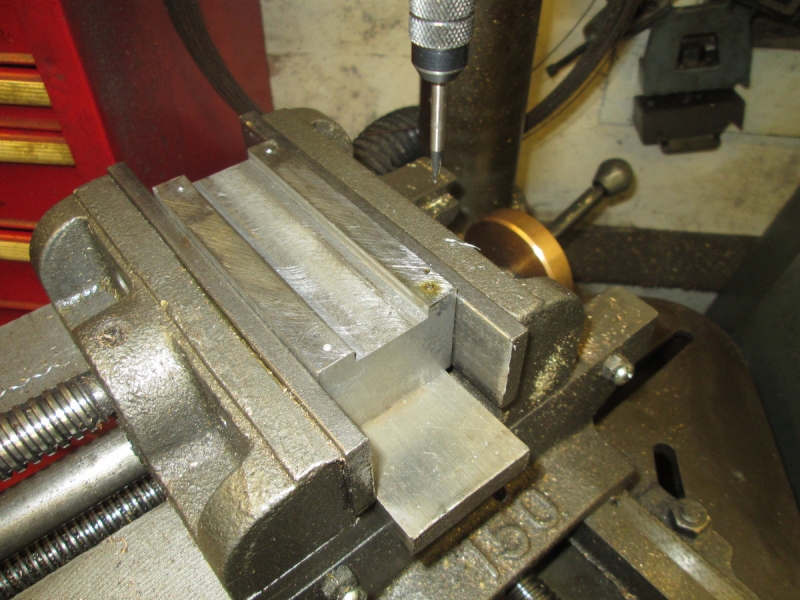
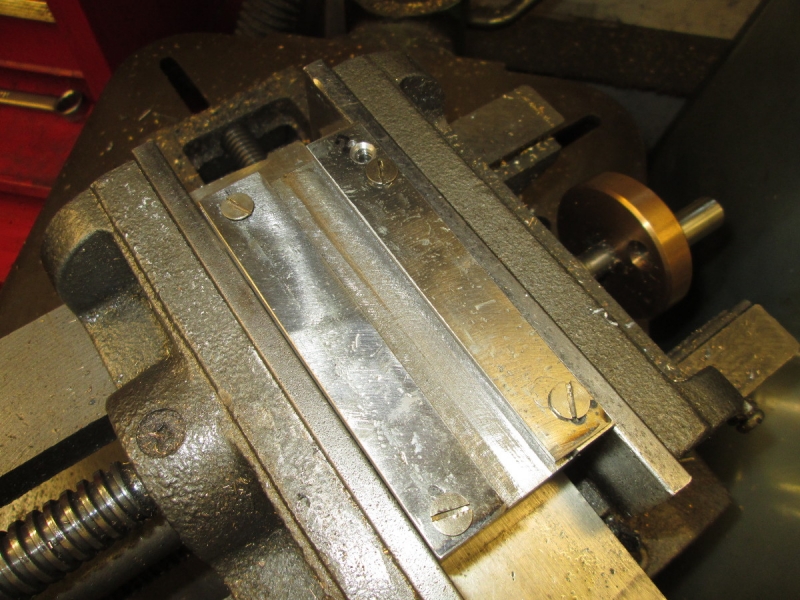
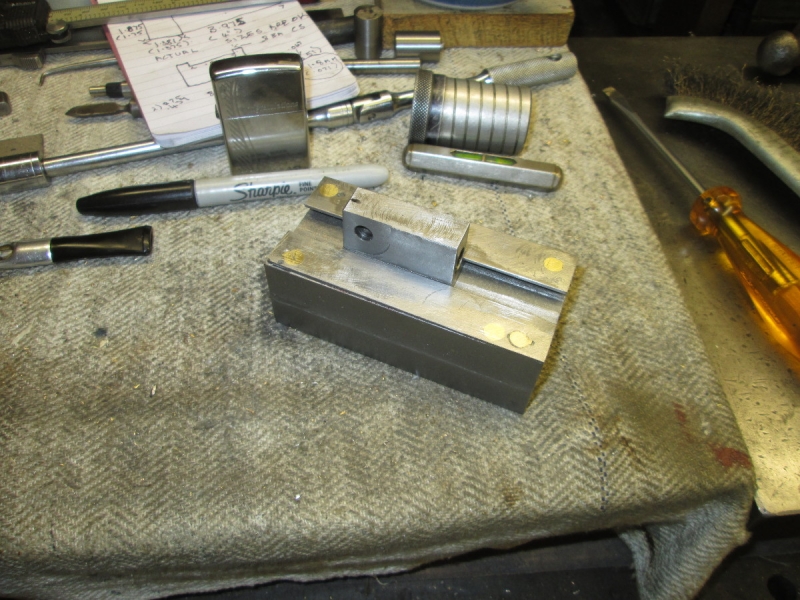
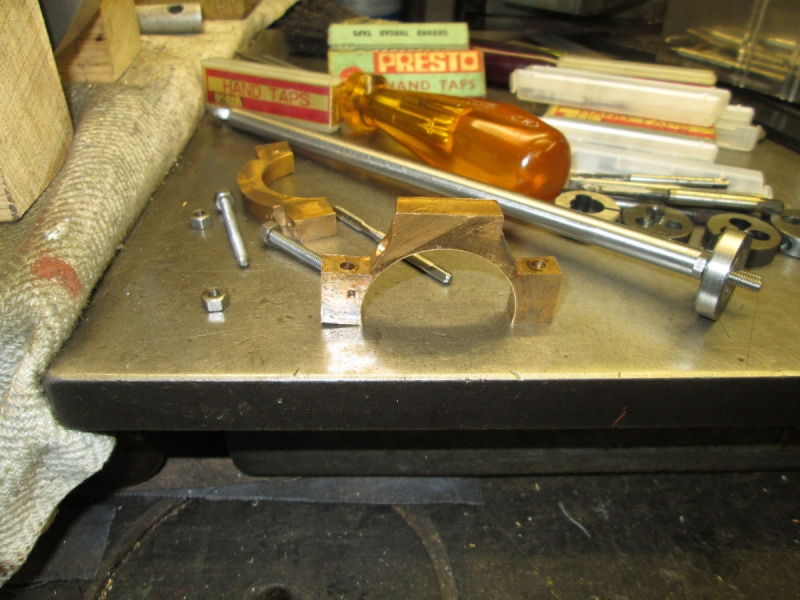
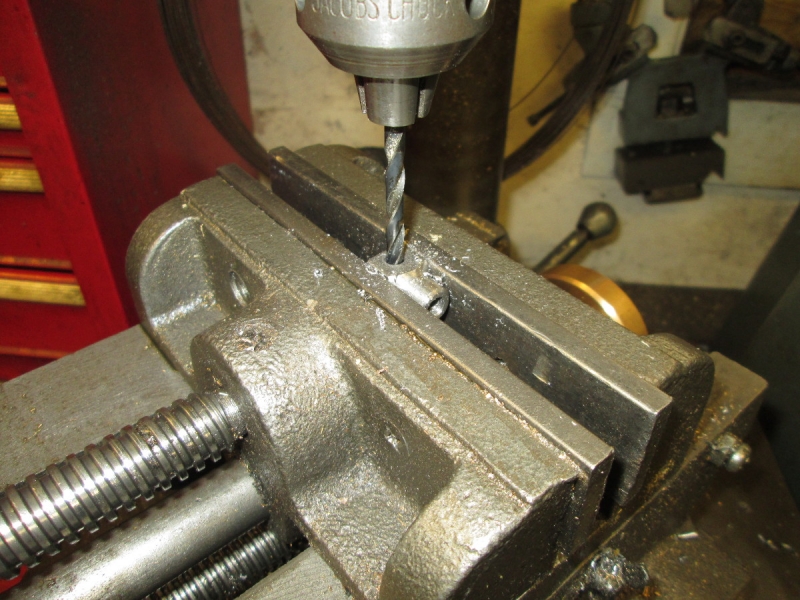
I had a rethink. I think I have to admit that tapping anything smaller than 6BA in steel is a lost cause. OK for brass etc. but no good for steel. I did what I should have done in the first place, I ditched the 8BA screws and found 4 2BA in their place. I started on one side and here's the result, a good fix properly countersunk and when they are cleaned off you won't be able to see where they are. Now for the other plate......
Here's the state of play at closing time, ready for tapping the hole at this end. However, things aren't as rosy as they look. My bum eyes let me down and I drilled the far hole first but failed to see I was too close to the hole with the broken tap in. First I realised was when sparks came out of the hole.... I have the hole to a decent depth and think I might have cleared out the bits of broken tap. I'll tap the good hole at this end first thing tomorrow and then try the other with an old 2BA tap. Up to now I've been using a brand new set that has been in the treasure chest for years. I have an idea I can get away with it..... If not, it's a completely different position.....
I decided to have another crack at it using the tap I broke, ground back to a cutting edges....The difference is I'm going to use a 1.9mm tapping drill instead of the 1.8mm.
I cleaned off all the old glue and set the plates up again in the vice. Four fresh holes started in fresh locations....
Here we go again. Maximum care. Just turning the tap with my hand on the chuck.....
And here's my reward.... broke the bloody tap again!!
I had a rethink. I think I have to admit that tapping anything smaller than 6BA in steel is a lost cause. OK for brass etc. but no good for steel. I did what I should have done in the first place, I ditched the 8BA screws and found 4 2BA in their place. I started on one side and here's the result, a good fix properly countersunk and when they are cleaned off you won't be able to see where they are. Now for the other plate......
Here's the state of play at closing time, ready for tapping the hole at this end. However, things aren't as rosy as they look. My bum eyes let me down and I drilled the far hole first but failed to see I was too close to the hole with the broken tap in. First I realised was when sparks came out of the hole.... I have the hole to a decent depth and think I might have cleared out the bits of broken tap. I'll tap the good hole at this end first thing tomorrow and then try the other with an old 2BA tap. Up to now I've been using a brand new set that has been in the treasure chest for years. I have an idea I can get away with it..... If not, it's a completely different position.....
Stanley Challenger Graham
Stanley's View
scg1936 at talktalk.net
"Beware of certitude" (Jimmy Reid)
The floggings will continue until morale improves!
Stanley's View
scg1936 at talktalk.net
"Beware of certitude" (Jimmy Reid)
The floggings will continue until morale improves!
-
Stanley
- Global Moderator
- Posts: 90344
- Joined: 23 Jan 2012, 12:01
- Location: Barnoldswick. Nearer to Heaven than Gloria.
Re: SHED MATTERS 2
As promised, I tried two old 2BA taps in the bum hole but failed completely to establish a thread. There's enough of the broken tap in there to destroy any tap you poke into it. I decided I'd have to live with this.
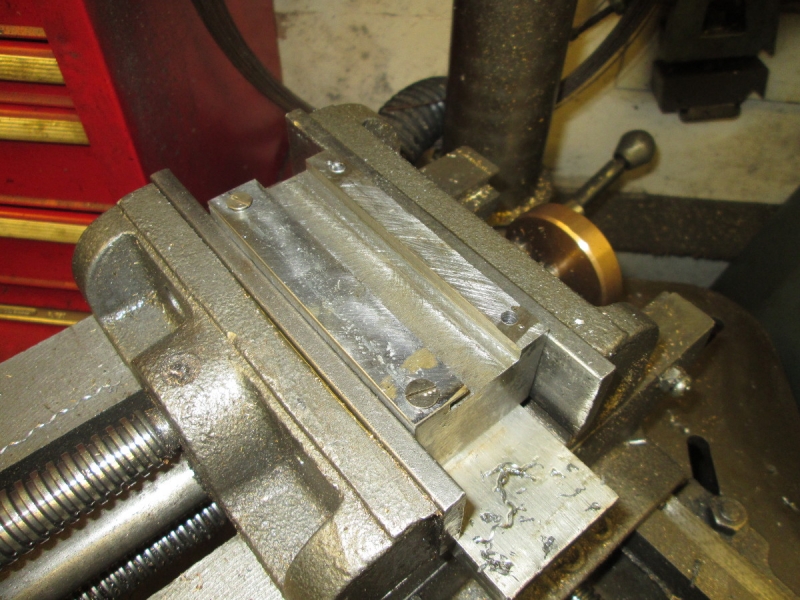
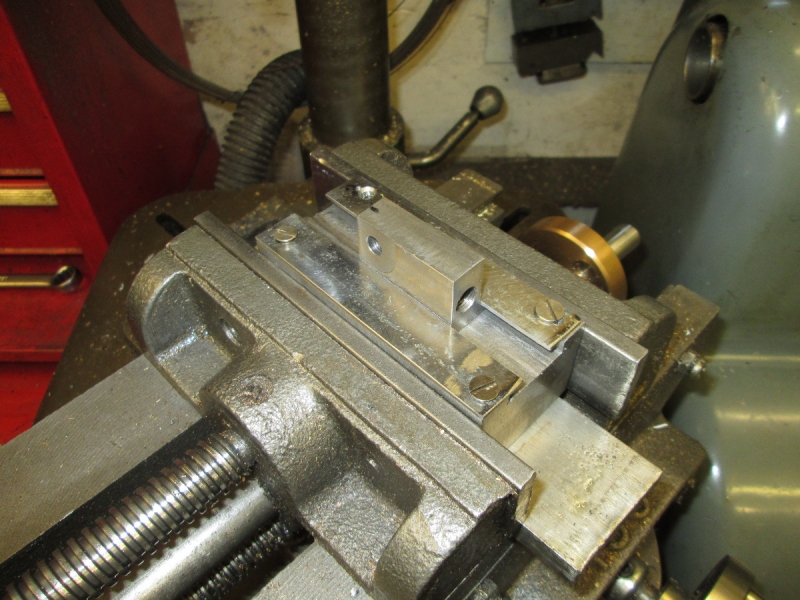
I shifted my attention to the good drilling at the other end and had no problem establishing a good thread so I fitted the top strip using that as a locator. Then I stabilised the strip with a toolmaker's cramp and drilled a fresh tapping hole through the strip and into the meat of the crosshead.
I soon had a good tapping, drilled the strip for clearance and countersunk the hole and fitted the strip with both screws tight. We have achieved at least one objective, I have both the strips firmly in place and the crosshead is a good fit.

Next job was to make the screws a permanent fix. I cleaned the holes with brake cleaner (Thanks John.....) and screwed the fastenings down really tight with Loctite in the holes. I hit a small problem with one of the holes I did yesterday, I hadn't threaded it quite deep enough so I re-tapped it deeper and that cured that problem.
Next move was into the mill and I took the heads of the screws down until I was just grazing the strips. Then I put it in the vise and spent about 30 minutes filing and finishing. Oh one thing I did was hammer a screw into the bad tapping hole and in effect it upset in the hole and became a rivet. I didn't trust it under the mill but filed it down flush with the strip. As usual the decision was when have I done enough. I have already decided that the crosshead is going to get a coat of paint eventually.
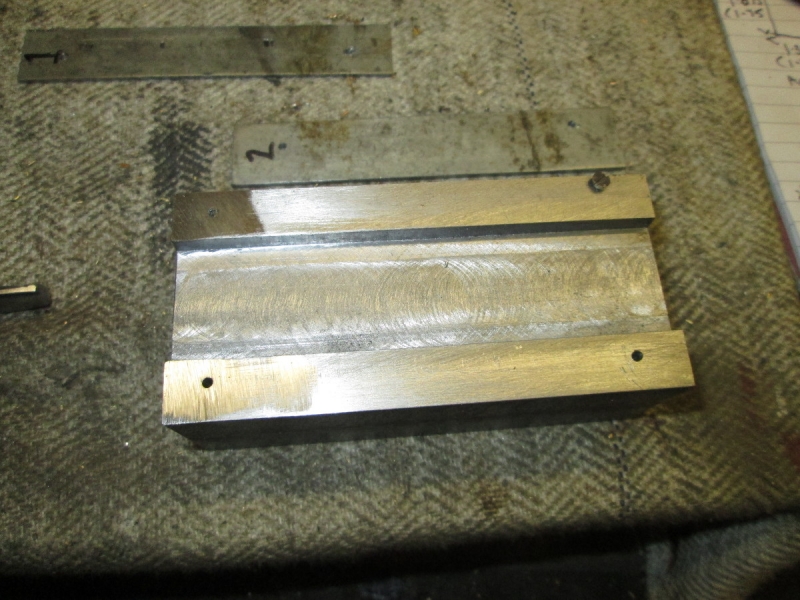
Here we are at closing time. Not my finest moment but it has all ended up well. The crosshead is a lovely fit, there is room for the clevis and when it is painted nobody will be able to tell what a pain it has been and how badly I performed. We live and learn. I have one more job, I have to make provision for fastening it down onto the bed but that's easy and I'll do it tomorrow.
Stanley Challenger Graham
Stanley's View
scg1936 at talktalk.net
"Beware of certitude" (Jimmy Reid)
The floggings will continue until morale improves!
Stanley's View
scg1936 at talktalk.net
"Beware of certitude" (Jimmy Reid)
The floggings will continue until morale improves!
-
Stanley
- Global Moderator
- Posts: 90344
- Joined: 23 Jan 2012, 12:01
- Location: Barnoldswick. Nearer to Heaven than Gloria.
Re: SHED MATTERS 2
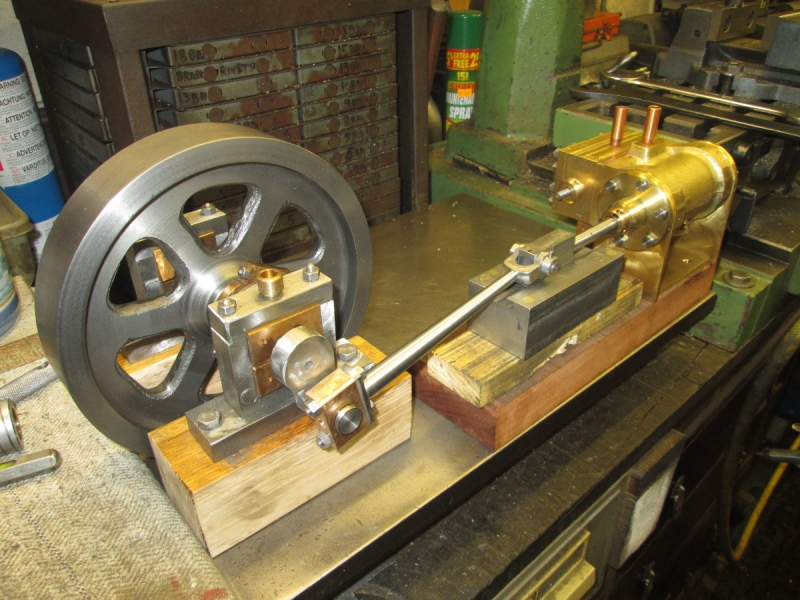
This morning is a broken morning because I have to go to the surgery for a re-run of a blood test. So I didn't finish the crosshead off, I set the engine up temporarily on the surface plate. Now I have the crosshead slide finished and in place I can do my measurements for the Valve driving rod, its clevis and more importantly, the definitive sizes for the wooden bed and outrigger. First I checked that I had the crosshead slide right, that the con-rod clears the slides and that in mid stroke when the rod is at maximum downward angle it clears the slide. All that's OK.
So I went on to do a fag packet drawing of the valve rod and the bed and outrigger. I've done that and made a good drawing for B&D who are going to get the order today for the hardwood blocks I need. I can carry on making the valve rod while that's being done. When I have the bed and the outrigger I can set to to fix the cylinder and arrange the flywheel and bearings in their finished position.
We are getting very close to a finished engine! It's going to be bigger than I expected but will be OK considering it's been done out of my head as I have gone along. I like making them that way, definitely a one off!
Stanley Challenger Graham
Stanley's View
scg1936 at talktalk.net
"Beware of certitude" (Jimmy Reid)
The floggings will continue until morale improves!
Stanley's View
scg1936 at talktalk.net
"Beware of certitude" (Jimmy Reid)
The floggings will continue until morale improves!


-
Stanley
- Global Moderator
- Posts: 90344
- Joined: 23 Jan 2012, 12:01
- Location: Barnoldswick. Nearer to Heaven than Gloria.
Re: SHED MATTERS 2
Thanks for that Kev..... I put in the order for the bed today, it will be ready Friday. It's going to be one piece plus the outrigger block.
The three new 8BA taps have arrived and gone in the appropriate treasure chest.....
The three new 8BA taps have arrived and gone in the appropriate treasure chest.....
Stanley Challenger Graham
Stanley's View
scg1936 at talktalk.net
"Beware of certitude" (Jimmy Reid)
The floggings will continue until morale improves!
Stanley's View
scg1936 at talktalk.net
"Beware of certitude" (Jimmy Reid)
The floggings will continue until morale improves!

Re: SHED MATTERS 2
Just a small point on how to avoid breaking small taps and I'm sure you'll say " that's exactly what I do.
Use the appropriate lubrication. Something like break free for steel.
I like to use a free hand method but making absolutely sure the tap is at 90 degrees.
Change the taps, starter, plug, intermediate, as soon as there is any resistance to cutting.
Break the swarf chip by reversal several times per revolution of tap.
Never try a full depth cut using a single type tap.
Clear out the swarf , don't let the tap bottom out.
Say three Holy Mary's as you go along.
-
Stanley
- Global Moderator
- Posts: 90344
- Joined: 23 Jan 2012, 12:01
- Location: Barnoldswick. Nearer to Heaven than Gloria.
Re: SHED MATTERS 2
" that's exactly what I do." You took the words out of my mouth. Alternatively, never use anything smaller than 5BA in steel..... But thanks for taking notice....
Stanley Challenger Graham
Stanley's View
scg1936 at talktalk.net
"Beware of certitude" (Jimmy Reid)
The floggings will continue until morale improves!
Stanley's View
scg1936 at talktalk.net
"Beware of certitude" (Jimmy Reid)
The floggings will continue until morale improves!
-
Stanley
- Global Moderator
- Posts: 90344
- Joined: 23 Jan 2012, 12:01
- Location: Barnoldswick. Nearer to Heaven than Gloria.
Re: SHED MATTERS 2
I started the day by having a good clean up and then getting the oil guns out and lubricating all the nipples (Did you know that the Americans shy away from 'nipples' and call them 'zerks'?) Then having a good wipe up of the excess oil and the muck it had flushed out of the bearings and ways. Some people never bother.....
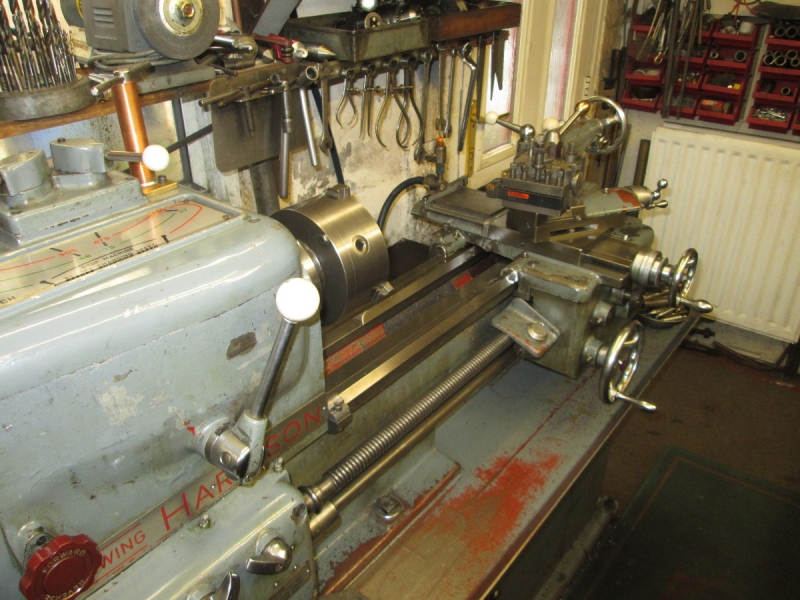
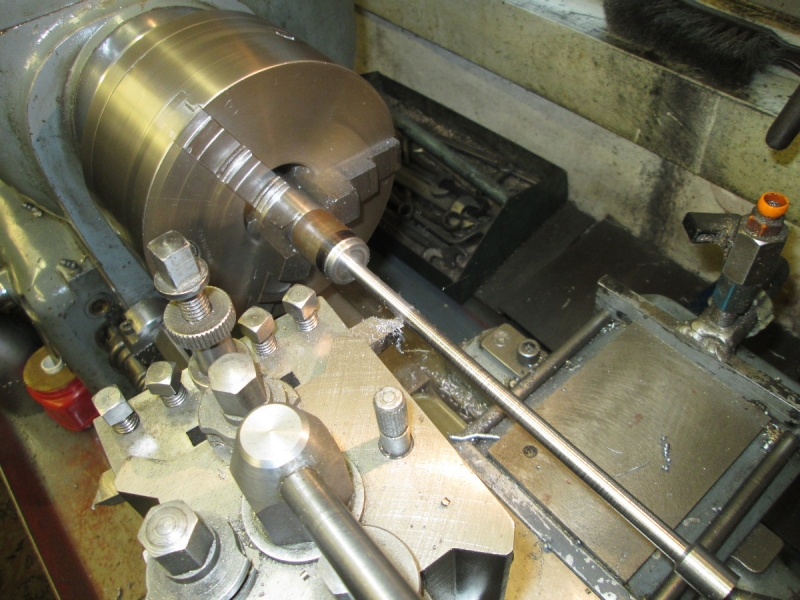
Today is going to be the valve rod! The largest diameter is a shade under 1" so I fished out a piece of 1" stock from behind the lathe. Faced one end and centred it and then cleaned the other end up so I could get a good accurate grip in the chuck, it was quite heavily rusted. Then I reversed it and put a mark in at the end of the 8" I need. I had honed my HS cutter up but decided to have a bit more practice with my tipped tools. I am still learning!
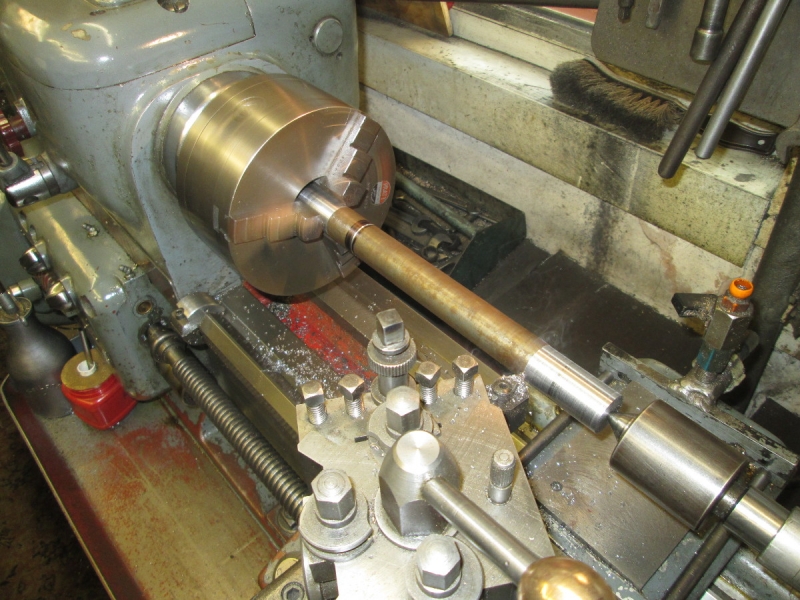
As I say so often, we spend most of our time in our sheds making pieces of metal smaller! Funnily enough it was easier in full size practice because something like this was forged to roughly the shape before the turner got hold of it. I have to chop it out of the solid and the first stage is reducing it overall to 1/2" diameter. I'm cutting at 300rpm and 50thou here as that was what I had found worked best with the tip I was using. If I was starting with tipped tools from scratch this wouldn't be my choice but it just so happens that this is what I have. It's a plain negative rake tip and fit only for heavy roughing really. Another thing, I watch people like Adam Booth taking heroic cuts on large work pieces and what we have to realise is that while Mrs Harrison is a big lathe compared with a Myford or some of the even smaller imports it is still a small lathe and this cut of 50thou with this tip is quite respectable. Adam wouldn't laugh at me..... Quietly away I got it reduced and then started on the reduction of the rest.
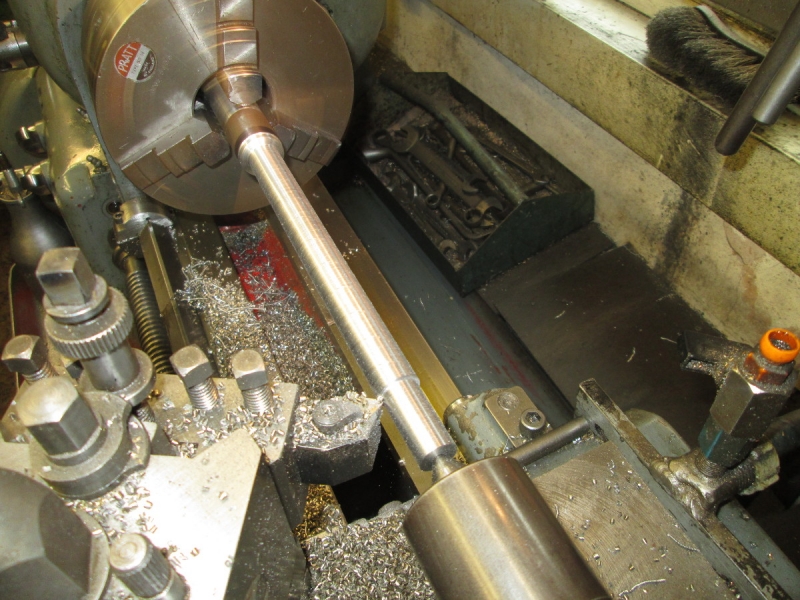
Here's where I am at closing time. I have got the shaft down to what I think will be the final diameter (I think I'm ditching my original idea of having a taper!) but it's not a satisfactory finish, largely because my last cut was lighter and a slower feed! One thing I am learning is that Carbide tips like to be pushed! Tomorrow I'll give it a light finishing skim with a sharp HSS tool. My last move was to vacuum up all the chips and leave a clean start..... I do like a clean lathe!
Stanley Challenger Graham
Stanley's View
scg1936 at talktalk.net
"Beware of certitude" (Jimmy Reid)
The floggings will continue until morale improves!
Stanley's View
scg1936 at talktalk.net
"Beware of certitude" (Jimmy Reid)
The floggings will continue until morale improves!
-
Stanley
- Global Moderator
- Posts: 90344
- Joined: 23 Jan 2012, 12:01
- Location: Barnoldswick. Nearer to Heaven than Gloria.
Re: SHED MATTERS 2
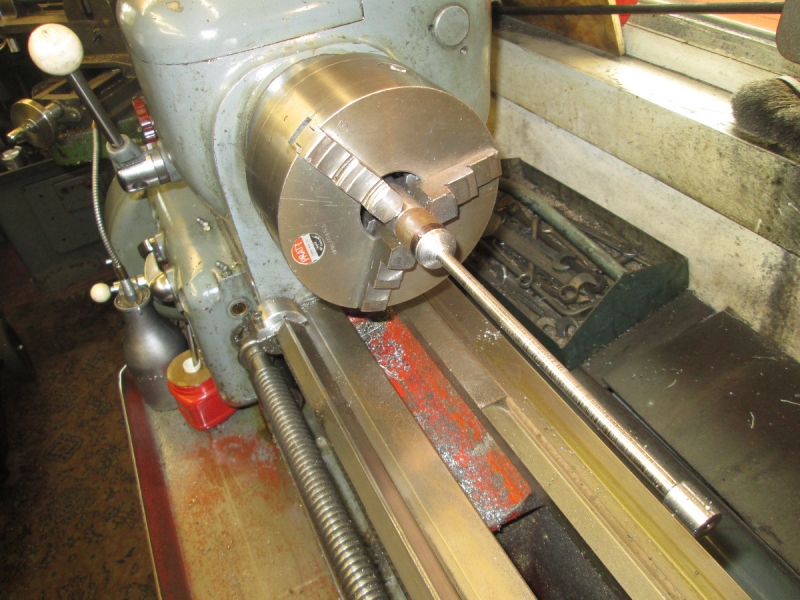
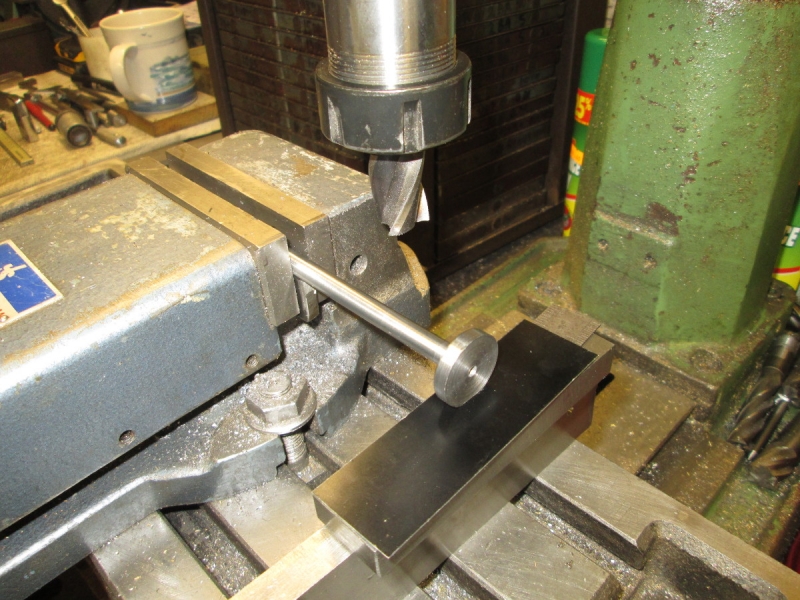
I want to finish up with a finished blank for the valve rod. I was late into the shed because Friday is my busy morning domestically but I was in there shortly after 8AM. I swapped for a freshly honed HSS cutter and finished shaping the rod, checking the sizes carefully and adjusting, getting rid of the centre drilling in the clevis end and finally parting it off and finishing the face of the foot.
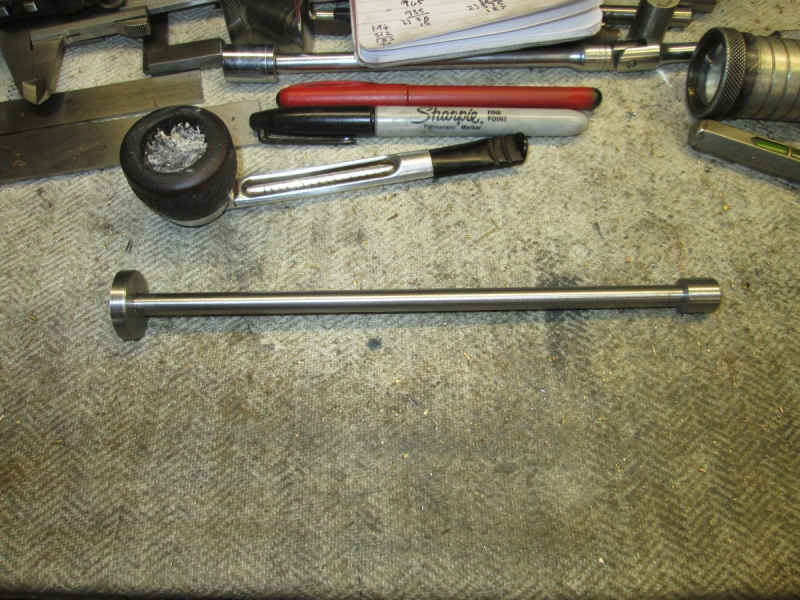
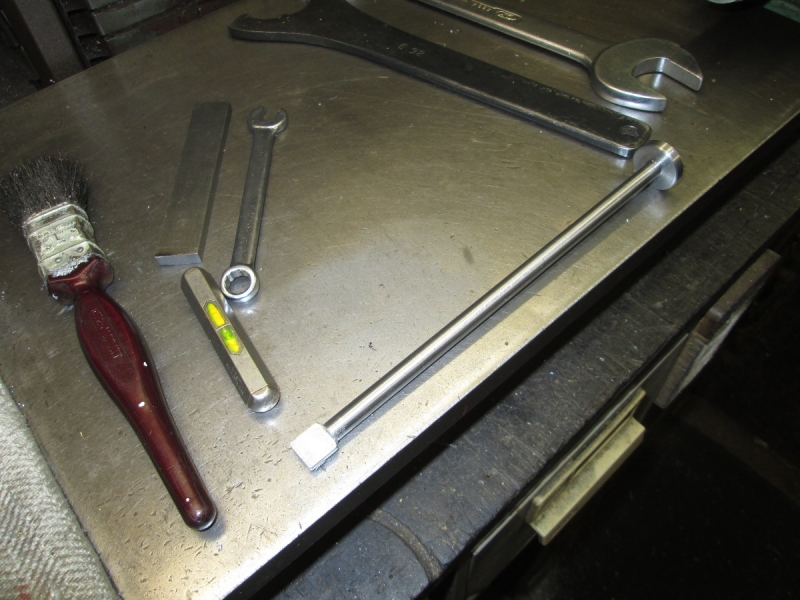
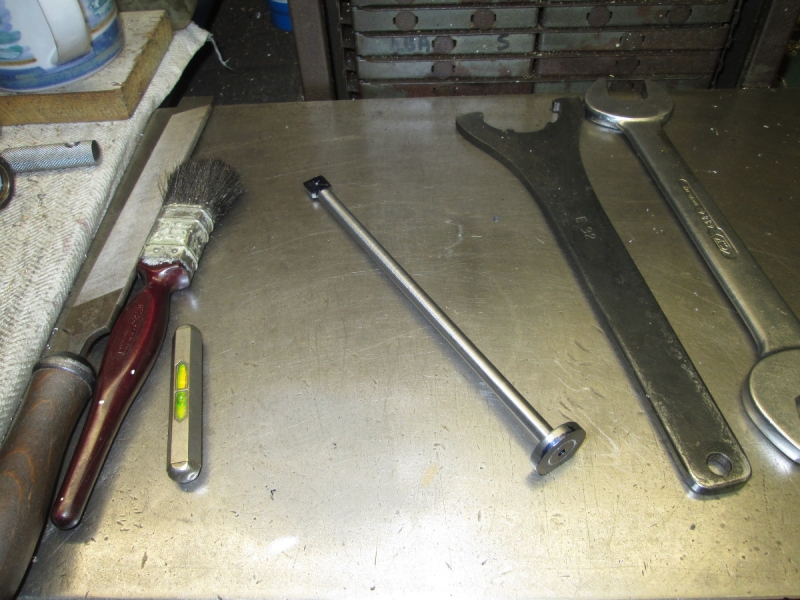
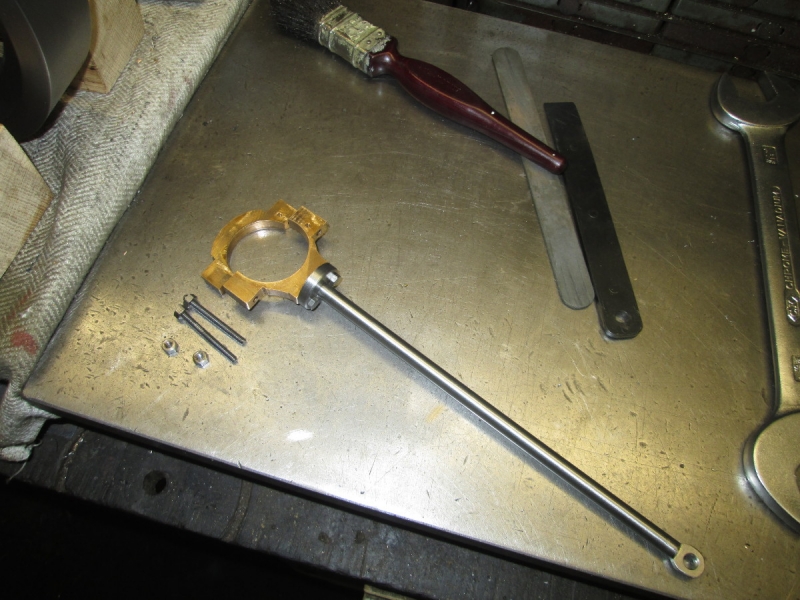
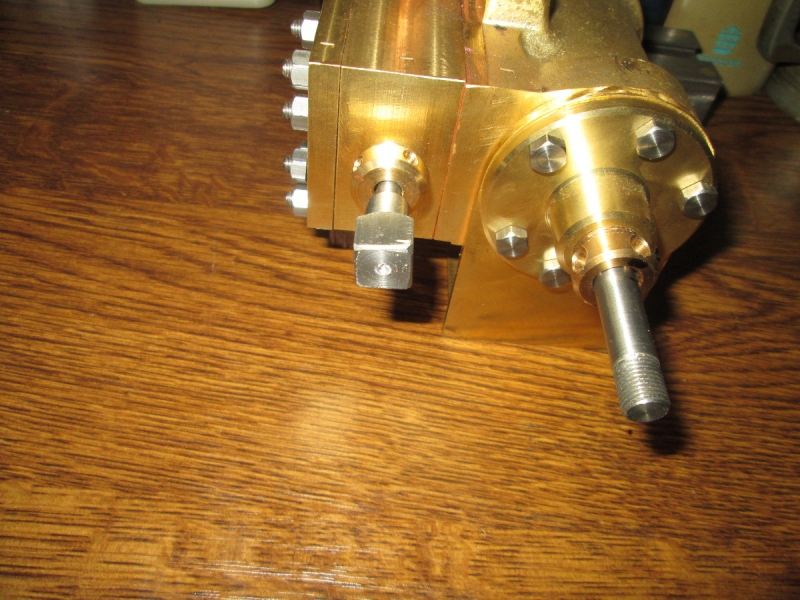
Here's the finished result at closing time which was early because I have another errand. I'm quite pleased with it, not a bad finish. It's tool finish with a slight emery polish, I'm improving.......
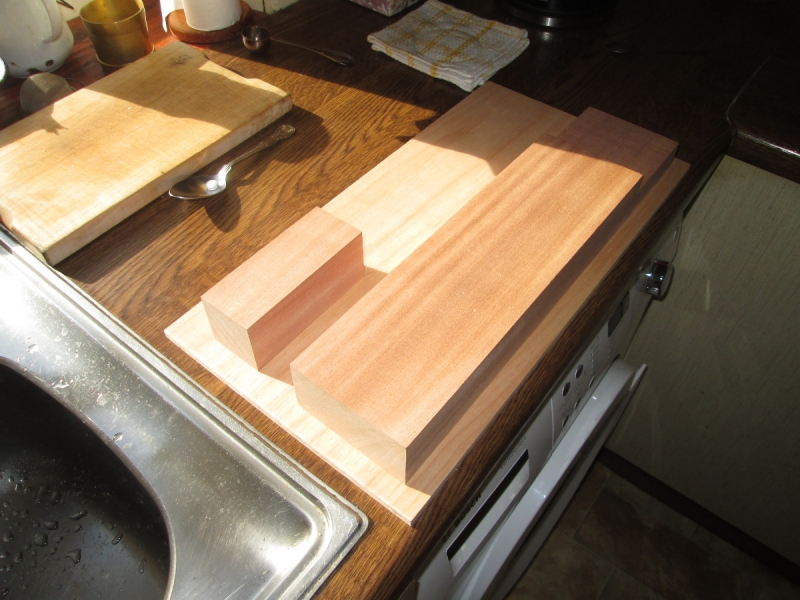
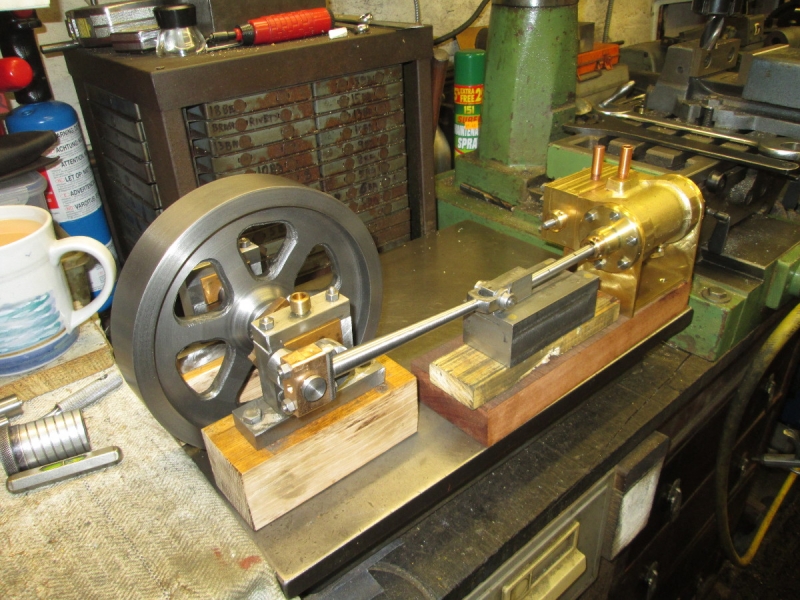
Here's the errand. I had to walk down to Briggs and Duxbury's for my beds and plinth. This is the approximate orientation and I think you can see the idea. At the moment I fancy the foundation blocks in black and the plinth a clear varnish finish once it has been given a chamfer all round.....
Stanley Challenger Graham
Stanley's View
scg1936 at talktalk.net
"Beware of certitude" (Jimmy Reid)
The floggings will continue until morale improves!
Stanley's View
scg1936 at talktalk.net
"Beware of certitude" (Jimmy Reid)
The floggings will continue until morale improves!
-
BillHowcroft
- Donor
- Posts: 102
- Joined: 19 Aug 2017, 17:39
- Location: Derby
Re: SHED MATTERS 2
That's a long, thin turning job. Do you have a travelling steady for Mrs H?
Persistence personified. Can't be that long now until the engine gets its first run.
Persistence personified. Can't be that long now until the engine gets its first run.
-
Stanley
- Global Moderator
- Posts: 90344
- Joined: 23 Jan 2012, 12:01
- Location: Barnoldswick. Nearer to Heaven than Gloria.
Re: SHED MATTERS 2
Yes Bill but I hardly ever use it, if you have your cutter sharpened properly there is very little pressure trying to force it away from the cutting edge. I even have a little gadget that enables me to turn rod down to 1/16". Plenty to do yet before we have a runner!
Stanley Challenger Graham
Stanley's View
scg1936 at talktalk.net
"Beware of certitude" (Jimmy Reid)
The floggings will continue until morale improves!
Stanley's View
scg1936 at talktalk.net
"Beware of certitude" (Jimmy Reid)
The floggings will continue until morale improves!
-
Stanley
- Global Moderator
- Posts: 90344
- Joined: 23 Jan 2012, 12:01
- Location: Barnoldswick. Nearer to Heaven than Gloria.
Re: SHED MATTERS 2
I got in the shed early this morning because I expected to be cut short by Susan's visit but she is poorly so I had a long morning!
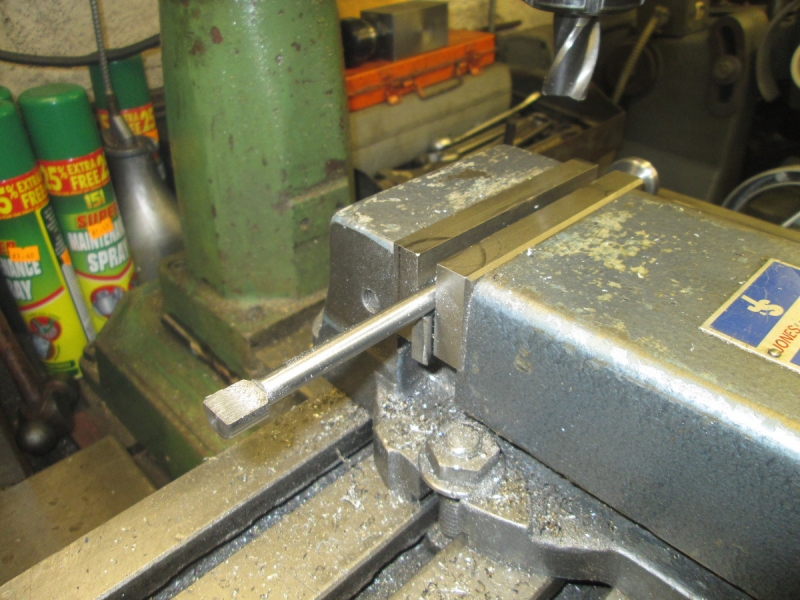
First job was to start reducing the end of the rod to fit the clevis. I milled one flat on it and then milled a flat on the foot at the same setting as a register.
I used that flat to set up the other side of the clevis end parallel with the first.
I'm ready now for some careful marking out for the wrist pin hole and also the holes for the 4BA set screws that will fix the rod to the eccentric strap.
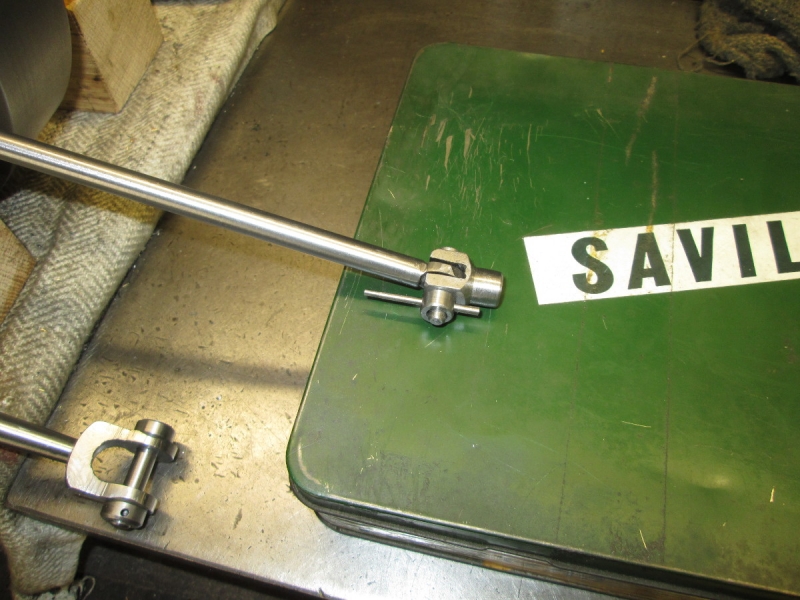
I have marked for the wrist pin and popped the rod in the lathe to scribe a PCD on the foot for the bolts.
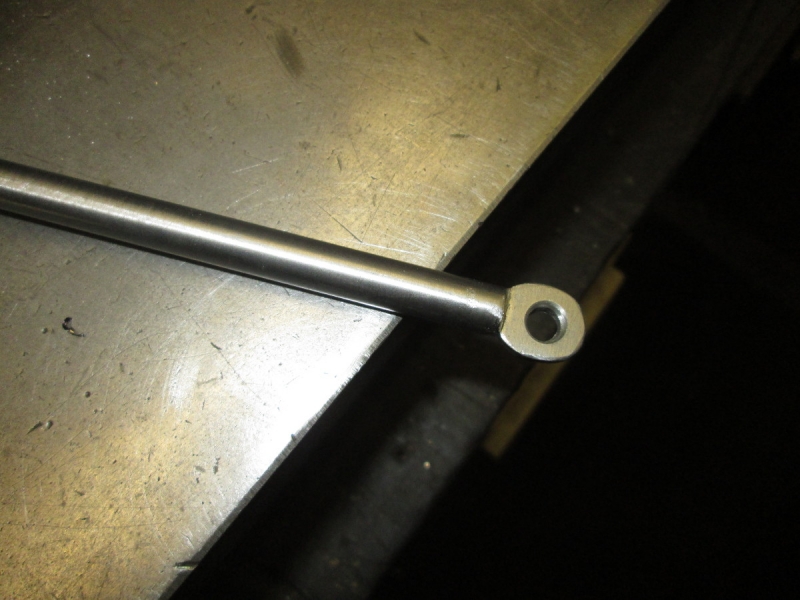
I drilled the end and spent a lot of time finishing the loop and making it pretty!
I sorted out two set screws and the 4BA tap and drilled the holes in the foot for clearance by hand.
This was perhaps the most ticklish job, getting the strap off the eccentric without breaking it. Because of its shape it has a couple of weak spots and I think you can see that even taking care, I distorted it a bit getting it off. With a bit of luck I can get it back to shape later!
First job was to start reducing the end of the rod to fit the clevis. I milled one flat on it and then milled a flat on the foot at the same setting as a register.
I used that flat to set up the other side of the clevis end parallel with the first.
I'm ready now for some careful marking out for the wrist pin hole and also the holes for the 4BA set screws that will fix the rod to the eccentric strap.
I have marked for the wrist pin and popped the rod in the lathe to scribe a PCD on the foot for the bolts.
I drilled the end and spent a lot of time finishing the loop and making it pretty!
I sorted out two set screws and the 4BA tap and drilled the holes in the foot for clearance by hand.
This was perhaps the most ticklish job, getting the strap off the eccentric without breaking it. Because of its shape it has a couple of weak spots and I think you can see that even taking care, I distorted it a bit getting it off. With a bit of luck I can get it back to shape later!
Stanley Challenger Graham
Stanley's View
scg1936 at talktalk.net
"Beware of certitude" (Jimmy Reid)
The floggings will continue until morale improves!
Stanley's View
scg1936 at talktalk.net
"Beware of certitude" (Jimmy Reid)
The floggings will continue until morale improves!
-
Stanley
- Global Moderator
- Posts: 90344
- Joined: 23 Jan 2012, 12:01
- Location: Barnoldswick. Nearer to Heaven than Gloria.
Re: SHED MATTERS 2
I got in the shed early this morning because I expected to be cut short by Susan's visit but she is poorly so I had a long morning!
First job was to start reducing the end of the rod to fit the clevis. I milled one flat on it and then milled a flat on the foot at the same setting as a register.
I used that flat to set up the other side of the clevis end parallel with the first.
I'm ready now for some careful marking out for the wrist pin hole and also the holes for the 4BA set screws that will fix the rod to the eccentric strap.
I have marked for the wrist pin and popped the rod in the lathe to scribe a PCD on the foot for the bolts.
I drilled the end and spent a lot of time finishing the loop and making it pretty!
I sorted out two set screws and the 4BA tap and drilled the holes in the foot for clearance by hand.
This was perhaps the most ticklish job, getting the strap off the eccentric without breaking it. Because of its shape it has a couple of weak spots and I think you can see that even taking care, I distorted it a bit getting it off. With a bit of luck I can get it back to shape later!
A bit of careful drilling and tapping! I had to ease the holes in the foot of the rod to get them to fit but managed that OK and fitted the strap to the rod, it was nice and square.
My next task is going to be to mill the excess metal off the foot to match the eccentric strap, so I gave my cutter a touch up. I want a nice easy cut when I get the rod under the cutter!
Closing time. I'm ready for trimming the foot. I put some tackle away, things were getting cluttered. I've managed to avoid several traps this morning, quite pleased with myself but aware we aren't out of the wood until the strap and rod are fitted on the eccentric. That's the first job tomorrow.....
Stanley Challenger Graham
Stanley's View
scg1936 at talktalk.net
"Beware of certitude" (Jimmy Reid)
The floggings will continue until morale improves!
Stanley's View
scg1936 at talktalk.net
"Beware of certitude" (Jimmy Reid)
The floggings will continue until morale improves!
-
Stanley
- Global Moderator
- Posts: 90344
- Joined: 23 Jan 2012, 12:01
- Location: Barnoldswick. Nearer to Heaven than Gloria.
Re: SHED MATTERS 2
I'm quite inordinately pleased about the valve rod. I went in to have a gloat this morning. Every now and again you get something just right and it's lovely......
Stanley Challenger Graham
Stanley's View
scg1936 at talktalk.net
"Beware of certitude" (Jimmy Reid)
The floggings will continue until morale improves!
Stanley's View
scg1936 at talktalk.net
"Beware of certitude" (Jimmy Reid)
The floggings will continue until morale improves!
-
Stanley
- Global Moderator
- Posts: 90344
- Joined: 23 Jan 2012, 12:01
- Location: Barnoldswick. Nearer to Heaven than Gloria.
Re: SHED MATTERS 2
This morning is free leccy of course and as you know it is my laundry and cooking day. However, I managed to get almost an hour in the shed for some very satisfactory progress.
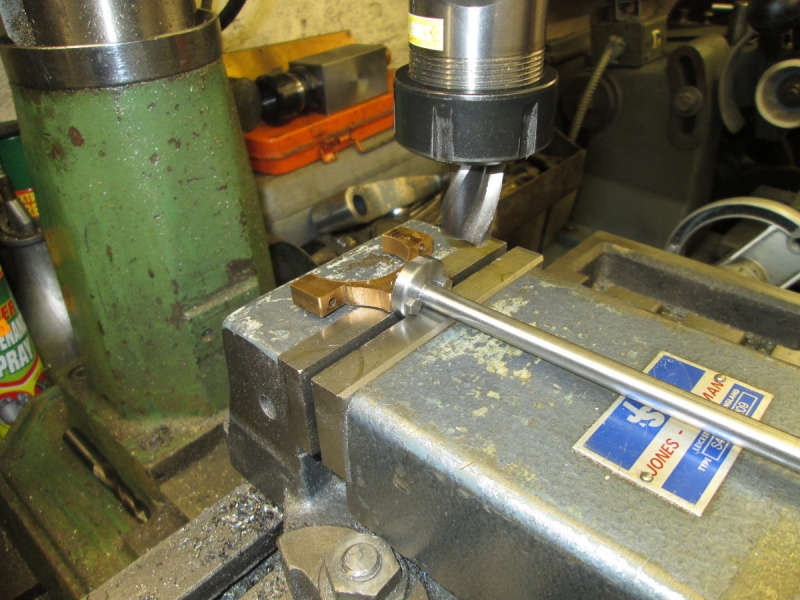
Today I want to finish and fit the valve rod and eccentric strap. First move is to very carefully mill off the excess of the foot until it is flush with the strap. The first side is relatively easy because I can use the excess on one side to hold the rod perfectly square while I mill the other side off. The only thing that can go wrong, (well, one of the only things!) is if the strap isn't mounted perfectly square on the foot and that depends on how well I made it. I'm happy to report that it was OK, I appear to have it mounted just right.
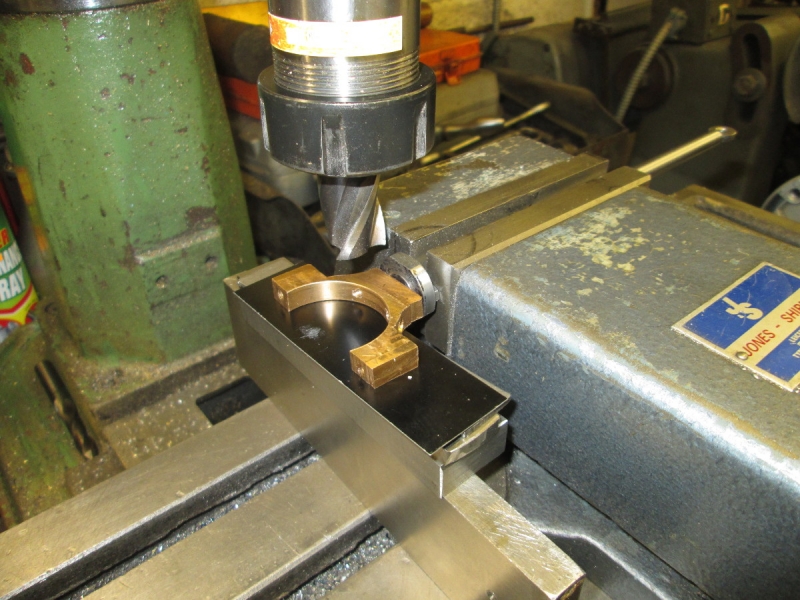
The other side isn't quite as easy to set up but I think you can see how I did it. Again, the foot cleaned up just as I was reaching the strap. Lovely! Then a bit of hand work tidying the fit up.
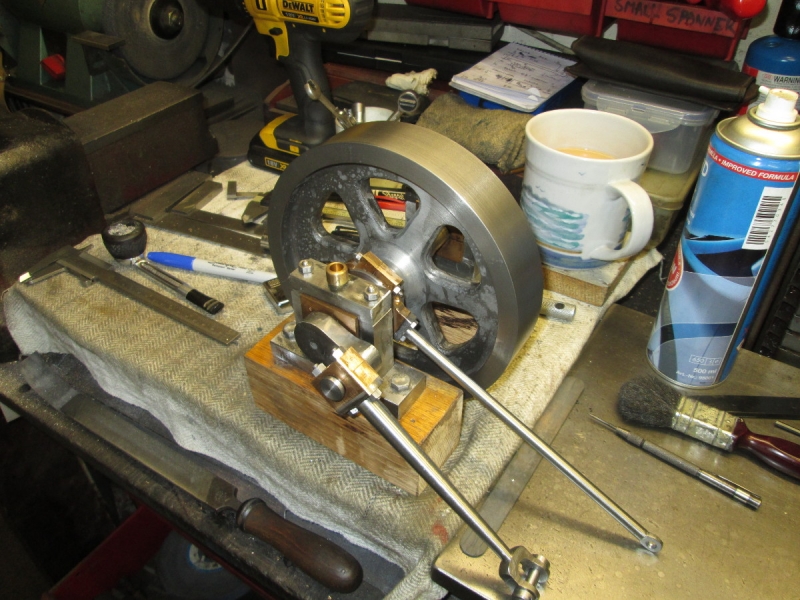
Accurate making and fitting showed up again as I fitted the rod. I had no problem lining the long studs up even though they are a very close fit in the strap. Not surprisingly, when I tightened it up it was solid on the eccentric, it has got distorted a touch with fitting the foot and bending it back to shape after it distorted. It was a close fit before but is binding now. No problem. I slackened the studs off and got some thin oil in it and then added a little bit of extra fine lapping paste and worked the strap on the eccentric until it came free, then tighten up a bit and repeat until I had the studs holding the strap together dead tight but still free. Then wash the bearing out with brake cleaner and lubricate with proper oil. The strap is a perfect fit on the eccentric, the rod is dead straight and it's as good a fit as anyone could want. Nice result, nice morning and tomorrow I'll make the clevis for the end of the valve rod and the wrist pin......
Today I want to finish and fit the valve rod and eccentric strap. First move is to very carefully mill off the excess of the foot until it is flush with the strap. The first side is relatively easy because I can use the excess on one side to hold the rod perfectly square while I mill the other side off. The only thing that can go wrong, (well, one of the only things!) is if the strap isn't mounted perfectly square on the foot and that depends on how well I made it. I'm happy to report that it was OK, I appear to have it mounted just right.
The other side isn't quite as easy to set up but I think you can see how I did it. Again, the foot cleaned up just as I was reaching the strap. Lovely! Then a bit of hand work tidying the fit up.
Accurate making and fitting showed up again as I fitted the rod. I had no problem lining the long studs up even though they are a very close fit in the strap. Not surprisingly, when I tightened it up it was solid on the eccentric, it has got distorted a touch with fitting the foot and bending it back to shape after it distorted. It was a close fit before but is binding now. No problem. I slackened the studs off and got some thin oil in it and then added a little bit of extra fine lapping paste and worked the strap on the eccentric until it came free, then tighten up a bit and repeat until I had the studs holding the strap together dead tight but still free. Then wash the bearing out with brake cleaner and lubricate with proper oil. The strap is a perfect fit on the eccentric, the rod is dead straight and it's as good a fit as anyone could want. Nice result, nice morning and tomorrow I'll make the clevis for the end of the valve rod and the wrist pin......
Stanley Challenger Graham
Stanley's View
scg1936 at talktalk.net
"Beware of certitude" (Jimmy Reid)
The floggings will continue until morale improves!
Stanley's View
scg1936 at talktalk.net
"Beware of certitude" (Jimmy Reid)
The floggings will continue until morale improves!
-
Stanley
- Global Moderator
- Posts: 90344
- Joined: 23 Jan 2012, 12:01
- Location: Barnoldswick. Nearer to Heaven than Gloria.
Re: SHED MATTERS 2
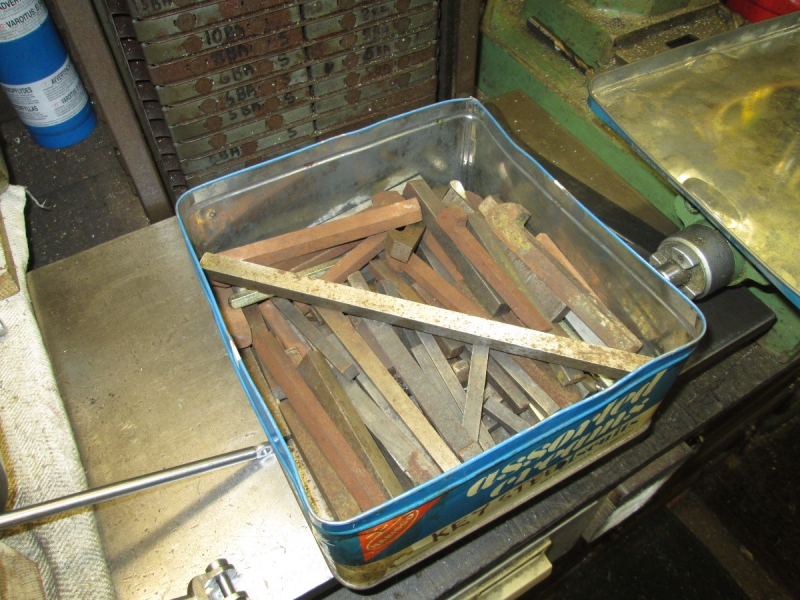
Today is clevis day.... I wanted some 1/2" stock and so went straight into the key steel box.
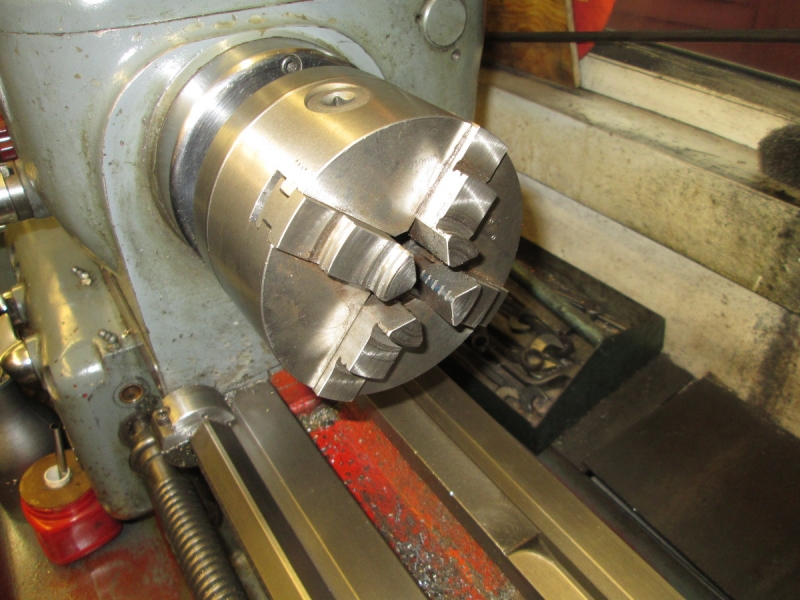
Square stock means the 4 jaw, you (you can't ever have too many chucks!) so that meant a chuck change and of course, being Stanley, a bit of displacement activity was indicated so I cleaned Mrs Harrison.
It didn't take long to knock out a shape, drill it and tap it 1/4" x 26tpi, don't forget that a 1/4" BSF is exactly the same..... Then I parted it off....
Just a quick check that it fits and looks OK then on to cutting the slot for the end of the valve rod.
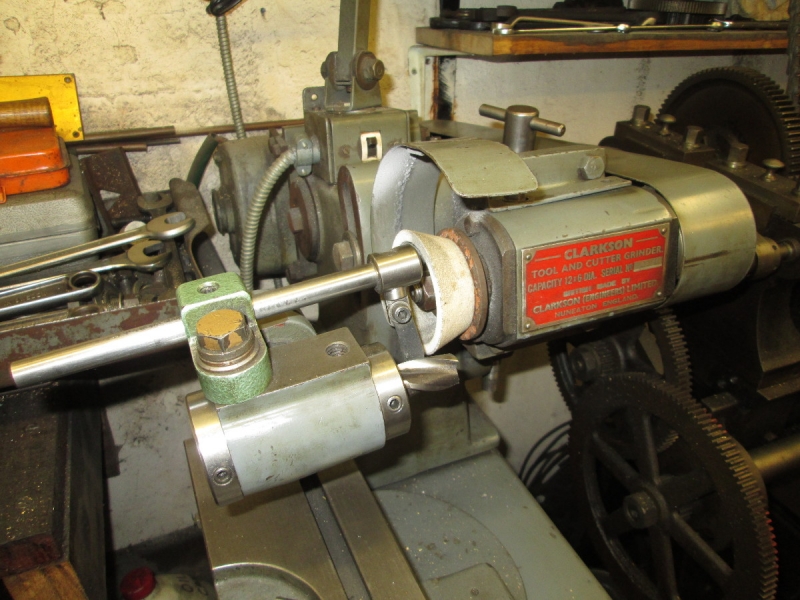
I decided on a 3/16" slot drill, turned the wick up on the VM to 1600rpm and started some careful cuts. It all went well for a while and then I started to get some serious vibrations as I got deeper.
I thought it might be a blunt cutter so I popped it into the T&C grinder and gave it a touch up. No different so I dropped the speed to 1400rpm but no improvement. Time for a rethink as it was obvious I was heading for a broken cutter, whatever the reason.
Into the vice, two hacksaw cuts. This brought me into the drilling for the rod and so I broke the excess out with a hammer and screwdriver (I know! But it fitted nicely.) and started cleaning up with a succession of small files. It was knocking off time so I'll finish the slot tomorrow and make the 3/16" pin. Thinking back, the reason for my mill problems was the fact that this is key steel. It's a bit better than normal stock and is tough stuff. Far better to go onto hand work than break a perfectly good cutter! On the bright side it will make a better clevis!
Stanley Challenger Graham
Stanley's View
scg1936 at talktalk.net
"Beware of certitude" (Jimmy Reid)
The floggings will continue until morale improves!
Stanley's View
scg1936 at talktalk.net
"Beware of certitude" (Jimmy Reid)
The floggings will continue until morale improves!
-
Stanley
- Global Moderator
- Posts: 90344
- Joined: 23 Jan 2012, 12:01
- Location: Barnoldswick. Nearer to Heaven than Gloria.
Re: SHED MATTERS 2
First part of the morning was finishing filing out the slot in the clevis and making sure it fitted the loop on the end of the rod, I had to modify that a bit as well to get enough swing. I think I've done enough but can always adjust it again when I get to the point of actually fitting it. Once I was sure I had it right I marked the clevis for drilling for the pin.
I drilled it and de-burred each side. It looks about right! Then some careful measuring to get the sizes for the pin, find some 1/2" stock and get into Mrs Harrison!
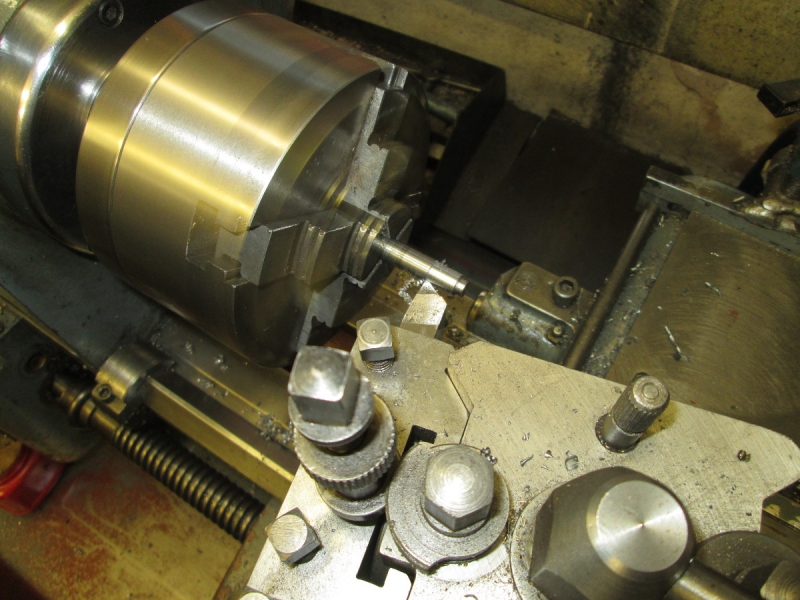
Then some careful turning..... I honed the cutter to make sure it was sharp.
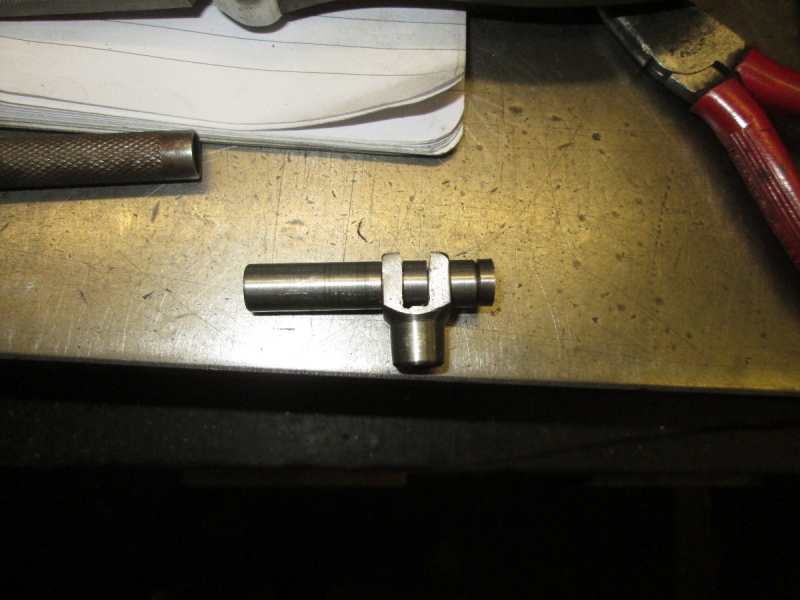
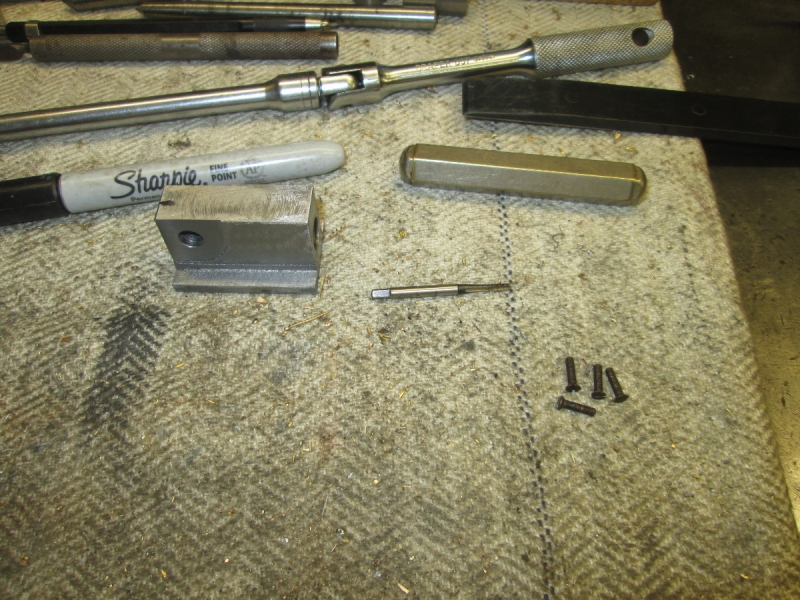
Some time later...... I have made the pin and the collar. I've also made a spacer to go inside the clevis and a dummy for the end of the pin.
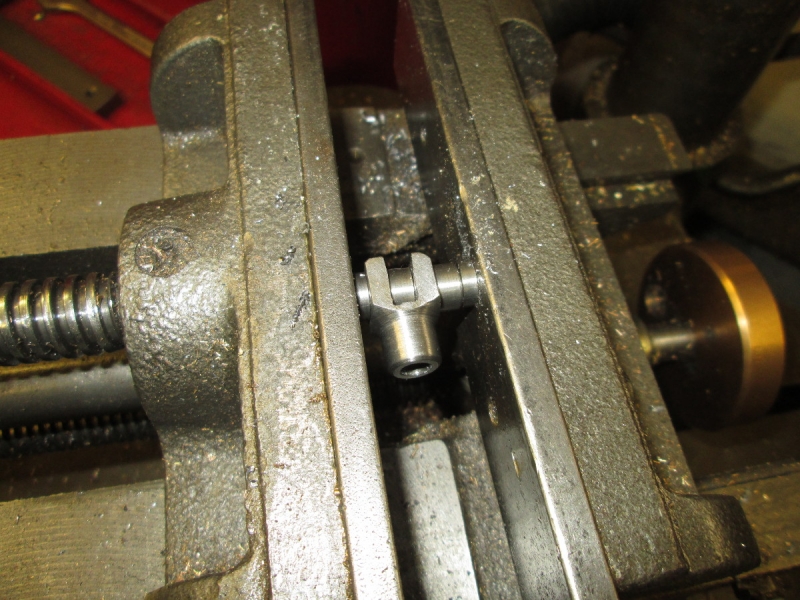
Here's the set up in the vise on the pillar drill. The spacer stops the clevis being crushed as I grip the pin and the small dummy on the end gives clearance for the end of the pin and ensures that the collar is firmly pressed up against the clevis and securely held while I drill for the taper pin.
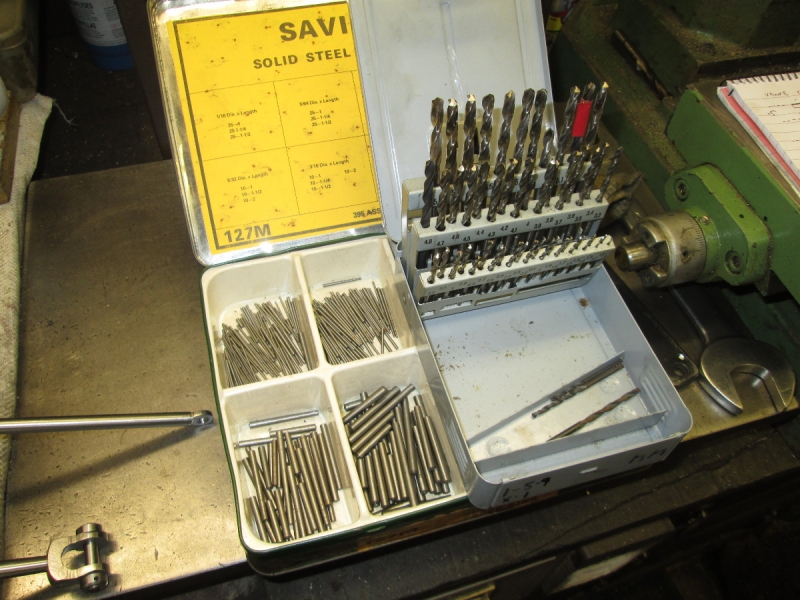
Out with the taper pins and the metric drills. Just to remind you, I cheat! I don't ream the hole for the taper, I simply measure the diameter part of the way down the pin and drill for that. When the pin is driven in it will grab hold and never move!
Here we are at closing time. The pin is just pushed into the hole and can be cut to length later after it has been finally driven in. In case you're wondering, I never get the hole truly central and there is only one orientation where the pin slides in nicely but as long as it is somewhere near that doesn't bother me. Apart from anything else my eyes aren't good enough to be chasing ultimate accuracy!
I drilled it and de-burred each side. It looks about right! Then some careful measuring to get the sizes for the pin, find some 1/2" stock and get into Mrs Harrison!
Then some careful turning..... I honed the cutter to make sure it was sharp.
Some time later...... I have made the pin and the collar. I've also made a spacer to go inside the clevis and a dummy for the end of the pin.
Here's the set up in the vise on the pillar drill. The spacer stops the clevis being crushed as I grip the pin and the small dummy on the end gives clearance for the end of the pin and ensures that the collar is firmly pressed up against the clevis and securely held while I drill for the taper pin.
Out with the taper pins and the metric drills. Just to remind you, I cheat! I don't ream the hole for the taper, I simply measure the diameter part of the way down the pin and drill for that. When the pin is driven in it will grab hold and never move!
Here we are at closing time. The pin is just pushed into the hole and can be cut to length later after it has been finally driven in. In case you're wondering, I never get the hole truly central and there is only one orientation where the pin slides in nicely but as long as it is somewhere near that doesn't bother me. Apart from anything else my eyes aren't good enough to be chasing ultimate accuracy!
Stanley Challenger Graham
Stanley's View
scg1936 at talktalk.net
"Beware of certitude" (Jimmy Reid)
The floggings will continue until morale improves!
Stanley's View
scg1936 at talktalk.net
"Beware of certitude" (Jimmy Reid)
The floggings will continue until morale improves!