Shed Matters 3

Post Reply
User avatar
Stanley
Global Moderator
Global Moderator
Posts: 90301
Joined: 23 Jan 2012, 12:01
Location: Barnoldswick. Nearer to Heaven than Gloria.

Re: Shed Matters 3

Post by Stanley »

Image

Image

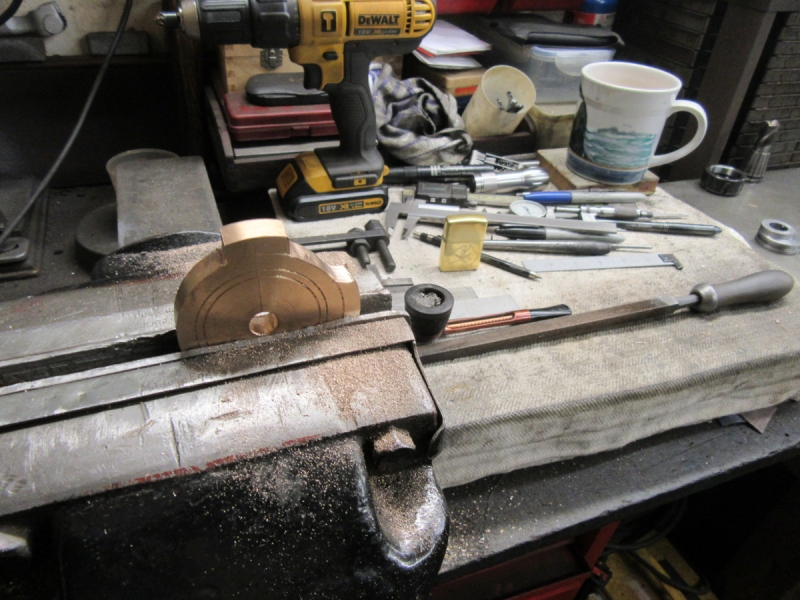
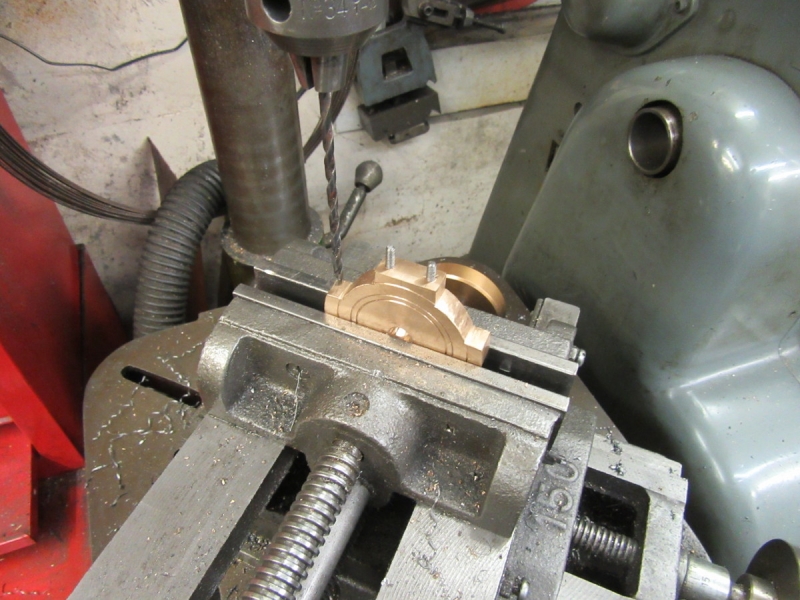
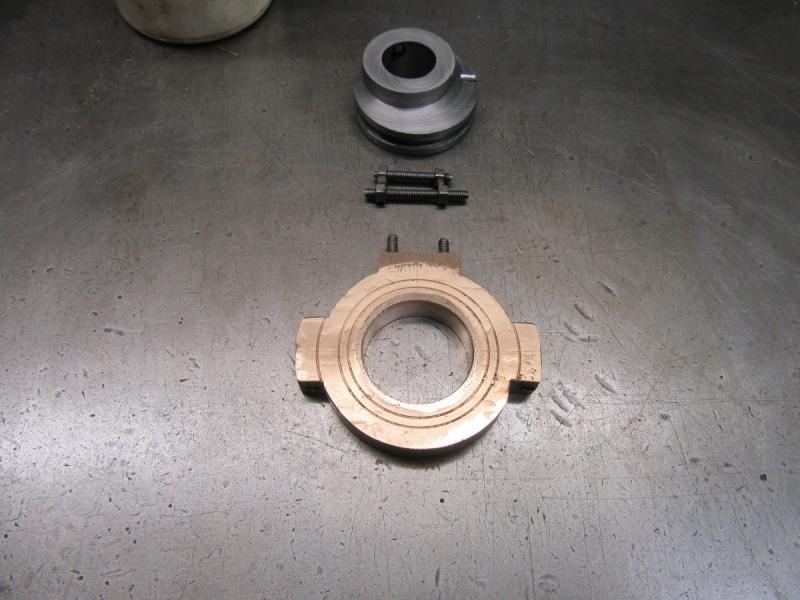
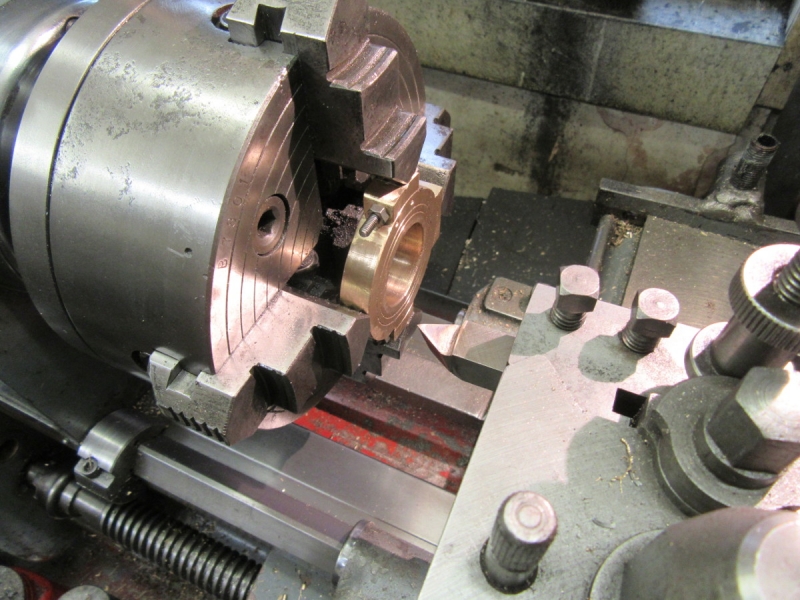
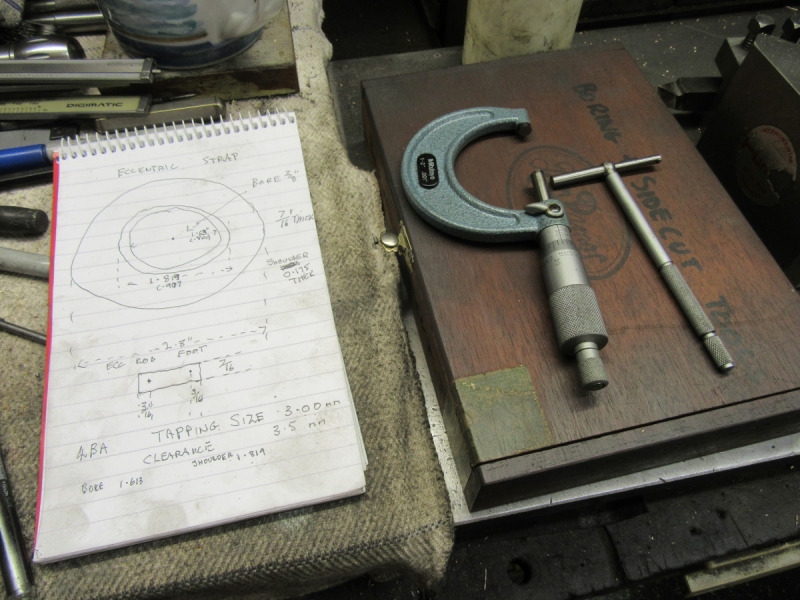
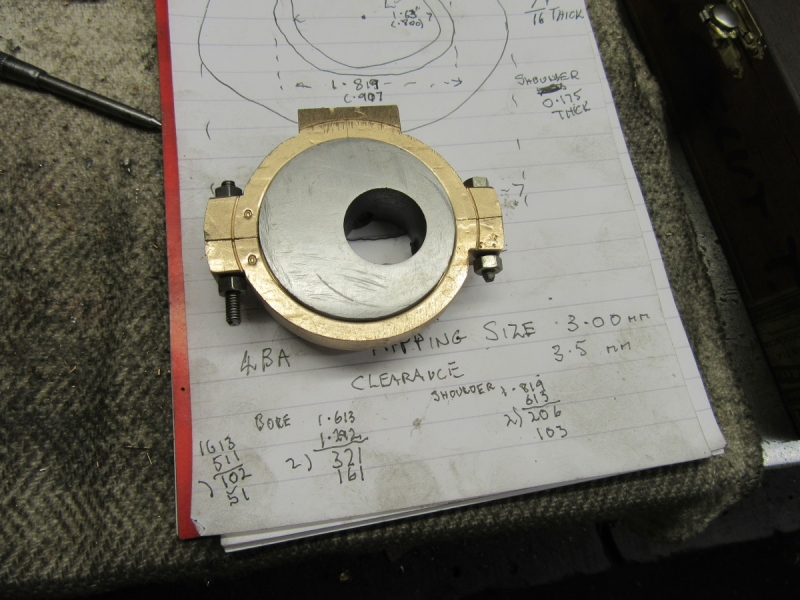
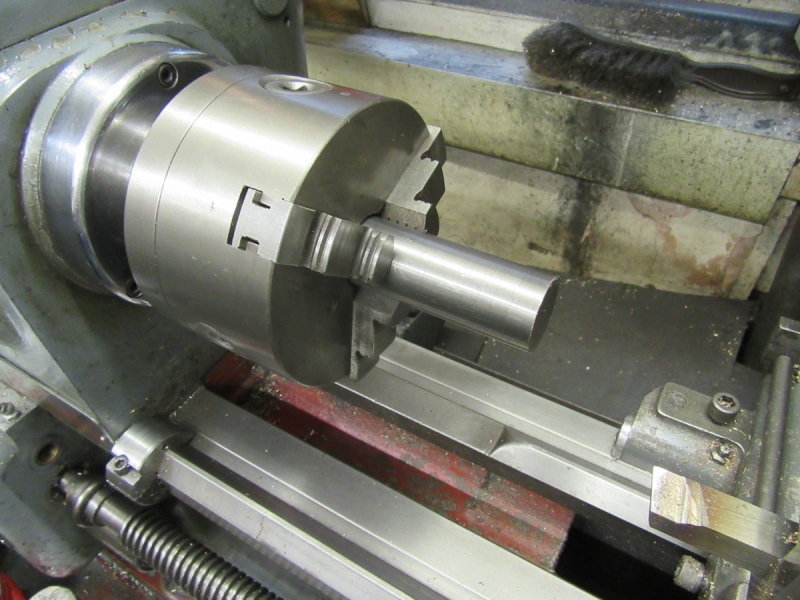
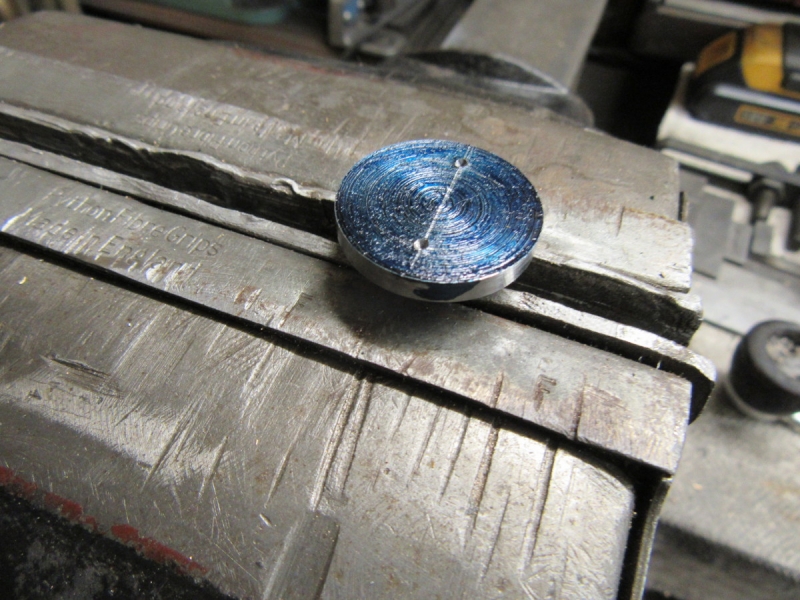
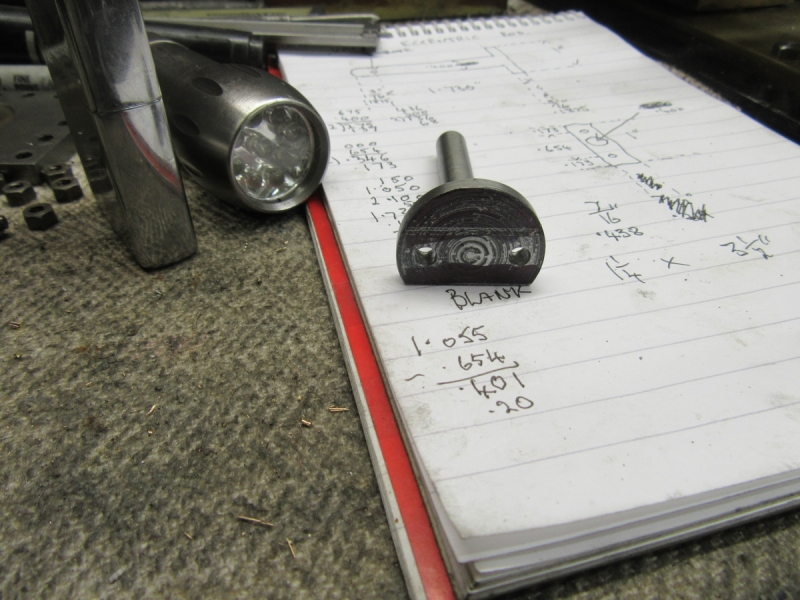
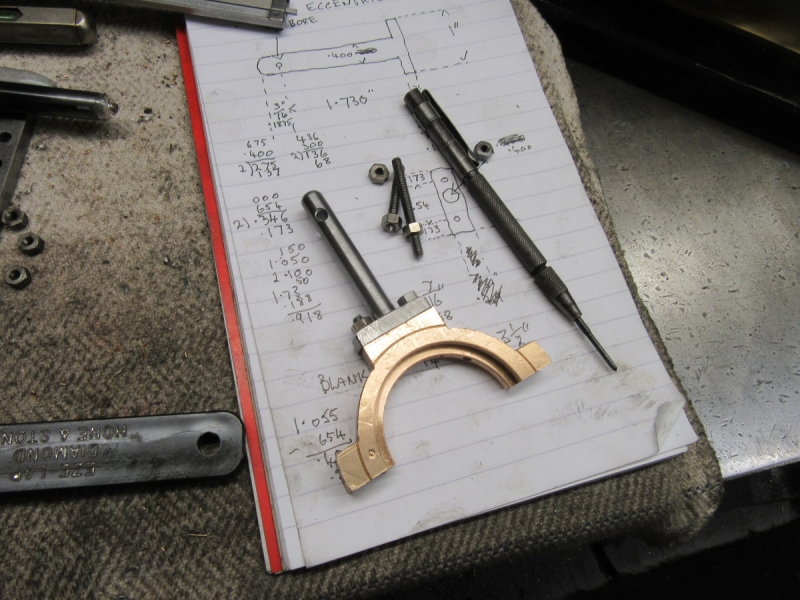
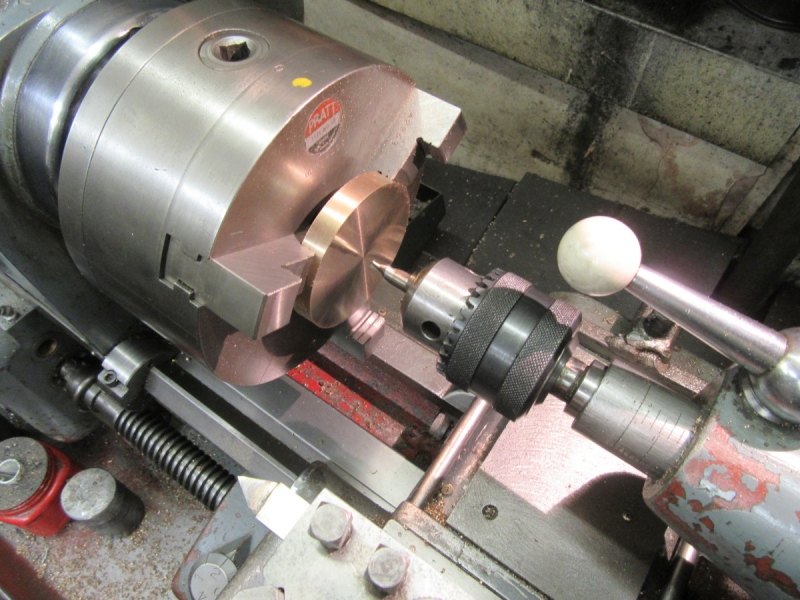
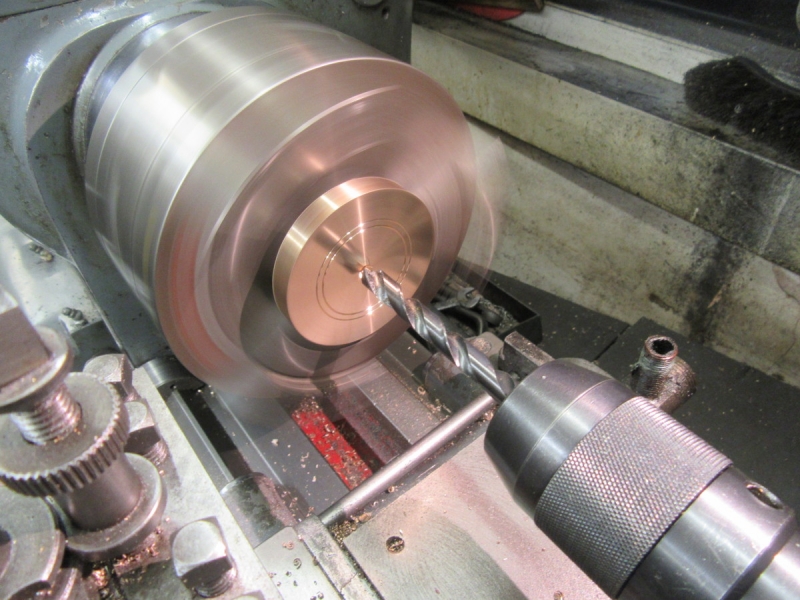
I've done my thinking overnight and realised that I need a 3/8" hole in the centre so I can mount the blank on the rotary table. I also need circles marking for the bore, the cut back and the limit of the outside cuts to get the shape. In case you're wondering I forgot the latter but went back to do it. Before I did this marking I had to do some careful measuring. If you're with me you'll realise that when I split the strap the bores will need doing again because they will have shrunk because of the cut but I will still have my marker.

Image

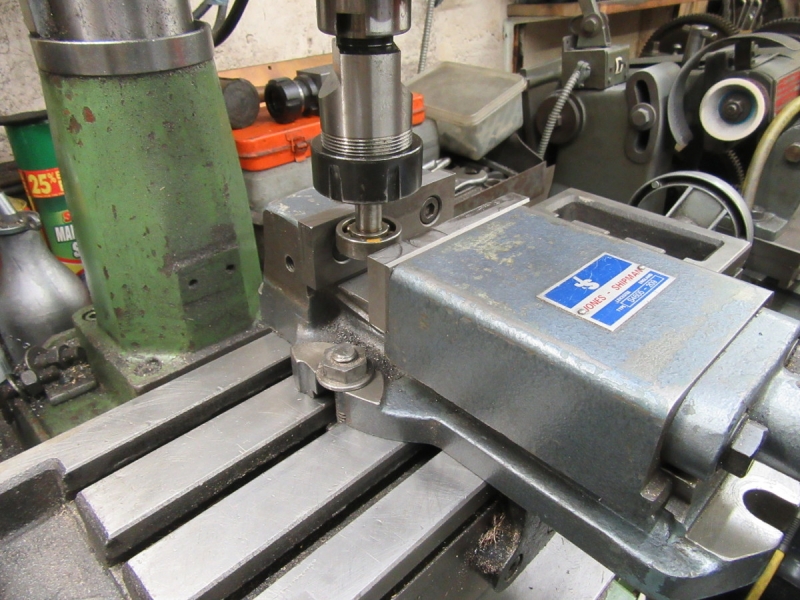
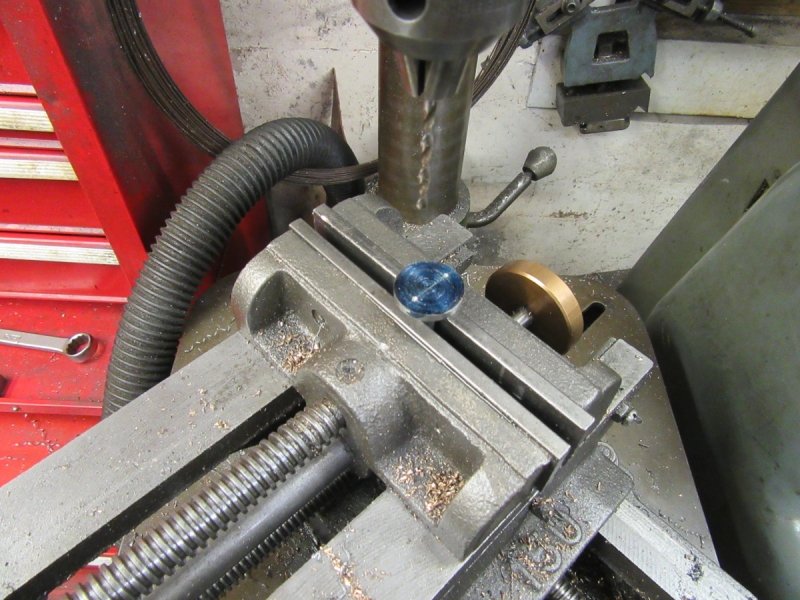
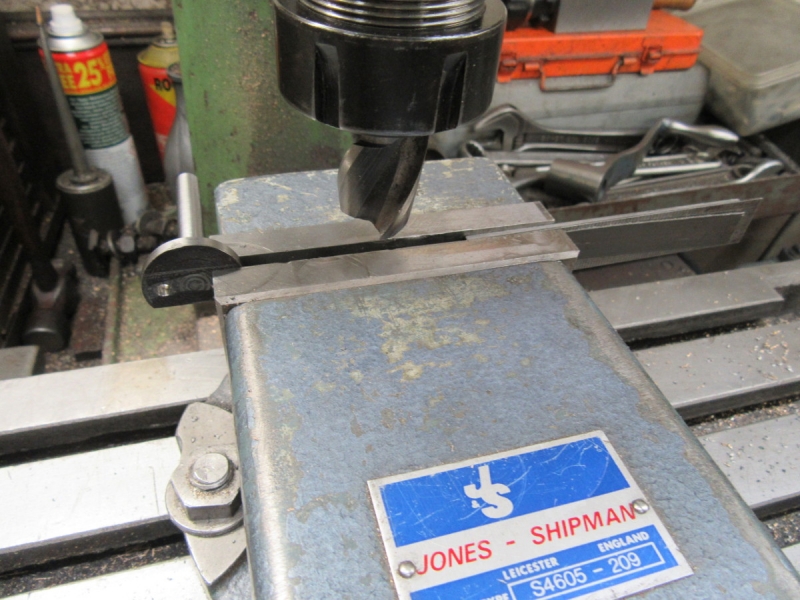
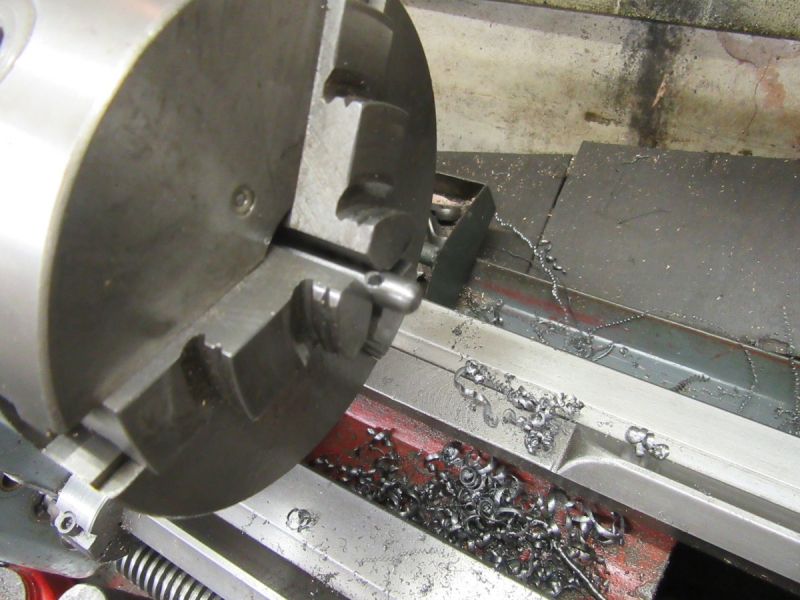
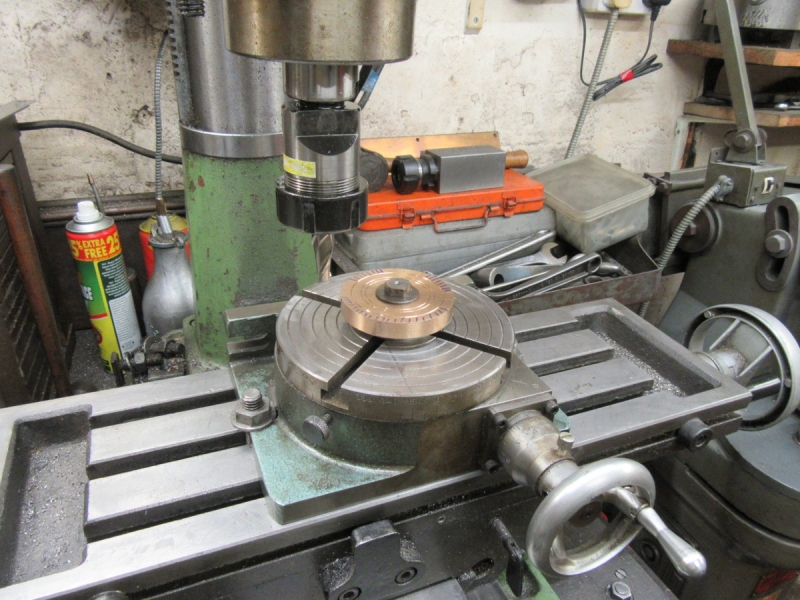
Next I put the rotary table up and found the centre and locked the sideways movement. (I can never remember whether it's X or Y!)

Image

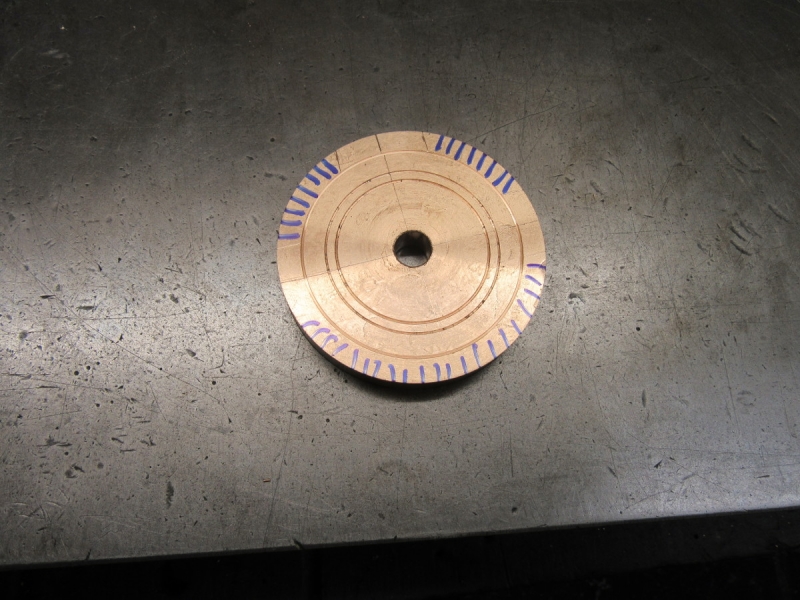
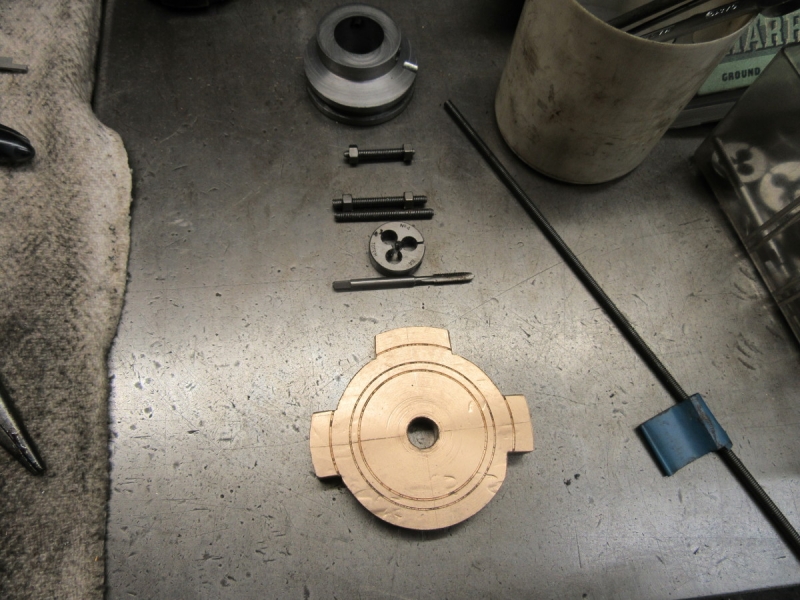
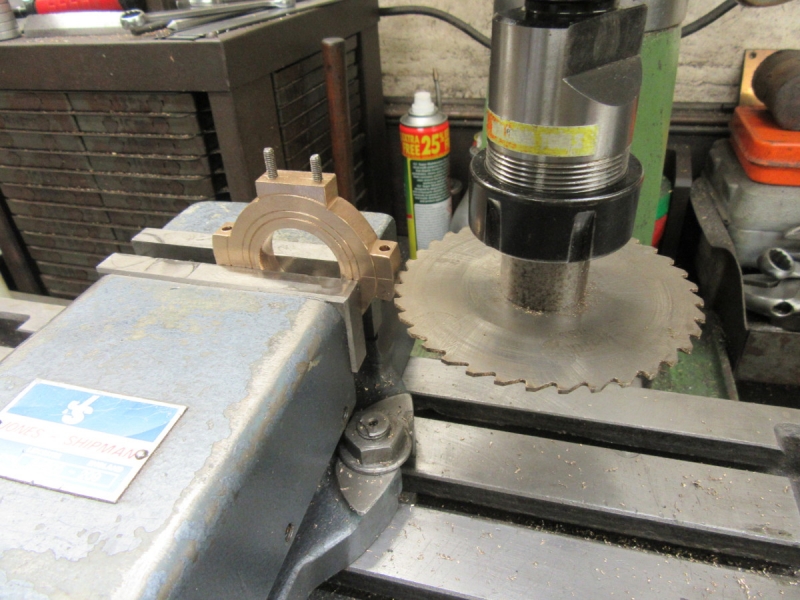
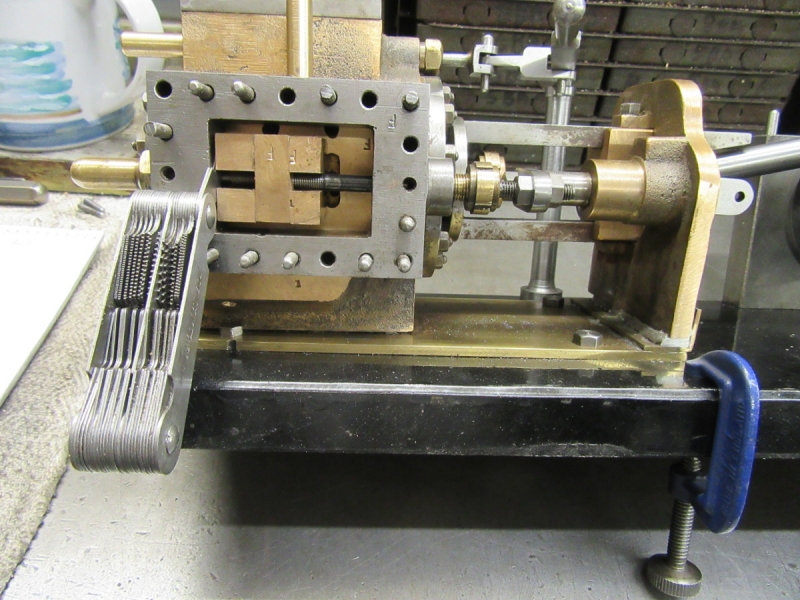
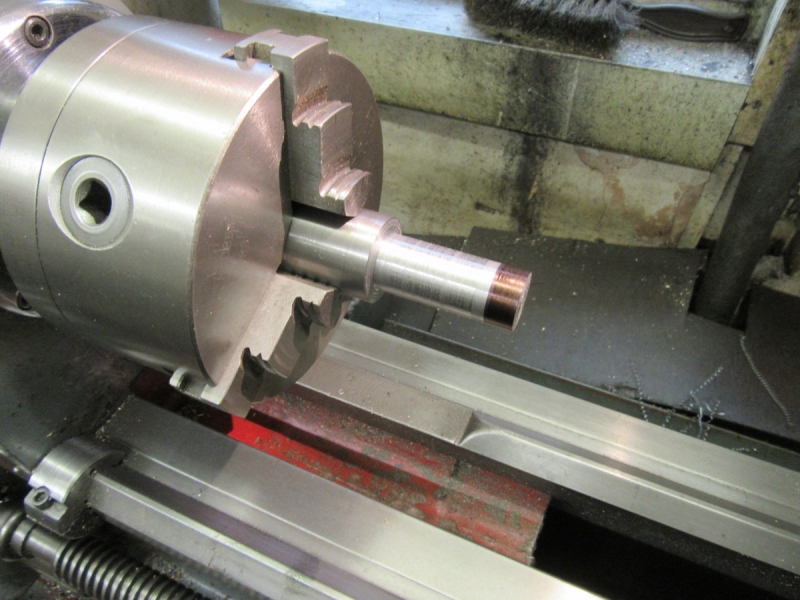
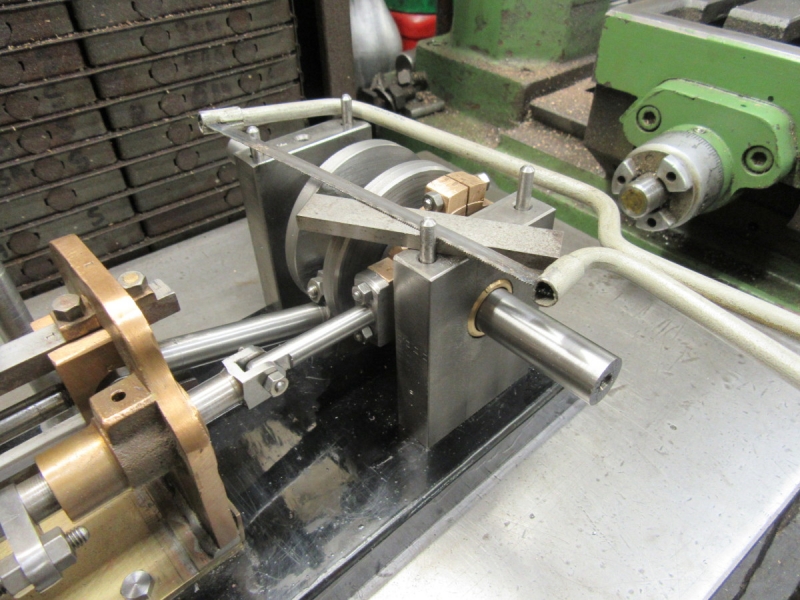
Some careful measuring and marking and I hatched the metal that needs to come out.

Image

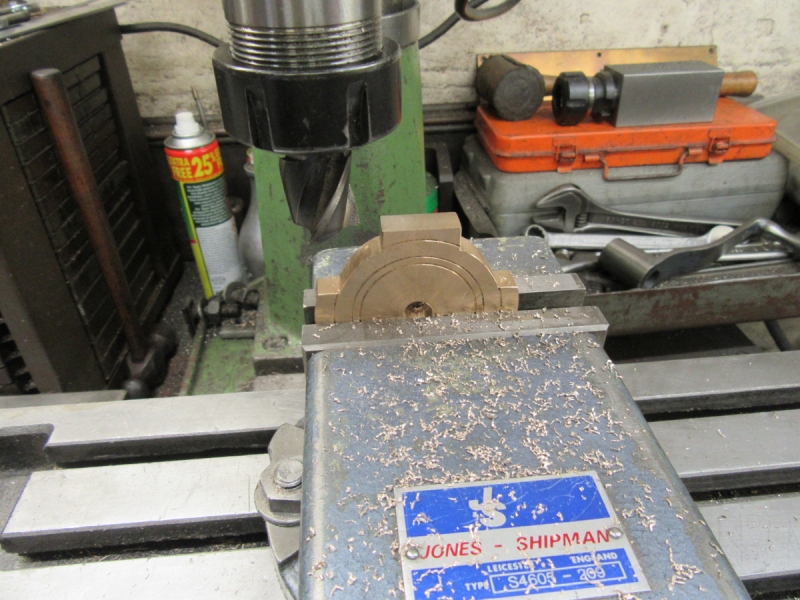
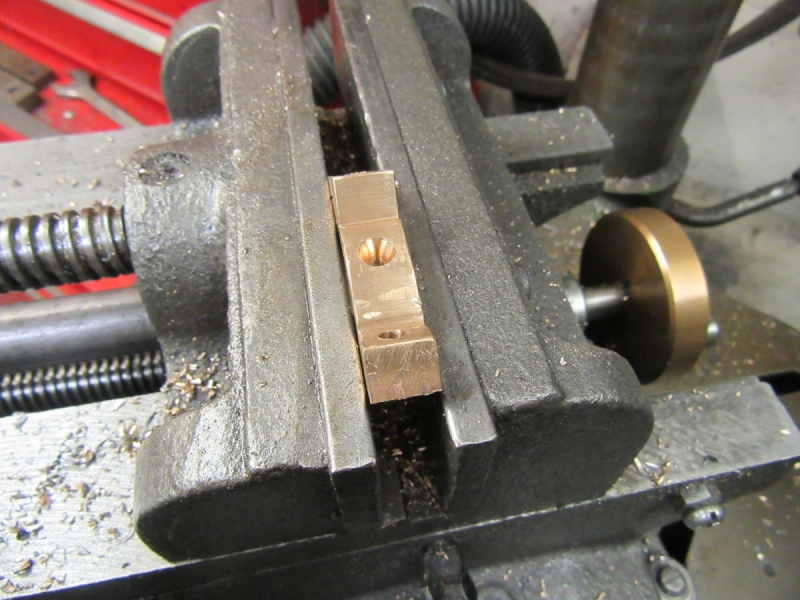
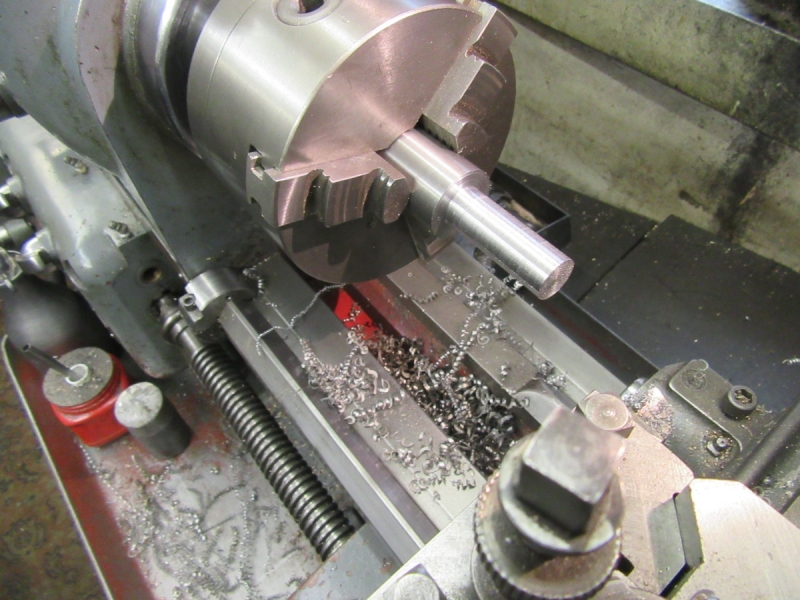
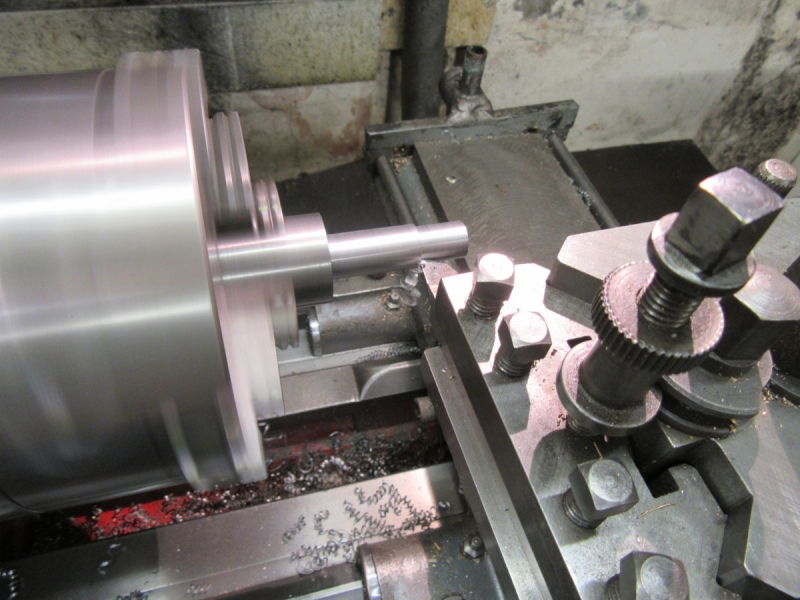
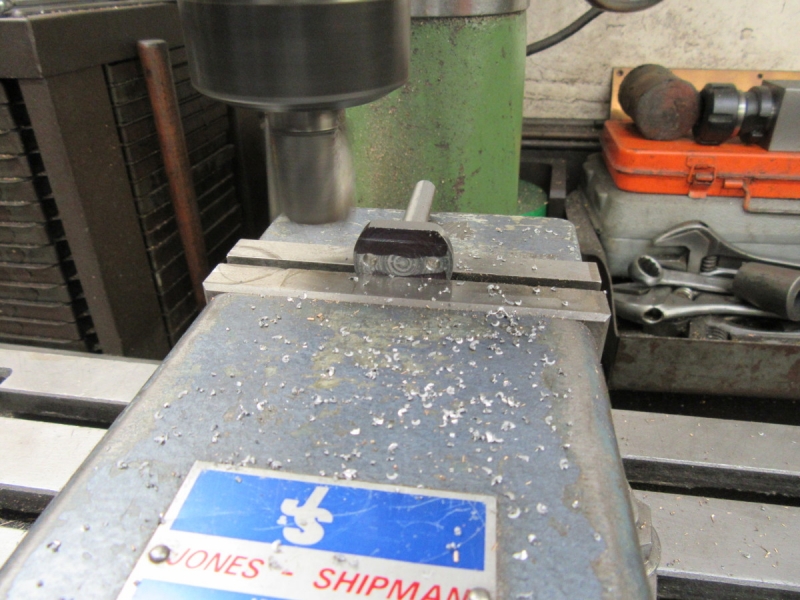
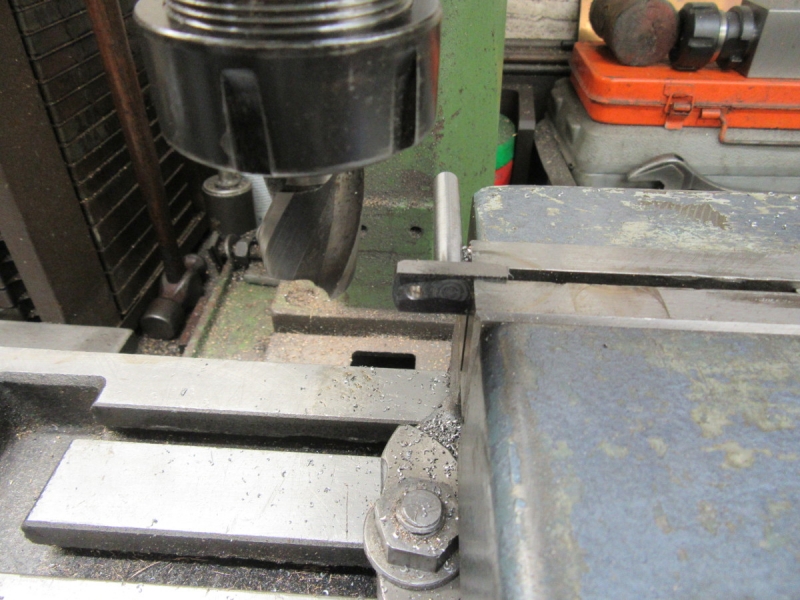
I found a sharp cutter for the side milling, put the speed of the spindle up to 1400rpm and started some careful cutting. What we are doing is taking the meat out and leaving a tidy concentric edge. I shall have to finish the ends of the cuts out by hand, the only way I can get them square.

Image

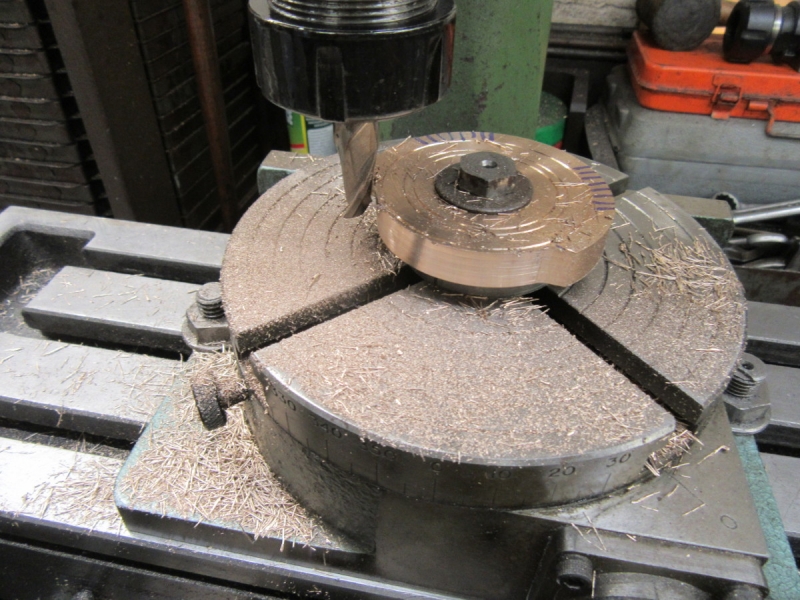
Then some careful patient cutting, needle sharp chips spraying all over the place!

Image

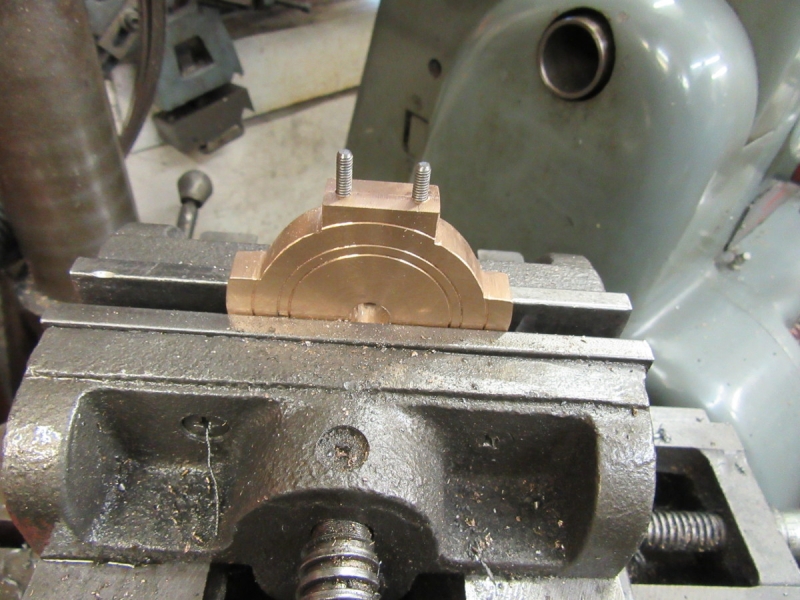
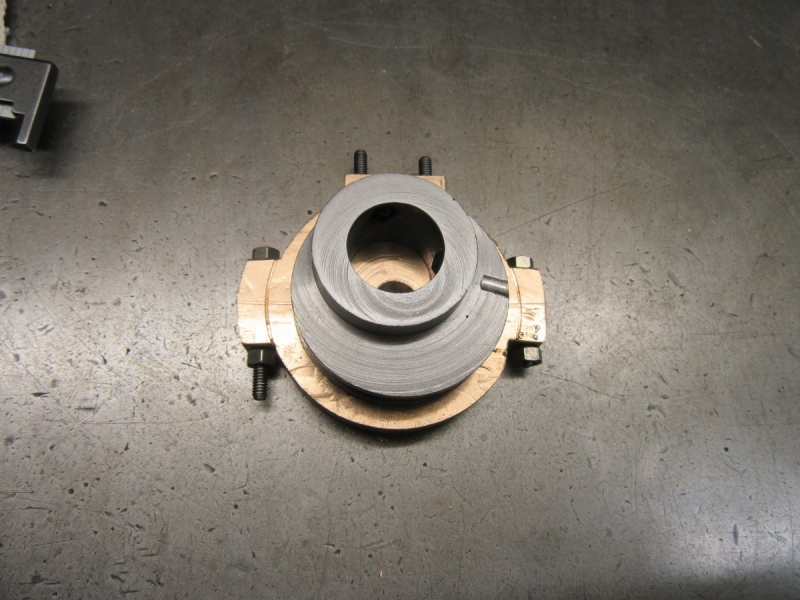
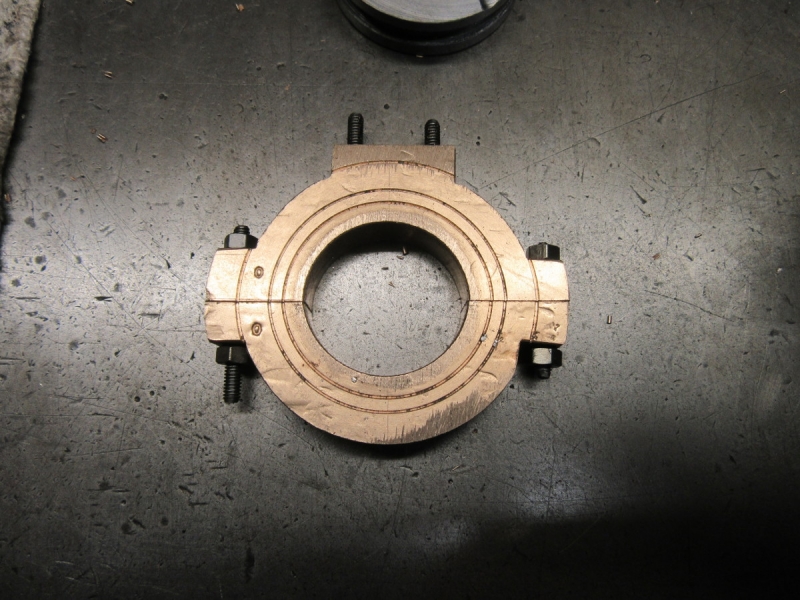
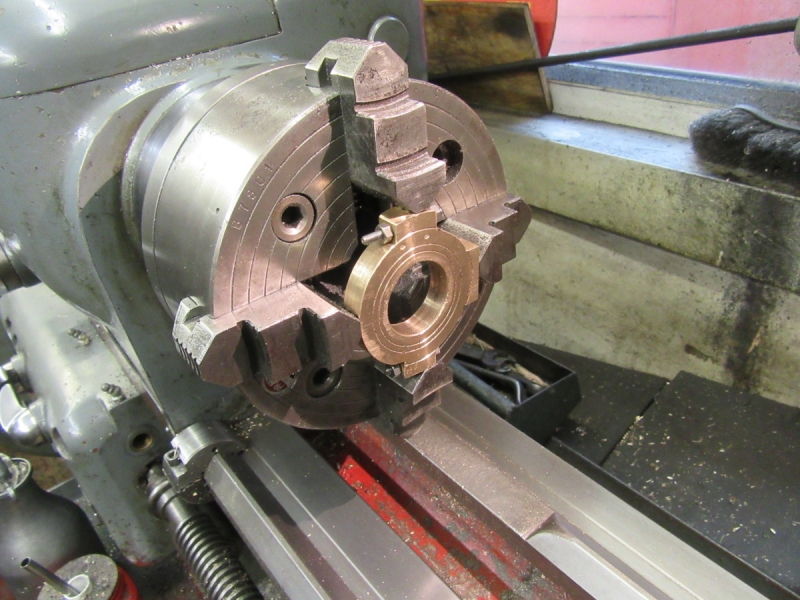
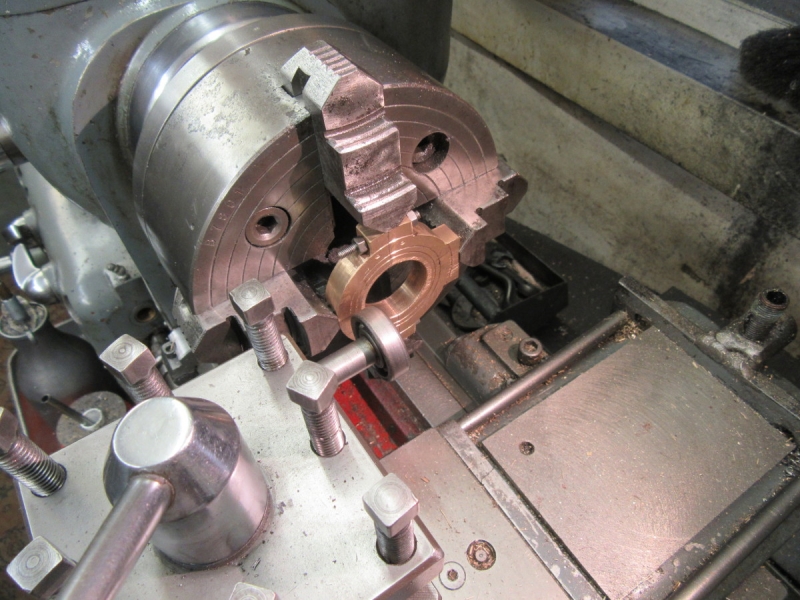
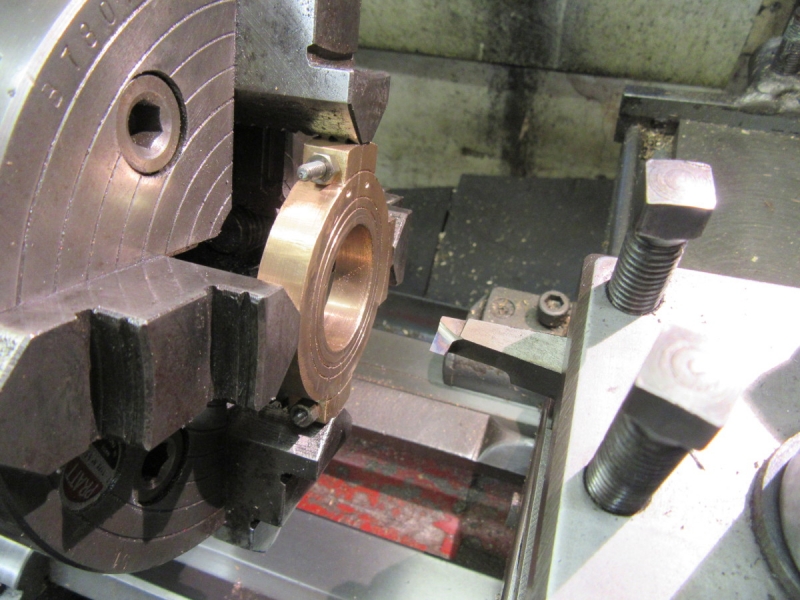
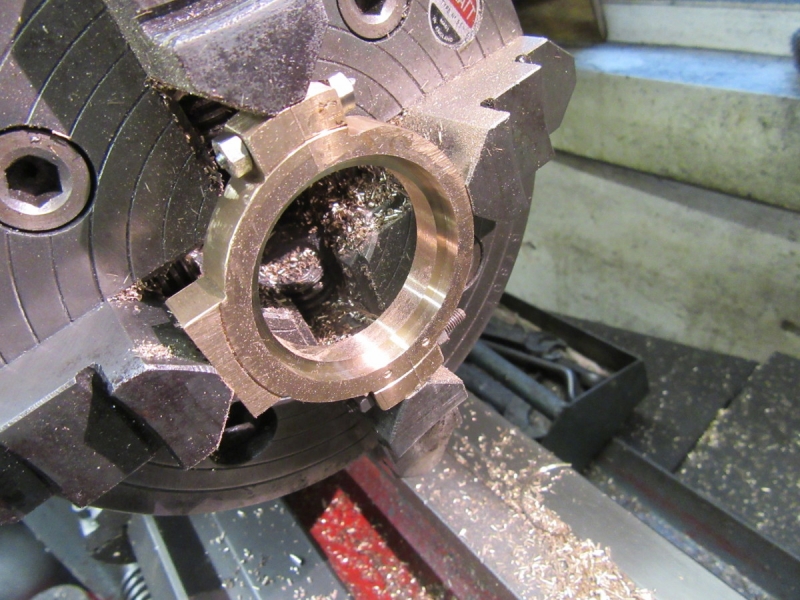
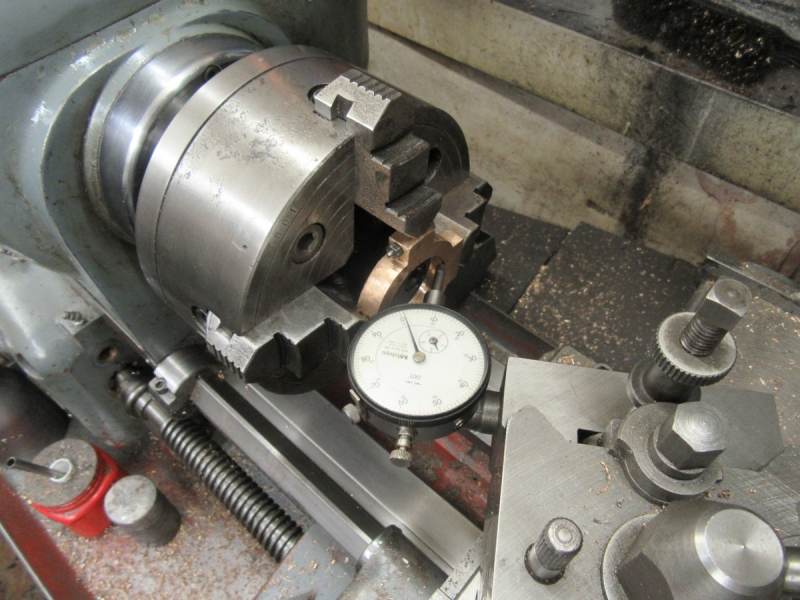
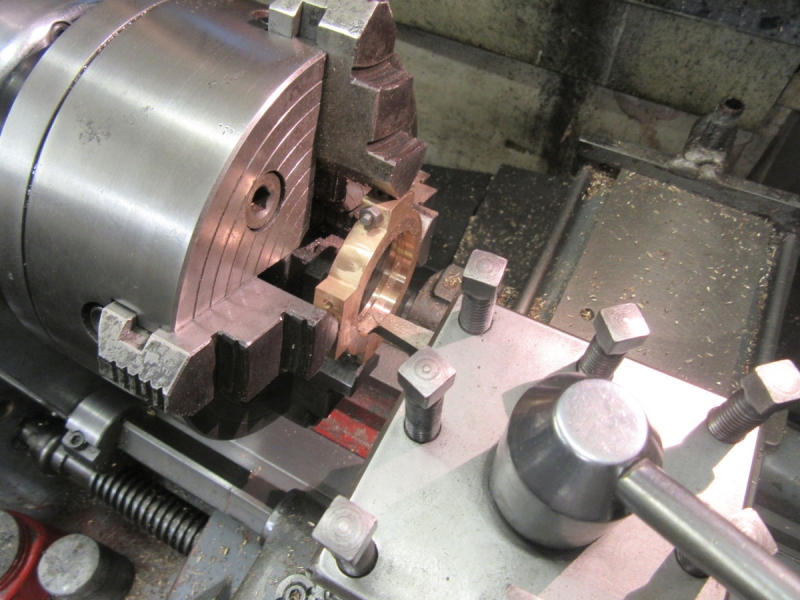
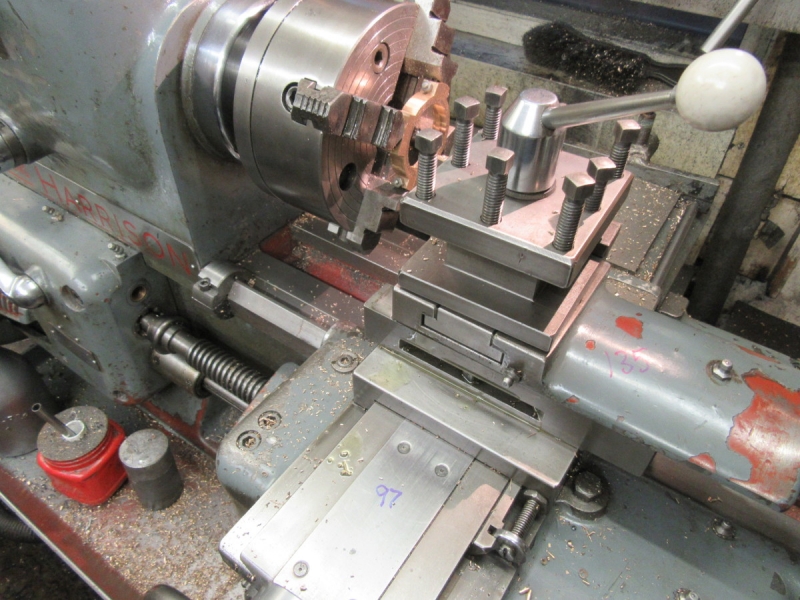
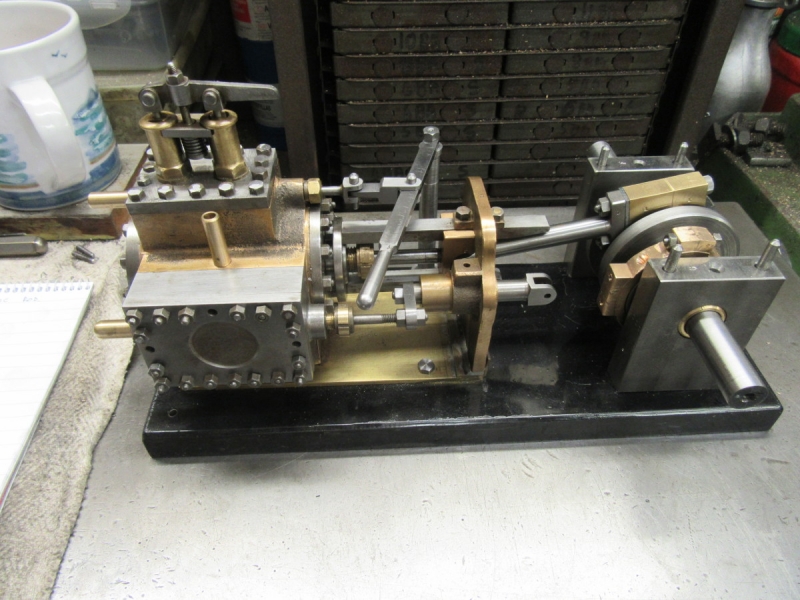
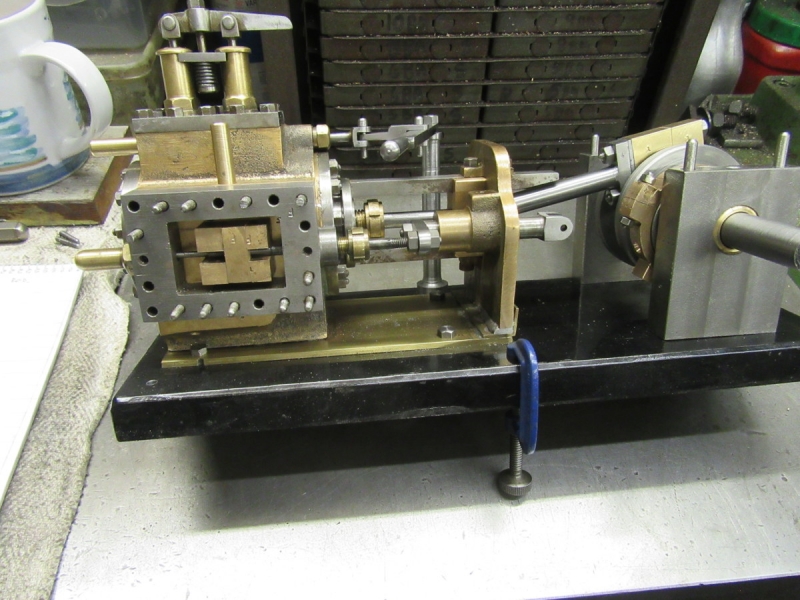
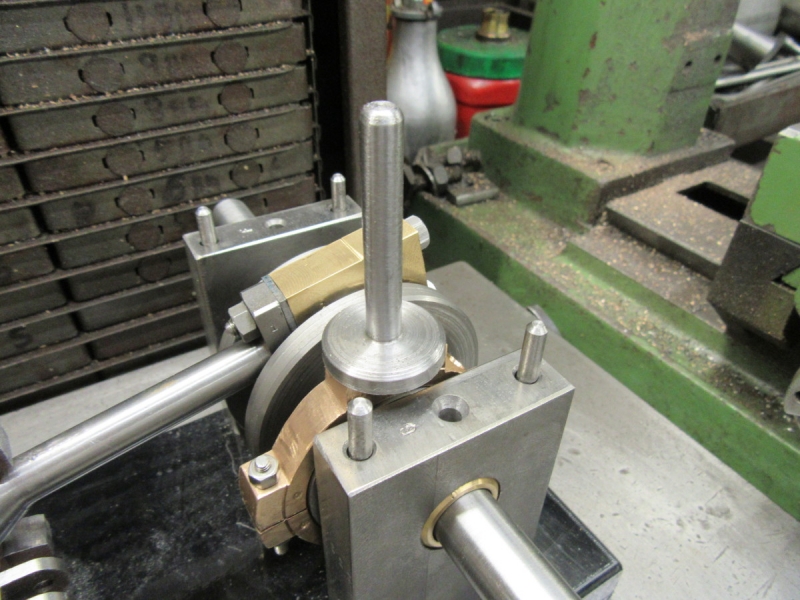
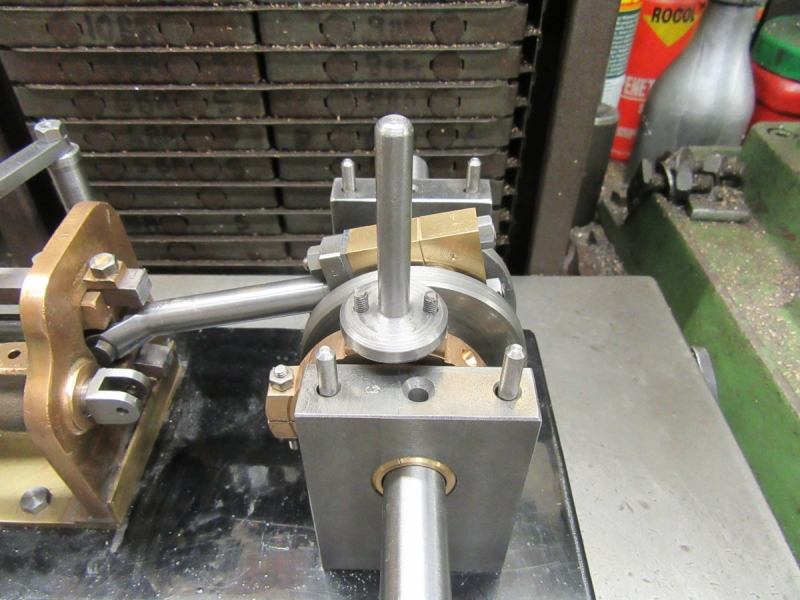
Some time later here's where we are. No slip ups, we are ready for boring the centre out, splitting the stock, squaring my edges and then of course installing the clamp bolts and re-finishing the bores. That's for tomorrow.

Image

I put some stuff away, had a chip chase and then vacuumed the floor, it was covered with brass chips. Tomorrow I'll finish getting sorted and go forwards with the strap.
Stanley Challenger Graham
Stanley's View
scg1936 at talktalk.net

"Beware of certitude" (Jimmy Reid)
The floggings will continue until morale improves!
User avatar
Stanley
Global Moderator
Global Moderator
Posts: 90301
Joined: 23 Jan 2012, 12:01
Location: Barnoldswick. Nearer to Heaven than Gloria.

Re: Shed Matters 3

Post by Stanley »

Image

The first hour of the morning was lots of careful hand work squaring the rounded corners up and breaking all the edges. No other way of doing it.

Image

Once I had the blank somewhere near tidy (I don't claim it's perfect, my eyesight won't allow perfect accuracy) I decided on 4BA for the studs and the joint bolts and sorted out my studs and nuts, the die and a tap. I ran the die down all the studding to make sure the threads were good and allowed nuts to be screwed on easily with fingers.

Image

Next job was to install the vise on the VM and tram it in. Then alter the belts on the VM to get the speed back to 530rpm.

Image

You won't be surprised to see that the next thing I did before fitting the cutter again was to get it in the T&C grinder and make sure it had a perfect edge.

Image

Then I put a flat on the large foot that will carry the valve rod. No need to do anything about the lugs where the split will run, it doesn't matter if they carry the original curve.

Image

My last blow that took me up to knocking off time was to get under the pillar drill and drill, tap and fit the 4BA studs that will attach the valve rod to the strap. Now I can sit back and have a bit of a think about where we go next. I think I have it clear but will go over it to make sure I am not making a mistake, far too easy to do if you just keep crashing on. I know, I've made all the mistakes!
Stanley Challenger Graham
Stanley's View
scg1936 at talktalk.net

"Beware of certitude" (Jimmy Reid)
The floggings will continue until morale improves!
User avatar
Stanley
Global Moderator
Global Moderator
Posts: 90301
Joined: 23 Jan 2012, 12:01
Location: Barnoldswick. Nearer to Heaven than Gloria.

Re: Shed Matters 3

Post by Stanley »

Image

The strap was still in the vise under the pillar drill and I had a long series drill that is very close to the 3.5mm clearance I need for the connecting bolts. That was lucky!

Image

Here's where we are, now we need to shift a bit of meat out of the centre. I changed the big 3 Jaw chuck for a smaller one, I think I can get away with it.....

Image

I had to use a small washer for a spacer under one jaw and got it very close. It doesn't need to be completely concentric, this is a muck-shifting operation!

Image

I used a succession of drills up to inch and a quarter and took the centre out of it.

Image

Next, under the VM with a 1/16" thick slitting saw and do both cuts. I'll say it again, I wasn't wasting my time when I had the big HM cutter sharpening fest! It whistled through the strap.

Image

Here's where we ended up. Notice I have put two witness marks on the halves so that I have a register when I have cut the other marks out.

Image

Image

The three jaw won't do now so I put Johnny's 4 jaw on and fiddled a set up. You'll see that in the second pic I have a point tool in. I shall use that against the original concentric marks to get the set up right. This will work even though the marks are no longer perfect circles because of the saw cuts, they are still accurate along the line of the cuts. Actually it doesn't matter if I am a touch out of centre because that won't affect the way the eccentric works if you think about it as long as it is somewhere near and the two bores, one for the groove and the others for the exterior of the eccentric, are accurate and a good fit. I'll check the measurements before I start boring.
That's it for a couple of days, tomorrow I have a set off to visit my old haunts in Stockport and on Friday I am at the hospital all day for tests...... Deep Joy!
Stanley Challenger Graham
Stanley's View
scg1936 at talktalk.net

"Beware of certitude" (Jimmy Reid)
The floggings will continue until morale improves!
Invernahaille
Donor
Posts: 219
Joined: 23 Jan 2012, 17:43

Re: Shed Matters 3

Post by Invernahaille »

Take care Stanley.

Good to see your still hopping about in the Shed.
User avatar
Stanley
Global Moderator
Global Moderator
Posts: 90301
Joined: 23 Jan 2012, 12:01
Location: Barnoldswick. Nearer to Heaven than Gloria.

Re: Shed Matters 3

Post by Stanley »

Morning Robert, nice to know you are alive! No results from tests yet, see Medical Matters topic.
Yup, getting towards the finish of yet another bloody engine!
Stanley Challenger Graham
Stanley's View
scg1936 at talktalk.net

"Beware of certitude" (Jimmy Reid)
The floggings will continue until morale improves!
User avatar
Stanley
Global Moderator
Global Moderator
Posts: 90301
Joined: 23 Jan 2012, 12:01
Location: Barnoldswick. Nearer to Heaven than Gloria.

Re: Shed Matters 3

Post by Stanley »

Image

Three days out of the shed and I could tell this morning. I had an hour and a half and it was enough, I know my limits! The job is to turn the bore and the shoulder that will run in the groove. I started by getting the strap as near centre as possible using the point tool, dead centre is impossible of course because there's nothing to get central to! Very close is good enough as long as the bores are right and concentric. Remember not to go mad tightening the chuck jaws as there isn't a lot of lateral strength and it could distort very easily. When I was satisfied with the centre I used the ball bearing trick to get it flat or as near as I could!

Image

Then I sharpened a stubby boring bar, the shorter the more rigid of course. I had to grind a lot off the bottom so that it would clear the bore.

Image

Then a re-measure of everything and do my calculations all over again. Once I was sure I had a clear picture of what I was doing and then did some very careful turning, measuring all the time.The last thing we want to have to do is remake the strap and it would be so easy to do.

Image

After about an hour and a half this is where I got to at closing time. This side is done. Now I have to reverse it in the chuck and cut the shoulder that forms the central ridge on the other side. I shall spend a lot of time setting that up and want to come fresh to it.....
Stanley Challenger Graham
Stanley's View
scg1936 at talktalk.net

"Beware of certitude" (Jimmy Reid)
The floggings will continue until morale improves!
User avatar
Stanley
Global Moderator
Global Moderator
Posts: 90301
Joined: 23 Jan 2012, 12:01
Location: Barnoldswick. Nearer to Heaven than Gloria.

Re: Shed Matters 3

Post by Stanley »

Image

Today's task is simple, reverse the strap in the chuck and cut the shoulder. Like all 'simple' tasks there's a bit more to it than that! For a start off, remember that the more work you put into a part, the bigger the disaster is if you slip up, so, high alert! First thing was to get it concentric in the chuck so I dialled it in. I couldn't get it perfect because the pressure of the chuck jaws is distorting the shape slightly. I got it as close as possible and then pushed it straight with the ball bearing. By the way before I took the strap out I broke the edges on the cuts and sanded them well.

Image

Image

Then a complete re-calculation to get the cuts in my head, get set up and dials zeroed and write the targets on the cross and top slides. I made sure I had given the cuts plenty and then it was simply a matter of boring it with complete trust in all my measurements! (I say complete confidence but even then I wasn't sure....you just have to crash on!) The boring bar was again perfect, time spent modifying it was well worth it. I broke the edges and sanded them.

Image

A short while afterwards..... I got it right, its a perfect fit and just loose enough to work easily. I did one thing that isn't on this pic, I marked the eccentric itself with a witness mark matching the zeros on the strap. I also marked where the oil hole had to be! Useless if it's on the bottom side!

Image

A centre drill is ideal for making an oil hole, you get a flared mouth. I completed the bore with a 1/8" drill.

Image

The strap fitted on the crankshaft. No surprises, it fitted just as it ought and is lined up with the clevis as near as makes no difference.

Image

I knew that I had gone as far as I wanted to this morning, I was in the shed at 07:00 and had done an hour and a half so the next thing I did was harvest the non ferocious chips and put them in the special bin in the yard.

Image

Tomorrow I have to open the valve chest so I can see the valve, get the valve and the eccentric in matching positions and do my measurements for the next stage, designing a valve rod and making a fag packet drawing, it's going to be a stubby little bugger but will be OK. Very pleased with the morning.......
Stanley Challenger Graham
Stanley's View
scg1936 at talktalk.net

"Beware of certitude" (Jimmy Reid)
The floggings will continue until morale improves!
User avatar
plaques
Donor
Posts: 8094
Joined: 23 May 2013, 22:09

Re: Shed Matters 3

Post by plaques »

Thin section rings that may be subject to gripping distortion are usually clamped to a backplate. makes life a lot easier and safer.
User avatar
Stanley
Global Moderator
Global Moderator
Posts: 90301
Joined: 23 Jan 2012, 12:01
Location: Barnoldswick. Nearer to Heaven than Gloria.

Re: Shed Matters 3

Post by Stanley »

Yes P but in this case I knew I could get away with it. You want a tiny bit of play in an eccentric strap anyway..... It makes so little difference on the throw of the valve.
Stanley Challenger Graham
Stanley's View
scg1936 at talktalk.net

"Beware of certitude" (Jimmy Reid)
The floggings will continue until morale improves!
User avatar
Stanley
Global Moderator
Global Moderator
Posts: 90301
Joined: 23 Jan 2012, 12:01
Location: Barnoldswick. Nearer to Heaven than Gloria.

Re: Shed Matters 3

Post by Stanley »

Image

This morning is going to be interesting. I have to ascertain the length of the valve rod. Recognise that this is nothing to do with the throw of the eccentric, I have already set that in the design. Neither is it anything to do with timing, that again is governed by the eccentric and can be altered by changing its position on the shaft. This is simply about determining where I can place the valve rod in the motion and that will govern what length I have to make it. First job was to open the valve chest up so I can see the position of the valve. Tipping it by putting the clamp on the front helped!

Image

I used my thread gauges to act as a spacer at the back of the valve, this engine is going to breathe easily! Then I shortened the motion train as much as was sensible as this gives me more length in the rod itself. Once I had that set I could put the eccentric at the right end of its throw and measure the length from the eccentric face to the centre hole of the pin on the valve motion. Then measure all the other dimensions and do a fag packet drawing. Then go through all the measurements and double check them!

Image

At this point with all the measuring done I took the clamp off and allowed myself to be diverted. Remember me having to cut the end of the bottom guide rail off to allow the con-rod to swing? I always said that I would consider cutting the top one back to match it so I fitted a new 24tooth hacksaw blade......

Image

That definitely looks better....

Image

Now for a bit of relaxing plain turning! I sorted out a lump of inch and a quarter steel from the scrap box, changed over to the three jaw SC and faced the end.

Image

After honing my cutter and checking centre height I started turning, I measured what I needed using the top slide micrometer and as I did so I reminded myself that I had to be careful because relaxing doing the easy bit was just the time that mistakes could be made. Note the black marker on the end.... I realised after starting cutting I had got my measurements confused and I was making this section 3/16" too long! No matter, I cut it off and started into the rod again. I told you it was easy to slip up! But..... as I was cutting again I realised that I had double bluffed myself, the length was right in the first place! So a re-position in the chuck and after checking again, I put on what I had cut off. It's so easy to get confused!

Image

Here we are at knocking off time, back on track and this time I have it clear in my head. Tomorrow I'll have a nice day of plain turning.
Stanley Challenger Graham
Stanley's View
scg1936 at talktalk.net

"Beware of certitude" (Jimmy Reid)
The floggings will continue until morale improves!
User avatar
Stanley
Global Moderator
Global Moderator
Posts: 90301
Joined: 23 Jan 2012, 12:01
Location: Barnoldswick. Nearer to Heaven than Gloria.

Re: Shed Matters 3

Post by Stanley »

I spoke too soon Lads. Housework and cooking have overtaken the shed. They take precedence because they are far more important! See you tomorrow!
Stanley Challenger Graham
Stanley's View
scg1936 at talktalk.net

"Beware of certitude" (Jimmy Reid)
The floggings will continue until morale improves!
User avatar
Stanley
Global Moderator
Global Moderator
Posts: 90301
Joined: 23 Jan 2012, 12:01
Location: Barnoldswick. Nearer to Heaven than Gloria.

Re: Shed Matters 3

Post by Stanley »

Image

No hiding behind the housework this morning! I honed my cutters, never time wasted! Then set into finishing making the blank valve rod.

Image

A short time later....., Here we are with a blank. I altered the diameter of the rod a bit, I made it thinner, it was going to be too clumsy.

Image

Then some careful measuring and marking and punch the location of the two holes for the 4BA studs. I cheated and gave it them an extra tenth of a millimetre. No sense in making them tight!

Image

Then under the drill and poke a couple of 3.6mm holes in it.

Image

Then a trial fit and it dropped on nicely. I marked the width of the foot from underneath.

Image

Then under the mill and a careful set up before milling the first flat. I deliberately left it a shade proud, I can always file it down later if I need to but I can't add anything!

Image

Closing time. The other side isn't going to be as easy of course, no obvious way to hold it so a little bit of thought is needed. A nice little stint, everything has gone well and we are making good progress with no cock-ups! That's all I ask.....
Stanley Challenger Graham
Stanley's View
scg1936 at talktalk.net

"Beware of certitude" (Jimmy Reid)
The floggings will continue until morale improves!
User avatar
Stanley
Global Moderator
Global Moderator
Posts: 90301
Joined: 23 Jan 2012, 12:01
Location: Barnoldswick. Nearer to Heaven than Gloria.

Re: Shed Matters 3

Post by Stanley »

Image

Friday is always a funny day, so much to do and even busier today because I have to go the the hospital. But I got an hour in the shed and made some progress. I decided I could get away with this set up. Notice that I have put a stack of shims in the opposite side of the vice so as to even out the thrust and not damage the vice.

Image

Then a succession of very small cuts so as not to strain the set up. As you can see I got away with it, largely due to the fact that I have a very sharp cutter.

Image

After breaking all the edges and a bit of fiddly fitting I mounted the rod on the strap. It's a good fit. I knew that my centre line of the rod wouldn't quite match up with the clevis so I slackened the eccentric off on the shaft and managed to gain a small amount which brought me close enough to being in line to be no problem. Notice that I have got the rod a bit too long, no matter it can be shortened. I made sure I had the rod at the far extent of the throw and marked the position of the hole for the clevis pin. I set it up under the pillar drill and drilled my hole but got so wrapped up with trying to get it central that I never took a pic. This is very stressful for me because my eyes don't see straight and a lot of it was guesswork.

Image

Here's where I ended up. the 1/8" hole isn't exactly central but it will be OK and is inside the clevis anyway so they'll never see it off the Ribble. Now I have to shorten the rod and make a pin...... That's for tomorrow! We're a bit further forward and no cock-ups.....
Stanley Challenger Graham
Stanley's View
scg1936 at talktalk.net

"Beware of certitude" (Jimmy Reid)
The floggings will continue until morale improves!
User avatar
Stanley
Global Moderator
Global Moderator
Posts: 90301
Joined: 23 Jan 2012, 12:01
Location: Barnoldswick. Nearer to Heaven than Gloria.

Re: Shed Matters 3

Post by Stanley »

Image

The aim this morning is to get the valve rod fitted. So a variety of small jobs. First was to decide on a stud length and fit the two studs with Loctite 638. One little job out of the way.

Image

I'm lucky because the rod is just long enough to fit in the chuck jaws with the foot out of the way so dead easy to make a tidy job of cutting the rod back and finishing it.

Image

Image

Image

Then I attended to my studs and bolts, I got them all to the right length, made sure all the nuts ran free and checked that the rod was OK. That led to considering the clevis pin and I decided on a small threaded rod and two nuts. I tried every size but couldn't find the perfect fit so I went at it from the other end. I popped a 9/64" drill through the original 1/8" holes and it was a good tight fit for 4BA which is the same size as the other studs.

Image

The last thing was to mill a tidy little flat on each side of the rod so it will fit in the clevis. A bit of filing and fitting made sure it was a good fit.

Image

The last thing this morning was to fit the rod, tightening all the studs except for the bolts holding the strap together, I left them slack because that would militate against full travel. Then I tightened the eccentric on the shaft and turned the engine over, the throw is perfect, I got it right! That was a good morning. Tomorrow we have to address the fastening down of the pedestal blocks.
Stanley Challenger Graham
Stanley's View
scg1936 at talktalk.net

"Beware of certitude" (Jimmy Reid)
The floggings will continue until morale improves!
User avatar
Big Kev
Site Administrator
Site Administrator
Posts: 10954
Joined: 23 Jan 2012, 20:15
Location: Foulridge

Re: Shed Matters 3

Post by Big Kev »

:good:
Kev

Stylish Fashion Icon.
🍹
User avatar
Stanley
Global Moderator
Global Moderator
Posts: 90301
Joined: 23 Jan 2012, 12:01
Location: Barnoldswick. Nearer to Heaven than Gloria.

Re: Shed Matters 3

Post by Stanley »

Thanks Kev. nice to know someone is taking notice. It's looking good and won't half look busy when it's running! And that isn't far off.
Stanley Challenger Graham
Stanley's View
scg1936 at talktalk.net

"Beware of certitude" (Jimmy Reid)
The floggings will continue until morale improves!
User avatar
Bodger
Senior Member
Posts: 1285
Joined: 23 Jan 2012, 12:30
Location: Ireland

Re: Shed Matters 3

Post by Bodger »

Stanley, watching and being tacit.
User avatar
Stanley
Global Moderator
Global Moderator
Posts: 90301
Joined: 23 Jan 2012, 12:01
Location: Barnoldswick. Nearer to Heaven than Gloria.

Re: Shed Matters 3

Post by Stanley »

Nice! Thanks Bodge!

Image

First thing to address this morning was the holding down studs for the pedestals. I made sure they were all bottomed in their threaded holes and then marked them all using a suitable packing piece for a guide.

Image

Then into the lathe, cut to length, round the ends and thread them 2BA for the nuts. Quietly and carefully away and it took the best part of 45 minutes, I can see the end of the course so now is the time to take more care.

Image

I tightened up all the nuts on the motion and then got into timing the valve. Notice that I have put a dog on the shaft to help turn it, despite trying to avoid close fitting it's a shade tight but will soon slack off when it runs. It was surprisingly complicated because of there being an extra adjustment in the train but a bit of careful thought solved all the problems and eventually I got it set right. This engine will run when air has been put on it.

Image

Next was an encouraging job, the valve chest lid goes back on and as the valve is set it can be a permanent fixture. I do like the Loctite plastic gasket.

Image

Closing time, now we need a wooden base to raise the bed enough to give clearance for the flywheel. That's for tomorrow.... (Not that I am rushing to finish it tomorrow but I can spare an hour for the shed before I start getting my head round preparations for Airedale). A nice morning, I've enjoyed it. By the way, the empty holes are where Newton slipped up and put studs where they couldn't go. That was one of the things that Johnny criticised and caused Newton to lose heart.
Stanley Challenger Graham
Stanley's View
scg1936 at talktalk.net

"Beware of certitude" (Jimmy Reid)
The floggings will continue until morale improves!
User avatar
chinatyke
Donor
Posts: 3831
Joined: 21 Apr 2012, 13:14
Location: Pingguo, Guangxi, China

Re: Shed Matters 3

Post by chinatyke »

I don't know anything about metal working but it always interests me the way you get a round rod and make square ends on it, like on the valve connector rod. I assumed you would use a square or rectangular bar and turned the round section. Is there a particular reason for doing it your way?
User avatar
Stanley
Global Moderator
Global Moderator
Posts: 90301
Joined: 23 Jan 2012, 12:01
Location: Barnoldswick. Nearer to Heaven than Gloria.

Re: Shed Matters 3

Post by Stanley »

Because if the 'square bit' is smaller than the round shank you can't make it work. Dead easy to mill the flats on most plain parts. If all else fails a file will do the gob.
Stanley Challenger Graham
Stanley's View
scg1936 at talktalk.net

"Beware of certitude" (Jimmy Reid)
The floggings will continue until morale improves!
User avatar
chinatyke
Donor
Posts: 3831
Joined: 21 Apr 2012, 13:14
Location: Pingguo, Guangxi, China

Re: Shed Matters 3

Post by chinatyke »

I was thinking of the other end with the two bolt holes in it not the one with flats that go into the clevis (is that right?). My thought was that if you started with rectangular bar you'd have less metal to remove, but maybe that isn't right?
User avatar
Stanley
Global Moderator
Global Moderator
Posts: 90301
Joined: 23 Jan 2012, 12:01
Location: Barnoldswick. Nearer to Heaven than Gloria.

Re: Shed Matters 3

Post by Stanley »

Theoretically you're right China but I hadn't got any suitable bar and besides it would be very uncomfortable turning being an interrupted cut. Far easier in practice to start with a round bar big enough to accommodate the foot and chop it out. I have plenty of round stock.....
Today's shed work has been limited to looking in the wood bin to see if I have a bit of timber I can make the base out of. It needs to be thick enough to raise the flywheel enough to clear the surface it stands on. I haven't got any so I will have to buy a piece. So I shall be AWOL now for a day or two while I get my operation done and recover. Talk amongst yourselves!
Stanley Challenger Graham
Stanley's View
scg1936 at talktalk.net

"Beware of certitude" (Jimmy Reid)
The floggings will continue until morale improves!
User avatar
Stanley
Global Moderator
Global Moderator
Posts: 90301
Joined: 23 Jan 2012, 12:01
Location: Barnoldswick. Nearer to Heaven than Gloria.

Re: Shed Matters 3

Post by Stanley »

No shed matters lads.... I am recovering well at home but taking it easy! See medical matters if you want the details.
Stanley Challenger Graham
Stanley's View
scg1936 at talktalk.net

"Beware of certitude" (Jimmy Reid)
The floggings will continue until morale improves!
User avatar
Stanley
Global Moderator
Global Moderator
Posts: 90301
Joined: 23 Jan 2012, 12:01
Location: Barnoldswick. Nearer to Heaven than Gloria.

Re: Shed Matters 3

Post by Stanley »

No shed today, I am taking it easy. Doing an hour or two in the shed could be a bridge too far even though I feel fine, I am using my head.
Stanley Challenger Graham
Stanley's View
scg1936 at talktalk.net

"Beware of certitude" (Jimmy Reid)
The floggings will continue until morale improves!
User avatar
Stanley
Global Moderator
Global Moderator
Posts: 90301
Joined: 23 Jan 2012, 12:01
Location: Barnoldswick. Nearer to Heaven than Gloria.

Re: Shed Matters 3

Post by Stanley »

Still taking it easy lads......
Stanley Challenger Graham
Stanley's View
scg1936 at talktalk.net

"Beware of certitude" (Jimmy Reid)
The floggings will continue until morale improves!
Post Reply

Return to “Crafts”