
Many thanks but Ian has the exact kit I'm after
SHED MATTERS 2

-
Stanley

- Global Moderator

- Posts: 90301
- Joined: 23 Jan 2012, 12:01
- Location: Barnoldswick. Nearer to Heaven than Gloria.
Re: SHED MATTERS 2
Stanley Challenger Graham
Stanley's View
scg1936 at talktalk.net
"Beware of certitude" (Jimmy Reid)
The floggings will continue until morale improves!
Stanley's View
scg1936 at talktalk.net
"Beware of certitude" (Jimmy Reid)
The floggings will continue until morale improves!
-
Stanley
- Global Moderator
- Posts: 90301
- Joined: 23 Jan 2012, 12:01
- Location: Barnoldswick. Nearer to Heaven than Gloria.
Re: SHED MATTERS 2

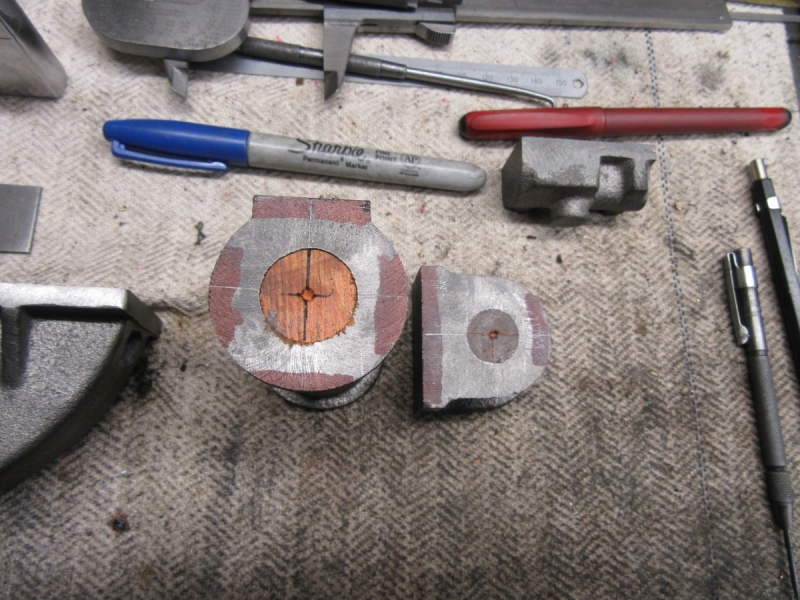
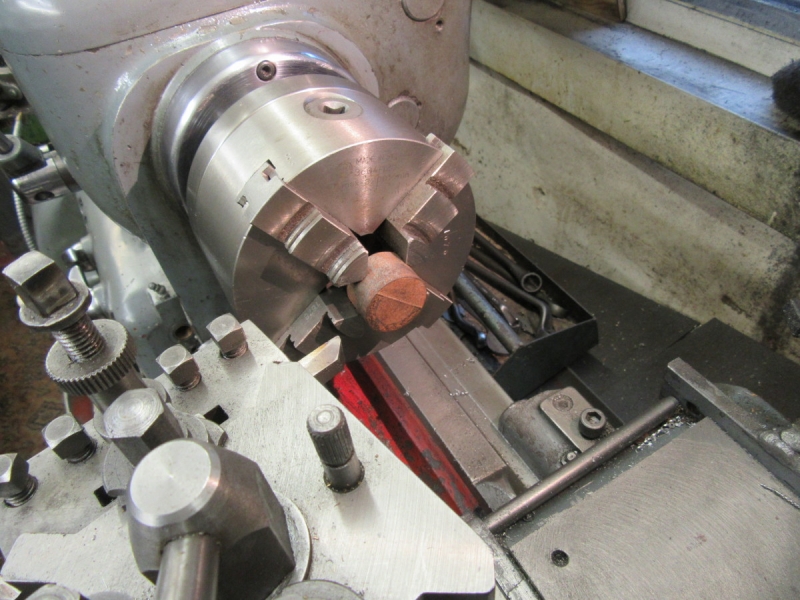
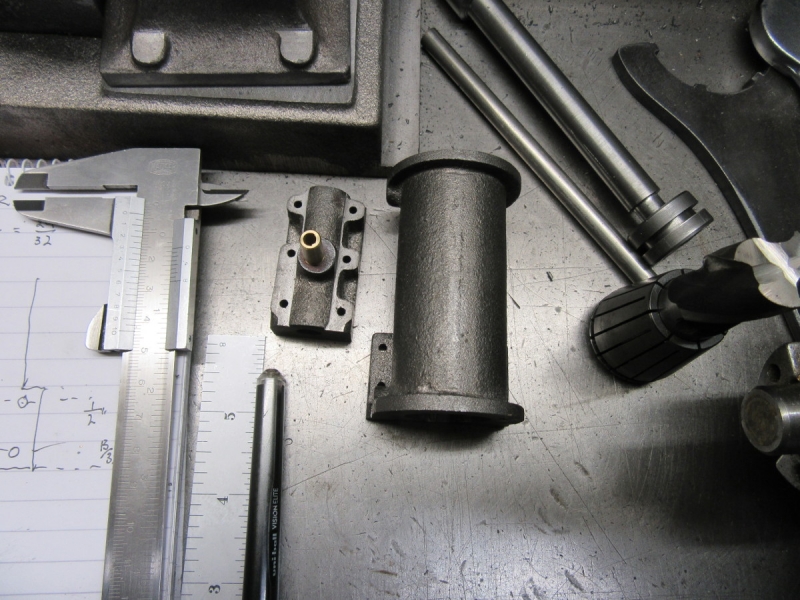
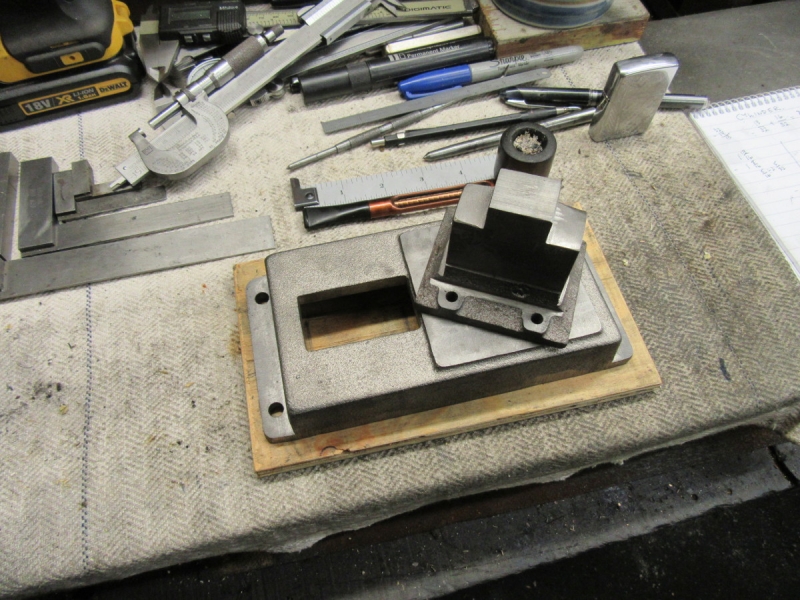
You all know how much I hate wood-turning..... but it has to be done. I need to plug some holes so that I can measure and mark centres for boring.

Here's the result. Very hard to mark a centre in thin air!
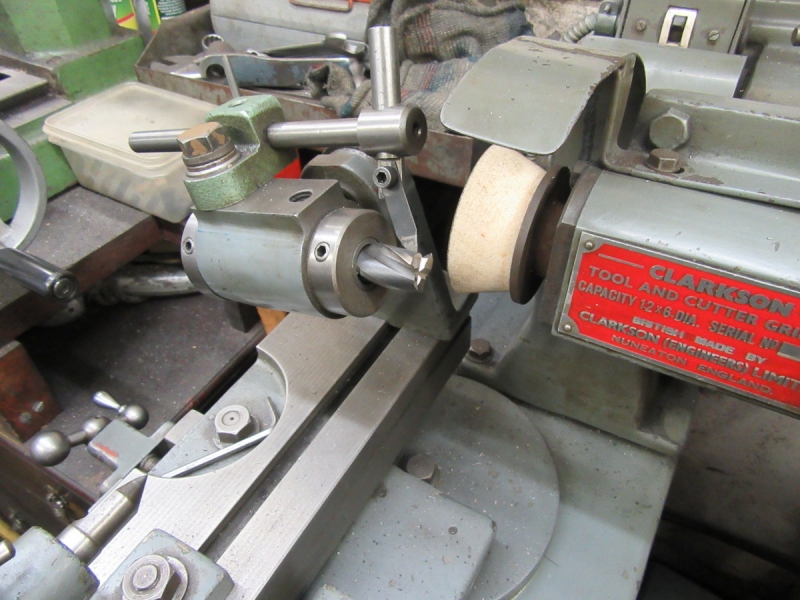
Now for the last casting, I need to get some register and dimensions in it before I can do my measuring. I hit a problem here, there was a chill in part of the casting resulting in some very hard metal in one area. Apart from an actual flaw, perhaps the worst fault you can meet. I haven't got any carbide cutters so I just had to soldier on.
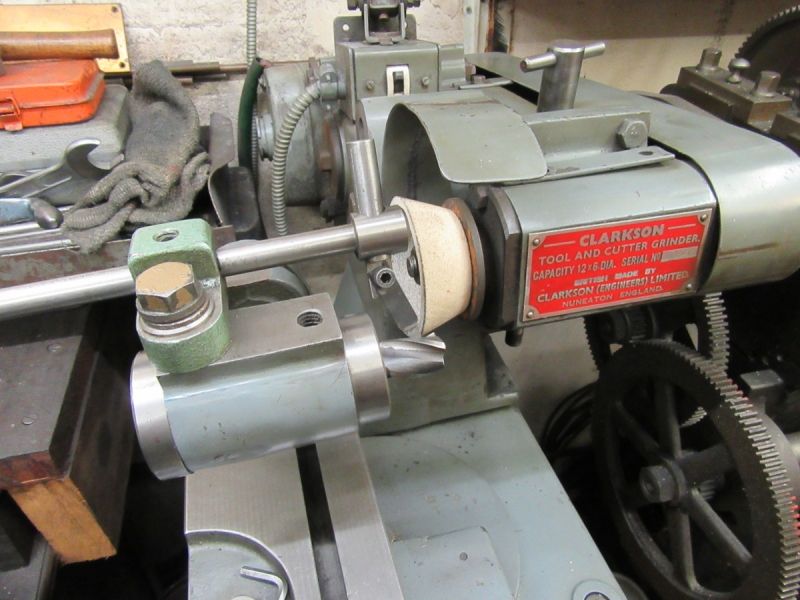
I managed the cut but straight into the T&C grinder afterwards to sharpen it.
The other side wasn't quite as bad but it still dulled the cutter so another trip to the grinder.
The last cut was the sides of the face.
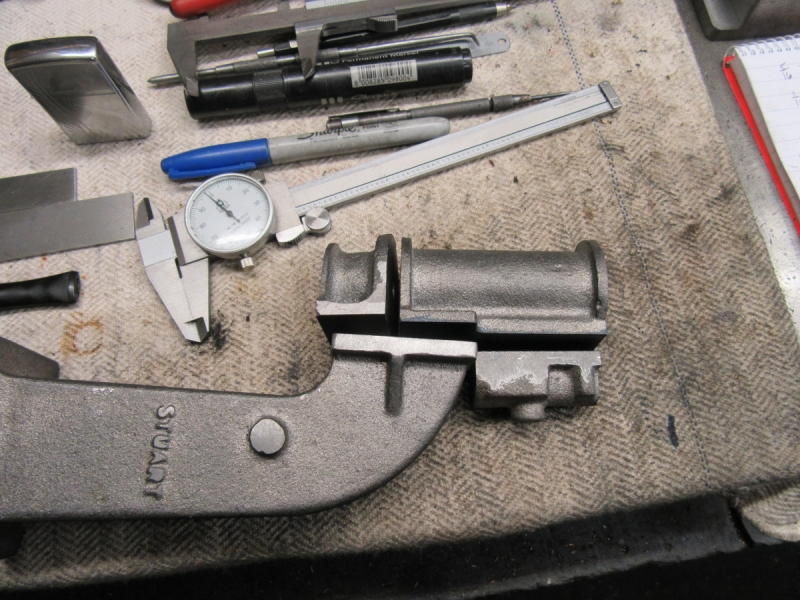
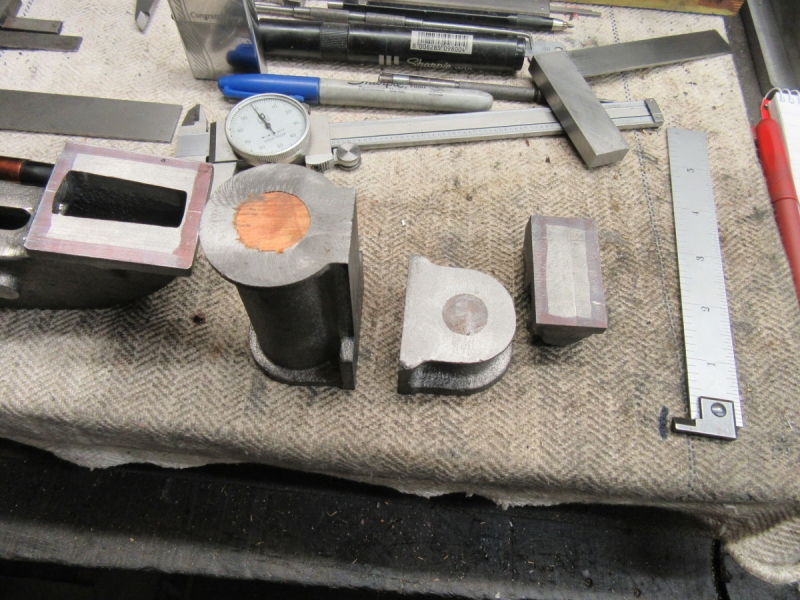
Here's where we are at. Some adjustments will be needed almost certainly but we are getting there.
Then some measuring.... I have found the centres and marked them. I have been guessing at the centres when machining the faces but they all turned it to be spot on the 7/8" I need. That's nice.
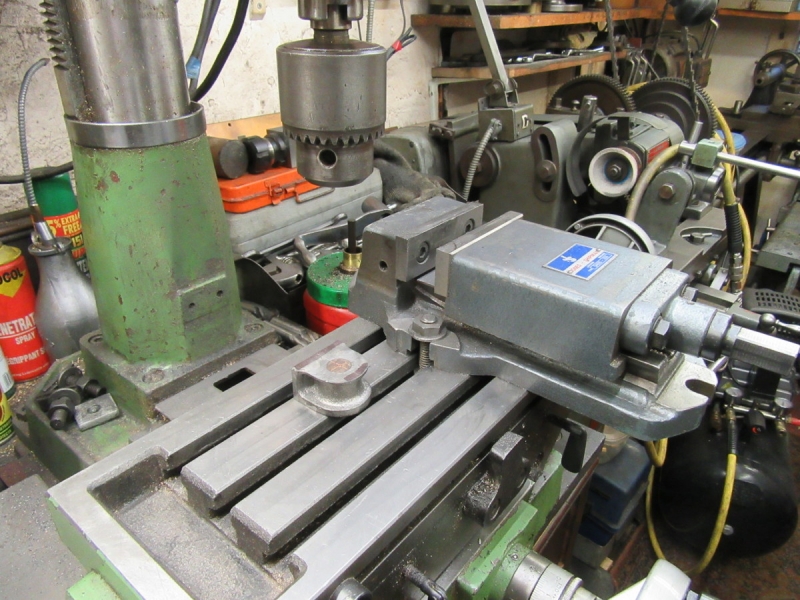
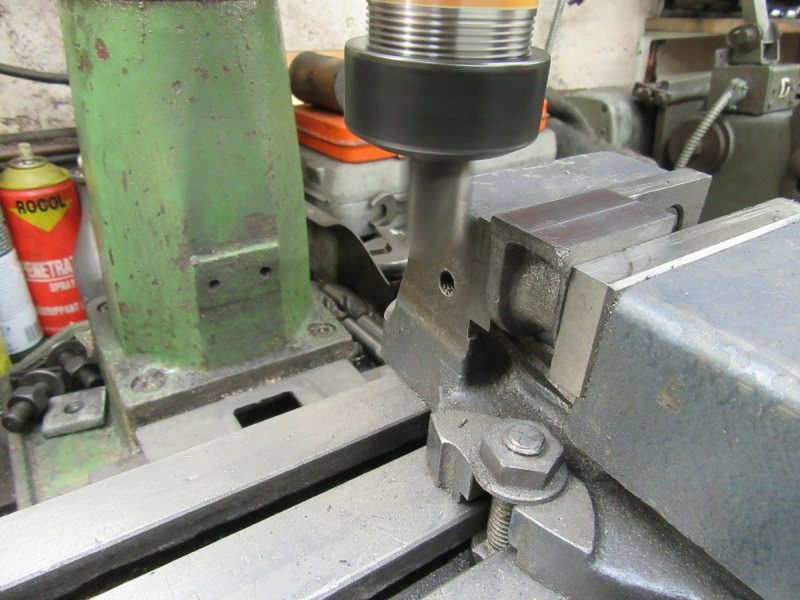
Last move before knocking off was to put a chuck on the mill. I could have got away with the collet chuck but I like to take that off every now and then because if you don't do it the Morse taper can freeze and it becomes a big job. Good clean up all round, nice morning and tomorrow will be boring (holes!) but enjoyable because I have done the groundwork.
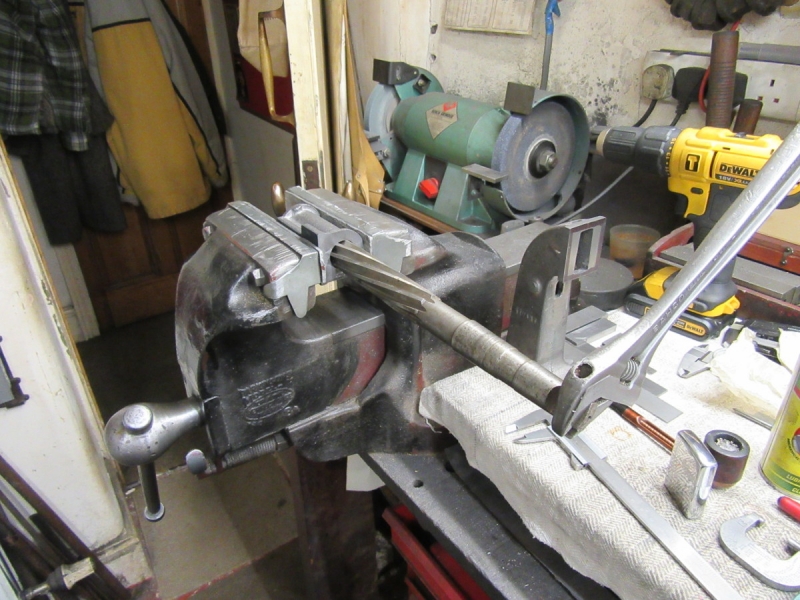
One thing to mention is that the drawings call for a peculiar feature, a flat on each side of the piston rod. That means that my first hole would be a 1/2" but with a flat on each side. My drills bore circular holes and I've never seen a forging hammer that didn't have a cylindrical ram so I've taken a unilateral decision and ditched the design, I shall have a circular ram!
Stanley Challenger Graham
Stanley's View
scg1936 at talktalk.net
"Beware of certitude" (Jimmy Reid)
The floggings will continue until morale improves!
Stanley's View
scg1936 at talktalk.net
"Beware of certitude" (Jimmy Reid)
The floggings will continue until morale improves!
-
Stanley
- Global Moderator
- Posts: 90301
- Joined: 23 Jan 2012, 12:01
- Location: Barnoldswick. Nearer to Heaven than Gloria.
Re: SHED MATTERS 2
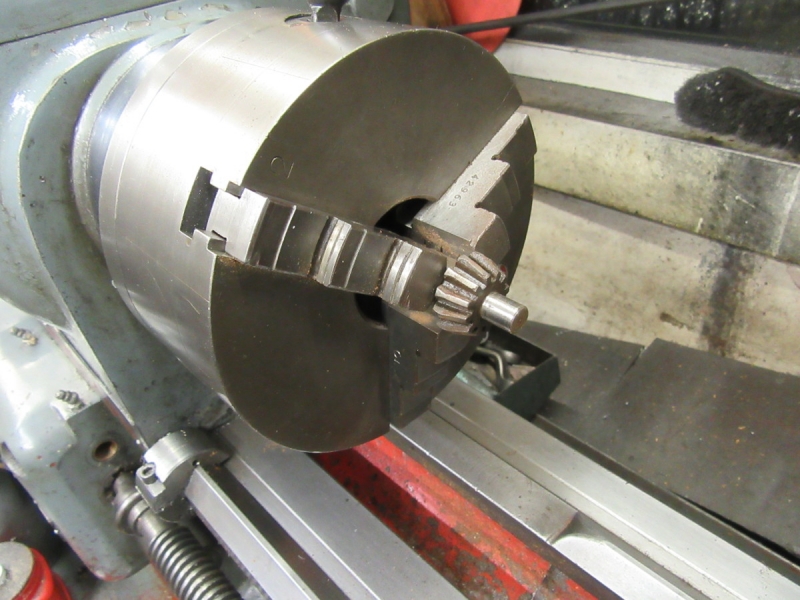
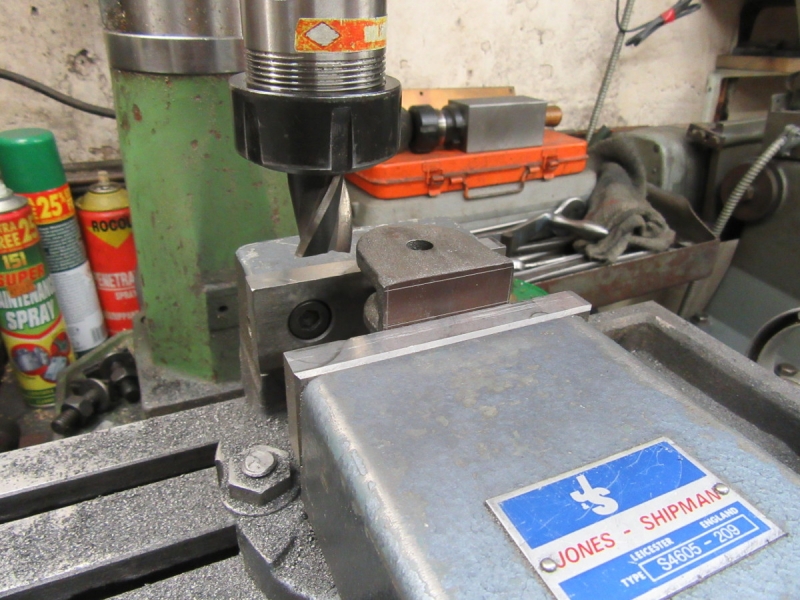
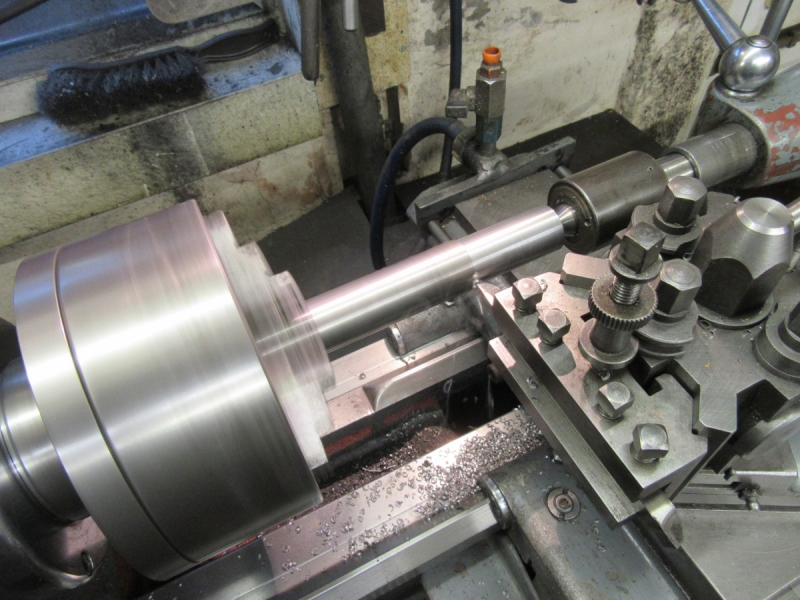
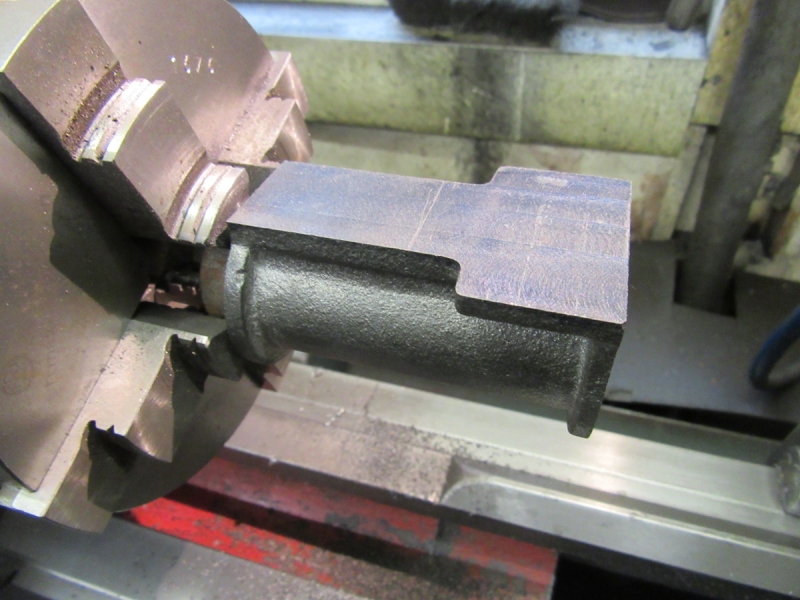
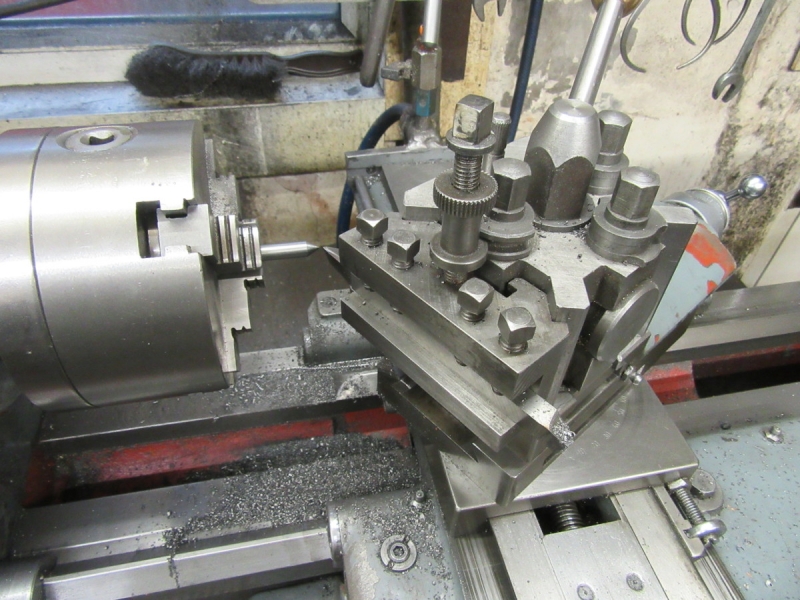
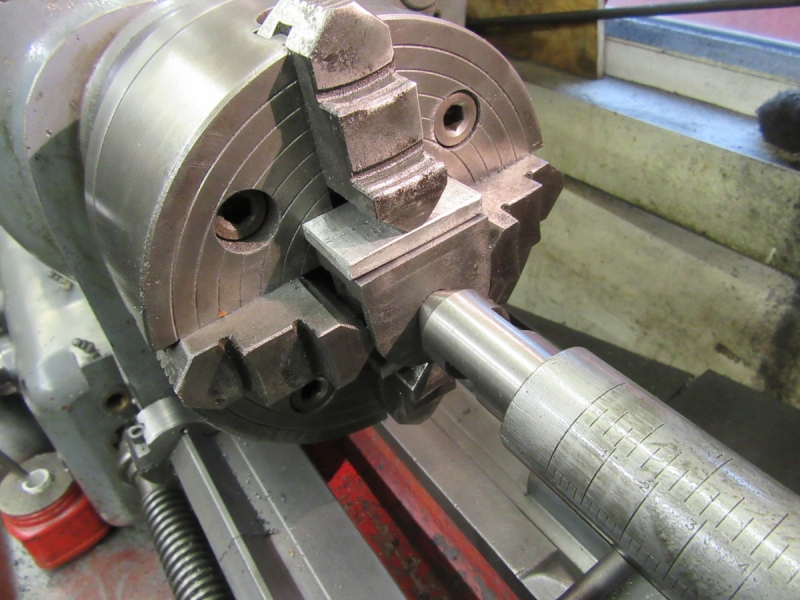
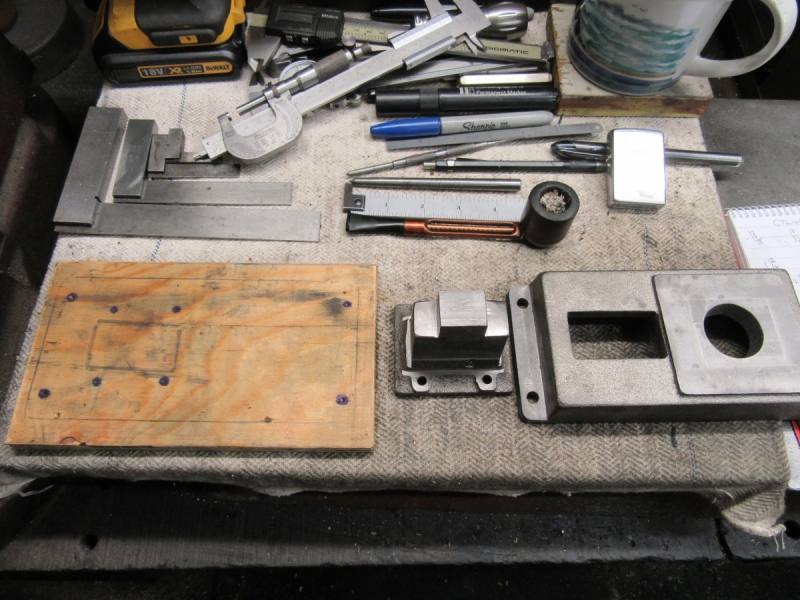
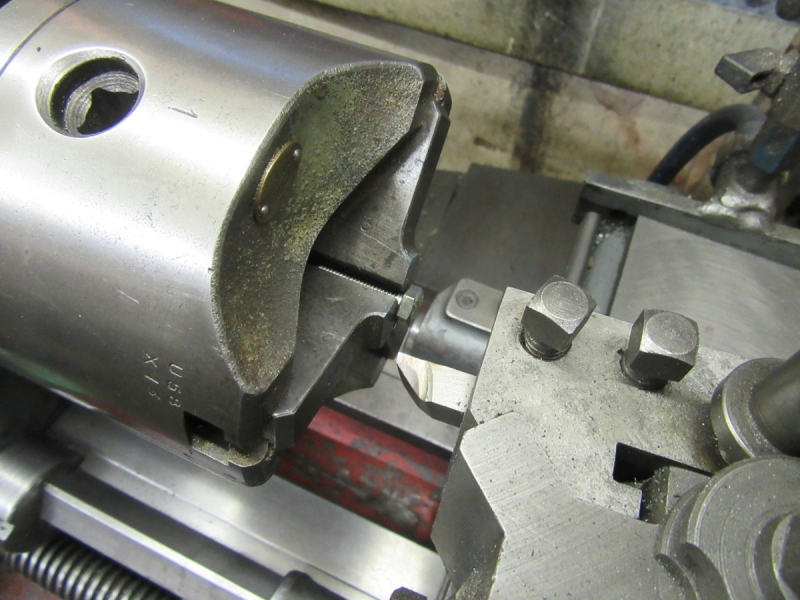
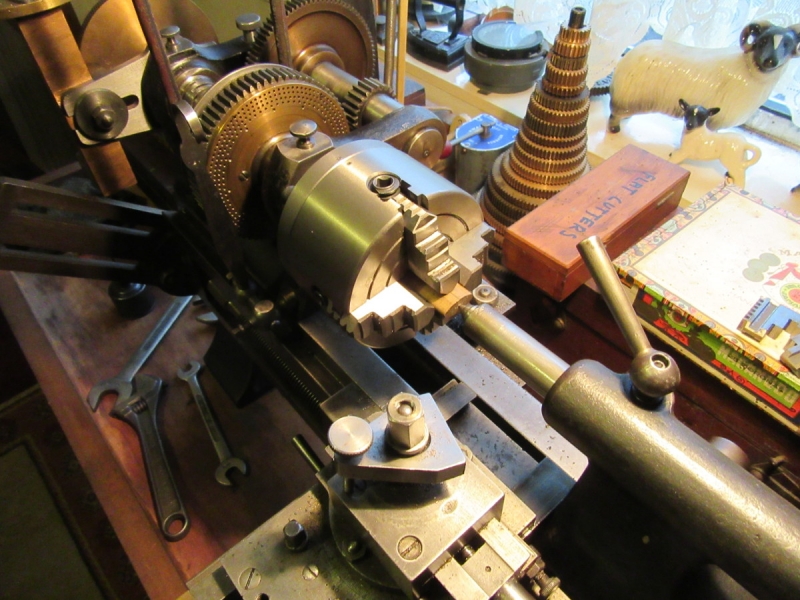
If you're thinking hello, he's off on a diversion you're right. I changed my mind about working on these castings under the mill. I can do a better job in the lathe. Yesterday I found a better chuck key for the big Besco chuck but it was very rusty so before I take the 3 jaw off I used it to clean the chuck key up while this chuck is on. I soon had that out of the way, put the collet chuck back on the VM and put the small 4 jaw independent on Mrs Harrison.

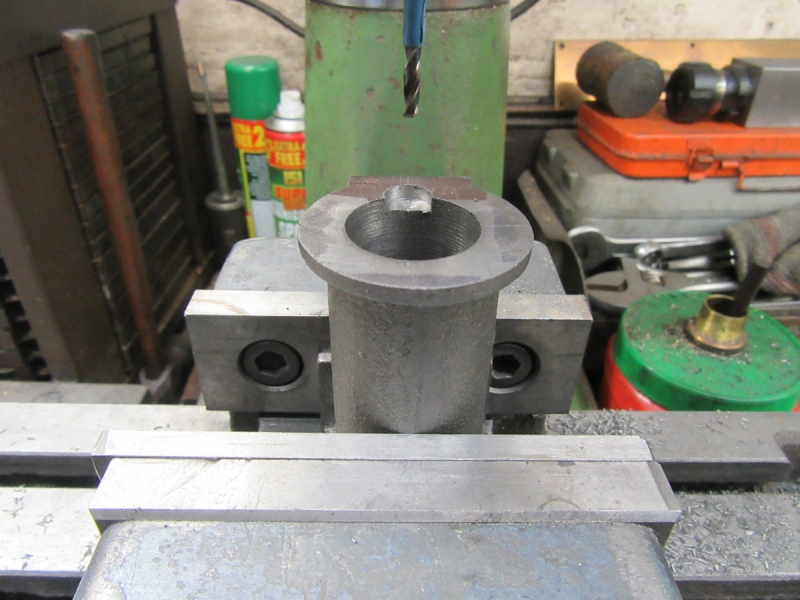
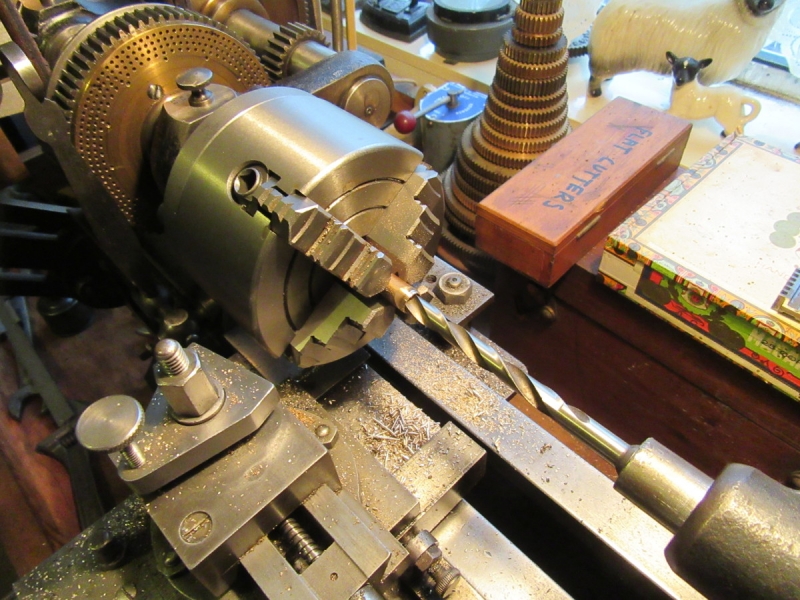
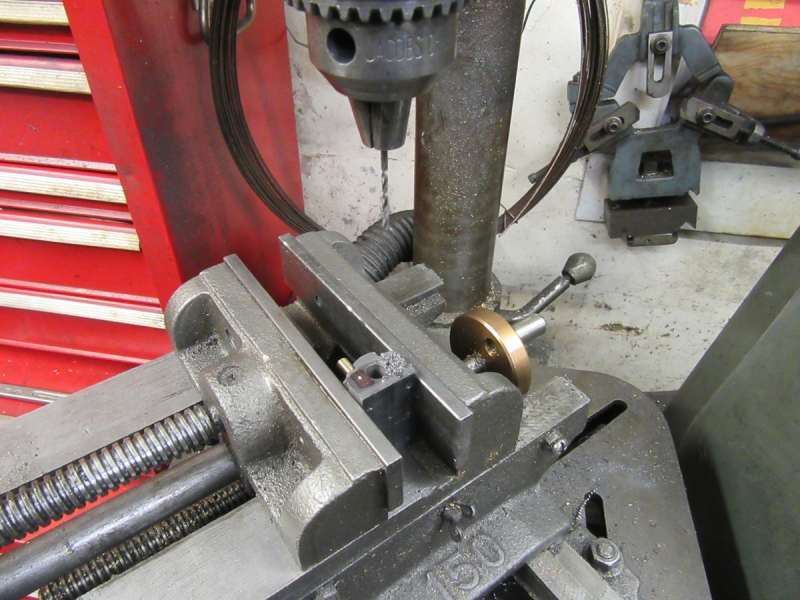
First for shaving was the gland body. First job was to bore the top end 1/2" for the ram. If you remember this casting was chilled and I had a bit of a struggle with it. I got it bored out but I doubt if it's perfectly concentric. I'll find out when I get round to fitting and can make any adjustments then.I had to resharpen both drills after this job, the metal is as hard as hell! I drilled it slightly undersize and then reamed it 1/2".
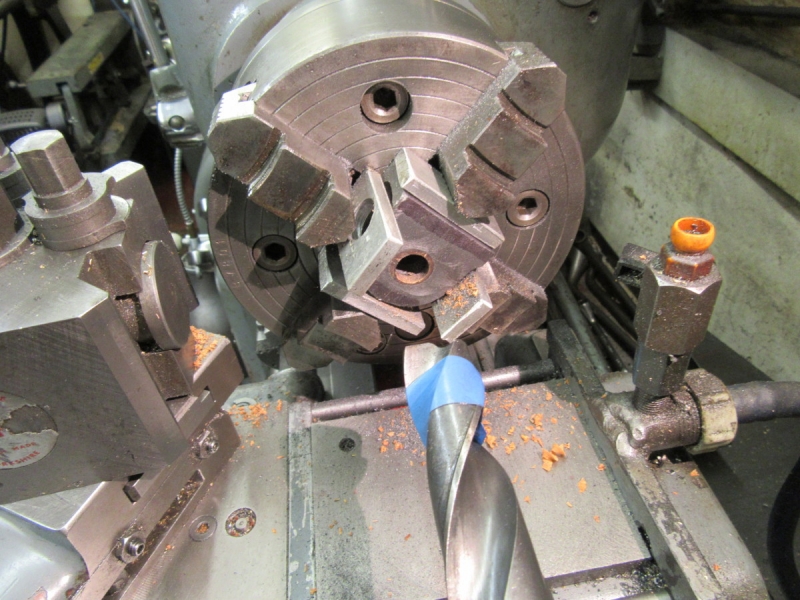
Next was the larger bore in the gland body, 7/8" drill and a sophisticated drill marker as usual to get the 5/8" depth. This end was a bit better metal.
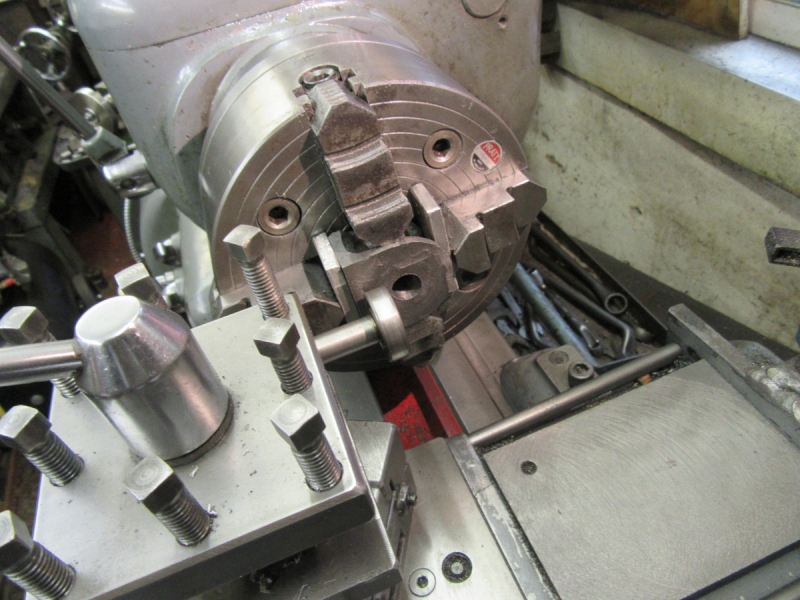
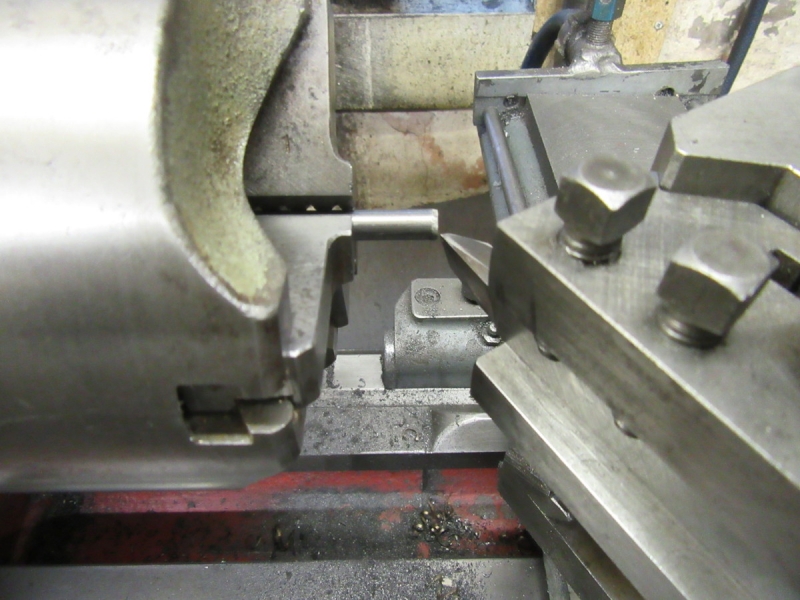
Next for shaving was the cylinder. Johnny's chuck is exactly the right size for this job. I took a lot of trouble setting it up and got it as near central and parallel as possible. I think it's OK. The indicator showed about Half a thou variation when I swept the face but that could be in the milled surface. Rough castings are always a bit of a challenge, you just have to do the best you can.
I cleared the bore by popping the 7/8" drill through it. Not quite concentric of course but the boring bar will straighten that up.
Ready for boring. Note the shiny bit on the boring bar, I had to grind a bit more off the square to make sure I could get my 3" depth without the bar fouling the bore.
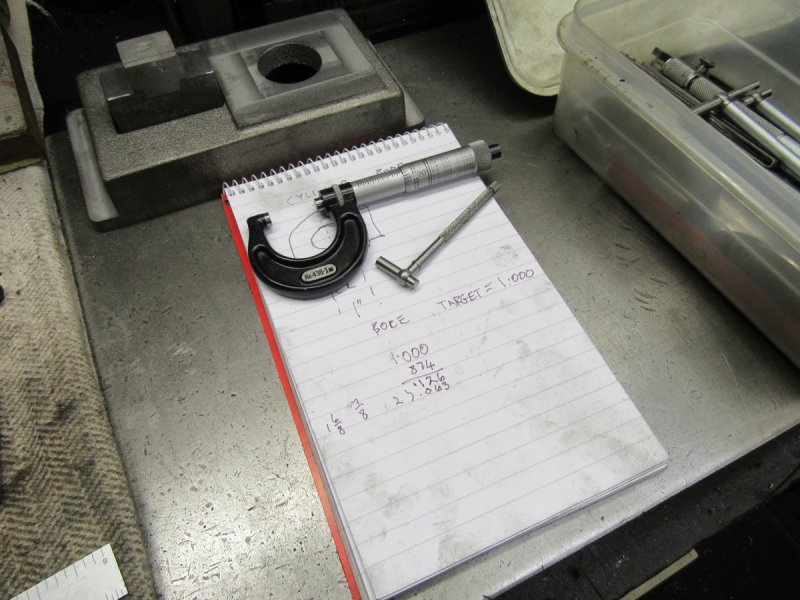
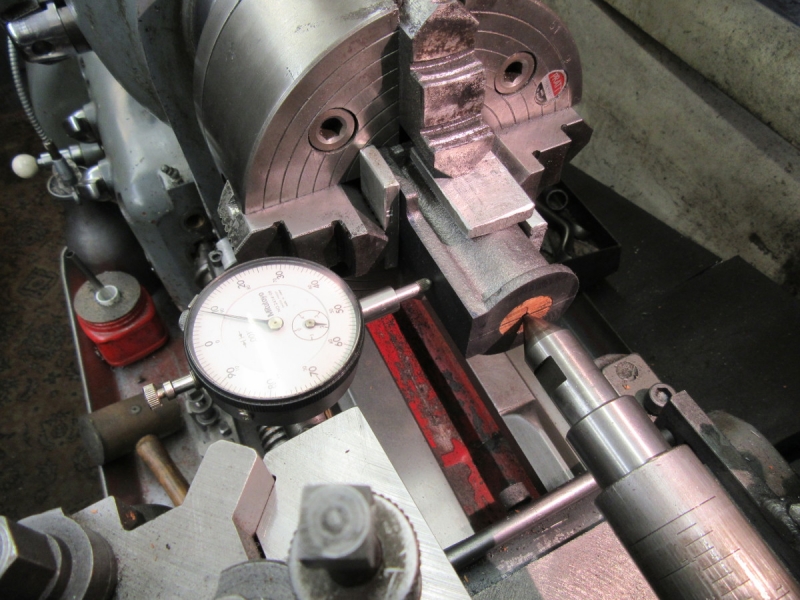
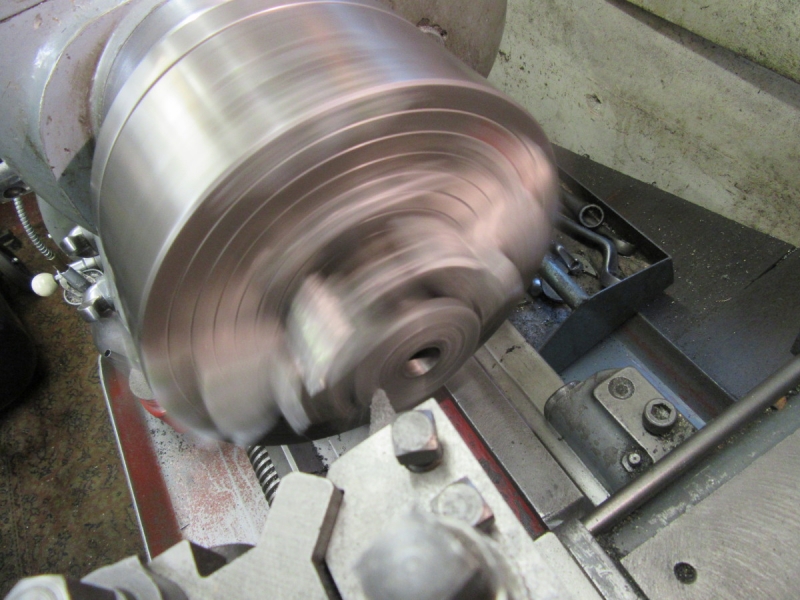
I got serious for the bore. Bleeding obvious tip if you haven't done a bore before.... Once you have found out what you have to take out, in this case about 60thou each side, divide it into equal parts, about 20thou a cut here and each time you have taken a cut leave the feed in gear, reverse the drive and take a cut in reverse without altering the setting. Then measure to see where you are. I hit exactly 1" with the last cut and a decent finish. There was one slight chilled spot in the casting but I had got through it by the time we had the last pass.
It was knocking off time but I haven't taken the cylinder out of the chuck. I want to scribe the PCD for the bolt circle on the face before I take it out. I think it's a pretty good job...... Nice morning.....
Stanley Challenger Graham
Stanley's View
scg1936 at talktalk.net
"Beware of certitude" (Jimmy Reid)
The floggings will continue until morale improves!
Stanley's View
scg1936 at talktalk.net
"Beware of certitude" (Jimmy Reid)
The floggings will continue until morale improves!
-
Stanley
- Global Moderator
- Posts: 90301
- Joined: 23 Jan 2012, 12:01
- Location: Barnoldswick. Nearer to Heaven than Gloria.
Re: SHED MATTERS 2
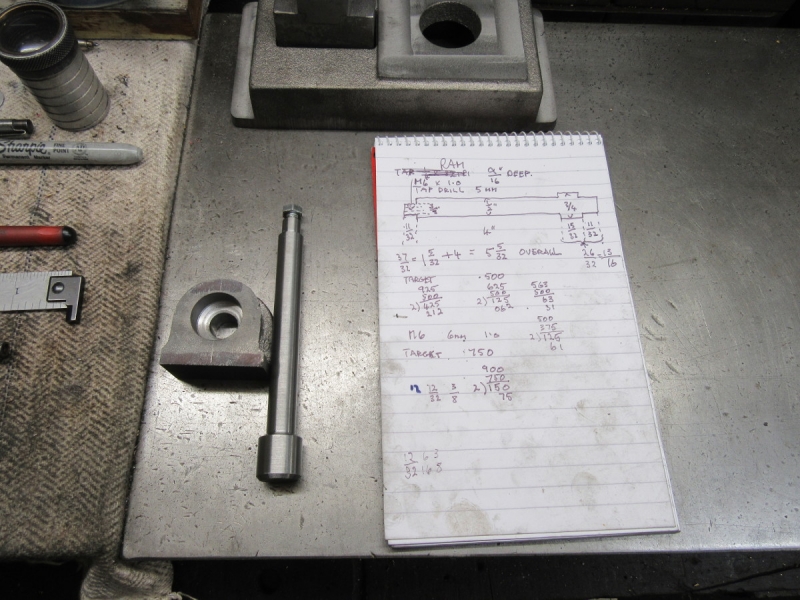
I finished yesterday talking about marking the PCD for the bolt holes but realised that was nonsense. I will do it my usual way by making the lid and marking the cylinder casting directly from that. So this morning I took the casting out of the chuck and tried the bore with a 1" standard, it enters at both ends but is a snug fit so I didn't force it in, I don't want to mark the standard and affect its accuracy. The point is that now the casting is at ambient temperature the bore is accurate.
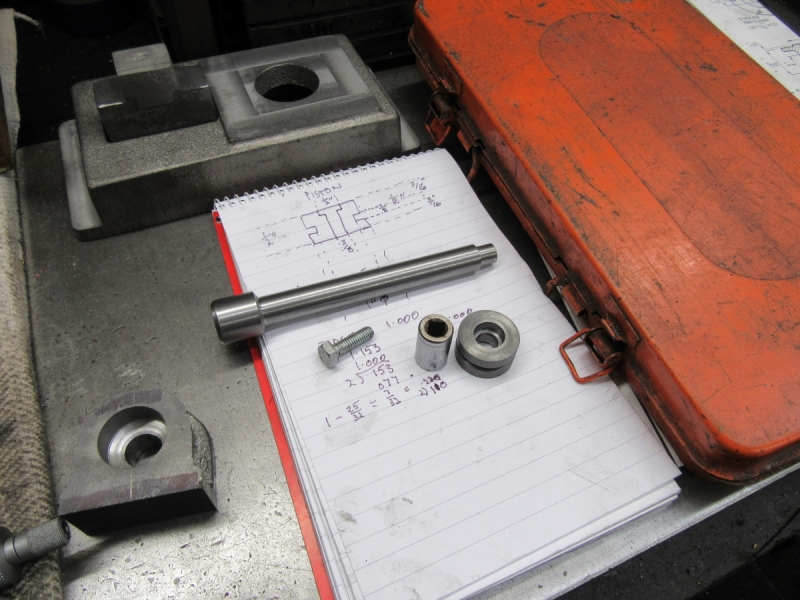
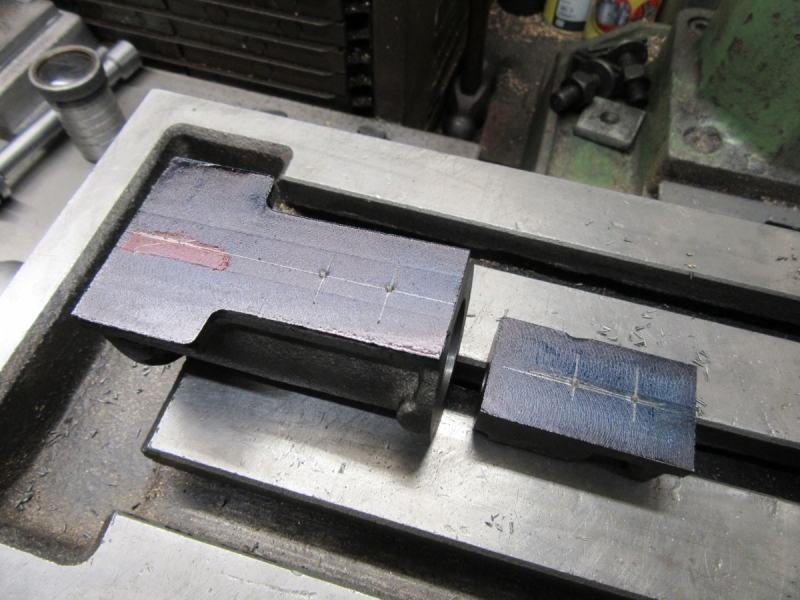
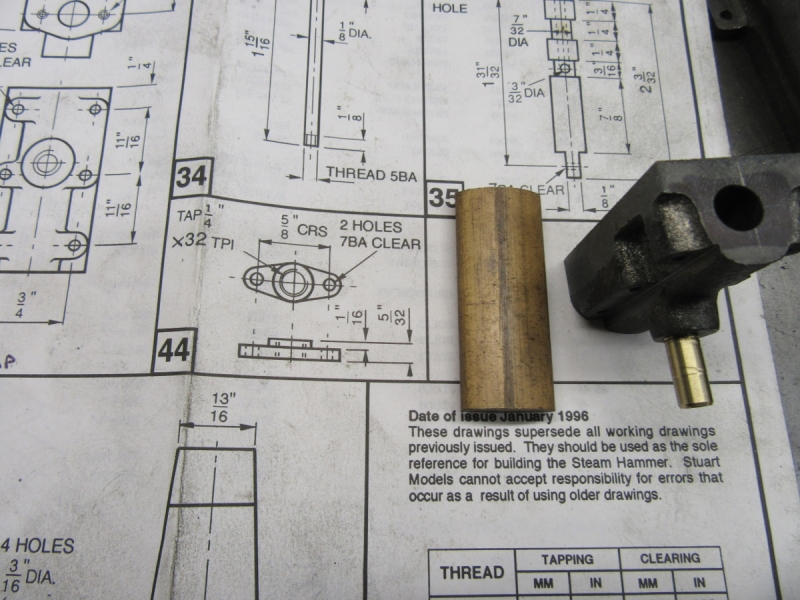
Then I spent a long time thinking and making sense of the drawings. Remember me saying that I wasn't comfortable with the concentricity of the bore for the ram in the gland casting? It dawned on me that if I made the ram and piston and fitted it together with the gland the gland casting could be adjusted perfectly to fit. So I decided to make the ram and piston. The first problem I hit was when I went to my box of treasures and looked for a lump of steel that would do. There was one that was perfect but I tried it with a file and it's hardened. I am no masochist so I ditched that one. You can see I found a piece, a bit big but nice material. Then I found that they had specified a 1/4" X 32tpi tapping for the bolt that holds the piston on the ram. As far as I know there is no such thread so I found a n M6 X 1.0mm pitch set screw. It was on my mind and I think they have made a mistake and it should have been 3/16" X 32tpi which is BSF. I think I'll stick to the M6 set screw, it will do the job. All this took time but I eventually got into the lathe.
I'm sticking to the 4 jaw and dialling in. No real need of course but it's good practice. I got it to within 1/2 a thou. I'm getting better at it.
Then I got started and did some careful turning.....
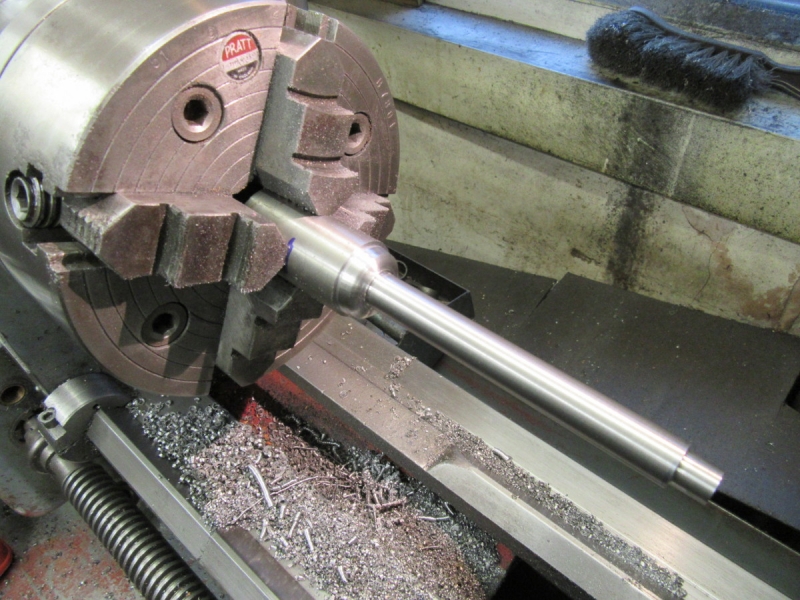
Here's where I was at knocking off time. No emery, dead on size and a nice finish. I shall reverse it tomorrow and do the foot then the tapping in the end of the rod.
Stanley Challenger Graham
Stanley's View
scg1936 at talktalk.net
"Beware of certitude" (Jimmy Reid)
The floggings will continue until morale improves!
Stanley's View
scg1936 at talktalk.net
"Beware of certitude" (Jimmy Reid)
The floggings will continue until morale improves!
-
Stanley
- Global Moderator
- Posts: 90301
- Joined: 23 Jan 2012, 12:01
- Location: Barnoldswick. Nearer to Heaven than Gloria.
Re: SHED MATTERS 2
I got away with finishing the rod without reversing it and then parted it off.
Now for the piston....
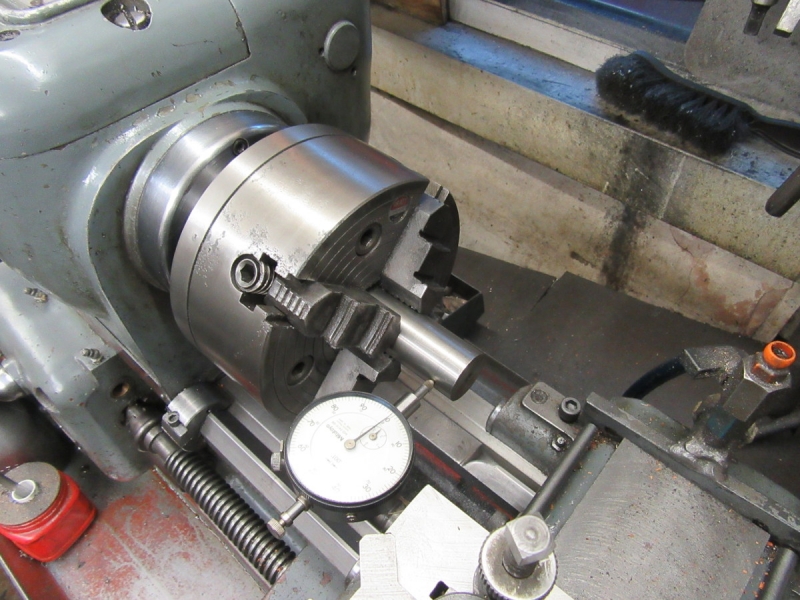
Stuarts provide a slug of cast iron for the piston but of course to save money they make it as short as possible. I changed over to the 4 jaw self centring chuck, there's going to be a lot of swapping about and fiddling and this will be quicker. I started by facing the end and reducing what I can get at to exactly 1" diameter.
Best way to check the fit. Not too tight but just about right I think.
Then I reversed it, took a chance and reduced the other end to the right diameter. Then I had to re-position the slug to give me enough room to reduce it to 1/2" long and still have room to get in with the parting tool to make the 1/8" groove for the piston ring. Not much room but we managed. Then drill it out 3/8" for the rod end and recess it with a milling cutter to take the nut and a socket to tighten it.
Knocking off time after a shorter stint than usual because of shopping but we're getting there. I need to do a bit of adjustment and fitting tomorrow to get the piston tight on the end of the rod. A nice morning I think!
Stanley Challenger Graham
Stanley's View
scg1936 at talktalk.net
"Beware of certitude" (Jimmy Reid)
The floggings will continue until morale improves!
Stanley's View
scg1936 at talktalk.net
"Beware of certitude" (Jimmy Reid)
The floggings will continue until morale improves!
-
Stanley
- Global Moderator
- Posts: 90301
- Joined: 23 Jan 2012, 12:01
- Location: Barnoldswick. Nearer to Heaven than Gloria.
Re: SHED MATTERS 2
I was in the shed very early this morning because, misreading the time on my bedside clock I got up early and by the time I woke up enough to realise it was only 2AM it wasn't worth going back. So I have had a full three hours in the shed.
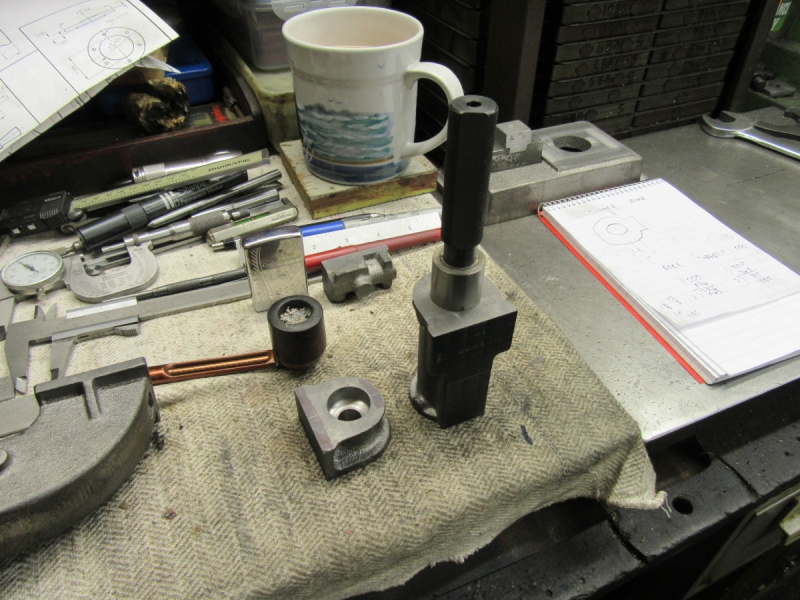
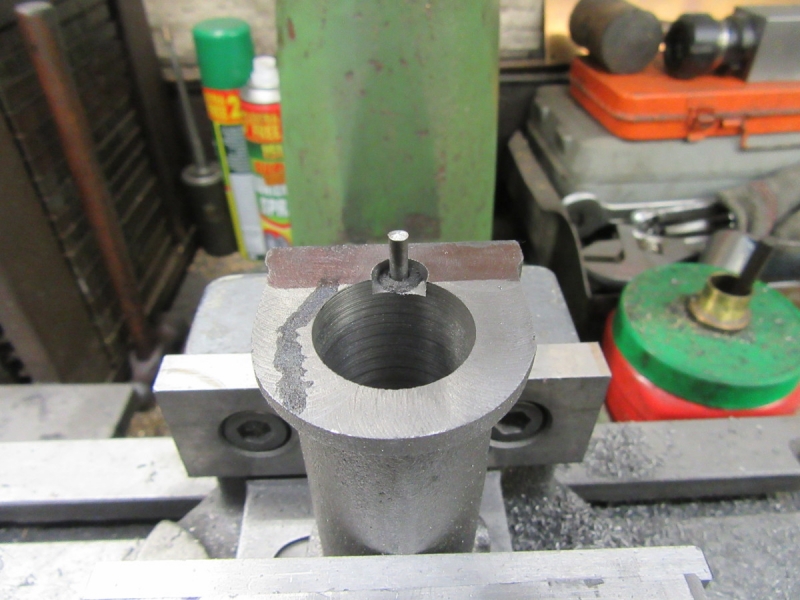
I started by finishing fitting the piston to the ram and then trying it in the bore. Remember me saying there was a little hard shop in the bore? It was stopping me getting a full stroke so I popped it in the vise and poked a 1" reamer through it. Easy to say but it was bloody hard work! I think it took me about 30 minutes but once I got through and tried the piston it was perfect.
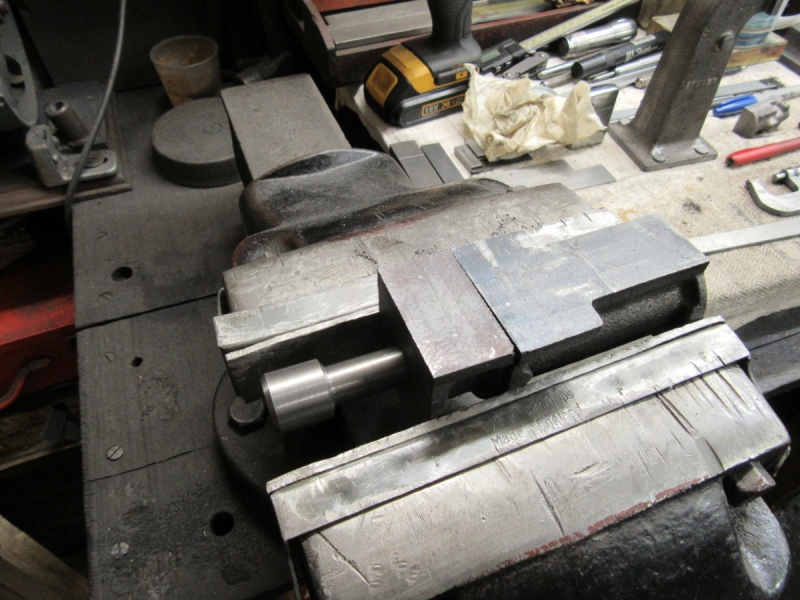
Then I poked a 1/2" reamer through the gland and installed the ram and piston in the assembly to see what the rabbit was. It will need a slight adjustment but it's OK.
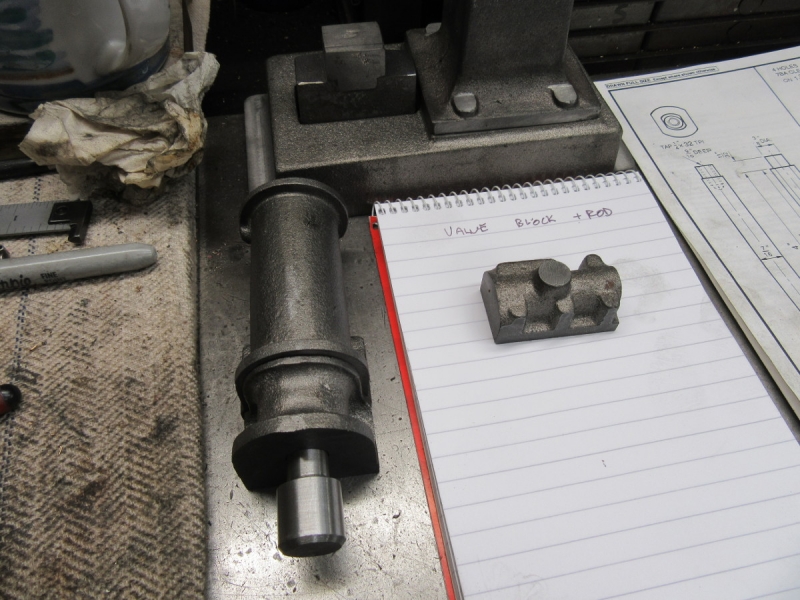
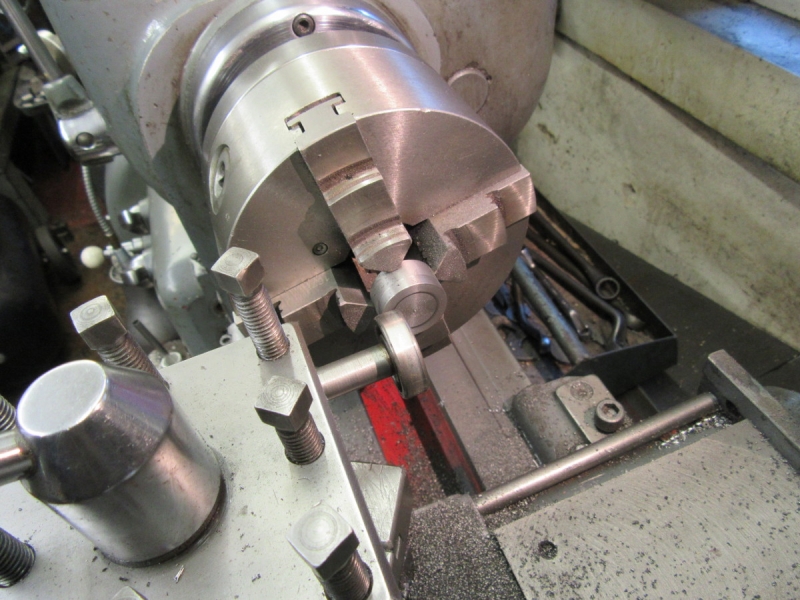
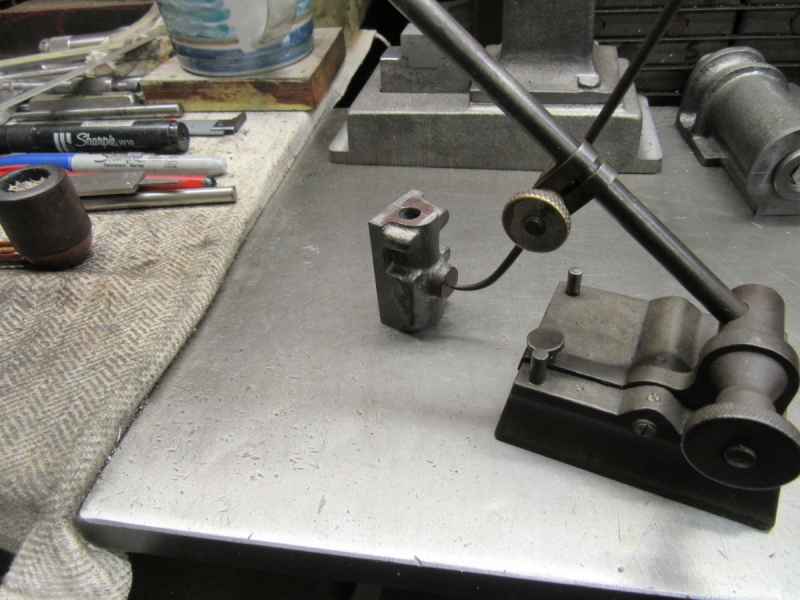
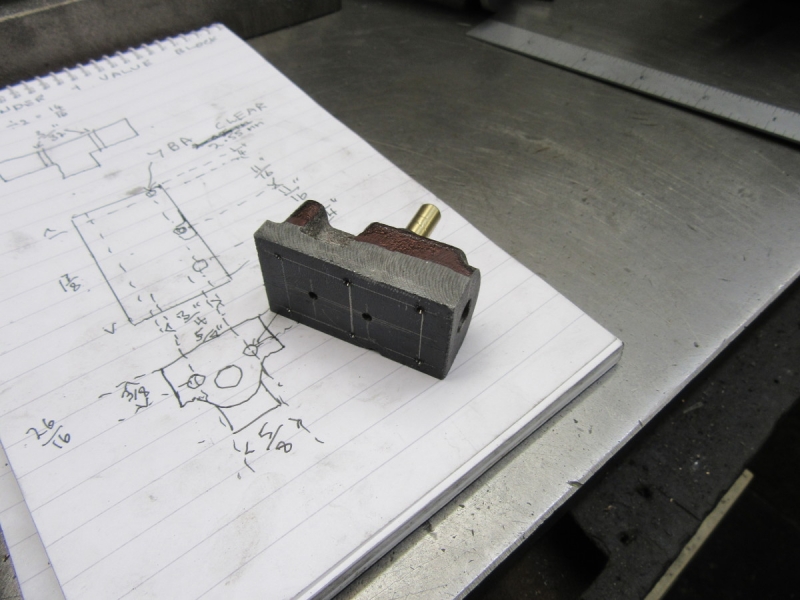
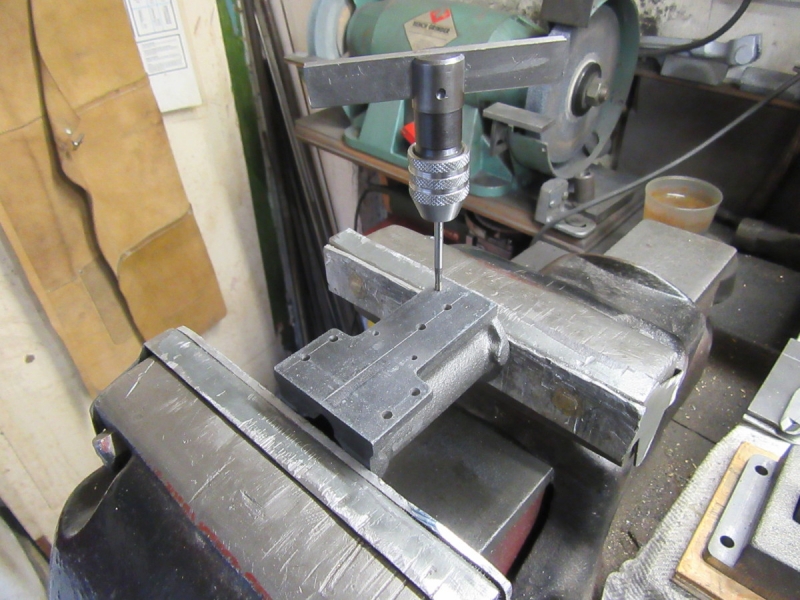
Lots to do on the castings yet but I decided to mark the valve block up and bore it.

I decided to simply drill it 5/16" and set it up in the mill.
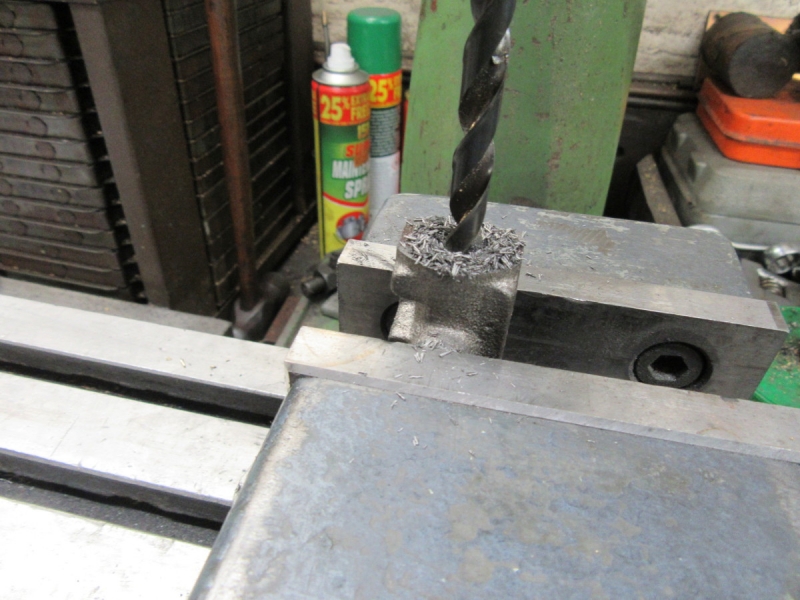
I found the centre, locked the tables and went straight through.
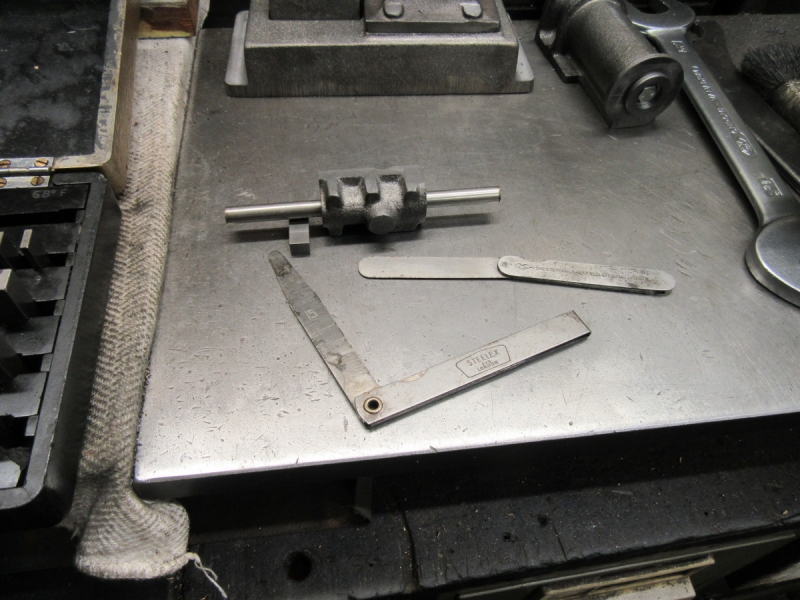
The stock for the valve is a nice fit but it looked to be a mile out at the bottom end! So I got the matrix slips out and did a bit of measuring. I was right, it was a bit off centre but nowhere near as bad as it looked, only 4 thou. It looks worse because of the way the body has been cast and it will be no detriment on fitting.
Then measure and mark the steam inlet.
I re-cut my centre finder, it was getting a bit blunt because it isn't hardened.
Then I drilled and tapped the steam inlet for the copper inlet pipe. Once again they specify a thread that doesn't exist in my book, 1/4" X 32tpi. I ignored this and made it 1/4" X 26tpi, old fashioned brass thread.
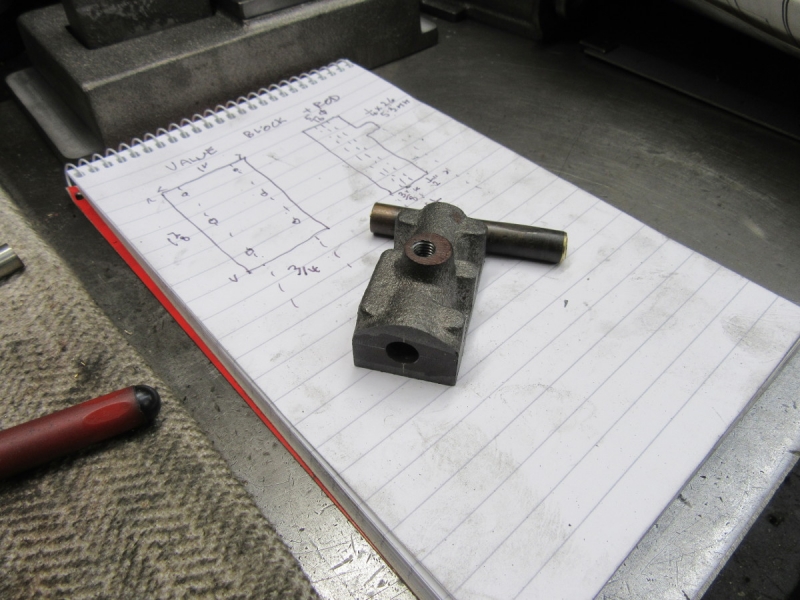
Here's where I was at knocking off time. The valve body is bored and tapped and I have found some brass stock to make a 1/4" inlet pipe. Not a bad morning.... I may be ready for drilling holes. Come to think, it wouldn't be a had idea to make the top lid, divide it for the bolt holes and fit it to the cylinder. I'll see how I feel tomorrow.
Stanley Challenger Graham
Stanley's View
scg1936 at talktalk.net
"Beware of certitude" (Jimmy Reid)
The floggings will continue until morale improves!
Stanley's View
scg1936 at talktalk.net
"Beware of certitude" (Jimmy Reid)
The floggings will continue until morale improves!
-
PanBiker

- Site Administrator

- Posts: 16449
- Joined: 23 Jan 2012, 13:07
- Location: Barnoldswick - In the West Riding of Yorkshire, always was, always will be.
Re: SHED MATTERS 2
I follow shed matters as usual and I have been having a feeling of deja vu with the latest project. I was looking on the archive site today and came across a posting or three on there from just over 10 years ago when you built one before. I knew I had seen it somewhere else. 

Ian
-
Stanley
- Global Moderator
- Posts: 90301
- Joined: 23 Jan 2012, 12:01
- Location: Barnoldswick. Nearer to Heaven than Gloria.
Re: SHED MATTERS 2
You're right Ian. I gave that one to my grand daughter Yiota and fancied another go. I had the castings for the first in my treasure chest, this lot cost me over £300!! Ah well......
Stanley Challenger Graham
Stanley's View
scg1936 at talktalk.net
"Beware of certitude" (Jimmy Reid)
The floggings will continue until morale improves!
Stanley's View
scg1936 at talktalk.net
"Beware of certitude" (Jimmy Reid)
The floggings will continue until morale improves!
-
Stanley
- Global Moderator
- Posts: 90301
- Joined: 23 Jan 2012, 12:01
- Location: Barnoldswick. Nearer to Heaven than Gloria.
Re: SHED MATTERS 2
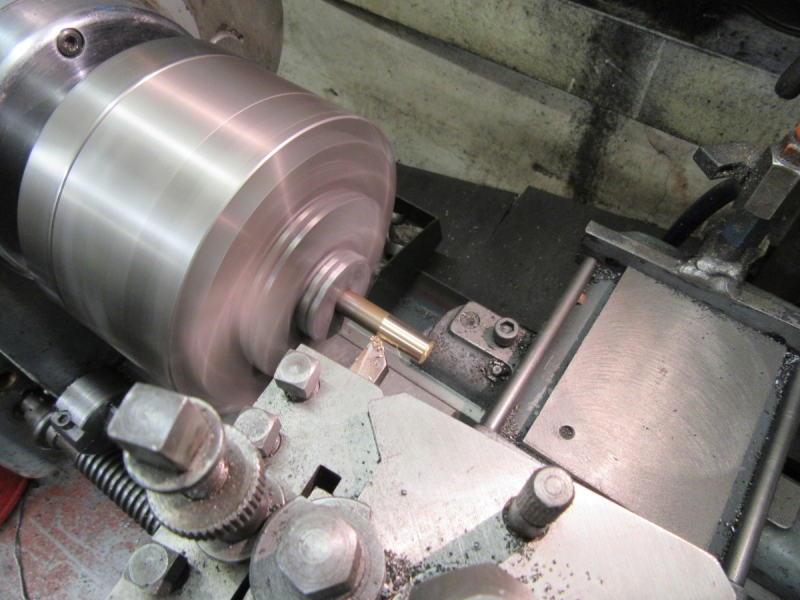
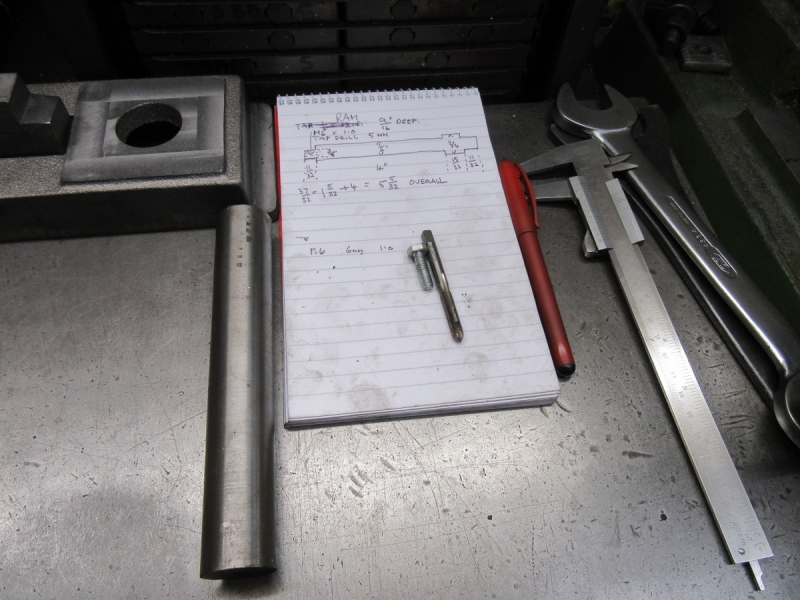
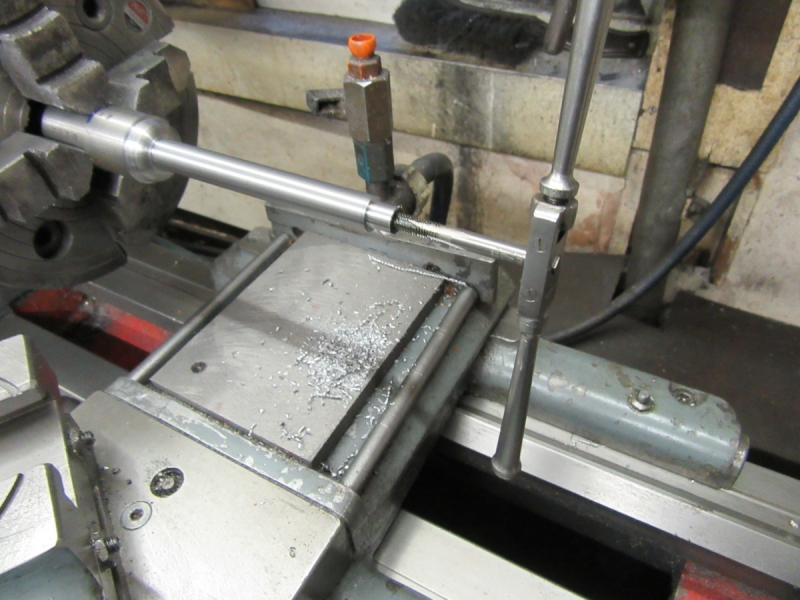
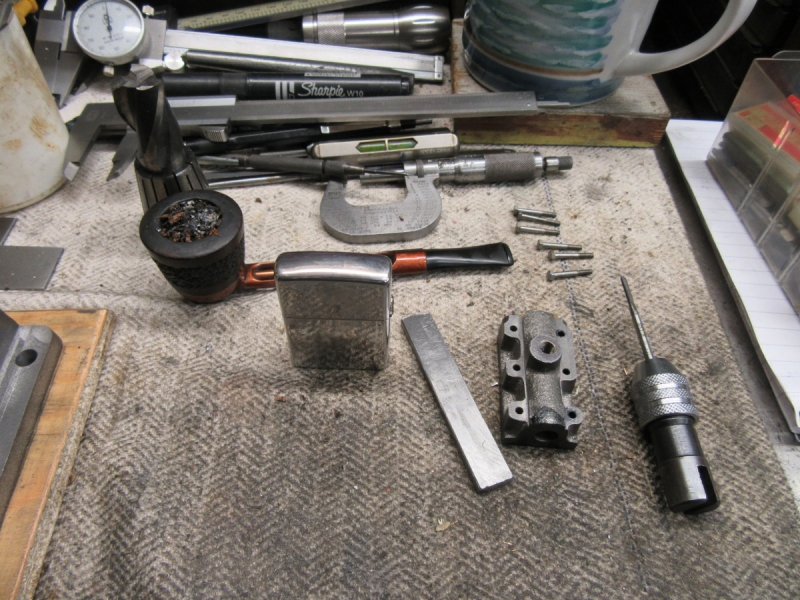
First job was to make the steam inlet pipe. I had no 1/4" pipe so I made my own from some scrap 3/8" brass bar.
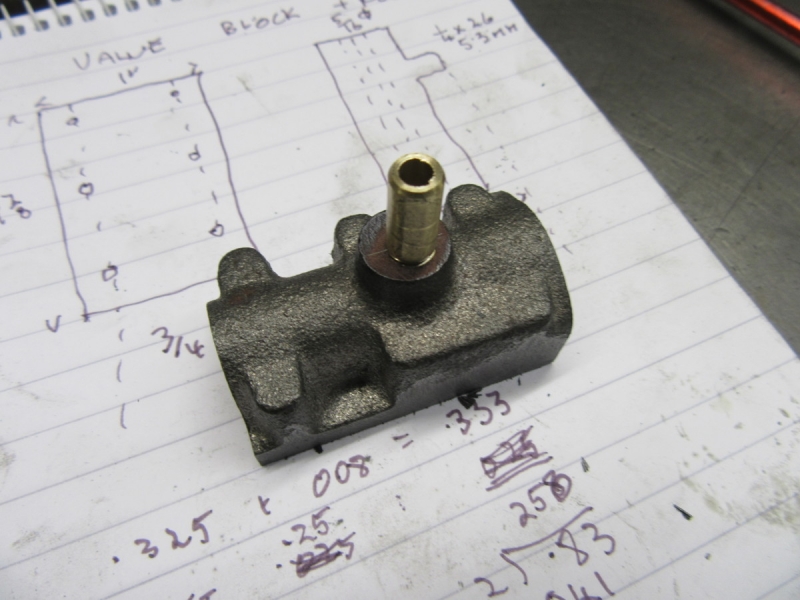
That's that out of the way!
Next was the top lid. I faced it and put the 1" register on for the bore and then reversed it and did it with the outside jaws because that gripped the register more securely. I slipped up and made it a few thou less in diameter than it should have been but that won't harm.
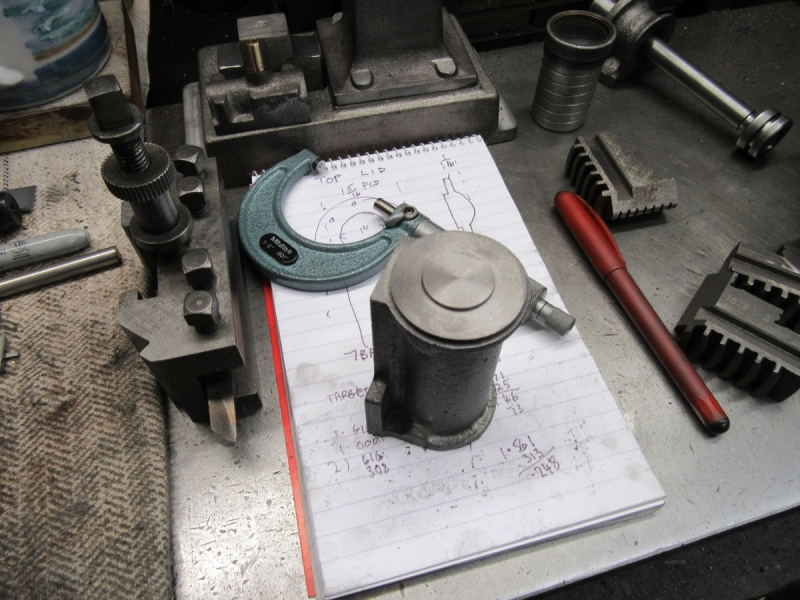
Knocking off time. The PCD for the 7BA bolt holes is scribed on the inside and tomorrow the first job will be to go onto Johnny's lathe in the front room and divide the circle for six bolts.
The drawing calls for a domed top to the lid but this dates back to the days when the lid supplied would be a casting with a domed top. I just made it as in the picture.
Stanley Challenger Graham
Stanley's View
scg1936 at talktalk.net
"Beware of certitude" (Jimmy Reid)
The floggings will continue until morale improves!
Stanley's View
scg1936 at talktalk.net
"Beware of certitude" (Jimmy Reid)
The floggings will continue until morale improves!
-
Stanley
- Global Moderator
- Posts: 90301
- Joined: 23 Jan 2012, 12:01
- Location: Barnoldswick. Nearer to Heaven than Gloria.
Re: SHED MATTERS 2
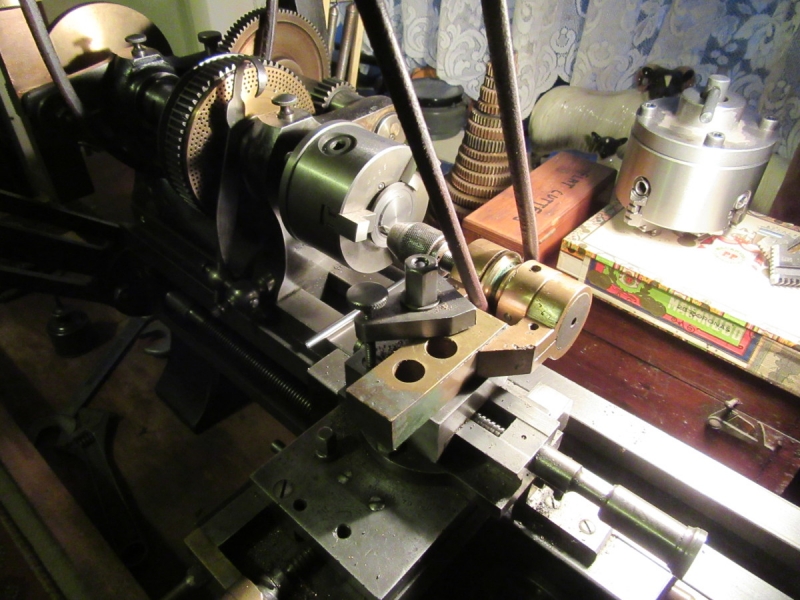
Johnny's lathe is such a joy to work with and just the job for this of course. Right size and built-in dividing. I set it up this morning for dividing and here I am ready to start. No dramas, I used the 12 hole register on the pulley and just used every second hole..... Then I put the lathe back in turning mode and went into the shed.
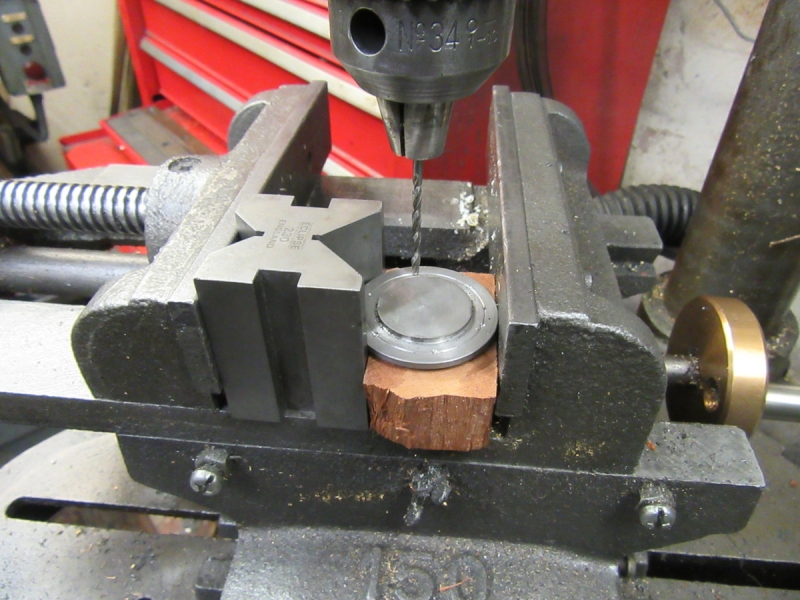
Then under the drill press and drill the lid clearance for 7BA studs.
If only everything was as accurate and easy!
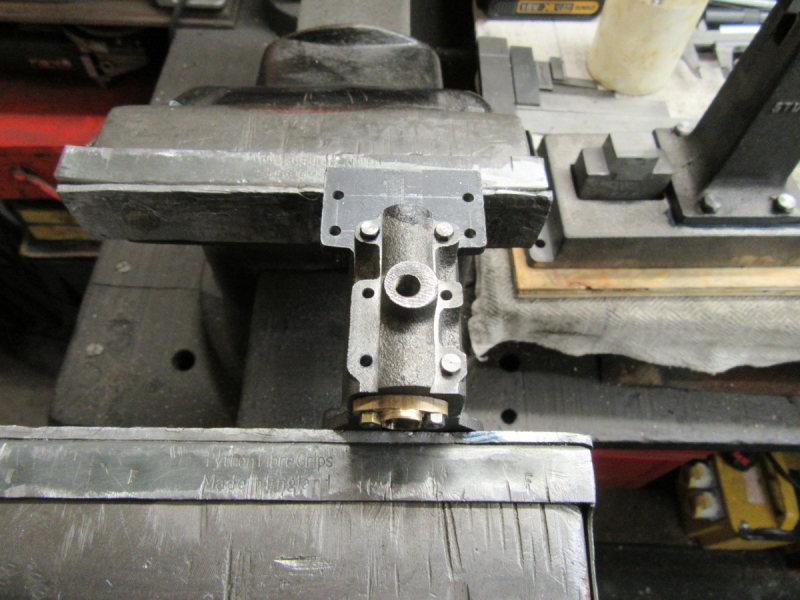
This was a different kettle of fish. I have to put a register on the gland body but first I have to get it mounted central and accurate in the 4 jaw. It's a very awkward shape and it was a bugger. I think it took over half an hour to get it somewhere near!
Once I had it as near central as I could, I addressed the squareness with John's push tool.
After checking with a dial indicator I decided I was as close as I was going to get and started cutting, it was perhaps 8thou out of square. Sometimes perfect is the enemy of progress.

Here we are with a flat face. Two things.... can you see two little marks to the left of the bore? This is the cold chill hard shop coming through, it made it more difficult. Second, I am not convinced I have this perfectly central and if I follow the drawings and put a register on at this setting I could find myself in trouble when I fit the ram. The register should have been made before I bored it. I've decided that the ram and piston are such a good fit that I am going to use them to position the gland body on the cylinder when I mark it up for the bolts. This will ensure I have it central and the lack of the register will not be any detriment. Tomorrow I shall finish taking the gland body down until I have the correct fit for the gland. I'm ready to knock off!
Stanley Challenger Graham
Stanley's View
scg1936 at talktalk.net
"Beware of certitude" (Jimmy Reid)
The floggings will continue until morale improves!
Stanley's View
scg1936 at talktalk.net
"Beware of certitude" (Jimmy Reid)
The floggings will continue until morale improves!
-
Stanley
- Global Moderator
- Posts: 90301
- Joined: 23 Jan 2012, 12:01
- Location: Barnoldswick. Nearer to Heaven than Gloria.
Re: SHED MATTERS 2
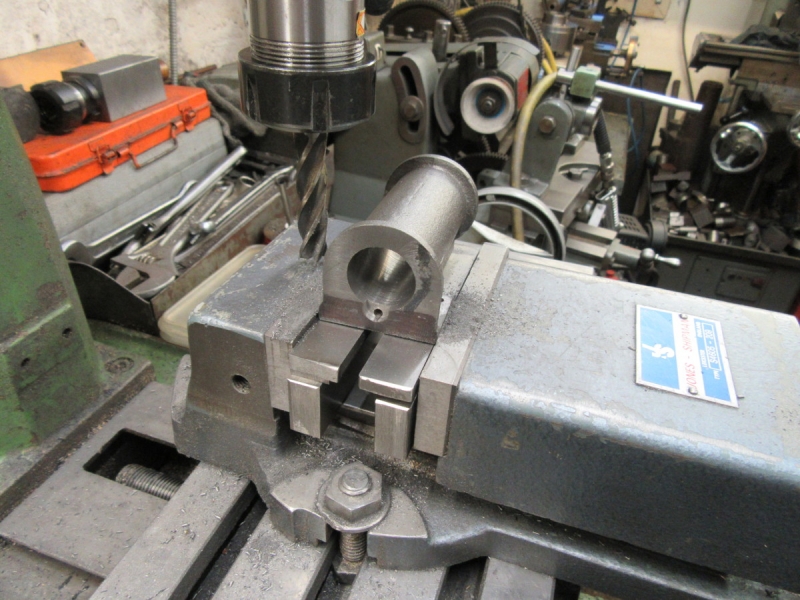
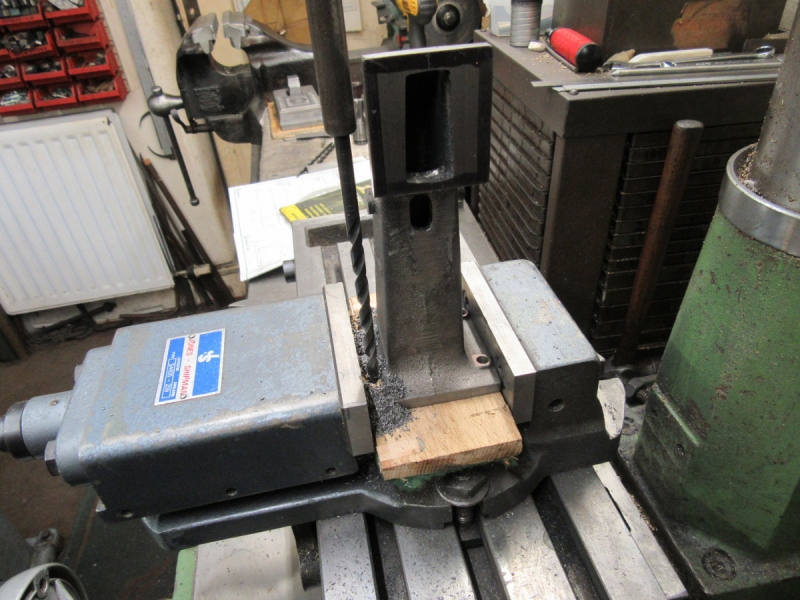
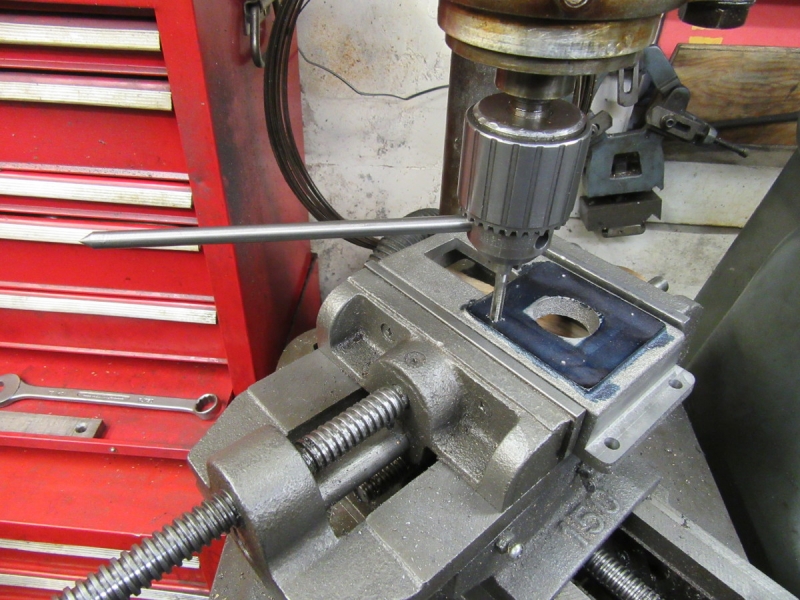
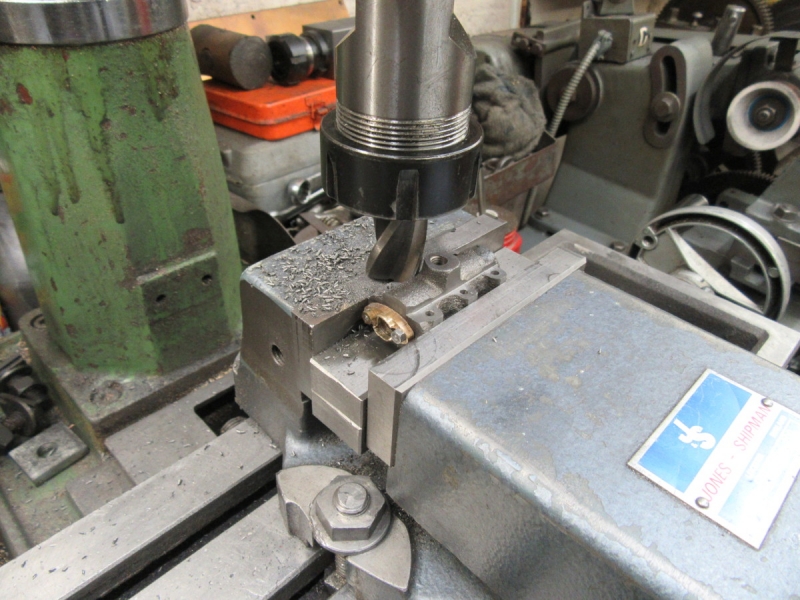
I finished the gland block off and then did some very careful measuring and marking. Today is going to be interesting, I want to drill the steam passages in the valve block and the cylinder. The cylinder will be the real test as there are some deep 1/8" holes..... The valve block transfer ports have to match the cylinder.....
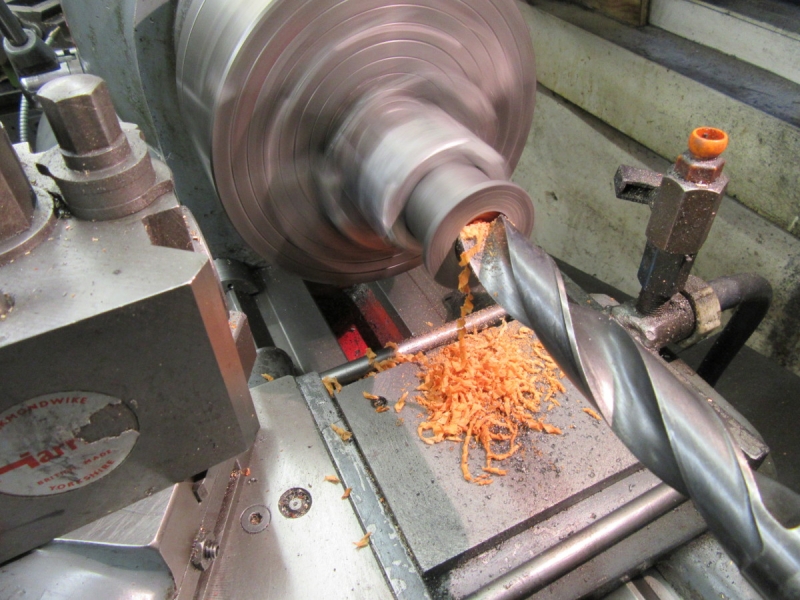
I did the transfer ports in the valve block first as they are easy. Then I went to the cylinder, set it up in the VM and opened the recess up in the end of the bore with a 3/8" end mill. Then fit the 1/8" drill and drill a hole 5/8" deep. No problem. Note the depth gauge, don't laugh, it works.
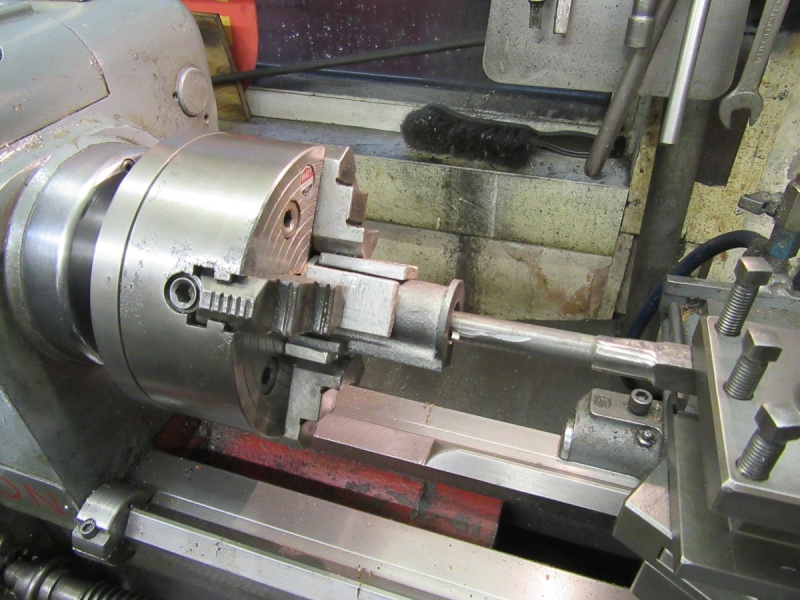
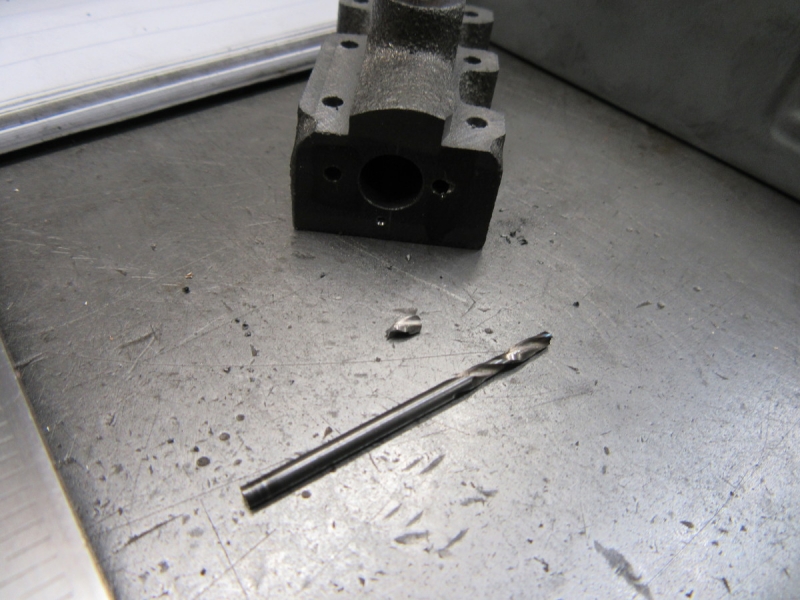
Then I went to the other end which is the really deep drilling. No problem with the recess. Made sure I had the depth measured and set off very quietly, stopping frequently, blowing out the chips and then taking another bite. Despite this, here's what happened, the ultimate nightmare. Funny thing is that when drills break they usually break in the fluted section where they are weakest. This broke in the shank making me wonder if there was a flaw in it. That's the bad news, the good news is that because there was some shank poking out of the hole I got hold of it with the Mole Grips and managed to loosen it and get it out.
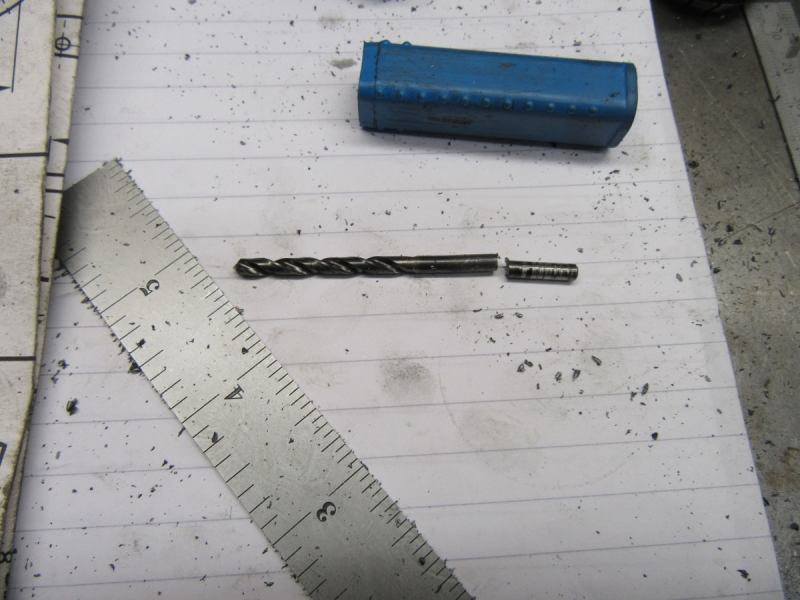
When I got it out, more good news, the rest of the drill was in one piece. Very strange, I have never had a drill break out of the hole like this. I went furtling and found a long series 1/8" drill and carried on.
Once I had the deep holes drilled in the cylinder I drilled the transfer ports, no problem here as you could feel when the drill has broken through into the steam passage. I checked that we had clear holes and that the valve block fits the cylinder face, all OK so here we are at knocking off time. A difficult morning but everything done properly with no cock-ups. I'm not counting the broken drill as a cock-up, something funny about that and I think there was a flaw in the shank. Glad that lot's done!
Stanley Challenger Graham
Stanley's View
scg1936 at talktalk.net
"Beware of certitude" (Jimmy Reid)
The floggings will continue until morale improves!
Stanley's View
scg1936 at talktalk.net
"Beware of certitude" (Jimmy Reid)
The floggings will continue until morale improves!
-
Stanley
- Global Moderator
- Posts: 90301
- Joined: 23 Jan 2012, 12:01
- Location: Barnoldswick. Nearer to Heaven than Gloria.
Re: SHED MATTERS 2
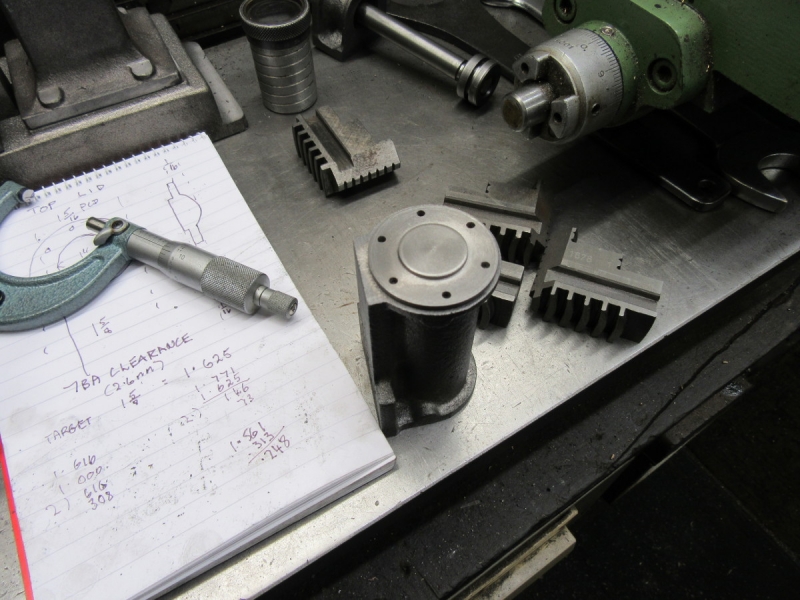
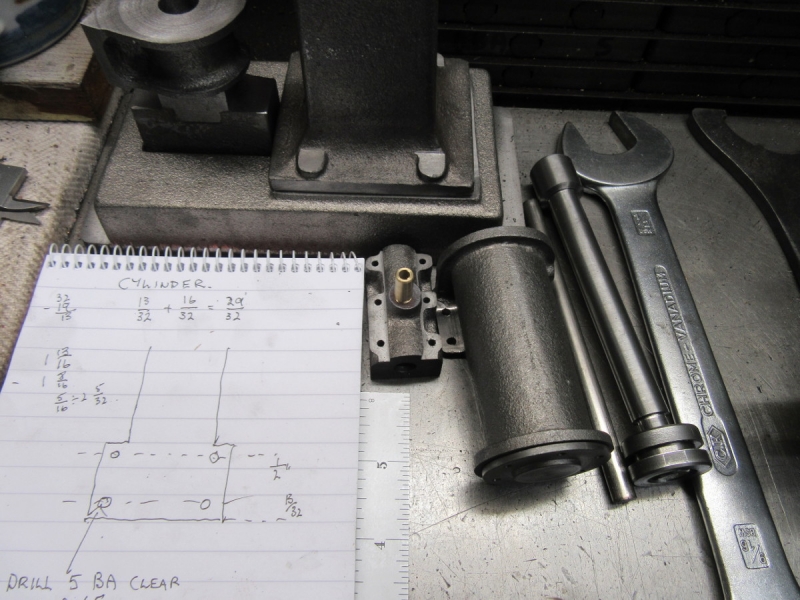
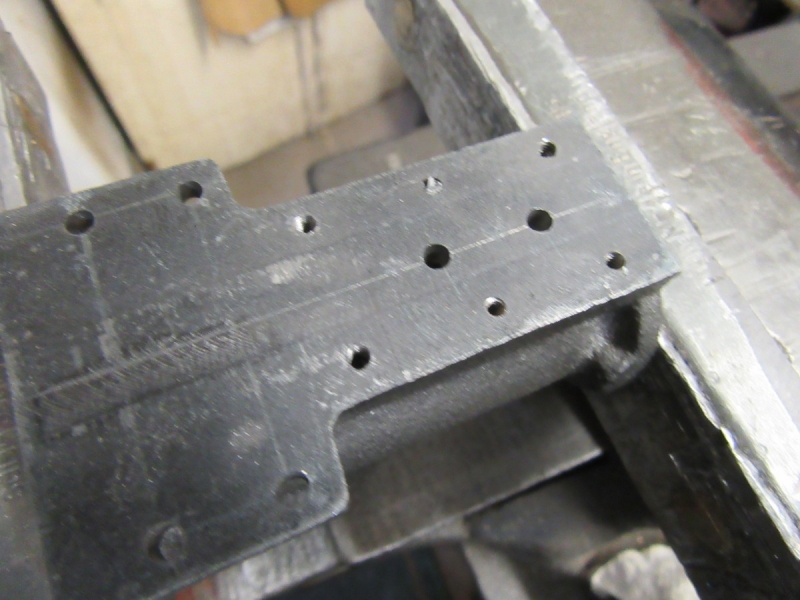
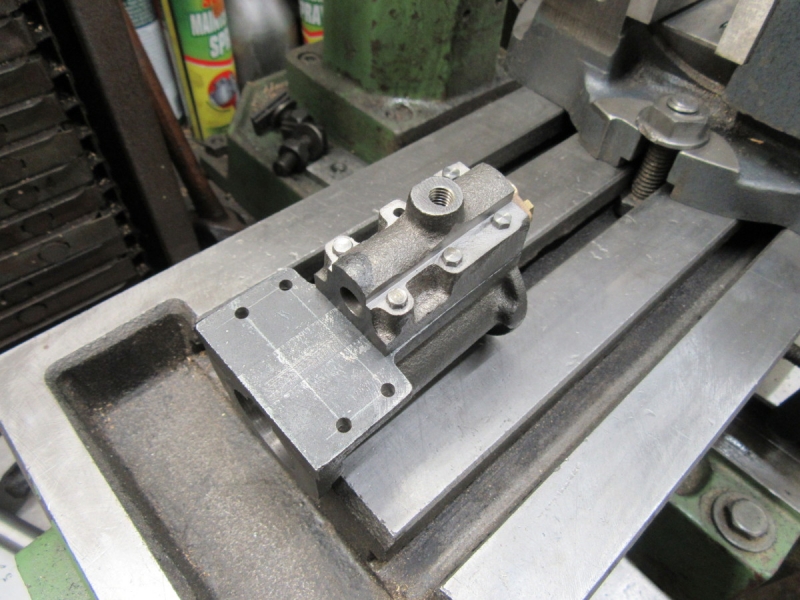
It's bolt holes in castings day. I started with the valve block. Some blue, careful measurement and marking and make a fag packet drawing even though I have the original drawing. The reason why I do this is that it sets things in my mind and is a useful check to see if I have got everything right.
Into the VM and first put a face on the bosses. I cut this side and transferred to the other side on the same setting so they are identical height.
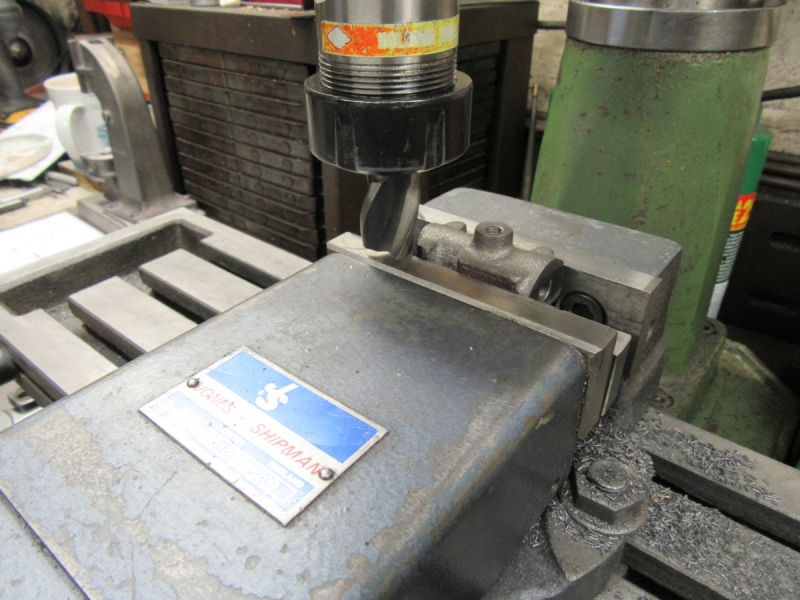
Then change to a 2.6mm drill and poke some holes through. These are quite deep drillings and the drill is being driven by a 1hp motor so quietly away, no rush and clean the hole out with compressed air after every peck! Good move buying that compressor....
Here's the result, nice to see that even though the holes were drilled from the face they have ended up central on the bosses. Everything has come together nicely. Important to realise that the reason for this is that the initial machining of the valve block was accurate. Bad work early on can catch you out down the road.

Next is the four holes in the flange of the cylinder. Not as deep a drilling as the valve block and so less stress, straight through with gentle pressure on the quill and we have 4 perfect 2.7mm holes. (Clearance for 5BA)
Knocking off time. I didn't get in the shed until after 8AM, someone has to do the cooking! I shall make some decisions about facing the flange on the cylinder tomorrow.....
Stanley Challenger Graham
Stanley's View
scg1936 at talktalk.net
"Beware of certitude" (Jimmy Reid)
The floggings will continue until morale improves!
Stanley's View
scg1936 at talktalk.net
"Beware of certitude" (Jimmy Reid)
The floggings will continue until morale improves!
-
Stanley
- Global Moderator
- Posts: 90301
- Joined: 23 Jan 2012, 12:01
- Location: Barnoldswick. Nearer to Heaven than Gloria.
Re: SHED MATTERS 2
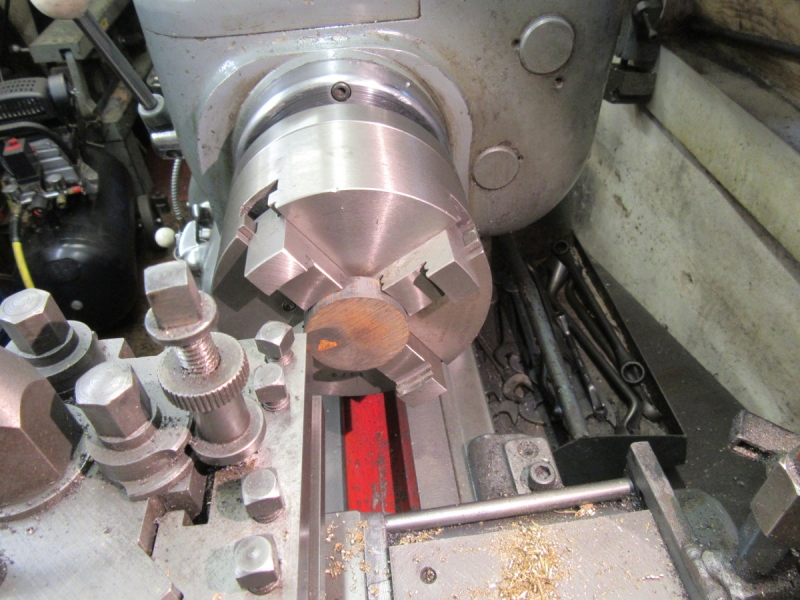
My first thoughts about facing the flange on the cylinder were find the centre and then spot face with a small end mill. First I realised that my centre was to thick too get at the centre. I went to slim it down, was careless and buggered it up! So Here I am making a replacement centre. Splendid, only trouble was that even this one was too thick and on top of that I realised that the small end mill will be too short to reach anyway. I retired to my pipe and pot of tea and had a rethink.
Here's the solution.... use a longer end mill and just take what I could get at.

Then I got the Dremel out and cleaned up what I hadn't got with the mill. Not the best solution in the world but it does the job. Then, just as a check I tried the 5BA bolts that have to go into the holes and bless me, they didn't fit. Back to the drawings and of course as usual it was down to me, I had drilled the holes tapping size instead of clearance. That was soon put right, I popped a 3.3mm drill through the holes and then checked to see if the bolts fitted. One was interfered with by the pad for the drain cock which I shan't be using so I filed a bit off the side of it to give the bolt clearance.
Here we are at knocking off time. I was a bit late in the shed this morning because of shopping so we haven't torn any trees up but progress nonetheless. I shall have a think about where to go next.
Stanley Challenger Graham
Stanley's View
scg1936 at talktalk.net
"Beware of certitude" (Jimmy Reid)
The floggings will continue until morale improves!
Stanley's View
scg1936 at talktalk.net
"Beware of certitude" (Jimmy Reid)
The floggings will continue until morale improves!
-
Stanley
- Global Moderator
- Posts: 90301
- Joined: 23 Jan 2012, 12:01
- Location: Barnoldswick. Nearer to Heaven than Gloria.
Re: SHED MATTERS 2
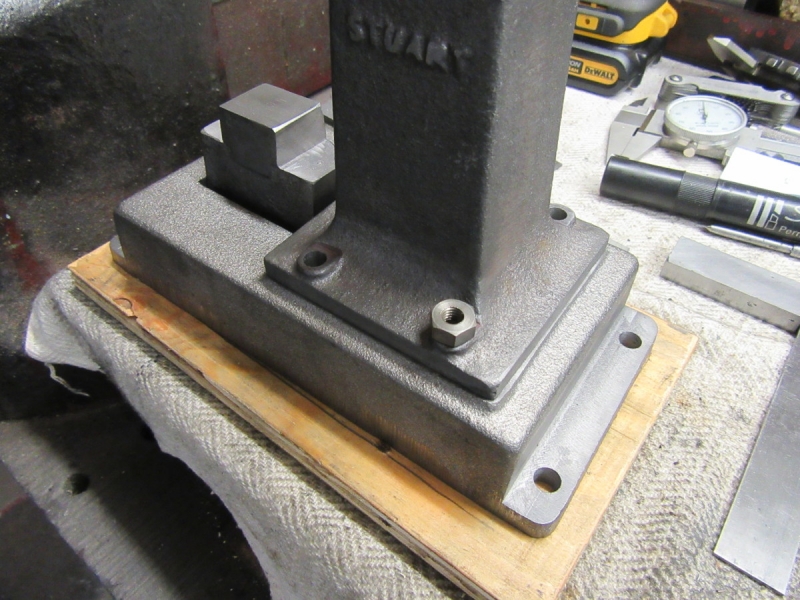
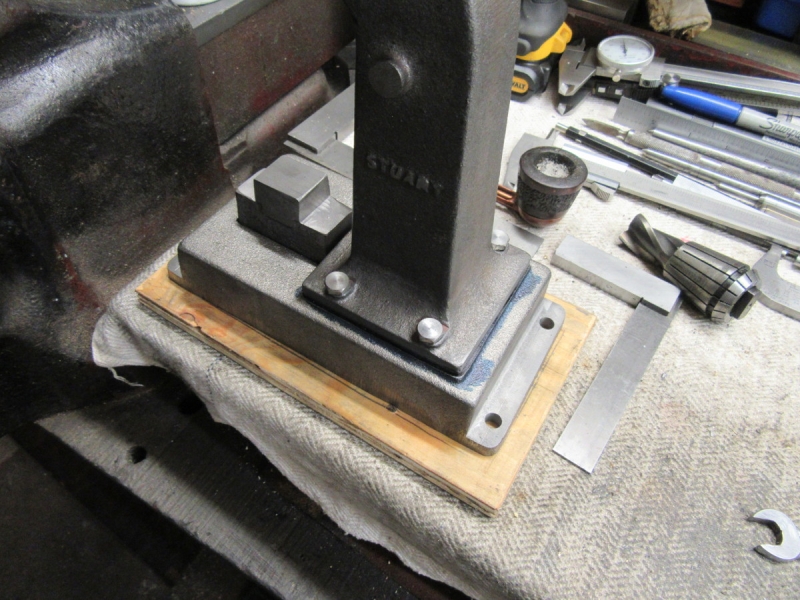
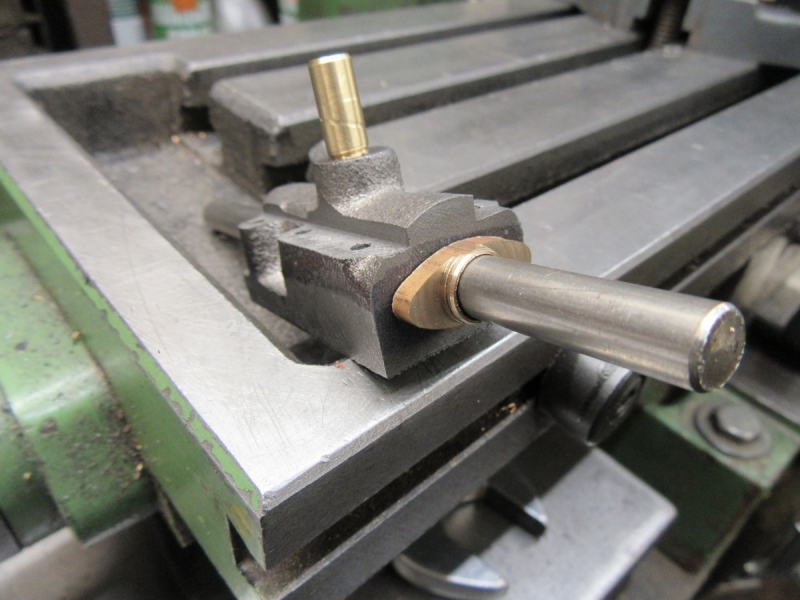
I decided to do the drillings for the holding down bolts. While I was at it I cut a piece of plywood to act as a temporary base for use while I am fitting.
I marked it with the location of the holes in the base while I was at it and put a register on the anvil to show which way round it goes.
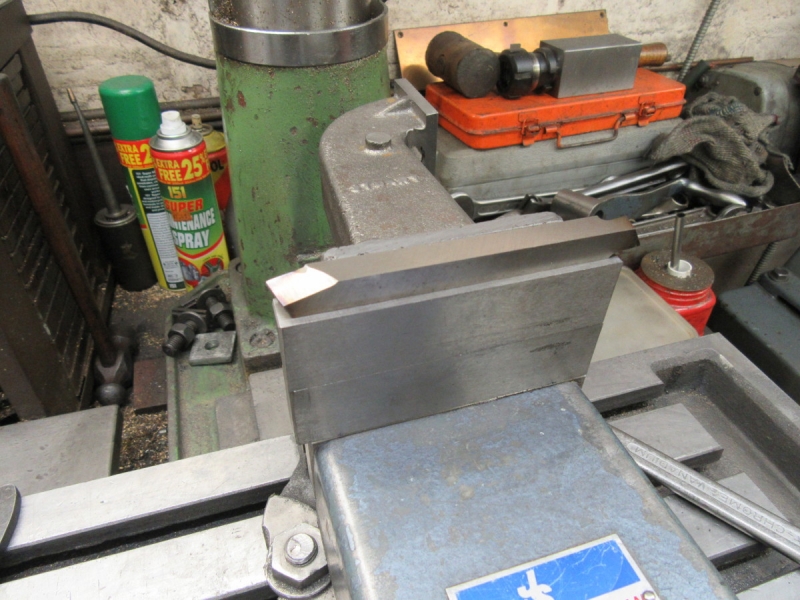
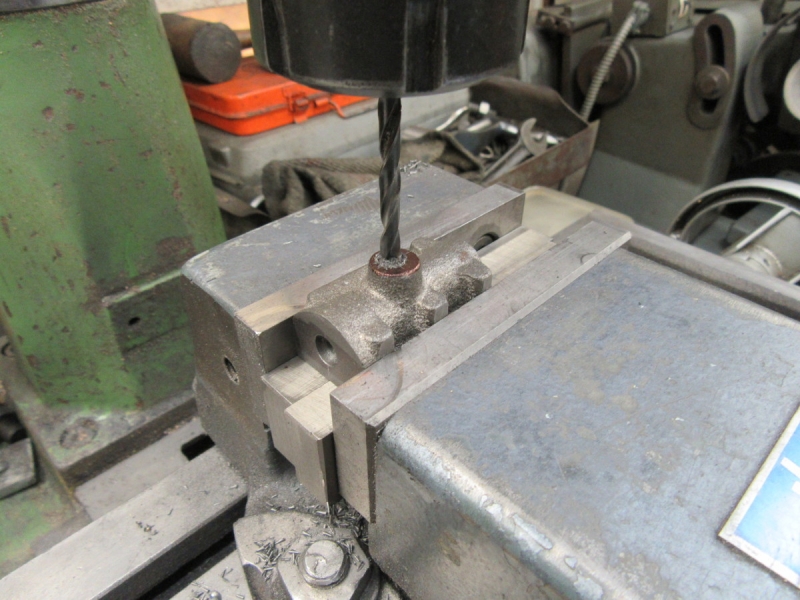
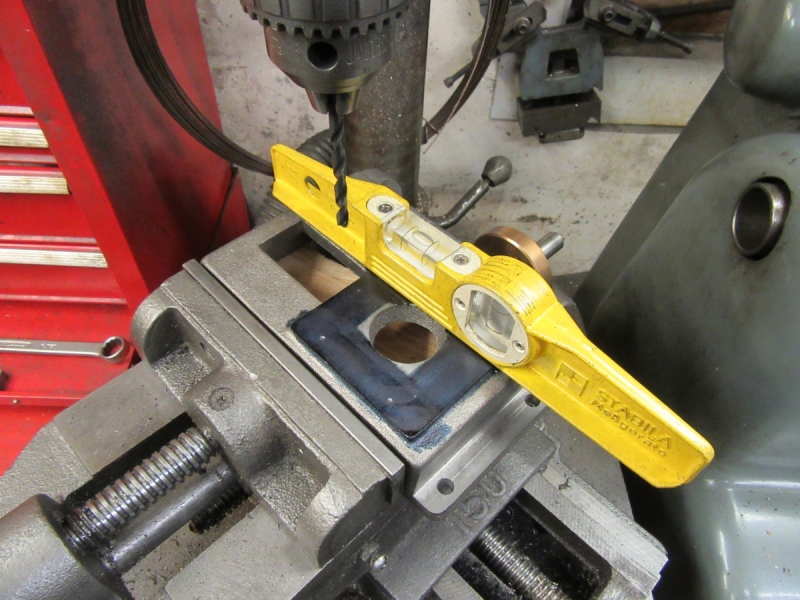
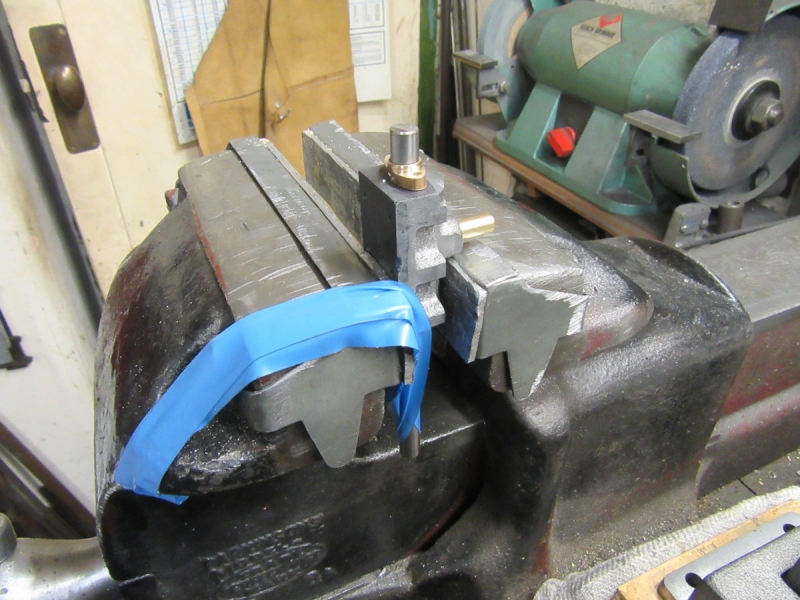
When I came to put the standard in the vise on the mill in order to drill it I found it was slightly too big and not quite square so I adjusted it with a light cut. It fitted after that.
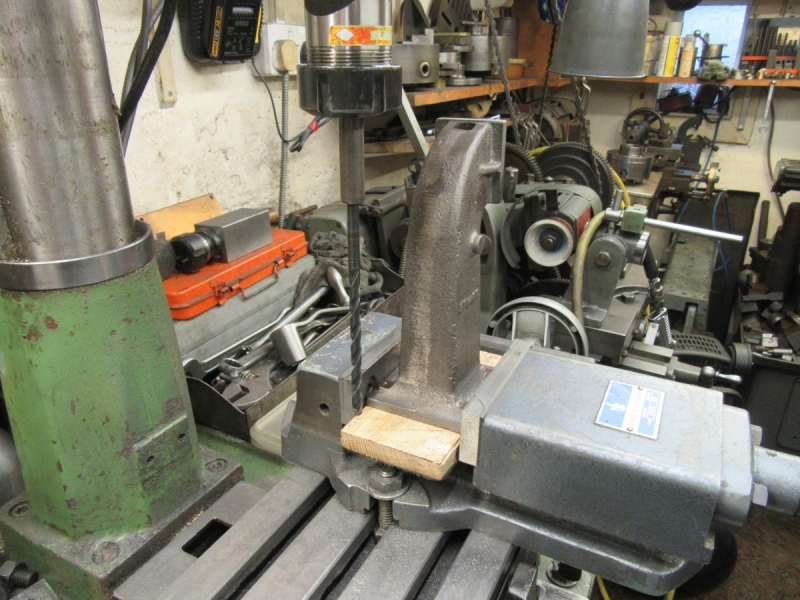
I hit a bit of a problem here. I marked the base of the standard and thought I could get away with a long series 3/16" drill which is what the drawings called for, clearance for 2BA bolts. It was nowhere near long enough but..... I had a milling cutter holder drilled 1/4". I decided that 1/4" would be all right as I could always use bigger bolts. So I ground a flat on the drill so that the grub screw would bite, lifted the head of the mill enough to accept the drill and crashed on.
The drill wasn't quite running concentric, not surprising considering the length, but nothing I couldn't deal with if I was careful. I sharpened the drill to give me the best chance and drilled all four holes with no problem but I was very careful and let the drill dictate the pressure on it.
Here's where I was at closing time. The nut is 0BA and doesn't look out of place. I can manage this. Far better than drilling from the back side as it could be marked better and going down that route would have had its own problems. Nice morning......
Stanley Challenger Graham
Stanley's View
scg1936 at talktalk.net
"Beware of certitude" (Jimmy Reid)
The floggings will continue until morale improves!
Stanley's View
scg1936 at talktalk.net
"Beware of certitude" (Jimmy Reid)
The floggings will continue until morale improves!
-
Stanley
- Global Moderator
- Posts: 90301
- Joined: 23 Jan 2012, 12:01
- Location: Barnoldswick. Nearer to Heaven than Gloria.
Re: SHED MATTERS 2
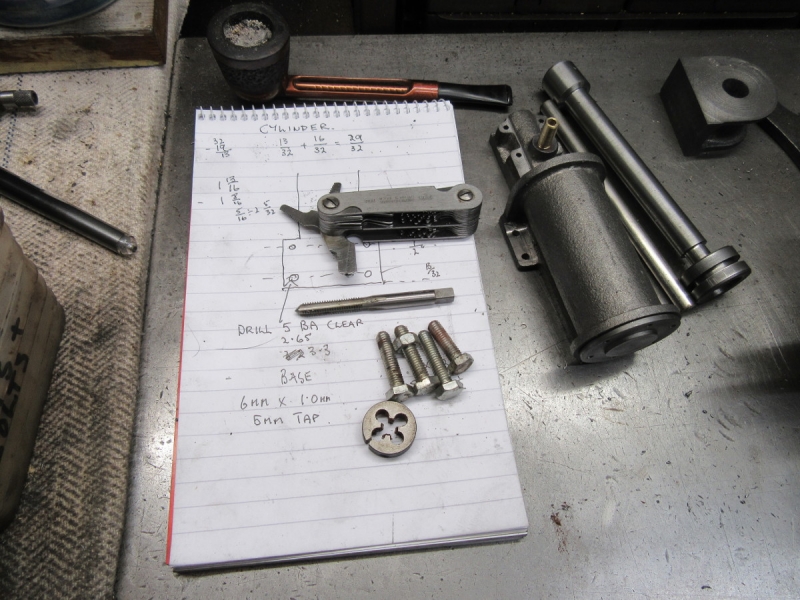
I decided my first job was to find some bolts that would suit the base. I had these 6mm X 1mm bolts and they are just right. I found the 6mm tap and die so I could run down the threads on the bolts and clean them up.
Usual route, blue up, mark as accurately as you can with a transfer punch and then get the base set level under the drill.
I tapped each hole on the same setting as the drill.
All modern bolts have information embossed on the head and this looks bad on a model so I took the time to turn all the heads down to a smooth finish and chamfered the edges.
The bolts all fitted and here they are in the base of the standard. They look about right I think.
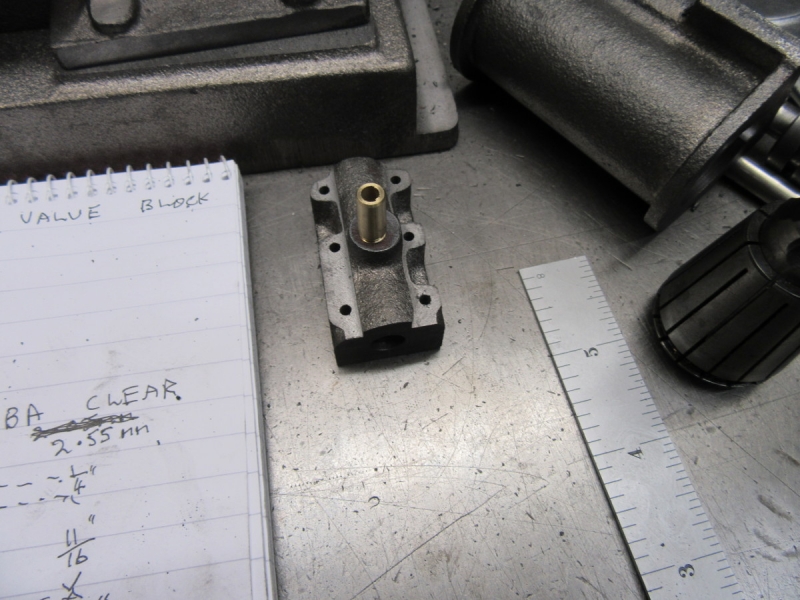
I decided to address the matter of the gland on top of the valve block. Of course I went to the drawing.... Problem is I don't understand it. For a start off the plans call for the gland to be threaded internally 1/4" X 32tpi. In case you've forgotten this is an archaic variation on the old Model Engineer thread. I don't have that tap but it doesn't matter because there is no reason for the gland to be threaded at all, let alone a smaller diameter than the 5/16" valve which has to slide freely in the gland. One other small matter is that there is no provision on the drawing for any packing. The Steam Hammer would function just as well if the gland didn't exist. I decided to make it anyway but bored out the same diameter as the valve piston. All a bit unsatisfactory!
One reason for pressing on is that it gives me a chance to use Johnny's copy of the Birch Lathe.... I swapped to the 4 jaw and set the stock up using the lathe centre.
I turned the face and put the boss on it and then drilled it 5/16"

Here's where I was at closing time. I sawed the gland off in the chuck using the jaws as a guide. I'm slightly perturbed by the fact that there isn't a big enough flat face on the valve block to accept all of the gland. I'll puzzle that out tomorrow!
All this is taking a lot of time but there's no rush!
Stanley Challenger Graham
Stanley's View
scg1936 at talktalk.net
"Beware of certitude" (Jimmy Reid)
The floggings will continue until morale improves!
Stanley's View
scg1936 at talktalk.net
"Beware of certitude" (Jimmy Reid)
The floggings will continue until morale improves!
-
Stanley
- Global Moderator
- Posts: 90301
- Joined: 23 Jan 2012, 12:01
- Location: Barnoldswick. Nearer to Heaven than Gloria.
Re: SHED MATTERS 2
Here's this morning's first job, fit the gland to the valve block complete with 7BA studs.... Nowt to it eh? Soon knock this off. Dream on Kids! One thing I realised was that I was mistaken yesterday when I complained about the casting not having a face big enough to accept the gland, I was looking at the wrong end! It always pays to check the drawings.
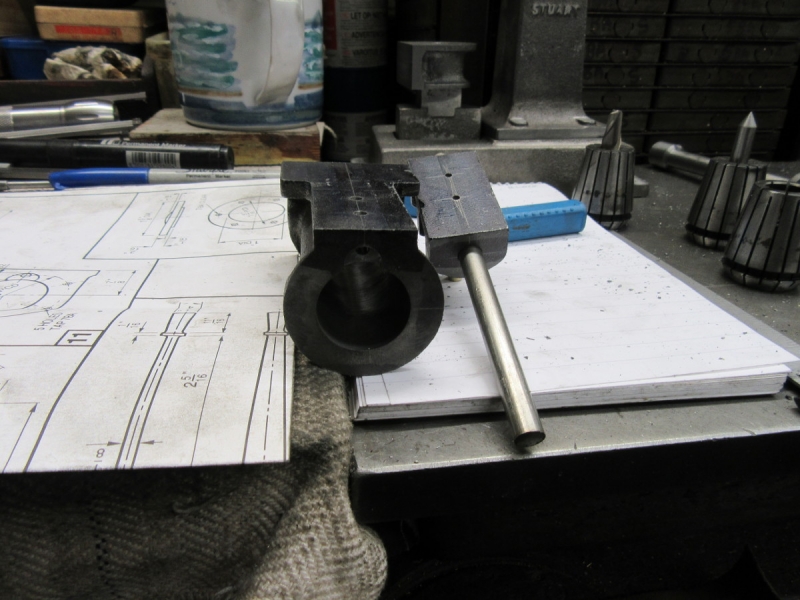
First job was mark the gland up and drill the 7BA clearance holes. Then transfer them to the valve block. In order to make sure I had it lined up properly I had to have the piece of stainless rod in place to make sure I had it lined up correctly. Hence the sophisticated set up, I needed a third hand to stop the valve rod falling out. By the way, I have put witness marks on the gland, the valve block, the cylinder top and the lid so that I can always preserve the correct relationship.
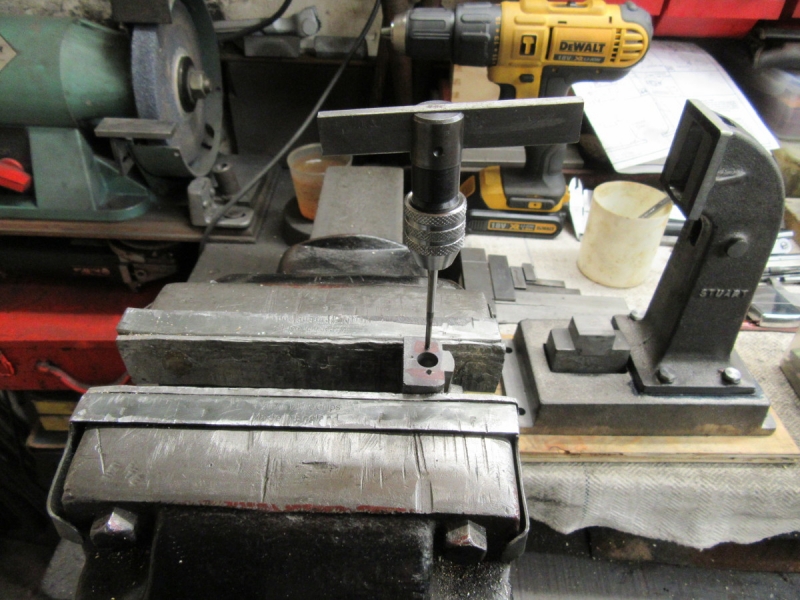
Then under the drill press, make sure it was upright and then drill the tapping holes for the 7BA studs. I drilled both holes, not enough feel to tap using the drill chuck. I hate small taps! By the way, I am cheating, I am drilling these holes 2.1mm instead of the correct size, 2.05mm, there's no strain on the studs and I want to make tapping as easy as possible. The increase will be OK.
The first hole was OK but just as I was getting to depth on the second..... Even though I was being ultra careful I sheared the drill off. Luckily I had been clearing the chips after each peck in the hole and before I went into a decline I gave the block a couple of smart taps on the surface plate and out popped the broken end. I'm not trying to avoid responsibility but usually when this happens it is chips jamming in the flutes and this is evidently not the case here which leaves the jury out on why the drill broke. But that's academic, I resharpened the drill and put back in the box.
With the broken drill in mind I was very careful as I tapped the holes. If you remember, the last time I hit trouble with these 7BA taps I bought a set of new ones.... No dramas and no forcing.

We've jumped forward here and left out a lot of finishing, filing and adjusting to get the gland to fit, get it bolted down and fitted with valve rod in place. Not surprisingly, I was a thou out with my alignment, the vale is a very close fit in the block, and had to recourse to files and other destructive tools to get it tightened down with a valve rod that slides freely.
Knocking off time, all this has been slow and painstaking. I think you can see the witness marks on the lid and the cylinder. Slow I know but it's OK, we can move on....
Stanley Challenger Graham
Stanley's View
scg1936 at talktalk.net
"Beware of certitude" (Jimmy Reid)
The floggings will continue until morale improves!
Stanley's View
scg1936 at talktalk.net
"Beware of certitude" (Jimmy Reid)
The floggings will continue until morale improves!
-
Stanley
- Global Moderator
- Posts: 90301
- Joined: 23 Jan 2012, 12:01
- Location: Barnoldswick. Nearer to Heaven than Gloria.
Re: SHED MATTERS 2
I shall be slow getting into the shed today. Tinternetwebthingy was AWOL until 5AM and I have a pressing legal matter to deal with......
Stanley Challenger Graham
Stanley's View
scg1936 at talktalk.net
"Beware of certitude" (Jimmy Reid)
The floggings will continue until morale improves!
Stanley's View
scg1936 at talktalk.net
"Beware of certitude" (Jimmy Reid)
The floggings will continue until morale improves!
-
Stanley
- Global Moderator
- Posts: 90301
- Joined: 23 Jan 2012, 12:01
- Location: Barnoldswick. Nearer to Heaven than Gloria.
Re: SHED MATTERS 2
I got in there about 08:15 and had a look at the rabbit.
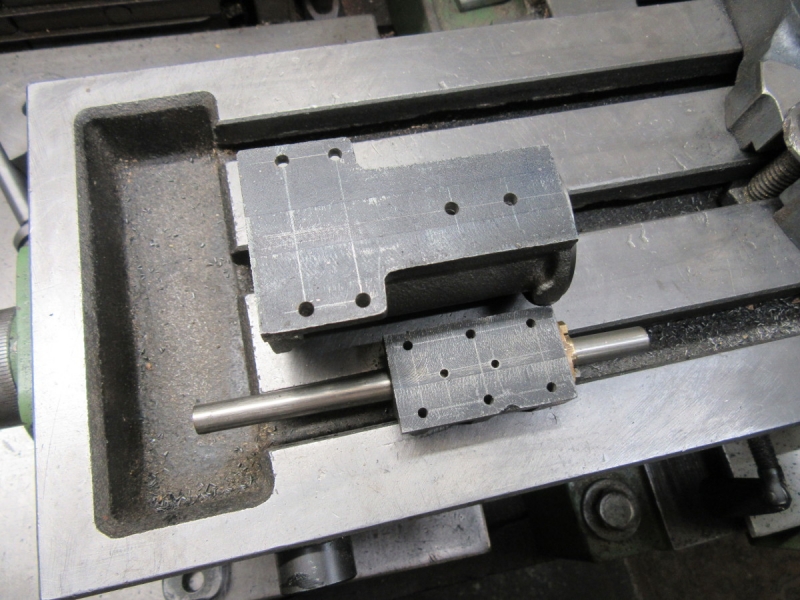
I'd decided I was going to do the fixings of the valve block on the cylinder and when I laid it out this is what I found. Have you spotted the mistake? Look at the transfer ports on the valve block, when I marked them I was still under my misapprehension about the way round the block went and I have them in the wrong place. Only one thing to do, plug the holes and re-drill in the right place.
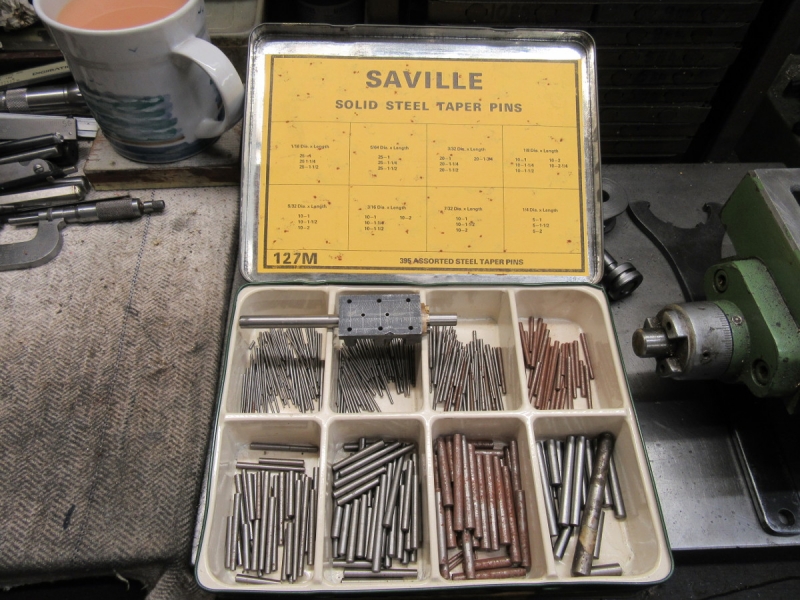
I decided that driving taper pins in would do the trick.
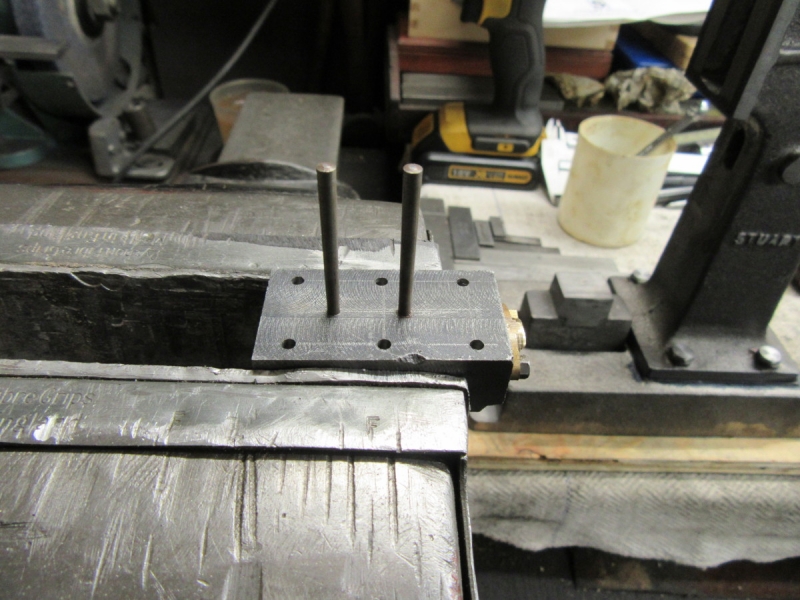
I found two candidates and ground them back until they were a nice fit but didn't interfere with the valve rod and drove them in reasonably tight.
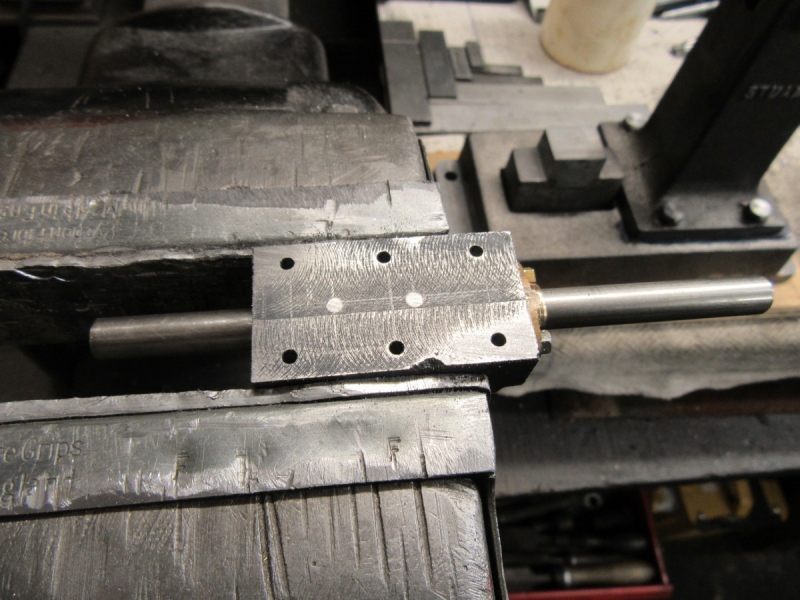
Then I sawed the surplus off and ran a smooth file over the face. Perfect!
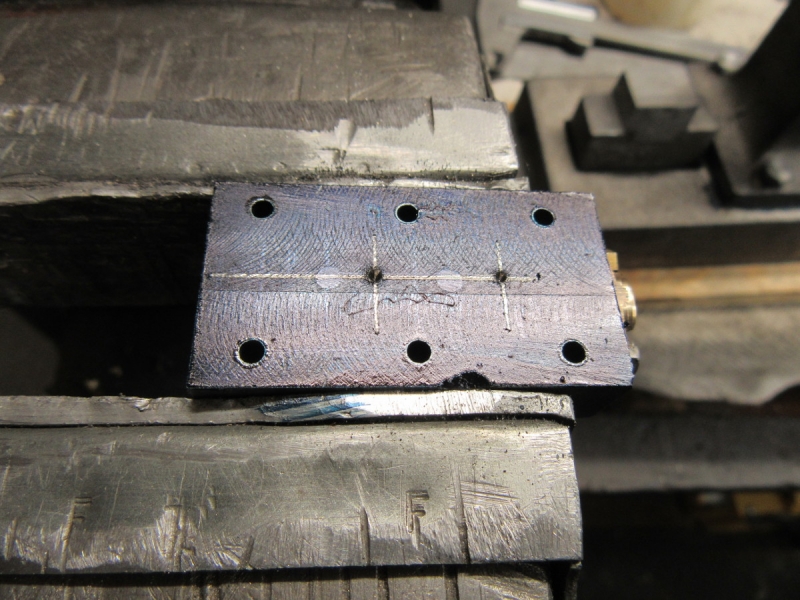
Then blue, measure and mark.
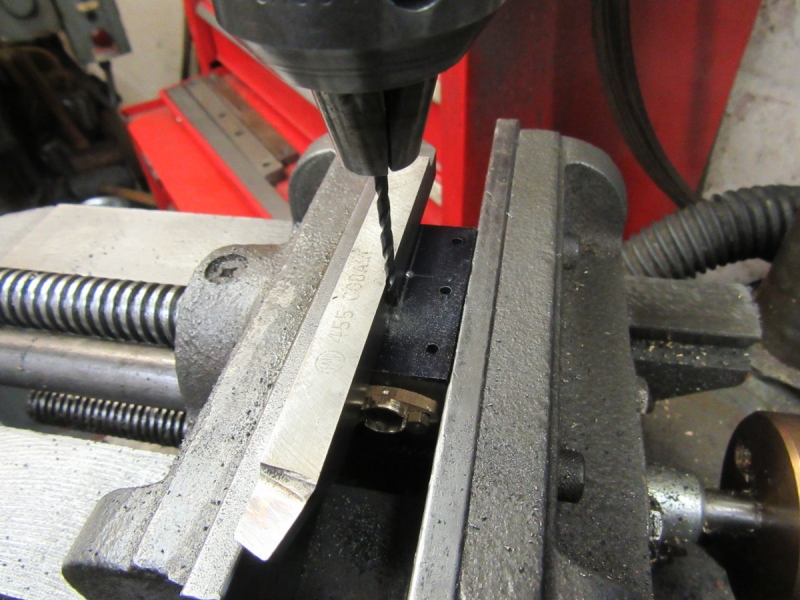
Then under the drill press and poke the drill through but here's a tip. If you do what I did and get the spotting with the drill wrong, you adjust it and drill again but the drill always wants to go back to the starting spot. Get a piece of high speed steel and use it to stop the drill wandering until the hole is starting in the right spot.
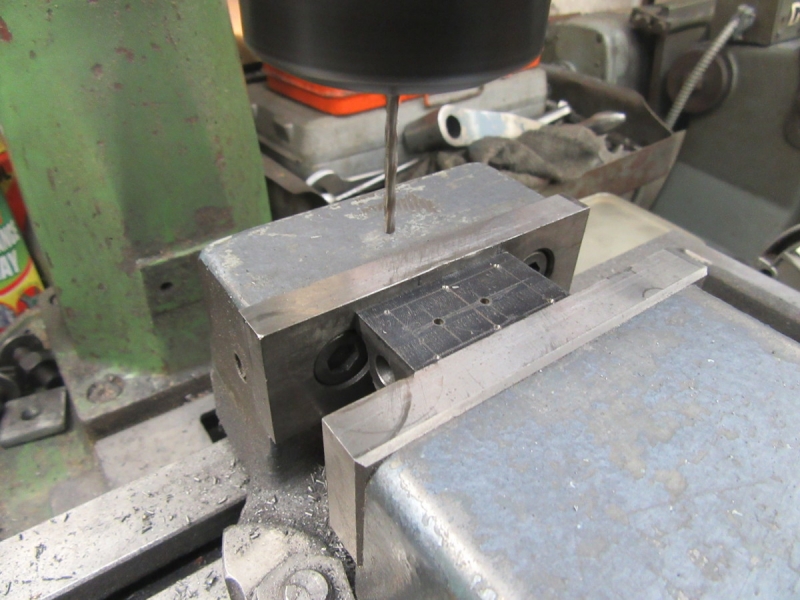
The next stage was to mark the cylinder using the block to get positions for the 7BA tappings for the holding down bolts. I clamped them together in the exact relationship and then marked three holes. I shall mark the rest when I have these three correctly fitted. Hard enough with three, bugger trying six at the same time!
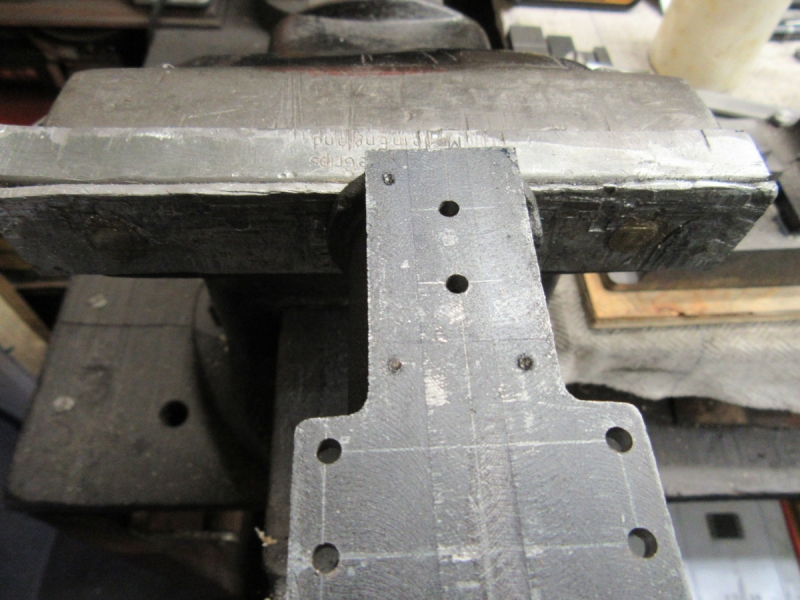
The three holes marked and popped.
I forgot to do a pic of drilling them. I used the drill I broke the other day. Have you any idea how difficult it is to sharpen a 2.1mm drill when you can't see straight? I must have been lucky, it cut OK and I was very careful. Here I am tapping the first one. At this point it was almost knocking off time so I tried one of the 7BA bolts supplied to see how the length was. I don't like it, not enough entry into the block for my liking. I checked my measurements and they are OK. I looked to see if I had any 7BA studding but I haven't got any. Two possible courses, upgrade the fixings to 6BA, I have plenty of that studding. Or mill some meat off the face of the valve block to give more entry into the cylinder casting. I'll think about it and make a decision tomorrow.....
I'd decided I was going to do the fixings of the valve block on the cylinder and when I laid it out this is what I found. Have you spotted the mistake? Look at the transfer ports on the valve block, when I marked them I was still under my misapprehension about the way round the block went and I have them in the wrong place. Only one thing to do, plug the holes and re-drill in the right place.
I decided that driving taper pins in would do the trick.
I found two candidates and ground them back until they were a nice fit but didn't interfere with the valve rod and drove them in reasonably tight.
Then I sawed the surplus off and ran a smooth file over the face. Perfect!
Then blue, measure and mark.
Then under the drill press and poke the drill through but here's a tip. If you do what I did and get the spotting with the drill wrong, you adjust it and drill again but the drill always wants to go back to the starting spot. Get a piece of high speed steel and use it to stop the drill wandering until the hole is starting in the right spot.
The next stage was to mark the cylinder using the block to get positions for the 7BA tappings for the holding down bolts. I clamped them together in the exact relationship and then marked three holes. I shall mark the rest when I have these three correctly fitted. Hard enough with three, bugger trying six at the same time!
The three holes marked and popped.
I forgot to do a pic of drilling them. I used the drill I broke the other day. Have you any idea how difficult it is to sharpen a 2.1mm drill when you can't see straight? I must have been lucky, it cut OK and I was very careful. Here I am tapping the first one. At this point it was almost knocking off time so I tried one of the 7BA bolts supplied to see how the length was. I don't like it, not enough entry into the block for my liking. I checked my measurements and they are OK. I looked to see if I had any 7BA studding but I haven't got any. Two possible courses, upgrade the fixings to 6BA, I have plenty of that studding. Or mill some meat off the face of the valve block to give more entry into the cylinder casting. I'll think about it and make a decision tomorrow.....
Stanley Challenger Graham
Stanley's View
scg1936 at talktalk.net
"Beware of certitude" (Jimmy Reid)
The floggings will continue until morale improves!
Stanley's View
scg1936 at talktalk.net
"Beware of certitude" (Jimmy Reid)
The floggings will continue until morale improves!
Re: SHED MATTERS 2
How come you didnr use a small centre drill to do your spotting holes this would stop the drill bit wandering
-
Stanley
- Global Moderator
- Posts: 90301
- Joined: 23 Jan 2012, 12:01
- Location: Barnoldswick. Nearer to Heaven than Gloria.
Re: SHED MATTERS 2
Because that wouldn't cure the problem. I can start holes accurately with the twist drill, they are sharpened properly. The problem is my vision is distorted after all the eye operations and tell me lies! What caused the wandering was trying to move the entry point slightly after I had spotted the hole and realised it was off centre.
Stanley Challenger Graham
Stanley's View
scg1936 at talktalk.net
"Beware of certitude" (Jimmy Reid)
The floggings will continue until morale improves!
Stanley's View
scg1936 at talktalk.net
"Beware of certitude" (Jimmy Reid)
The floggings will continue until morale improves!

Re: SHED MATTERS 2
Interesting video on the history of measurement. https://www.youtube.com/watch?v=gNRnrn5 ... e=youtu.be
-
Stanley
- Global Moderator
- Posts: 90301
- Joined: 23 Jan 2012, 12:01
- Location: Barnoldswick. Nearer to Heaven than Gloria.
Re: SHED MATTERS 2
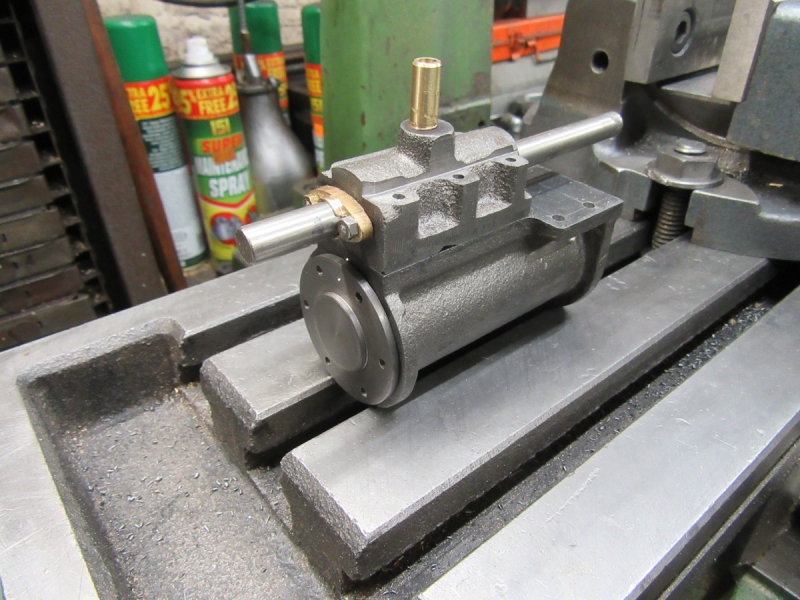
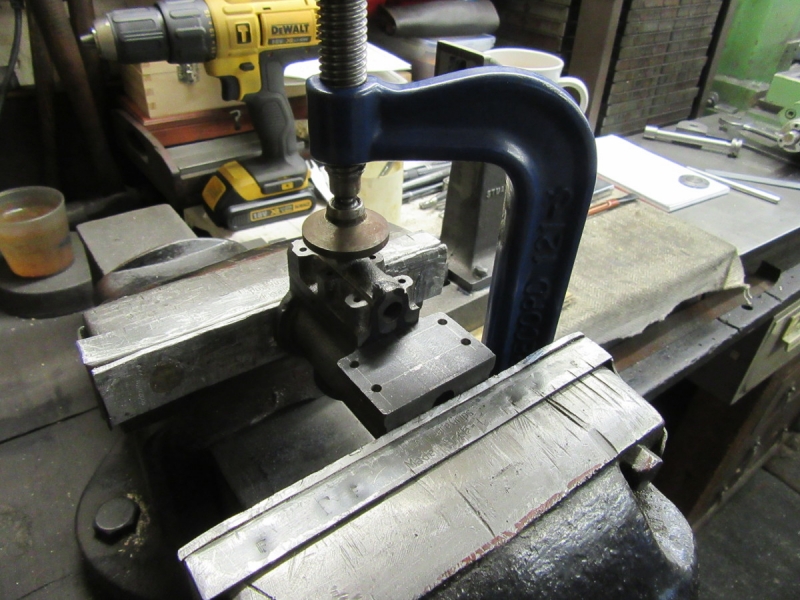
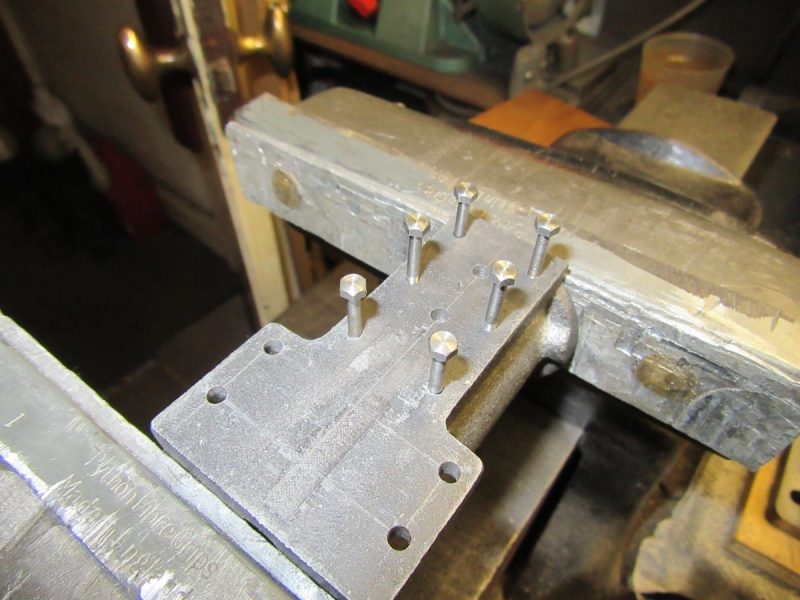
Straight into where I left off, fixing the valve block to the cylinder using the 6 7BA bolts in the picture. What could possibly go wrong......
After a lot of fiddling I got the first three bolts fitted. Still not 100% satisfied with the hold....
But I crashed on and drilled the other three holes tapping size for 7BA using the valve block as a guide. All three tapped successfully and the bolts tried in the holes. All well so far but at this point I offered the block up to the bolts and decided to mill a bolt head thickness off the pads to give me more hold in the threaded holes.
Belt and braces. The cutter needed backing off and touching up so I did that first. I saw Keith Rucker comment in a video that with the advent of indexable carbide tips tool and cutter grinding is a lost art, not here it isn't!
One cut to the right depth repeated on this side without altering the setting. Cutting beautifully..... Just to give myself a chance I poked a drill two tenths of a mm bigger through the clearance holes. Then I set to to make one of the threaded holes a bit deeper, again to make sure!
And here's what happened.... I broke the tap off in the far middle hole. There was profanity. No way I can get the broken end out so I rubbed the sharp edge down with a stone and fitted the block with five bolts. That will be plenty and I'll glue a dummy in the hole. They'll never see it off the Ribble.
Here we are at closing time after two and a half hours of honest endeavour. It will be OK and when it has some jointing compound in there will be no leaks. I hate small threads.......
Stanley Challenger Graham
Stanley's View
scg1936 at talktalk.net
"Beware of certitude" (Jimmy Reid)
The floggings will continue until morale improves!
Stanley's View
scg1936 at talktalk.net
"Beware of certitude" (Jimmy Reid)
The floggings will continue until morale improves!