Kitchen Refurb

User avatar
PanBiker
Site Administrator
Site Administrator
Posts: 16447
Joined: 23 Jan 2012, 13:07
Location: Barnoldswick - In the West Riding of Yorkshire, always was, always will be.

Re: Kitchen Refurb

Post by PanBiker »

Right a few images of where we are at, first a general view of where the boiler is.

Image

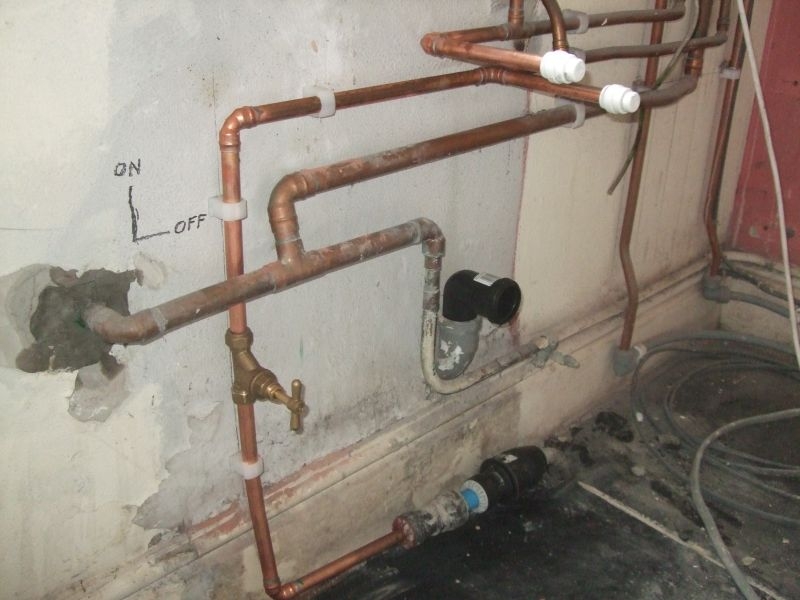
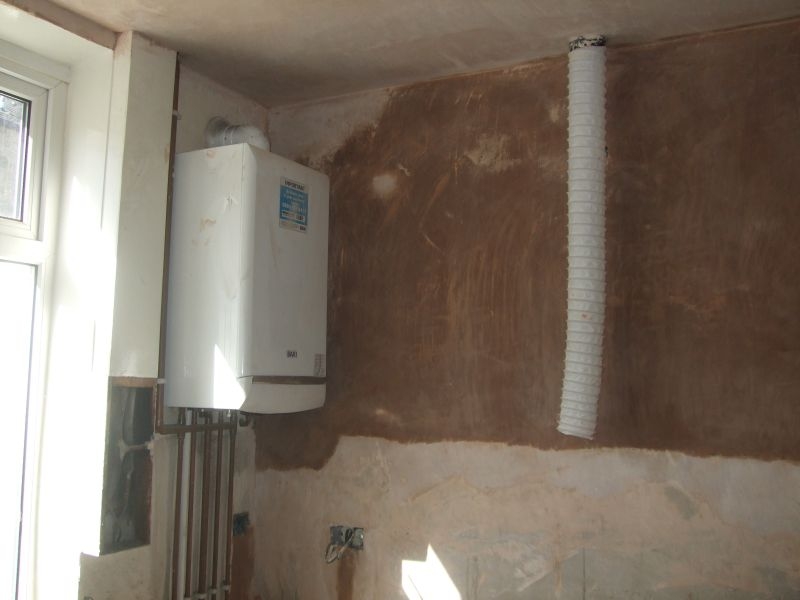
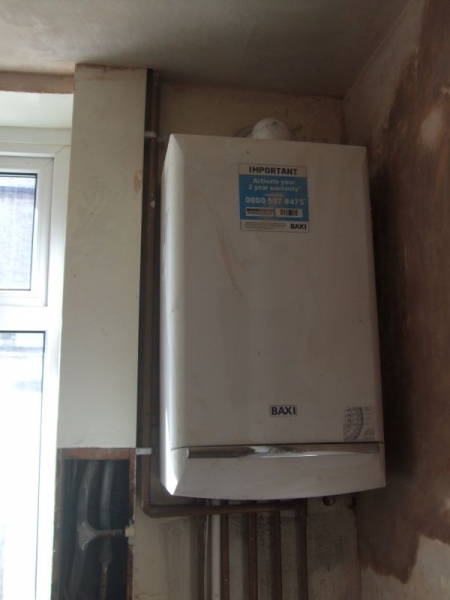
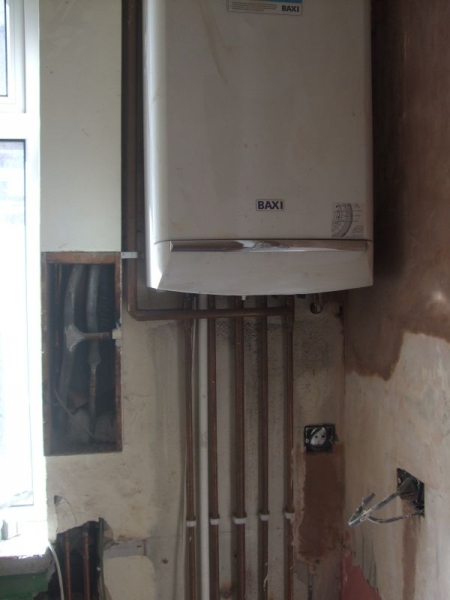
A couple more of the boiler to show the pipework layout better and what room I have to play with.

Image

Image

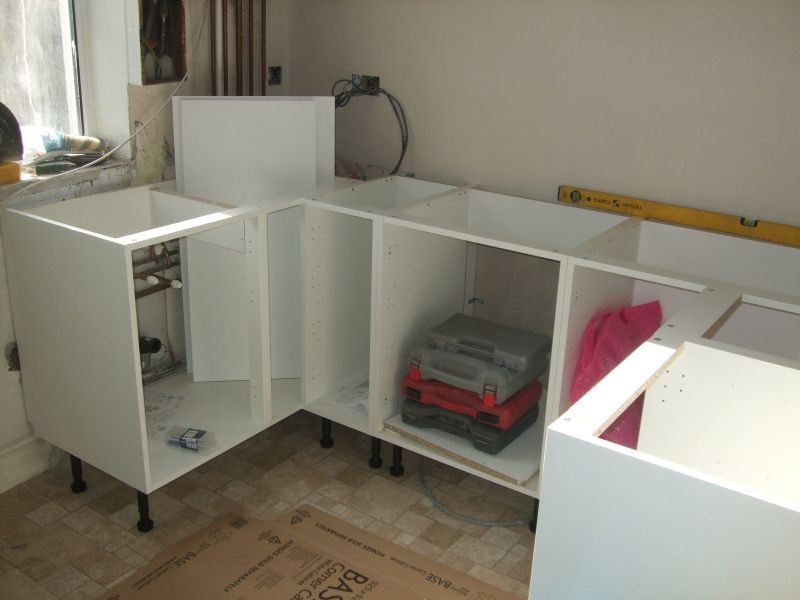
A few shots around the room.

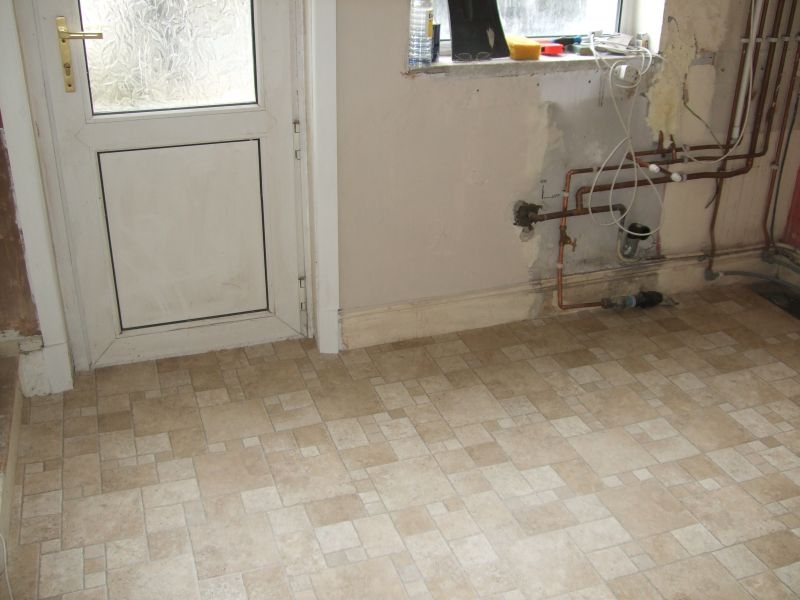
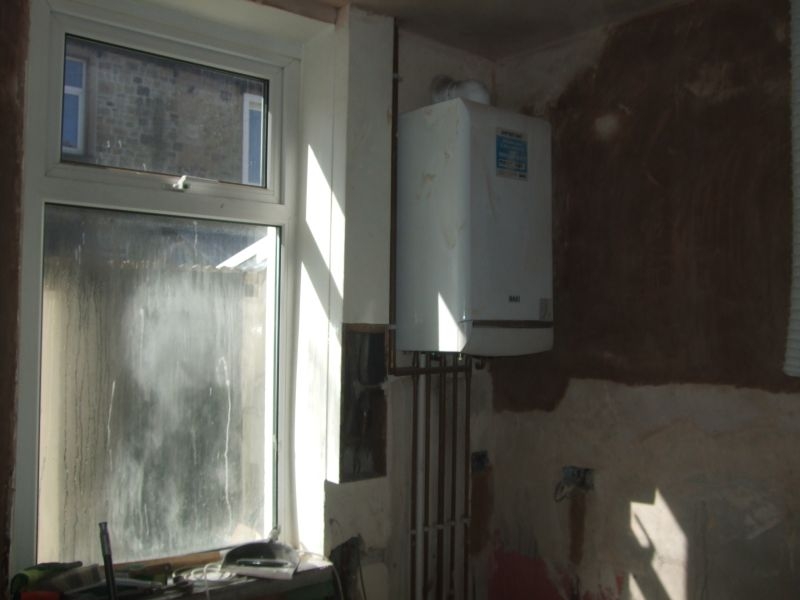
Window which you can see that the main DG unit is blown and will be replaced

Image

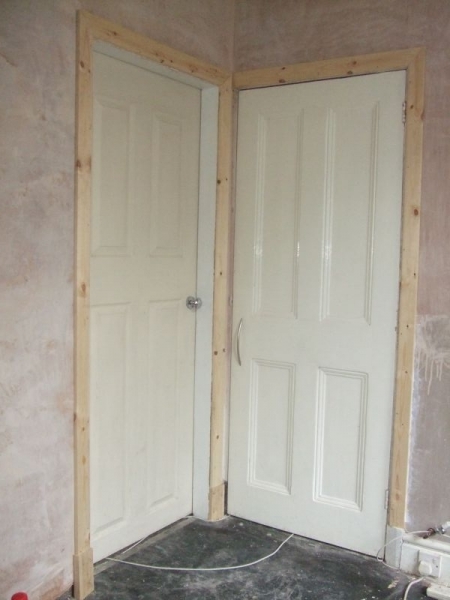
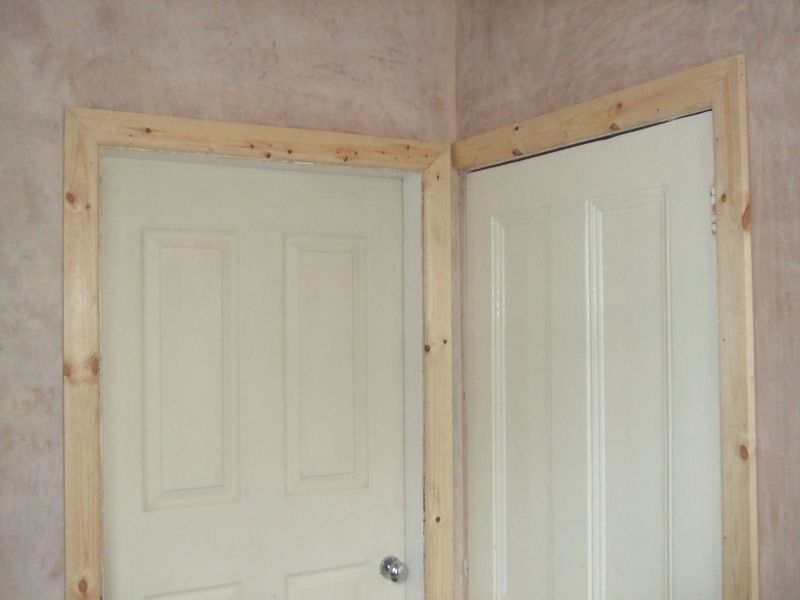
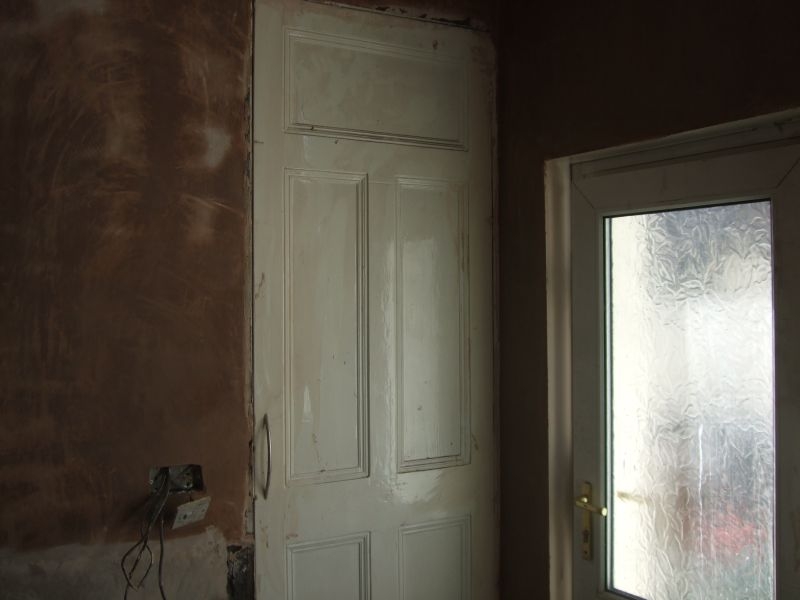
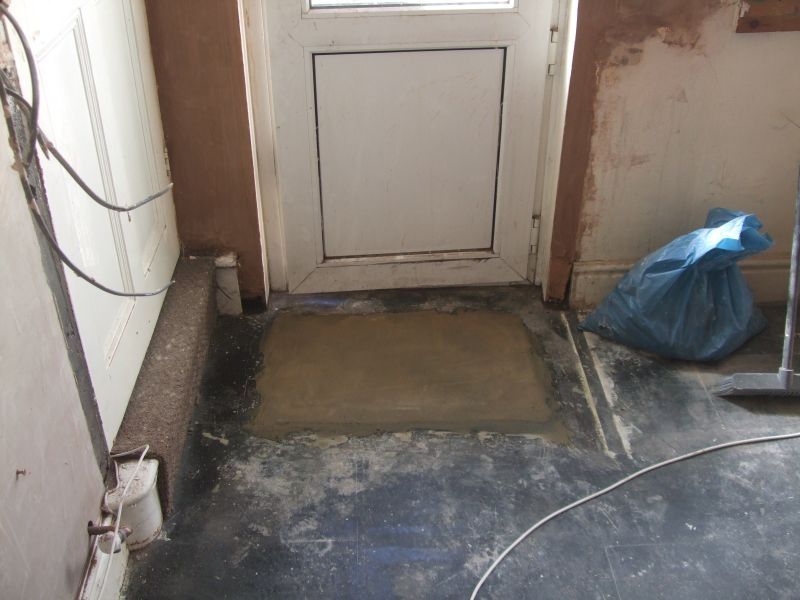
Back door and the 7ft stairs door.

Image

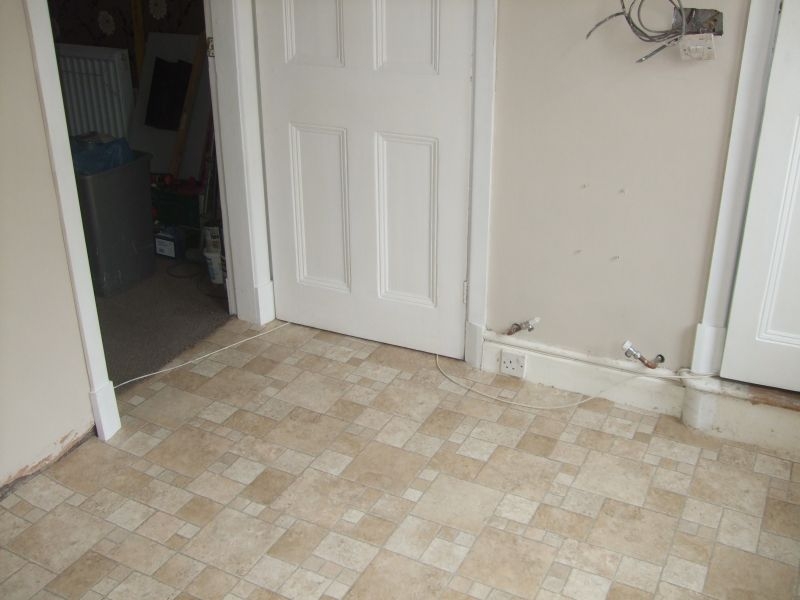
Doormat well that I have just filled.

Image

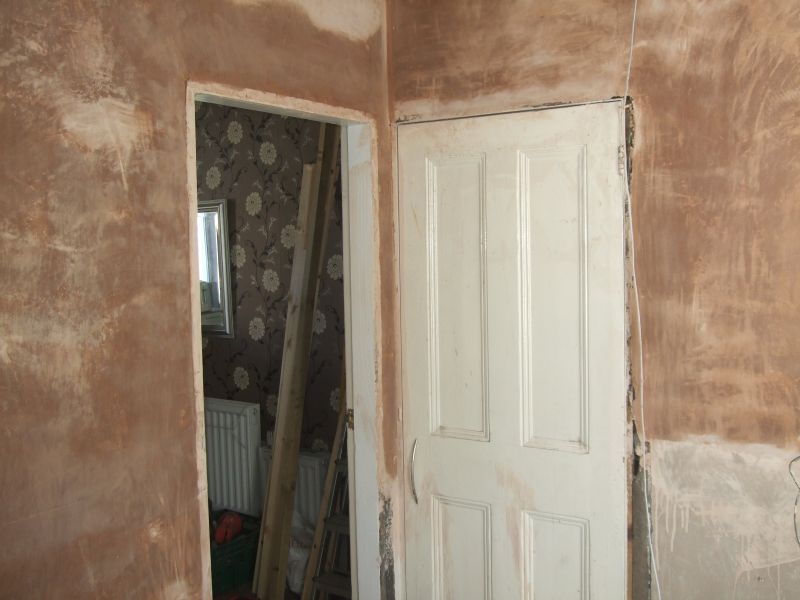
Stairs wall with pantry and living room doors.
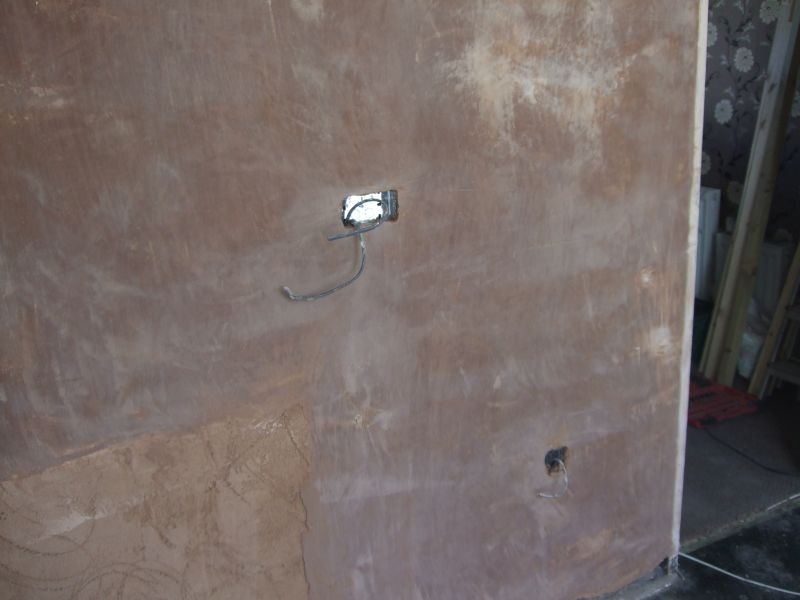
Image

Living room wall.

Image

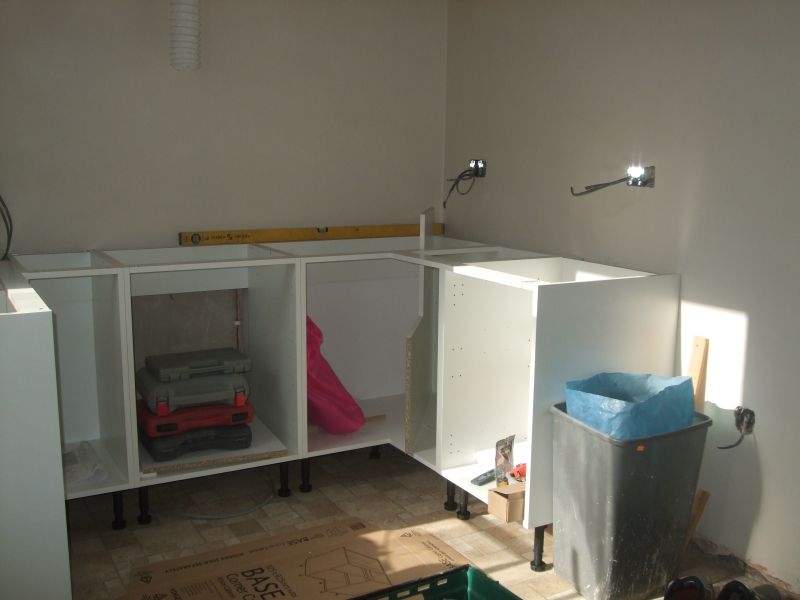
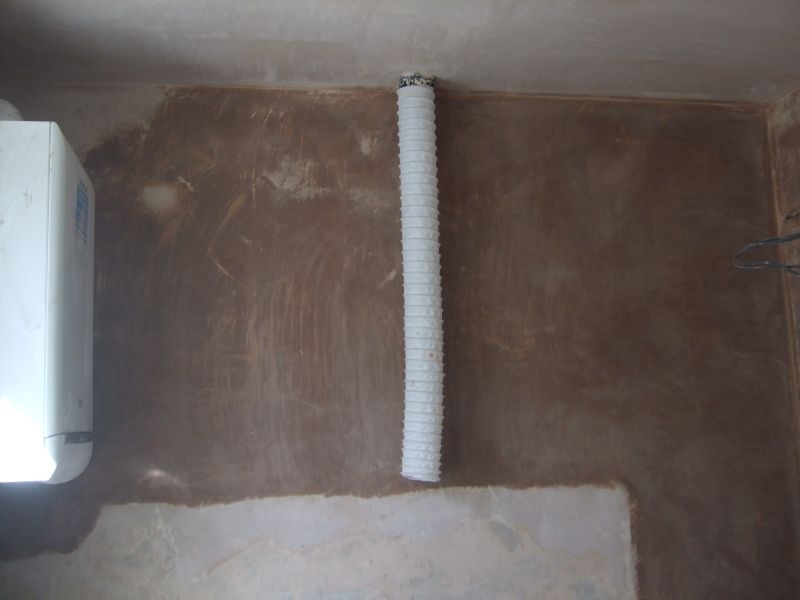
Then back round to the party wall which will have the cooker, hob and hood above, flexible ducting hopefully somewhere in the right parish.

Image

You can see that the ceiling is just about dry, the walls will take a good few more days.

I took the rest of the vinyl up today and had a good scrape of the floor previously under the units that had received a fair coating of plaster. Cleaning up is getting less and less, all future jobs will be localised muck so things are looking up. I didn't photo the cables, we have a big coil of all the feeds ready to be routed into the pantry but they have to go under the living room floor so we need a couple of reasonably big holes. We have 3x 2.5mm for the ring and an independent feed for the boiler, a new feed for the lights and a 6mm direct feed for the cooker. Loops have been incorporated in the cable runs which will be under the units to allow for easy access to the feeds if required in future.

We will get Nathan back on site and then he can bring them out exactly where he needs them for what will eventually become the new distribution board and consumer unit position in the pantry.

Knocked off for today and texted Jack to warn him not to stand in my doormat well handywork when he comes home! :extrawink:
Ian
User avatar
Big Kev
Site Administrator
Site Administrator
Posts: 10954
Joined: 23 Jan 2012, 20:15
Location: Foulridge

Re: Kitchen Refurb

Post by Big Kev »

I see what you mean with the boiler location now, Ian. Workable though :grin: . I'd reckon your plan of 'hooking' a door in front is a good option. You should be able to plant a bit of cabinet carcass on the front of the existing boxing. It'll certainly tidy it all up.
Kev

Stylish Fashion Icon.
🍹
User avatar
PanBiker
Site Administrator
Site Administrator
Posts: 16447
Joined: 23 Jan 2012, 13:07
Location: Barnoldswick - In the West Riding of Yorkshire, always was, always will be.

Re: Kitchen Refurb

Post by PanBiker »

I have not run the measure across it yet but I can probably get a matching door to the rest of the units, (multiple widths available). Jack has chosen cream slab for the finish on the rest. they are all ex stock so it shouldn't be a problem. The door would be better hinged on the wall side as the timer and controls are integral to the boiler. I might replace the hardboard on the existing boxing with something a bit more substantial so I have something better to screw to. I'm intending to box the pipes below in which will also hide the socket provided for the boiler. Easy enough to put a removable cover on that. It will have to be as low a profile as possible so as not to lose space on the worktop in that corner.

All good fun, it will be easier to visualise when all the units and worktops are in.
Ian
User avatar
Big Kev
Site Administrator
Site Administrator
Posts: 10954
Joined: 23 Jan 2012, 20:15
Location: Foulridge

Re: Kitchen Refurb

Post by Big Kev »

Ah. Didn't realise the controls were in there too. A hinged door wiil do the job. If you're replacing the hardboard on the existing boxing you could make it all in one piece, pipe boxing and cabinet side, to give it a bit of strength :-)
Kev

Stylish Fashion Icon.
🍹
User avatar
PanBiker
Site Administrator
Site Administrator
Posts: 16447
Joined: 23 Jan 2012, 13:07
Location: Barnoldswick - In the West Riding of Yorkshire, always was, always will be.

Re: Kitchen Refurb

Post by PanBiker »

Plaster is drying off nicely now, ceiling, living room wall and stairs wall are all dry, outside and party walls still have a way to go. Ceiling and walls will be all the same colour for ease of decorating, will probably make a start on the ceiling later this week. This can be sorted before the ceiling is drilled out for the downlights, we can then chase down the walls as they come ready.

I managed to get the cables routed out of the kitchen and under the living room floor. There was an existing hole that brought the old cooker cable into the kitchen and the feed for one of the old sockets that have already come out. I had just chopped them off level with the floor and wall but I dug them out today and enlarged the hole. I shoved a half then a one inch long masonry drill through a few times then knocked the sides clear with the chisel. I went up to B&D's and got a short length of 1.5" pipe, just long enough to go through the wall twice. I used half to exit the cables from the kitchen under the floor and the other bit will bring them back through into the pantry. The old rubber clad cable was a direct feed from the fuse box so was easily identifiable and was available at the pantry end of the living room, I used it to pull the cable loom through under the floor joists. The loom cluster was a 6mm and 3 x 2.5mm which I taped together at a few points down the length, plenty of spare cable so I have left a loop in the corner of the kitchen this will be under the corner unit, there is another loop at the other side of the wall under the living room alcove and a reasonable amount of spare at the feed end for the consumer unit. I had already filled most of the corner void with pre mixed concrete the other day so I finished it off with sand and cement to fasten the pipe in place and give us a level surface in the corner.

I picked up a length of chamfered timber for new plinths as I removed all these when I stripped the old architrave out. I might cut all the new plinths and architraves next so they are ready for fitting. I'll leave them off for now though as it will make painting easier.
Ian
User avatar
Marilyn
VIP Member
Posts: 7776
Joined: 23 Jan 2012, 20:29
Location: South Australia

Re: Kitchen Refurb

Post by Marilyn »

Have you noticed the "face" on the glass of the kitchen window?
Some-one is watching!
(Spooky)
User avatar
Stanley
Global Moderator
Global Moderator
Posts: 90300
Joined: 23 Jan 2012, 12:01
Location: Barnoldswick. Nearer to Heaven than Gloria.

Re: Kitchen Refurb

Post by Stanley »

I saw that as well Maz. Lovely to see your post, I've been missing you!!
Stanley Challenger Graham
Stanley's View
scg1936 at talktalk.net

"Beware of certitude" (Jimmy Reid)
The floggings will continue until morale improves!
User avatar
PanBiker
Site Administrator
Site Administrator
Posts: 16447
Joined: 23 Jan 2012, 13:07
Location: Barnoldswick - In the West Riding of Yorkshire, always was, always will be.

Re: Kitchen Refurb

Post by PanBiker »

It's happen the bloke that built it! I hope he likes my straightening. :extrawink: :curtain:
Ian
User avatar
PanBiker
Site Administrator
Site Administrator
Posts: 16447
Joined: 23 Jan 2012, 13:07
Location: Barnoldswick - In the West Riding of Yorkshire, always was, always will be.

Re: Kitchen Refurb

Post by PanBiker »

I turned my attention to the front wall yesterday and the window bottom. Previous owners had the window bottom tiled, this involved fitting a wooden support on the wall below and extending the depth of the sill with about 2" of concrete along the front edge. This wooden support structure which was hidden underneath the original customised sink unit was impeding the run along the front wall. I need this as low a profile as possible as it impacts the overall width of the room which is critical. I have removed al the extra wood work and knocked the sill back to its original state which is flush with the internal wall. I will decide what to do with it when I have offered the new unit up and seen where the worktop will lie in relation.

Existing pipework on the front wall is still standing a bit proud, it's actually deeper than the service channel on the units so needs altering. Jack rang Scott last night and he will be with us at 8am on tomorrow (Thursday). I think both gas and water may need altering, the gas feed is currently about 75mm from the wall. He is going to sort the stop cock out as well, this needs turning through 90 degrees as its currently sideways on to the wall and in the wrong place. It will be pleasure watching a bit of pipe bending magic.

I started to tidy up the door frames ready for fitting the architraves, I was going to leave them off for painting but offering a couple of lengths up shows there will be one or two areas that will need a little bit of filler. I'll put them all back on and we can then tidy up properly before painting. I cut a couple of plinths to length for the living room door, the other doors are very close to other frames or corners and there is no room for a plinth on some of the upright runs.

Discount day at B&Q today so we will go and get the paint and one or two other sundries.
Ian
User avatar
Big Kev
Site Administrator
Site Administrator
Posts: 10954
Joined: 23 Jan 2012, 20:15
Location: Foulridge

Re: Kitchen Refurb

Post by Big Kev »

Also worth checking out B&M Bargains in Burnley or Skipton if you can't find the paint you're looking for, they stock Johnsones and Dulux :grin:
Kev

Stylish Fashion Icon.
🍹
User avatar
Stanley
Global Moderator
Global Moderator
Posts: 90300
Joined: 23 Jan 2012, 12:01
Location: Barnoldswick. Nearer to Heaven than Gloria.

Re: Kitchen Refurb

Post by Stanley »

You reminded me of the pleasure I get watching a good pipe-fitter bending pipe. When they were building Coates Factory at Ellenroad they had a lot of multiple runs and I never did work out how they managed to bend the successive radii so accurately that the distance between to piped was always exactly the same.
Stanley Challenger Graham
Stanley's View
scg1936 at talktalk.net

"Beware of certitude" (Jimmy Reid)
The floggings will continue until morale improves!
User avatar
PanBiker
Site Administrator
Site Administrator
Posts: 16447
Joined: 23 Jan 2012, 13:07
Location: Barnoldswick - In the West Riding of Yorkshire, always was, always will be.

Re: Kitchen Refurb

Post by PanBiker »

I'm temporarily back home for some breakfast. Scott tipped up at 8am but he needs to go and get some bits for the mains water feed. It needs moving and is in lead so he needs an adaptor of some kind, he is going to saw off the original and take it with him to find the solution. My alarm didn't go off this morning so I turned up on time but without breakfast so the run for parts is a good respite for me, he will ring me when he is finishing off. He is going to remove the hot and cold feeds that are currently standing too proud of the wall and refit them at his last visit when he plumbs in the sink, a new feed for the washer will be installed in the cabinet as well.
Ian
User avatar
PanBiker
Site Administrator
Site Administrator
Posts: 16447
Joined: 23 Jan 2012, 13:07
Location: Barnoldswick - In the West Riding of Yorkshire, always was, always will be.

Re: Kitchen Refurb

Post by PanBiker »

Scott was sorted by 10am and I was the right side of breakfast and a brew. Here is his reworked pipework and the new stopcock. Next time he comes will be to sort the sink and Gas Hob, he will run a cold feed through the base unit for the washing machine as well. Pipes are a lot tidier and a flatter profile than before.

Image

Sally is doing the painting so she set too today and gave the ceiling it's first coat. I cracked on with the architraves and plinths. I managed to get the living room and pantry doors sorted. My nailing needs punching down and then filling, I have the filler and sorted out the punch but left the latter at home.

Image

Image
Ian
User avatar
Big Kev
Site Administrator
Site Administrator
Posts: 10954
Joined: 23 Jan 2012, 20:15
Location: Foulridge

Re: Kitchen Refurb

Post by Big Kev »

Looking good.
Kev

Stylish Fashion Icon.
🍹
User avatar
PanBiker
Site Administrator
Site Administrator
Posts: 16447
Joined: 23 Jan 2012, 13:07
Location: Barnoldswick - In the West Riding of Yorkshire, always was, always will be.

Re: Kitchen Refurb

Post by PanBiker »

Thanks Kev, I'm glad that I have moved on to a bit of woodworking, makes a change from all the muck. Putting back is a lot more satisfying than ripping out. :smile:
Ian
User avatar
Stanley
Global Moderator
Global Moderator
Posts: 90300
Joined: 23 Jan 2012, 12:01
Location: Barnoldswick. Nearer to Heaven than Gloria.

Re: Kitchen Refurb

Post by Stanley »

Putting back is a lot more satisfying :grin:
Stanley Challenger Graham
Stanley's View
scg1936 at talktalk.net

"Beware of certitude" (Jimmy Reid)
The floggings will continue until morale improves!
User avatar
Sue
VIP Member
Posts: 7328
Joined: 23 Jan 2012, 17:04
Location: Somewhere up norf!

Re: Kitchen Refurb

Post by Sue »

Looking good
If you keep searching you will find it
User avatar
Big Kev
Site Administrator
Site Administrator
Posts: 10954
Joined: 23 Jan 2012, 20:15
Location: Foulridge

Re: Kitchen Refurb

Post by Big Kev »

PanBiker wrote: 30 Mar 2017, 21:11 Thanks Kev, I'm glad that I have moved on to a bit of woodworking, makes a change from all the muck. Putting back is a lot more satisfying than ripping out. :smile:
Definitely :-)
Kev

Stylish Fashion Icon.
🍹
User avatar
PanBiker
Site Administrator
Site Administrator
Posts: 16447
Joined: 23 Jan 2012, 13:07
Location: Barnoldswick - In the West Riding of Yorkshire, always was, always will be.

Re: Kitchen Refurb

Post by PanBiker »

My back pain (see Medical Matters) made plinth and architrave cutting very interesting yesterday. I managed to finish the back door though which involved cutting the plinths down in width as previously the architrave ran straight to the floor, the stairs door is the same. The other two have plinths so I am making them all the same, a bit of OCD kicking in here I think. :smile: I just have the stairs door to do now which is only one side and the head piece as the door is fairly tight to the wall. I will leave the window until later, only one side and a head piece again but I need to sort what I am doing with the window bottom first. I have punched down all my nailing and filled and sanded as I am working my way round. Sally gave the ceiling a second coat yesterday and it looks OK.

On the boiler cupboard, I checked with Scott and he said I could put a bottom in it as long as it was removable for maintenance access along with the lower pipework. I can do this with roller catches I reckon, I may have a spare side panel or two with swap out colour matched sides on a couple of the cupboards in which case I may only need a door. If push comes to shove I'll get another cupboard and modify it for purpose.
Ian
User avatar
PanBiker
Site Administrator
Site Administrator
Posts: 16447
Joined: 23 Jan 2012, 13:07
Location: Barnoldswick - In the West Riding of Yorkshire, always was, always will be.

Re: Kitchen Refurb

Post by PanBiker »

I finished off the architrave around the stairs door today and filled and sanded my nailing. Sally gave the other two door architraves their first coat of undercoat, new wood needs two so she will follow on tomorrow with the ones I have completed today and then chase back round with a second coat.

I went back down for an hour after lunch to seal the floor where I have filled the doormat well in. I also turned up the expanding foam filler that I knew I had somewhere. I have used this to fill the quite large void that Scott opened up in the wall to access the hot and cold water feed pipes that run upstairs. This allowed him to remake the pipework below with a closer profile to the wall. There will only be about three inches of this void above the worktop so when the foam has dried off I will cut it back so that I can get some filler on top. The section will ultimately be boxed in or be tiled on top, either way it will be hidden from view.

Jack has chosen and ordered the vinyl that he likes and it can be fitted on Friday. That suits me as we can crack on with emulsioning the walls, we can do three out of the four, there is just a small section of the front wall that is yet to dry out. Its not a problem as with the window and door on that wall there is probably less than a couple of square metres to paint in total. All the ones that require stuff fitting or refitting can be done though so that will put us in a good position for moving straight on to unit building and installation.

It's coming along nicely now, I have four weeks before I am on daily invigilating up at school.
Ian
User avatar
PanBiker
Site Administrator
Site Administrator
Posts: 16447
Joined: 23 Jan 2012, 13:07
Location: Barnoldswick - In the West Riding of Yorkshire, always was, always will be.

Re: Kitchen Refurb

Post by PanBiker »

Sally has continued and finished undercoating all the architraves and doors. I have emulsioned all the walls apart from a small section at the side of the back door that is taking a while to dry.

Today I took the carpet up from the bottom step below the door into the kitchen. Vinyl will be fitted tomorrow so that will allow the fitter to cut it right up to the step, it will make the gloss painting on that door a lot easier as well with it off. I have removed all the existing handles from the doors and filled all the fixing holes, they are a simple 1970's style arced handle and could do with replacing with something more up to date and in keeping with the new furniture on the units or matching with the round knob that is fitted to the living room door, will give that a coat of thinking about, all the internal doors are on roller catches so there is no mechanism to worry about.

Ready for the floor covering going down tomorrow, I emptied everything from the room and had a good sweep up. I waited a while for the dust to settle and then went round again, finishing off with a bucket of hot water and a going over with the floor mop. The vinyl has to run through slightly wider and longer than the kitchen itself to cover up to the living room thresh and under the pantry door. This means that we can have it fitted fully to all walls within the kitchen itself. All the units will be fitted from the same level then so first job after the new covering is down will be the last job for Kev's laser level when I put the levels on for the units on three walls. I'll take my tripod down tomorrow so I can do them all from the same point in the centre of the room.

We need to get Nathan back next really to further the electrical installation and get the lighting back up. The new cabling will have to be temporarily connected to the existing fuse box as there is no proper earth on the rest of the cabling until that is upgraded to current specification. That will be phase two of Jacks upgrade to the house after he has saved up a bit.
Ian
User avatar
Big Kev
Site Administrator
Site Administrator
Posts: 10954
Joined: 23 Jan 2012, 20:15
Location: Foulridge

Re: Kitchen Refurb

Post by Big Kev »

Excellent progress Ian. Good to hear the laser is proving useful.
Kev

Stylish Fashion Icon.
🍹
User avatar
Stanley
Global Moderator
Global Moderator
Posts: 90300
Joined: 23 Jan 2012, 12:01
Location: Barnoldswick. Nearer to Heaven than Gloria.

Re: Kitchen Refurb

Post by Stanley »

It would have been a boon when I was installing the Whitelees engine.....
Stanley Challenger Graham
Stanley's View
scg1936 at talktalk.net

"Beware of certitude" (Jimmy Reid)
The floggings will continue until morale improves!
User avatar
PanBiker
Site Administrator
Site Administrator
Posts: 16447
Joined: 23 Jan 2012, 13:07
Location: Barnoldswick - In the West Riding of Yorkshire, always was, always will be.

Re: Kitchen Refurb

Post by PanBiker »

Floor guy turned up ahead of time yesterday and was all done by 11.30. I put a level up with the laser on the three walls that will have units on and started on building the units. I unpacked the 925 corner unit and used the packaging on Jacks new shiny floor for the build. I went back down after a bit of lunch and put it together. Different make to mine and the instructions left a bit out, good job I had built one before! That one is offered up and with the legs set at standard it is bang on with my level on the wall. I will level it out in both planes properly after we have found out If we need to take a bit of the service channel off to get the unit run on the bottom wall to fit. To that end I am continuing today to build the rest of that run, a 600 oven cabinet, 300 base cabinet and the 1000 sink base, we can then start to fit the jigsaw.
Ian
User avatar
PanBiker
Site Administrator
Site Administrator
Posts: 16447
Joined: 23 Jan 2012, 13:07
Location: Barnoldswick - In the West Riding of Yorkshire, always was, always will be.

Re: Kitchen Refurb

Post by PanBiker »

Here is the starting point from yesterday after Liam had finished laying the new vinyl.

Image

Image

Architraves and skirting still need to be glossed but I need to put a length of skirting in yet which will run from the end of the 500 drawer unit on the party wall back up to the door, cant do that until all the base units are in and fixed.

We cracked on today with all the base units as planned and managed to get them all built. We offered each one up in turn and made any cut outs required in the back edge service space for lateral pipe runs then fitted them all loose. I was pleased to see that we had a perfect fit down the party wall side, this was where we thought we may have had to take a bit off the service channel at one end to get them to fit.

I then started with the corner unit and levelled it out laterally and front to back. I set the level with the laser at 870mm and with the legs at the default 150mm it hit the line bang on. We levelled by adjusting the height upwards so as not to impede on the depth of the plinths that will be fitted later, better slightly high than too low. Once the corner was fully levelled we worked out to the left with the 600 oven cabinet. We moved on to the 1000 sink unit as that needed a few cut outs at the back to get it fully bedded to the outside wall, Scott's reworked pipework was perfect and fitted into the service channel nicely, we left the back out of the sink unit as it would have needed quite few holes cutting to get it right. The gap left between the sink unit and oven cabinet was 297mm, a bit of coaxing and the 300mm base unit slotted in nicely, (anyone would think we had measured it). No problem then in bringing each one up to the same level as the corner unit. We bracketed all these to the wall and then built the last of the base units, the 500 drawer unit for the other side of the corner unit on the living room wall. I finished off by fixing all the base units laterally to one another ensuring that meeting front faces were aligned.

Here is the corner and 500 drawer after final fix.

Image

and looking into the other corner with the sink cabinet, 300 base and oven carcass.

Image

Both ends of the cabinet runs will have colour matched clad on panels to finish them off. I need to put a baton on the wall between the end of the sink unit back to the door to support the worktop above the washing machine, there will be another colour matched panel bracketed to the wall to support the end of the worktop. The short length of skirting will be fitted from the 500 drawer unit cladding up to the living room door.

Very pleased with progress today, only the stuff on the walls to do now. cooker hood and chimney, cabinet and an 800 wide cupboard. I think I will leave these until the worktops are fitted. I should be able to ring Alan on Monday and get him to call at earliest.
Ian
Post Reply

Return to “DIY”