Kitchen Refurb
-
Stanley

- Global Moderator

- Posts: 90297
- Joined: 23 Jan 2012, 12:01
- Location: Barnoldswick. Nearer to Heaven than Gloria.
Re: Kitchen Refurb
Isn't it good when things go to plan! Looking good already!
Stanley Challenger Graham
Stanley's View
scg1936 at talktalk.net
"Beware of certitude" (Jimmy Reid)
The floggings will continue until morale improves!
Stanley's View
scg1936 at talktalk.net
"Beware of certitude" (Jimmy Reid)
The floggings will continue until morale improves!

-
PanBiker

- Site Administrator

- Posts: 16447
- Joined: 23 Jan 2012, 13:07
- Location: Barnoldswick - In the West Riding of Yorkshire, always was, always will be.
Re: Kitchen Refurb
Thanks, I'm in the position where I have removed some of my tools so definitely on the home stretch. Main delay now will be waiting on others. I can bring your SDS drill and laser level back Kev, I'll give you a ring before I call, probably tomorrow, I'm at the docs mid afternoon so I won't be on kitchen work.
Ian
Re: Kitchen Refurb
Grand job Ian. I'll be home about 5 but if you're going to be out and about earlier give Paulette a call on the landline. She's on holiday for a couple of weeks so should be about 
Kev
Stylish Fashion Icon.

Stylish Fashion Icon.

-
Stanley
- Global Moderator
- Posts: 90297
- Joined: 23 Jan 2012, 12:01
- Location: Barnoldswick. Nearer to Heaven than Gloria.
Re: Kitchen Refurb
So nice to see people cooperating with each other.......
Re. the cordless drills. Has anyone got any thoughts/recommendations about which current drill is the best? Price doesn't matter, I want something that is reliable. Watching my mates on Youtube, De Walt seems to be a favourite......
Re. the cordless drills. Has anyone got any thoughts/recommendations about which current drill is the best? Price doesn't matter, I want something that is reliable. Watching my mates on Youtube, De Walt seems to be a favourite......
Stanley Challenger Graham
Stanley's View
scg1936 at talktalk.net
"Beware of certitude" (Jimmy Reid)
The floggings will continue until morale improves!
Stanley's View
scg1936 at talktalk.net
"Beware of certitude" (Jimmy Reid)
The floggings will continue until morale improves!
Re: Kitchen Refurb
Screwfix always seem to have a deal on http://www.screwfix.com/p/dewal ... wodeF8PrQ
Kev
Stylish Fashion Icon.
Stylish Fashion Icon.
-
Stanley
- Global Moderator
- Posts: 90297
- Joined: 23 Jan 2012, 12:01
- Location: Barnoldswick. Nearer to Heaven than Gloria.
Re: Kitchen Refurb
Looks attractive Kev. I shall do something about it when the finances improve after the probate of Janet's estate goes through. Until then we are pulling our belts in!
Stanley Challenger Graham
Stanley's View
scg1936 at talktalk.net
"Beware of certitude" (Jimmy Reid)
The floggings will continue until morale improves!
Stanley's View
scg1936 at talktalk.net
"Beware of certitude" (Jimmy Reid)
The floggings will continue until morale improves!
-
PanBiker
- Site Administrator
- Posts: 16447
- Joined: 23 Jan 2012, 13:07
- Location: Barnoldswick - In the West Riding of Yorkshire, always was, always will be.
Re: Kitchen Refurb
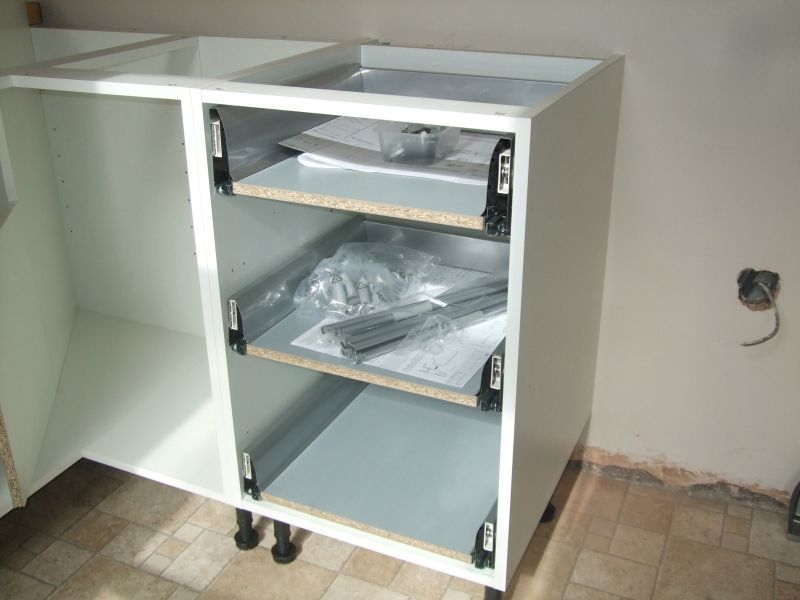
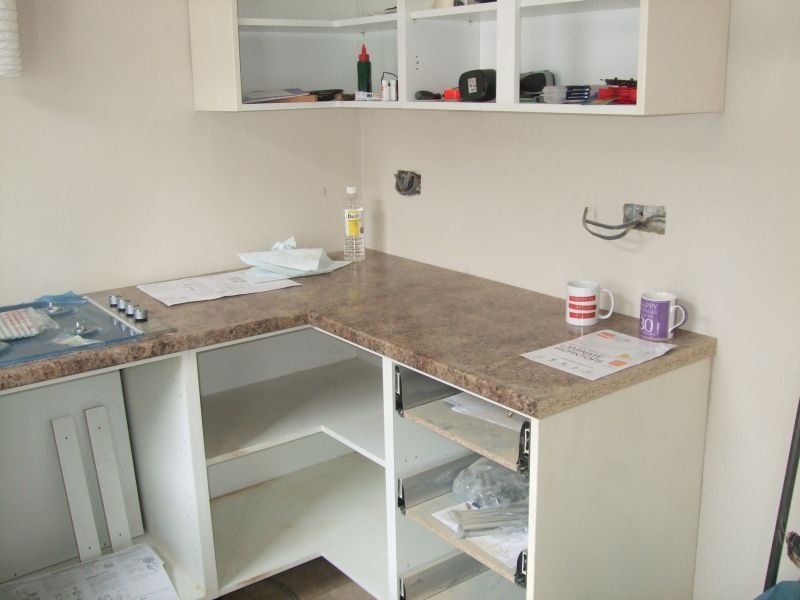
With going to see the nurse on Monday I only had time to make a start on populating the 500 drawer unit. I managed to get the top drawer built and the rails installed. Glad to see that in this Cooke & Lewis 500 base that all the euro drilling points for the runners were in the right place. I gave Alan a ring to say that we were ready for him to call at his earliest. He was working in town and said he would call in to see me around lunchtime to re check the window dimensions for the replacement sealed unit before he ordered. I had previously offered up the colour matched end panels for the ends of the unit runs, these are supplied oversized and I have asked Alan to do these as well as they involve a bit of careful cutting to get a god fit to a slightly out of kilter floor and the walls that are not exactly plumb. He will make a lot better job of it than I can. He will be with us on Thursday morning to do his stuff.
I continued on Tuesday and finished populating the 500 drawer. I fitted a baton to support the worktop run above the washing machine and through to the up stand on the end. I left it slightly short to allow for the cladding on the end of the sink base and between the upstand and the back door architrave.
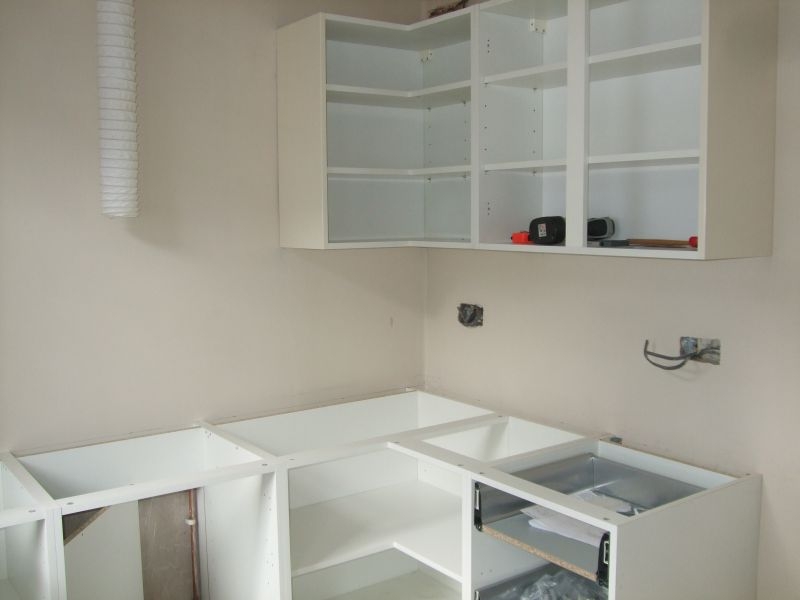
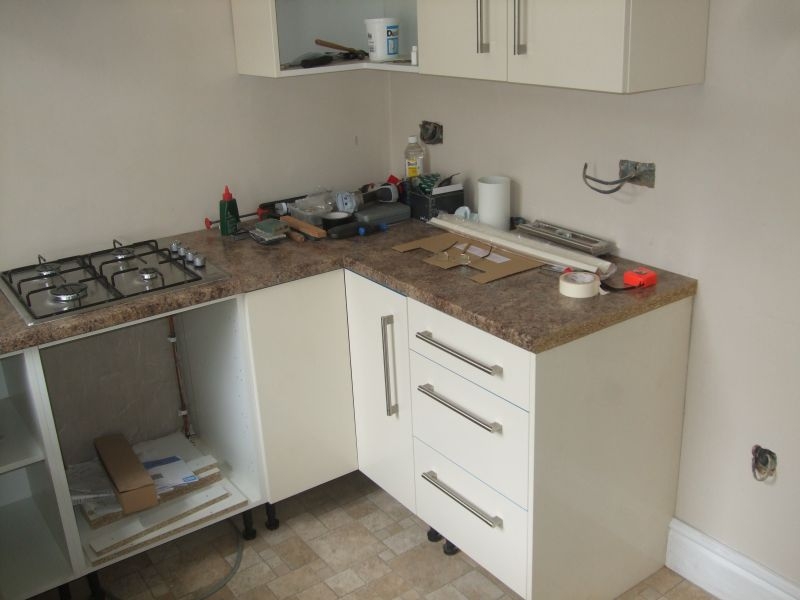
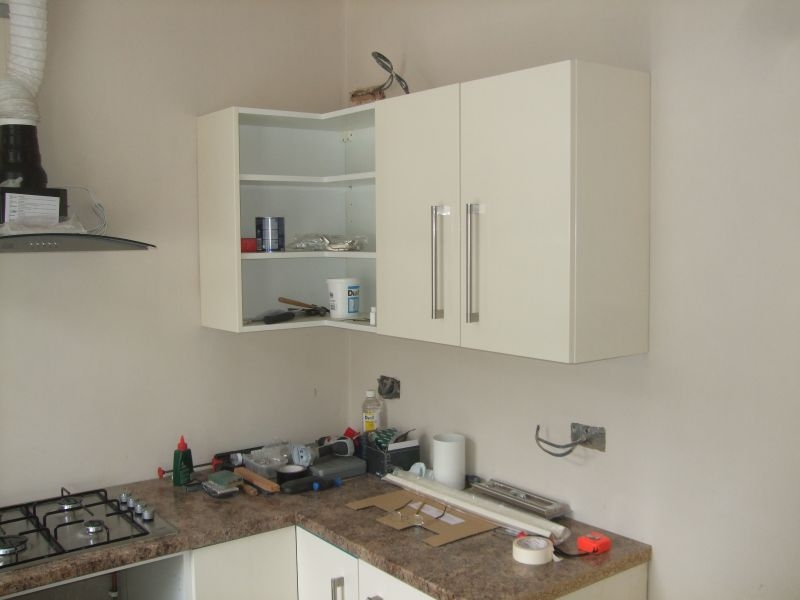
Jack has time off work this week so we used the opportunity to build and fit the wall cabinets. We started with the 625 corner cabinet and set the level for the hangars, 3 in this case for the corner. I extended the level out to accommodate the two hangars for the 800 wall cabinet. Both cabinets went together without a lot of problem we swapped out one end panel on each unit with a colour matched replacement as both ends of the cabinet run will be visible. We managed to get the levelling as near as makes no difference and they are now secured in place. The emulsion paint will need touching up in odd places where we have pencilled in guide marks etc. I will leave this until after the extractor and chimney has been fitted. there will probably be a bit more to touch up there as well.
We have a date for next week for Nathan to call and finalise and connect the electrics.
I continued on Tuesday and finished populating the 500 drawer. I fitted a baton to support the worktop run above the washing machine and through to the up stand on the end. I left it slightly short to allow for the cladding on the end of the sink base and between the upstand and the back door architrave.
Jack has time off work this week so we used the opportunity to build and fit the wall cabinets. We started with the 625 corner cabinet and set the level for the hangars, 3 in this case for the corner. I extended the level out to accommodate the two hangars for the 800 wall cabinet. Both cabinets went together without a lot of problem we swapped out one end panel on each unit with a colour matched replacement as both ends of the cabinet run will be visible. We managed to get the levelling as near as makes no difference and they are now secured in place. The emulsion paint will need touching up in odd places where we have pencilled in guide marks etc. I will leave this until after the extractor and chimney has been fitted. there will probably be a bit more to touch up there as well.
We have a date for next week for Nathan to call and finalise and connect the electrics.
Ian

Re: Kitchen Refurb
Ian, don't know if you are aware of this tip: you can get rid of pencil marks on emulsion painted and most other smooth surfaces with a normal soft eraser. Sounds obvious but I had forgotten and an electrician friend jogged my memory last year when he was marking and installing some conduit runs.

-
Wendyf

- Global Moderator
- Posts: 9442
- Joined: 23 Jan 2012, 12:26
- Location: Lower Burnt Hill, looking out over Barlick
Re: Kitchen Refurb
Impressed with the progress Ian.

Re: Kitchen Refurb
PanBiker, You seem to be having more success with your local tradesmen than I'm having trying to get some double glazing windows fitted. Does anybody know of a local man who would undertake some work in Colne that I could rely on. At the moment I'm getting a bit tired of leaving messages without any response.

Re: Kitchen Refurb
We got a swift response and good work from Nick Emmott at CGS tel 01282 835602 or 07968160828.
Say only a little but say it well.
Re: Kitchen Refurb
Thanks Moh, Note taken. The funny thing was that within an hour of my posting one of the contacts gave me a call. Powerful stuff this OG !
-
PanBiker
- Site Administrator
- Posts: 16447
- Joined: 23 Jan 2012, 13:07
- Location: Barnoldswick - In the West Riding of Yorkshire, always was, always will be.
Re: Kitchen Refurb
My joiner is Alan Hodgson, he started working for my uncles firm straight from school, time served bloke. When the firm closed down Alan went self employed initially in a partnership until his mate retired, worked alone ever since. I gave them their first job when they first set up building me a new kitchen on my first house. That was about 35 years ago, I have used him ever since, a good and reliable bloke. He can be contacted on 01282 814429 or 07790947290, he is based in Barlick but works wherever required.
I have had a day of his time today to do a proper job on the unit end matched claddings, upstand, worktops routing in two corners, cut outs for sink and hob and a new window bottom, he will be returning to fit a new sealed unit in the kitchen window when it has been built.
I have effectively been a labourer today and chief brew maker but its been a pleasure watching and expert work, I have learnt one or two things as well. Here's the photo's at the close of play today, a good leap forward.
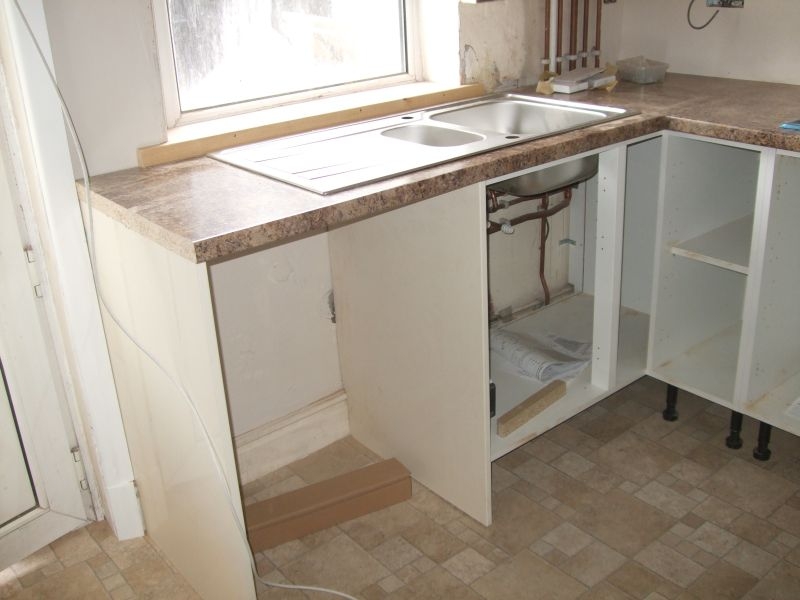
Sink and up stand for the washing machine.
Corner, oven base and hob.
Other corner and worktop to fridge freezer location.
Alan hasn't finished the end of the worktops as I am going to fit metal capping's to the ends. I can move on now to fitting the extractor fan, fit the doors and drawer fronts and then do any touch up painting required. There will be a bit of priming to do as well on new skirting and window bottom.
I have had a day of his time today to do a proper job on the unit end matched claddings, upstand, worktops routing in two corners, cut outs for sink and hob and a new window bottom, he will be returning to fit a new sealed unit in the kitchen window when it has been built.
I have effectively been a labourer today and chief brew maker but its been a pleasure watching and expert work, I have learnt one or two things as well. Here's the photo's at the close of play today, a good leap forward.
Sink and up stand for the washing machine.
Corner, oven base and hob.
Other corner and worktop to fridge freezer location.
Alan hasn't finished the end of the worktops as I am going to fit metal capping's to the ends. I can move on now to fitting the extractor fan, fit the doors and drawer fronts and then do any touch up painting required. There will be a bit of priming to do as well on new skirting and window bottom.
Thanks, China, I am aware of this but we have an odd paint chip to sort as well as a few grubby fingermarks to get shut of, probably more when I have fitted the extractor and chimney. Jack texted Scott his plumber mate yesterday and he come on Monday to plumb in the sink, fit the cold feed and drain for the washer and fit and connect up the gas hob. Nathan the electrician will be with us sometime mid week.
Ian
-
Stanley
- Global Moderator
- Posts: 90297
- Joined: 23 Jan 2012, 12:01
- Location: Barnoldswick. Nearer to Heaven than Gloria.
Re: Kitchen Refurb
I love watching good men working and learn a lot from them. That's one of the reasons why I love watching Abom79 (Adam Booth) on Youtube. He is the perfect machinist and well worth a look.....
Stanley Challenger Graham
Stanley's View
scg1936 at talktalk.net
"Beware of certitude" (Jimmy Reid)
The floggings will continue until morale improves!
Stanley's View
scg1936 at talktalk.net
"Beware of certitude" (Jimmy Reid)
The floggings will continue until morale improves!
Re: Kitchen Refurb
Would be well trained working for Uncle Bob. !!
Say only a little but say it well.
-
PanBiker
- Site Administrator
- Posts: 16447
- Joined: 23 Jan 2012, 13:07
- Location: Barnoldswick - In the West Riding of Yorkshire, always was, always will be.
Re: Kitchen Refurb
Indeed Moh! I forgot to mention that Alan was a childhood mate as well, he is a little younger than me but he lived on the next street to us so was part of our gang.
Thanks for the comments on the kitchen, I have been down today to get the architrave on around the window, easier to do this before the sink is installed on Monday. I took the new window bottom out that Alan put together yesterday its secured by two screws into the window sill and gave it a good sanding, I have refitted it and filled all the countersunk screws, along with all the nailing on the architraves, just waiting for the filler to set then I will go back down for a final sanding and give the new wood a coat of undercoat, again better to seal the wood before Scott gets to work with the silicone round the sink unit. I have fitted the short length of skirting that will be behind the fridge/freezer, I can give that a coat too, all woodwork will be ready for glossing then.
A bit later....
Been back down, sanded all the fillings and given everything a brush of undercoat.
Ian
-
Stanley
- Global Moderator
- Posts: 90297
- Joined: 23 Jan 2012, 12:01
- Location: Barnoldswick. Nearer to Heaven than Gloria.
Re: Kitchen Refurb
Brilliant work. My kitchen looks older by the day.......
Stanley Challenger Graham
Stanley's View
scg1936 at talktalk.net
"Beware of certitude" (Jimmy Reid)
The floggings will continue until morale improves!
Stanley's View
scg1936 at talktalk.net
"Beware of certitude" (Jimmy Reid)
The floggings will continue until morale improves!
-
PanBiker
- Site Administrator
- Posts: 16447
- Joined: 23 Jan 2012, 13:07
- Location: Barnoldswick - In the West Riding of Yorkshire, always was, always will be.
Re: Kitchen Refurb
No Nathan yet, they have a lad off so a bit pushed with existing jobs. I have been moving things on with drawer fronts and door fitting. I started with the drawers and have aligned and levelled them with the adjusters in the front fixings. I have set the handle spacings and height on the verticals with reference to the top drawer which is set centrally, the two deeper drawers have the handles set the same distance from the top of the drawer front, this ensures less stooping for the bottom drawer. All other handles have been set with the same spacing from the opening edge.
I continued with the corner base unit which has a different door arrangement to the one in my kitchen. Mine is fitted with a carousel and has two doors opening separately. This has a linked door arrangement using 170 and 220 degree hinges, levelling and aligning this one took a bit of thinking about, 8 adjusters to go at, got there eventually and it's as near as damn it makes no difference. Single handle, opens from the right and has a soft close buffer for the right had door close.
All the other hinges are soft close and have an integral damping mechanism within the hinge mechanism. The main difference to a normal articulated hinge is that the base plates for fixing to the cabinet side are integral to the hinge so you have to offer the door up complete rather than attach it to a previously attached mounting plate, the mechanisms still have all the adjustment options though. The damping mechanism works well but I will still fix rubber spot buffers on the inside front edges of the doors, it gives them a silent touchdown and slight bounce.
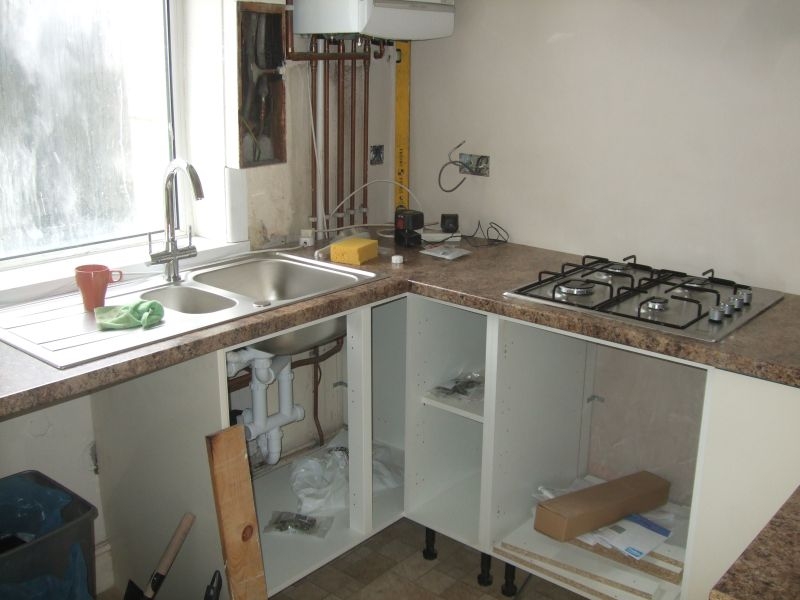
The sink base unit has some artisan plumbing for the 1.5 sink and Scott has fitted a tapped water feed for the washing machine and a waste input into the drain. I will have to put a couple of holes through to the machine cavity to feed the pipes through, there will be another for the mains feed as there will be a switched socket added inside the sink base for the machine, the cable is waiting under the unit for this.
I can't really fit any more doors until the electrics have been finalised, the sink base, 300 base and upper corner cupboard are all having some form of switching or sockets installed in them so best left off for now for better access.
You can just see that I have also installed the extractor hood, this took a bit of careful measuring and drilling but was straightforward enough. I replaced all the supplied fixing screws with some I already had, the ones supplied were domed head and neither one thing or the other, I could not find a driver to match the head so I used standard dual thread posidrive of a higher spec, it won't fall down! My calculated ducting egress point from the ceiling is fortunately inside the chimney, towards the side but within limits, I had to work this out before the plaster went on which in turn dictated the lateral position of the hob below, glad it worked out OK.
At a bit of a straight edge, I knocked off for the day for a late lunch. I had just finished that when Alan rang to say he could come to replace the kitchen window unit later in the afternoon. Jack rang me just before I was going to go back down to say he was at home and Alan was already on the job, Jack was working locally yesterday so he was home early.
Coming along nicely.
I continued with the corner base unit which has a different door arrangement to the one in my kitchen. Mine is fitted with a carousel and has two doors opening separately. This has a linked door arrangement using 170 and 220 degree hinges, levelling and aligning this one took a bit of thinking about, 8 adjusters to go at, got there eventually and it's as near as damn it makes no difference. Single handle, opens from the right and has a soft close buffer for the right had door close.
All the other hinges are soft close and have an integral damping mechanism within the hinge mechanism. The main difference to a normal articulated hinge is that the base plates for fixing to the cabinet side are integral to the hinge so you have to offer the door up complete rather than attach it to a previously attached mounting plate, the mechanisms still have all the adjustment options though. The damping mechanism works well but I will still fix rubber spot buffers on the inside front edges of the doors, it gives them a silent touchdown and slight bounce.
The sink base unit has some artisan plumbing for the 1.5 sink and Scott has fitted a tapped water feed for the washing machine and a waste input into the drain. I will have to put a couple of holes through to the machine cavity to feed the pipes through, there will be another for the mains feed as there will be a switched socket added inside the sink base for the machine, the cable is waiting under the unit for this.
I can't really fit any more doors until the electrics have been finalised, the sink base, 300 base and upper corner cupboard are all having some form of switching or sockets installed in them so best left off for now for better access.
You can just see that I have also installed the extractor hood, this took a bit of careful measuring and drilling but was straightforward enough. I replaced all the supplied fixing screws with some I already had, the ones supplied were domed head and neither one thing or the other, I could not find a driver to match the head so I used standard dual thread posidrive of a higher spec, it won't fall down! My calculated ducting egress point from the ceiling is fortunately inside the chimney, towards the side but within limits, I had to work this out before the plaster went on which in turn dictated the lateral position of the hob below, glad it worked out OK.
At a bit of a straight edge, I knocked off for the day for a late lunch. I had just finished that when Alan rang to say he could come to replace the kitchen window unit later in the afternoon. Jack rang me just before I was going to go back down to say he was at home and Alan was already on the job, Jack was working locally yesterday so he was home early.
Coming along nicely.
Ian
-
PanBiker
- Site Administrator
- Posts: 16447
- Joined: 23 Jan 2012, 13:07
- Location: Barnoldswick - In the West Riding of Yorkshire, always was, always will be.
Re: Kitchen Refurb
I went to the electrical wholesalers on Tuesday and picked up the sockets, surface boxes, switches and fused spurs that we need for the installation. The hob, hood and oven are all stainless steel so I got matching stainless sockets and the 4 way switch bank for all the electrics above the counter top, standard white for the ones that are hidden, (washer, fridge freezer), and the fused switches, cooker control, boiler feed that will all be hidden from view above below or in cupboards or base units.
I fitted all the above worktop decorative sockets, first then the single feed for the boiler, some of the back boxes were set a bit deep when I installed them as I didn't know what the depth of the plaster would be, consequently I needed some longer screws for some of the sockets. The electrics for the extractor are fed from the ring main via a switched fuse installed on top of the corner cabinet and a straight connection unit that is above the extractor and will be hidden by the chimney. This means that the extractor can be electrically isolated if required. I will take a lighting feed from the ring main side of this switch to drop down the service channel at the back of the cupboard to feed another fused switch that I can connect under cupboard lighting to.
Once I had finalised the electrical connection for the hood I decided to fit the chimney as my next job. This is where I ran into a slight problem! The chimney is stainless steel and consists of two sections in a telescope arrangement. The bottom section sits in a rebate channel on top of the hood and the top section is extended and is secured with two self tapping screws to a bracket installed close to the ceiling. The wall bracket has lateral adjustment and the fixings holes for the top section of chimney are vertically slotted so you can extend it past the bracket to meet the ceiling. Now here is where the problem arose, when I extended the top section to meet the top bracket the two sections parted in the middle by about 5mm! I revisited the installation and drilling information which I had followed to the letter to check the height for the hood and the distance between the brackets all were as specified but clearly the hood is set to low or the chimney is not long enough. I had had enough by this point so knocked off to give it a coat of thinking about.
Wednesday is Senior Citizens discount day at B&Q and Sally had indicated that she needed another tin of gloss paint. I decided to nip on and get that and some longer screws for the sockets. While I was there I picked up a stainless steel splash back for behind the hob. Seniors discount on this lot came to just over £7.00 so worth the Wednesday shopping trip.
I offered the splash back up when I went down yesterday an I noticed straight away that whatever the problem with the hood was I had fortunately inherited a get out. The splash back was short of butting up to the the hood by 35mm when set from the worktop. I was going to tile either side of the splash back as it is 10mm deep the same depth of the border tiles that I will be fitting. The get out is that the tiles are 48mm high so I can mount the splash back on top of the tile run. It will mean resetting the hood 10mm higher but that will have the knock on that the chimney will fit as well. The wall runs away slightly between the worktop an the top of the splash back where it meets the hood, having them butt together will hide this to some degree and a bead of sealant down the vertical edges will finish it off nicely.
Jack came round for tea yesterday so I got him to choose the tiles he wanted. I worked out what he needed and we checked the stock at various B&Q branches in the area. No stock at Nelson or Keighley but the did have them at Blackburn or Halifax. Fortunately Jack was driving through Halifax today between the two schools he supports on a Friday so we ordered them online for Click and Collect today at Halifax, Jack picked them up at lunchtime.
I continued today with more electrical installation. We have a 6mm feed for a cooker control unit which I have fitted in the sink base unit. The oven will be directly connected here and the gas hob ignition will be fed from the socket in the control unit. I have also fitted a single gang switched socket on the ring loop alongside the cooker control unit for the washing machine. I have a few holes to drill in the base unit for cable feeds for the plug leads to the sockets. I will continue while I have the drill out to make holes for the water feed for the washer and the waste water pipe which are both fed or terminated under the sink.
Tiling tomorrow then but not until I have re installed my HF wire antenna, Nathan delivered me a nice 3.9m extending cat ladder yesterday.
Ian
-
Stanley
- Global Moderator
- Posts: 90297
- Joined: 23 Jan 2012, 12:01
- Location: Barnoldswick. Nearer to Heaven than Gloria.
Re: Kitchen Refurb
Stanley Challenger Graham
Stanley's View
scg1936 at talktalk.net
"Beware of certitude" (Jimmy Reid)
The floggings will continue until morale improves!
Stanley's View
scg1936 at talktalk.net
"Beware of certitude" (Jimmy Reid)
The floggings will continue until morale improves!