

I have promoted a smilie for a quick thanks.
SHED MATTERS 2
-
Stanley

- Global Moderator

- Posts: 90295
- Joined: 23 Jan 2012, 12:01
- Location: Barnoldswick. Nearer to Heaven than Gloria.
Re: SHED MATTERS 2
I like it Ian and will be using it. 
I'm going to have to do some milling this morning. The cutter looked OK but I decided that a touch up wouldn't do any harm.
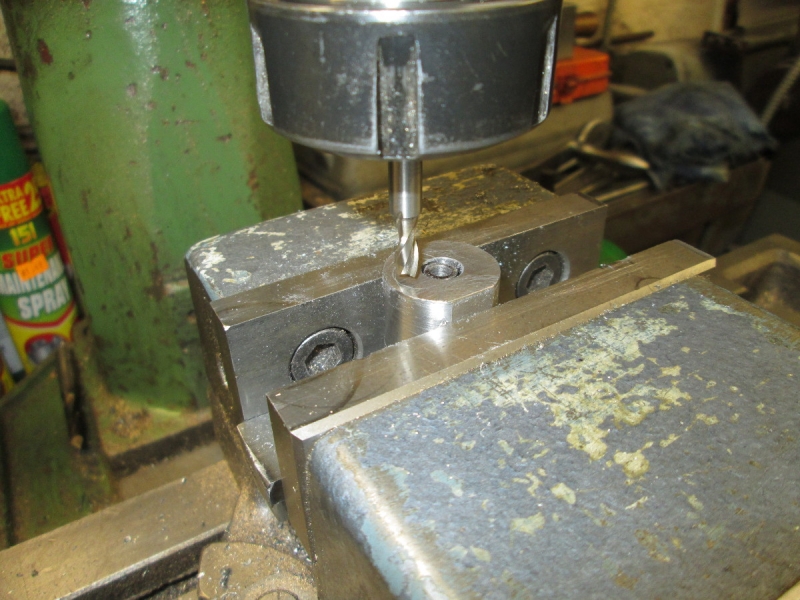
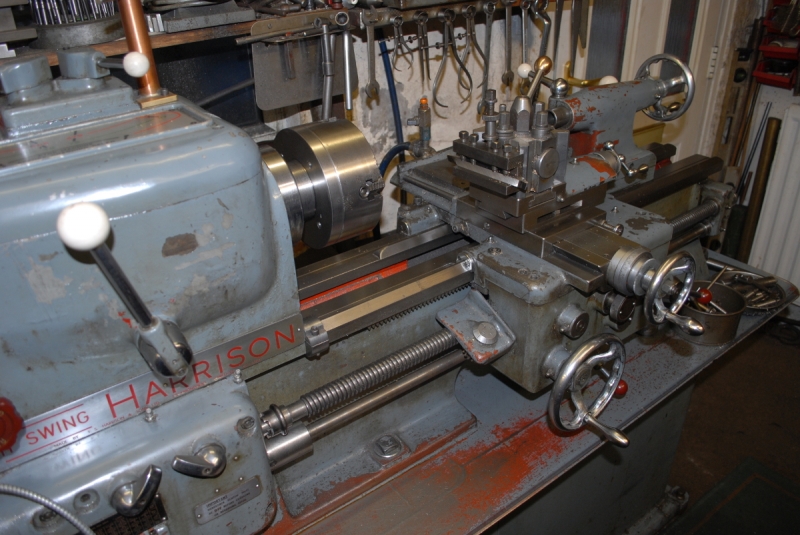
I needed a very accurate measurement for a hole I have to make in the body so I put the three jaw on Mrs Harrison and used the top slide to dial .502" in.
A bit of careful setting up by eye (!!) and I bored the 4.2mm hole and cleaned it up. There's been a lot of setting up like this this morning and it ain't easy!
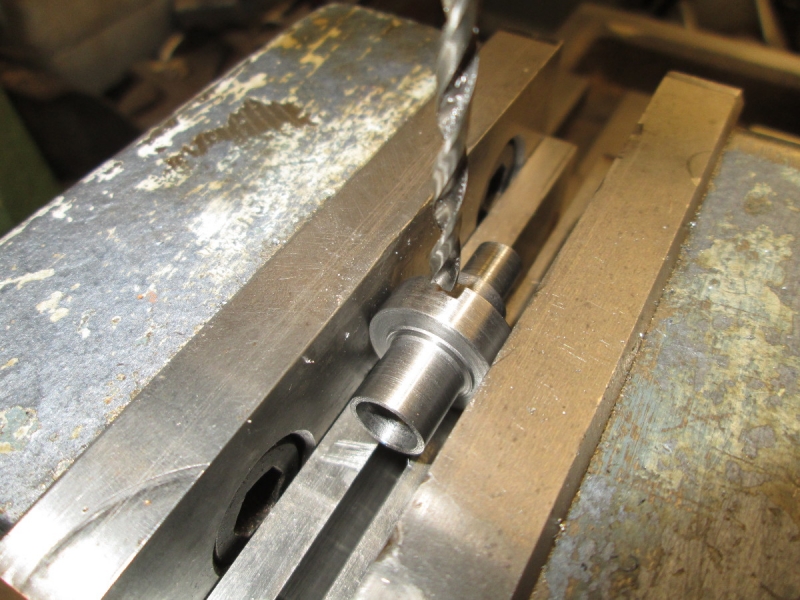
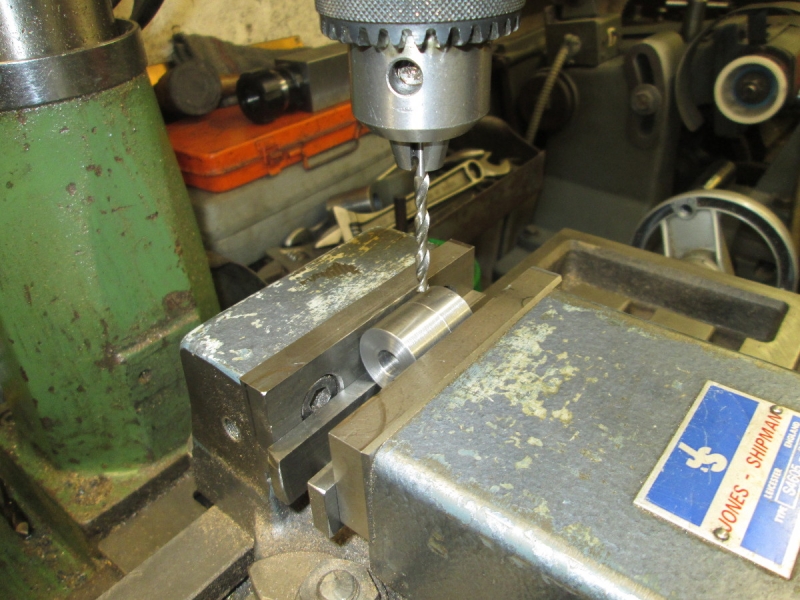
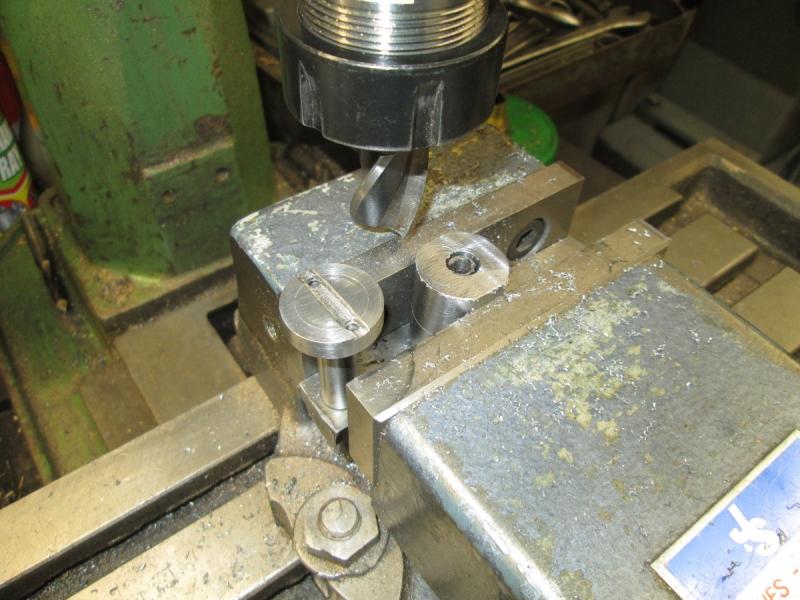
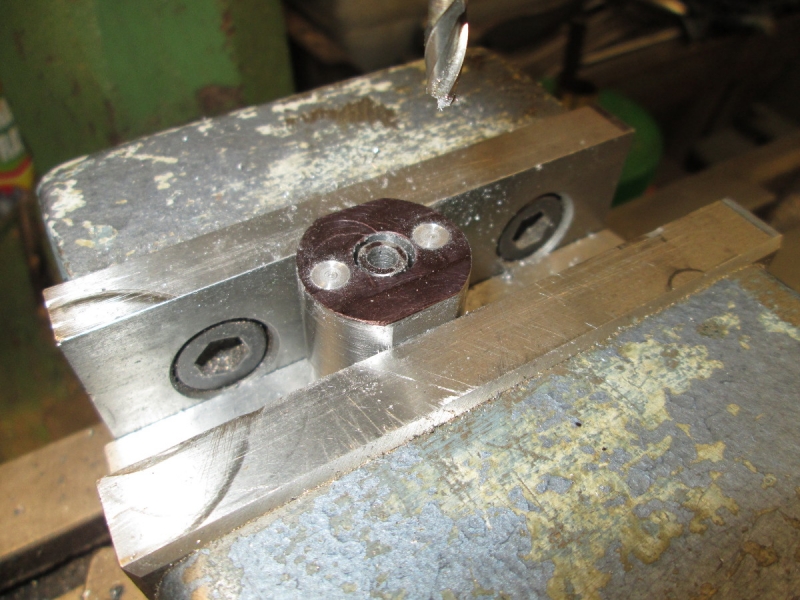
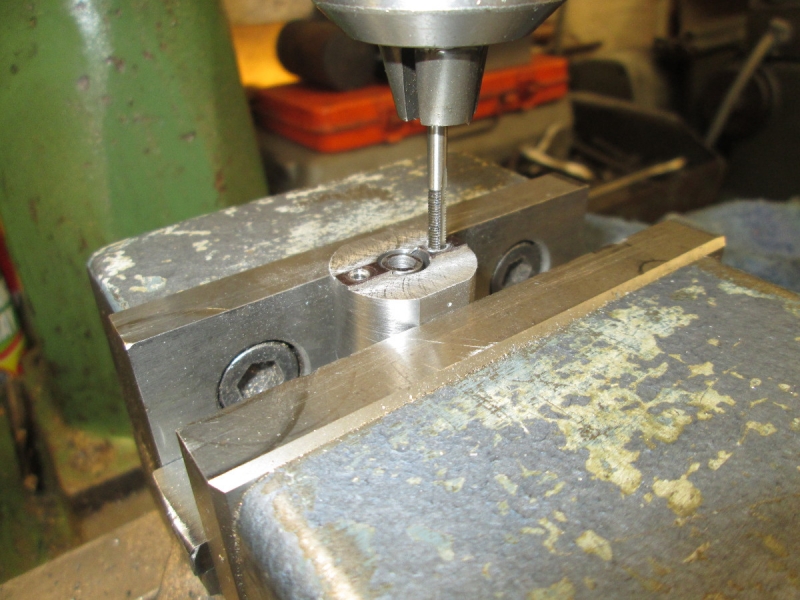
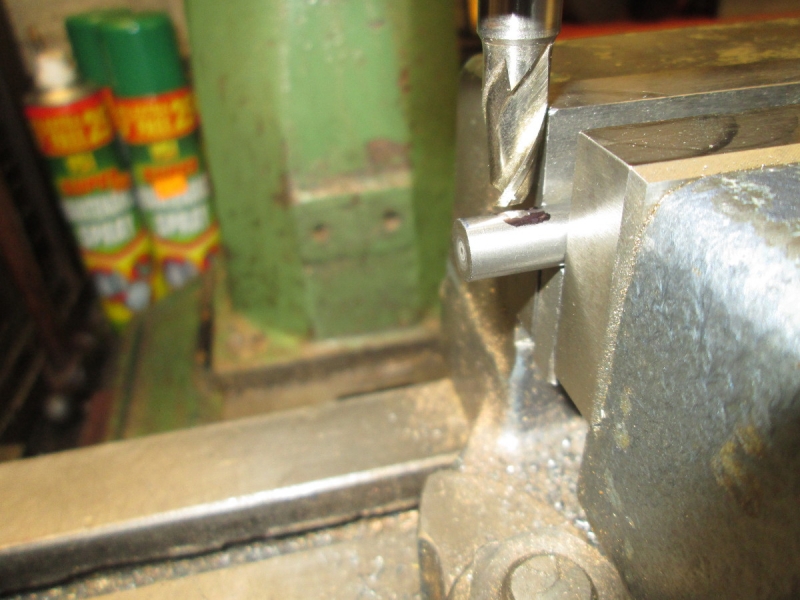
Next I had to drill a 3.3mm hole and tap it 4mm for the set screw that retains the cutter in the spindle. This has to be dead in line with the hole in the body so I assembled the spindle and bearings in the body and marked the spindle with a transfer punch. Then take it out and set it up in the vise with the drill dead centre. I have to say I took a long time doing this!
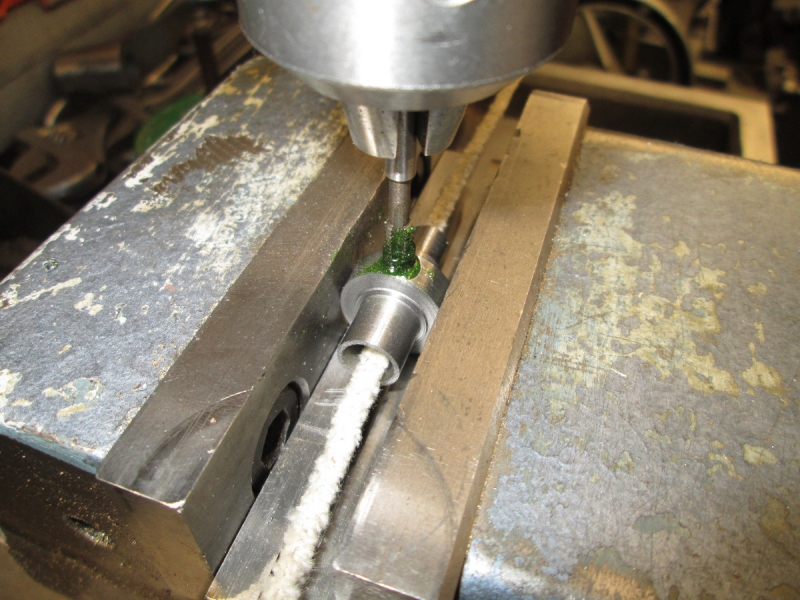
Then a very careful tapping of the hole on the same setting. No broken taps allowed! The pipe cleaner is to clear the chips from the bore so I could judge when the tap was fully through the hole.
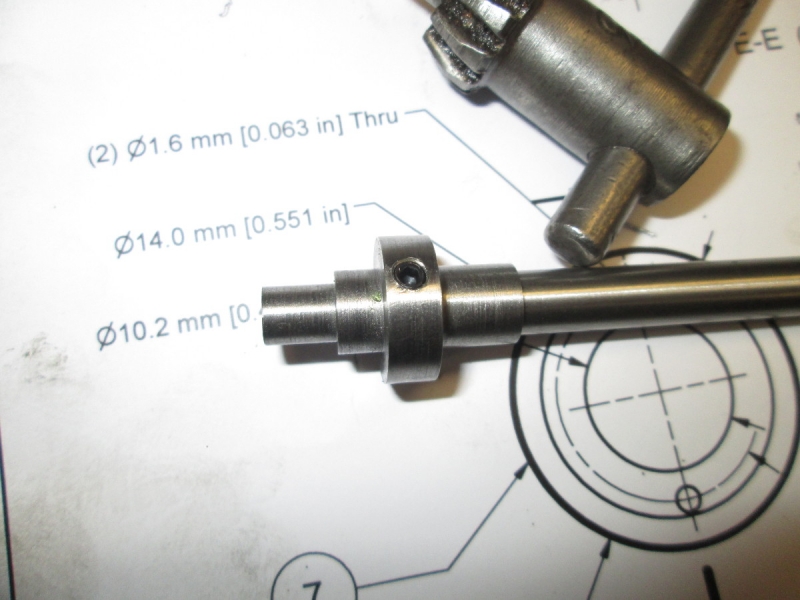
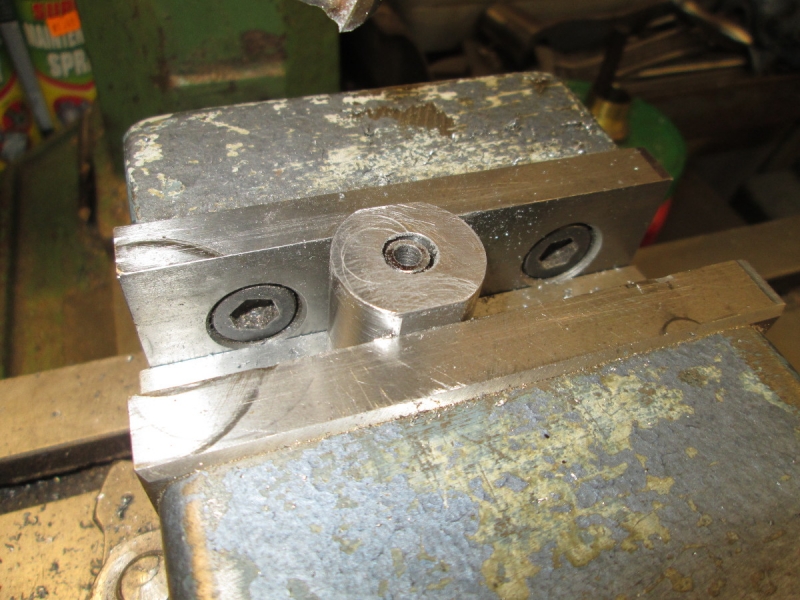
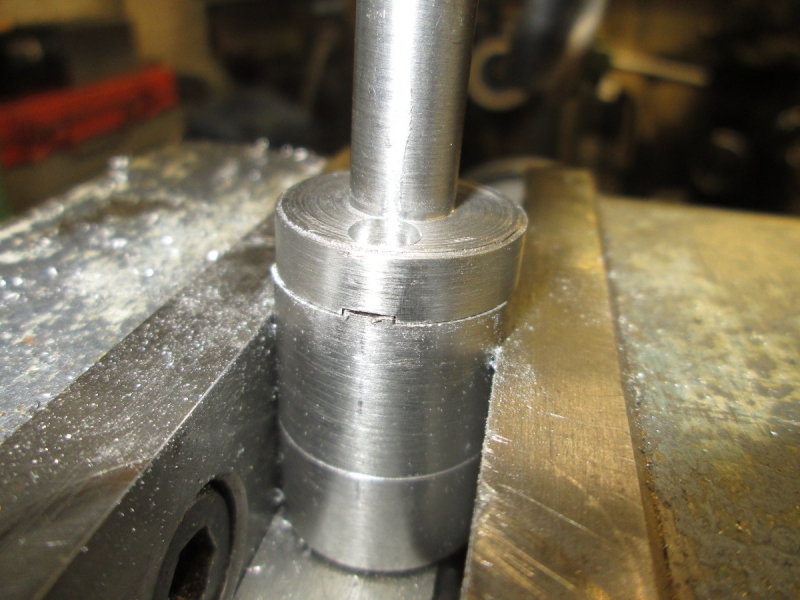
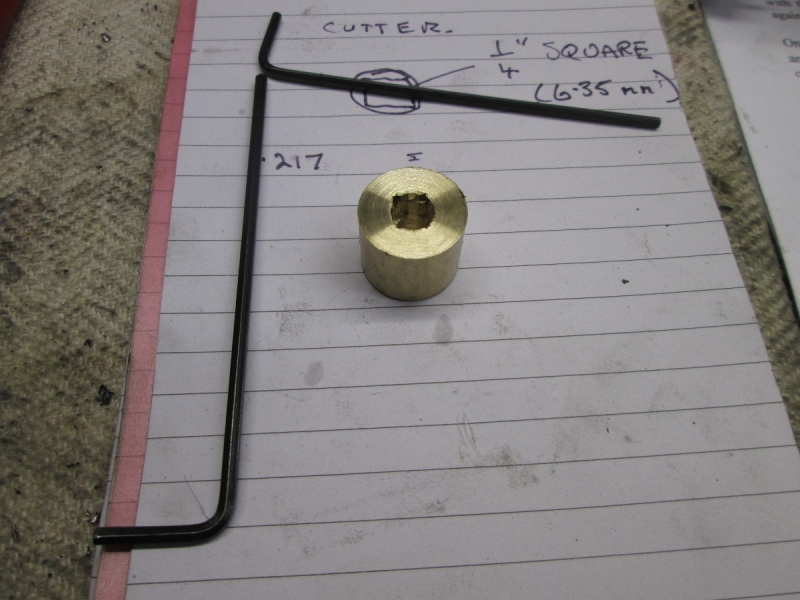
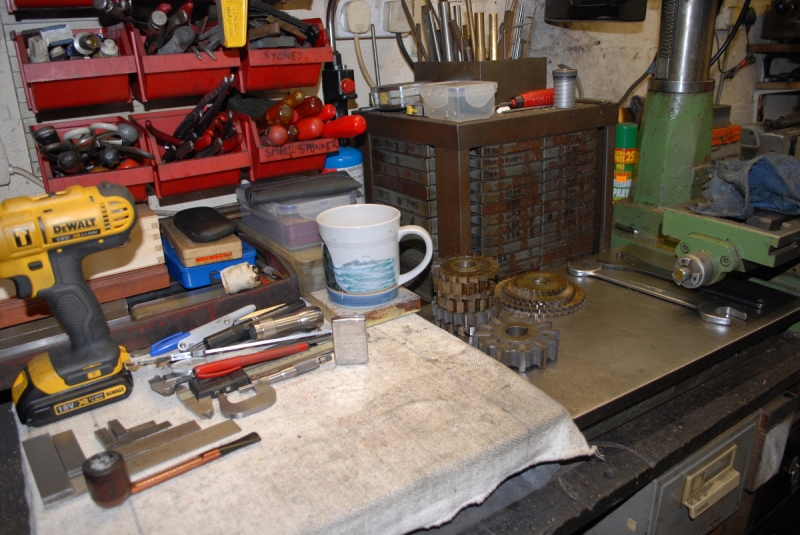
Here it is with the grub screw locking the silver steel that will be the cutter in place.
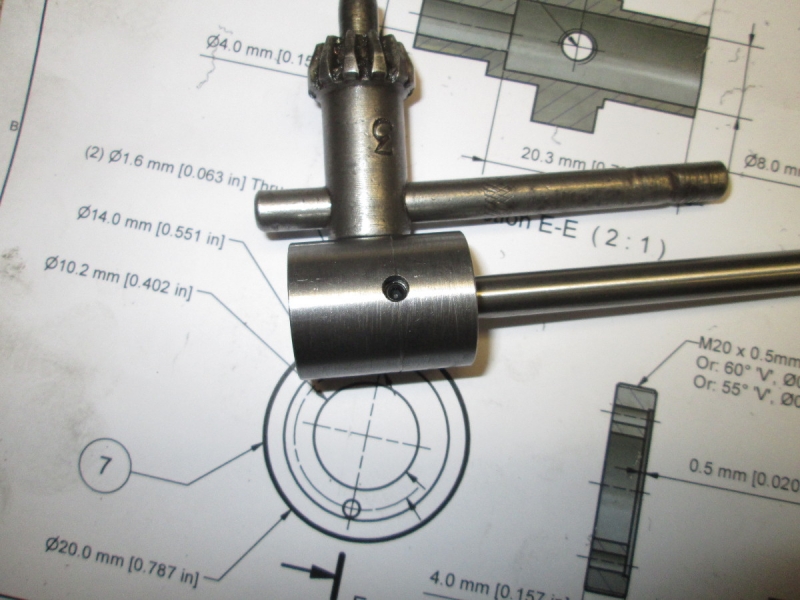
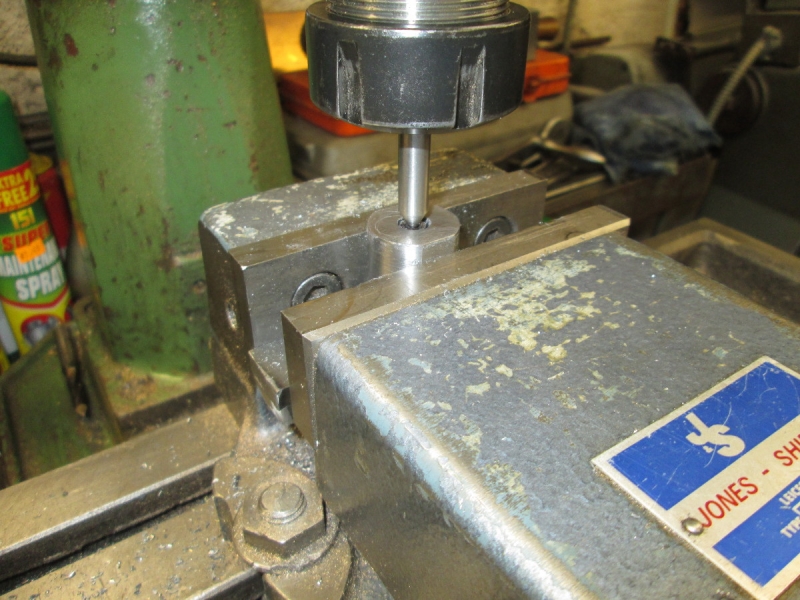
Here it is assembled in the body. As you can see, I got it in line! Big sigh of relief.
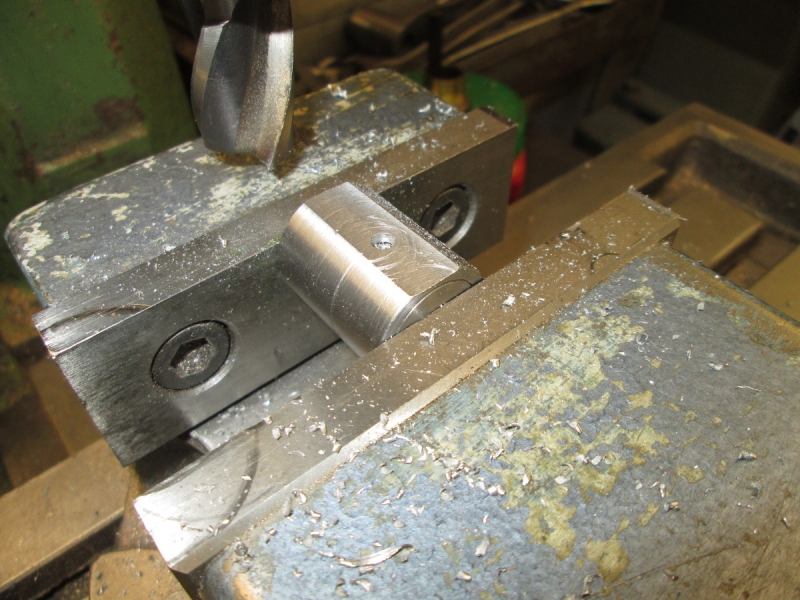
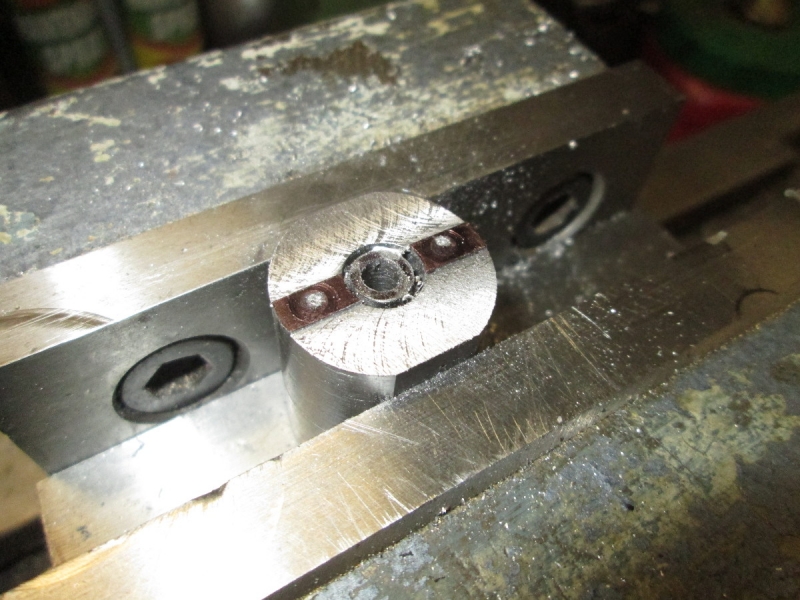
Next job is two flats on the body to prepare for the next stage.
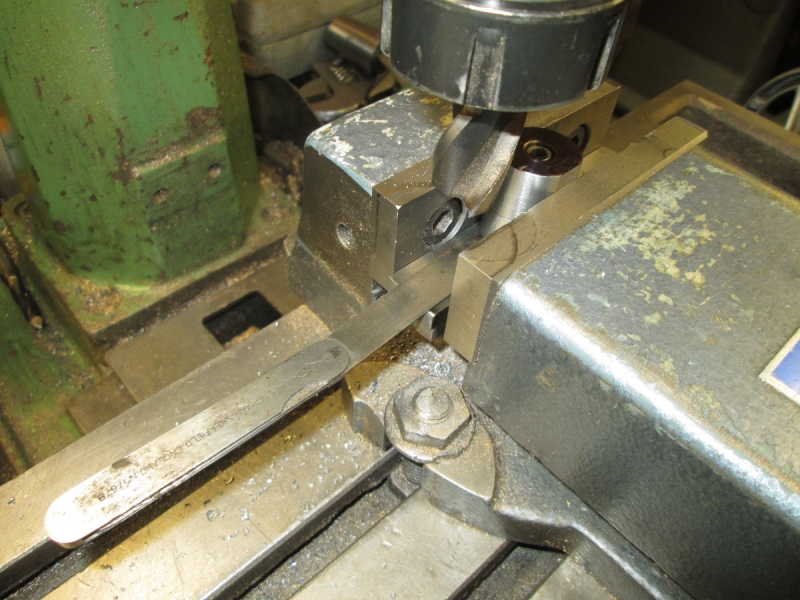
This is a tickle operation. I have to cut the end of the body out of line so that when I fit the shank I will have introduced the wobble that enables the cutting action. I blued the face up and mounted it in the vise with .018" of feelers under the edge to give me the one degree wobble. Very fine cuts until the blue had all been cut off.
Now I have to cut the end of the body to give a raised tab that will fit in the channel of the shank. I knocked off here because it isn't immediately obvious how this is oriented. I need to spend time studying the drawings because at the moment the answer to this is unclear. Another fiddle! And best if I come to it like a giant refreshed!
I'm going to have to do some milling this morning. The cutter looked OK but I decided that a touch up wouldn't do any harm.
I needed a very accurate measurement for a hole I have to make in the body so I put the three jaw on Mrs Harrison and used the top slide to dial .502" in.
A bit of careful setting up by eye (!!) and I bored the 4.2mm hole and cleaned it up. There's been a lot of setting up like this this morning and it ain't easy!
Next I had to drill a 3.3mm hole and tap it 4mm for the set screw that retains the cutter in the spindle. This has to be dead in line with the hole in the body so I assembled the spindle and bearings in the body and marked the spindle with a transfer punch. Then take it out and set it up in the vise with the drill dead centre. I have to say I took a long time doing this!
Then a very careful tapping of the hole on the same setting. No broken taps allowed! The pipe cleaner is to clear the chips from the bore so I could judge when the tap was fully through the hole.
Here it is with the grub screw locking the silver steel that will be the cutter in place.
Here it is assembled in the body. As you can see, I got it in line! Big sigh of relief.
Next job is two flats on the body to prepare for the next stage.
This is a tickle operation. I have to cut the end of the body out of line so that when I fit the shank I will have introduced the wobble that enables the cutting action. I blued the face up and mounted it in the vise with .018" of feelers under the edge to give me the one degree wobble. Very fine cuts until the blue had all been cut off.
Now I have to cut the end of the body to give a raised tab that will fit in the channel of the shank. I knocked off here because it isn't immediately obvious how this is oriented. I need to spend time studying the drawings because at the moment the answer to this is unclear. Another fiddle! And best if I come to it like a giant refreshed!
Stanley Challenger Graham
Stanley's View
scg1936 at talktalk.net
"Beware of certitude" (Jimmy Reid)
The floggings will continue until morale improves!
Stanley's View
scg1936 at talktalk.net
"Beware of certitude" (Jimmy Reid)
The floggings will continue until morale improves!

Re: SHED MATTERS 2
1° wobble, the mind boggles. It's a complicated little gizmo, isn't it?
-
Stanley
- Global Moderator
- Posts: 90295
- Joined: 23 Jan 2012, 12:01
- Location: Barnoldswick. Nearer to Heaven than Gloria.
Re: SHED MATTERS 2
Dead right China. Amazing how offensive to the eye that small deviation is..... It looked like the leaning tower of Pisa!
Stanley Challenger Graham
Stanley's View
scg1936 at talktalk.net
"Beware of certitude" (Jimmy Reid)
The floggings will continue until morale improves!
Stanley's View
scg1936 at talktalk.net
"Beware of certitude" (Jimmy Reid)
The floggings will continue until morale improves!
-
Stanley
- Global Moderator
- Posts: 90295
- Joined: 23 Jan 2012, 12:01
- Location: Barnoldswick. Nearer to Heaven than Gloria.
Re: SHED MATTERS 2
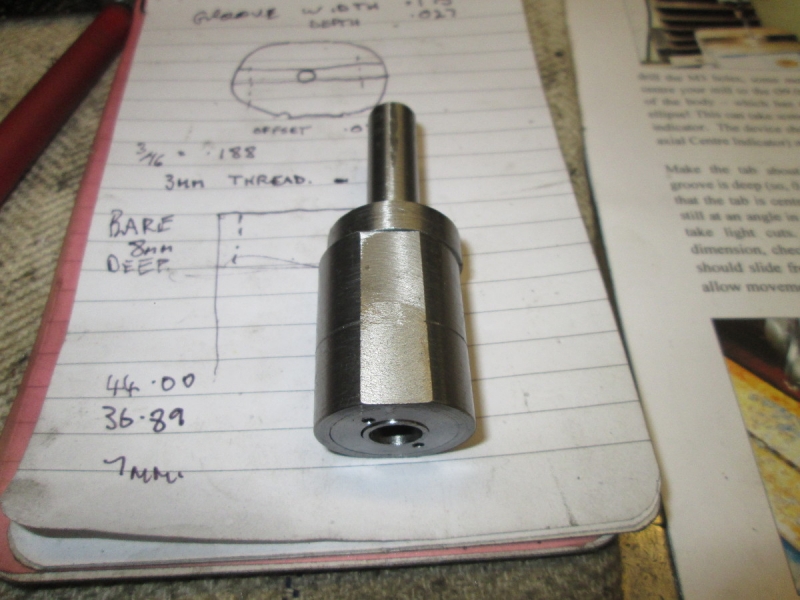
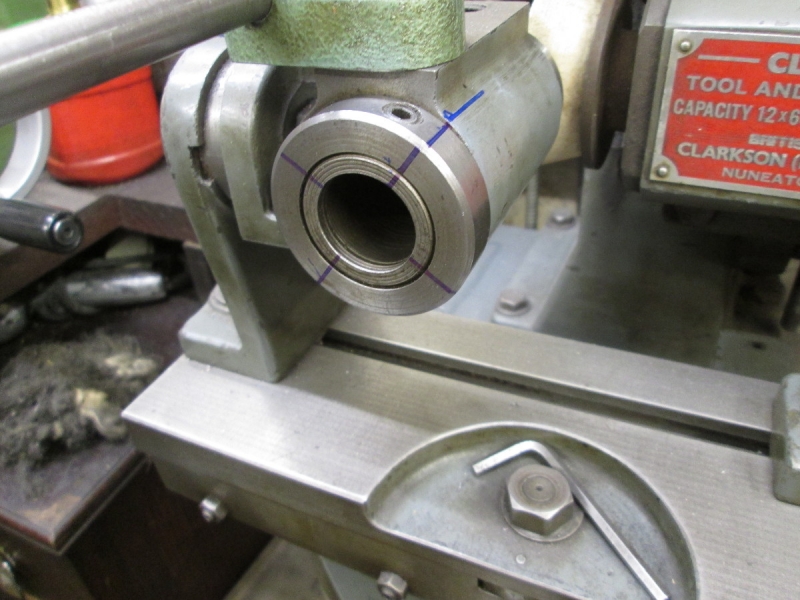
Today is about fitting the shank to the body. I haven't moved the body in the vise and the first thing I did was rub the milled surface over with a coarse diamond hone, my cutter is sharp but leaving a few marks on the face. These don't matter of course from a cosmetic point of view because it will be covered up but I have some very close marking and cutting to do so I want it to be clear. Then I had a good read and I think I have grasped the essentials. The main thing that I wouldn't have thought of is that the shank is perfectly central but by milling the body on a one degree slant I have moved the actual centre of the broach slightly to the left as we look at it here and this has to be allowed for in what follows.
The first thing to do is form the tab on the end of the body which fits the groove in the shank. So I want the centre. Remember that the hole in the end is now an ellipse so I had to be very careful finding the centre of the tab. Once I was satisfied I locked the table on the Y axis.
Now I have to mark the body for cutting. Not as easy as it looks because I don't have DRO and what I am measuring is under 4mm wide. I decided to make a mark with a 3/16" cutter at each side. This is bigger than the tab but the edges give me some reference points because the actual cutting will be eyeball.
I think I have them right!
A bit later..... The shank is a satisfactory fit, not dead central as you can see but it's going to get even worse than that! Main thing is that the tab doesn't quite bottom in the groove so I know I have good face contact.
I spotted the location of the holes with a transfer punch and a light pop mark. By the way I have marked a register on the shank and the body so that I know which way round it fits as there will almost certainly be a slight discrepancy.
Then the tricky bit. I put a centre drill in and found each pop mark and then moved them both .027" to the left so they are on the true centre. I marked them both with a good centre drill hole.
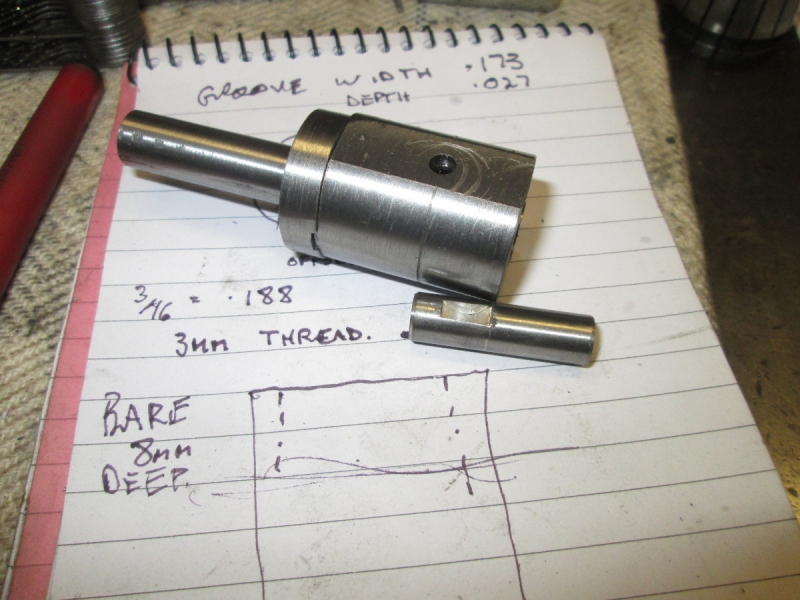
Then a quick check of the drawings. The thread is 3mm X .5 pitch, this is in over 50tpi territory. Problem was that the drawing didn't specify the pitch and I had to measure the thread on the cap screws. That put a bit of a strain on me eyes I can tell you! Then find a 3mm tap and a 2.5mm tapping drill. Fix my depth indicator to the drill. I have to go in no more than 8MM and I am within .5mm of the thrust bearing at that so no room for error!
You can take it as read that these two holes were drilled with maximum care! I think I have them right. Now I have to tap the holes. The tap is a 2nd cut so when I have them to depth I shall perhaps have to convert it to a bottoming tap so it's going to be another tickle operation. It was closing time, I have done enough. I shall come back to the tapping first thing tomorrow.....
Stanley Challenger Graham
Stanley's View
scg1936 at talktalk.net
"Beware of certitude" (Jimmy Reid)
The floggings will continue until morale improves!
Stanley's View
scg1936 at talktalk.net
"Beware of certitude" (Jimmy Reid)
The floggings will continue until morale improves!
-
Stanley
- Global Moderator
- Posts: 90295
- Joined: 23 Jan 2012, 12:01
- Location: Barnoldswick. Nearer to Heaven than Gloria.
Re: SHED MATTERS 2
We have to tap two holes 3mm X .5, 7mm deep without breaking a tap off in the hole which would be a disaster! One thing I need is a bottoming tap because I know I am very tight in my depth. Of course I could shorten the cap screws but I want all the hold I can get. I found another 3mm tap and converted the second stage tap to a bottoming one. Can't put it off any longer!
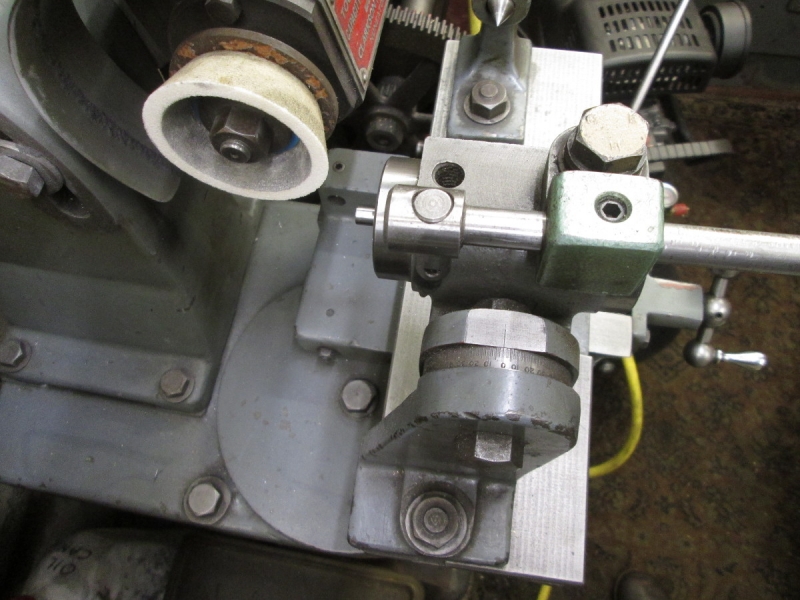
Here we are tapping in the mill by turning the pulley by hand. Very insensitive and I did a lot of reversing out and clearing chips. In my experience it's a trapped chip that initiates breakage.

Some time later. I finished the tapping by hand because I had to be sure when I had bottomed out with the second tap. I think we are OK but won't know until I fit the shank.
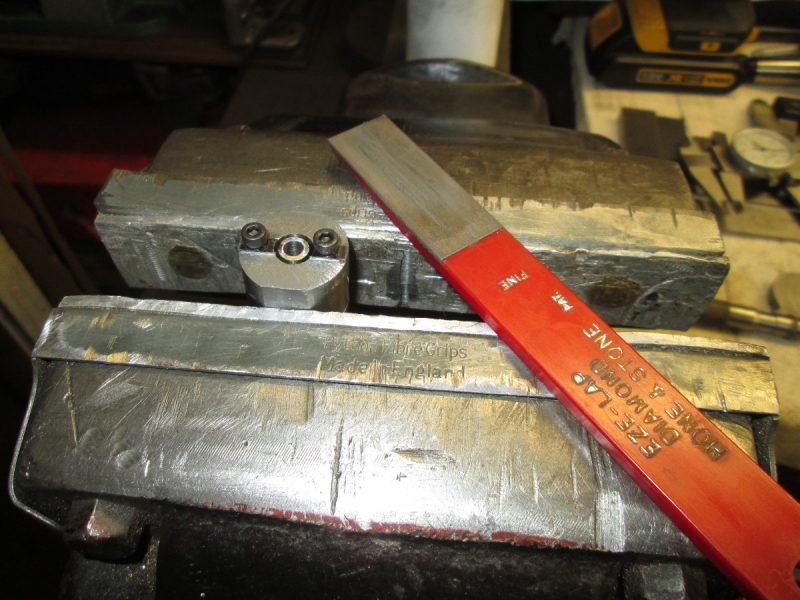
Before I had my trial fit I cleaned my faces and edges up with a fine diamond hone.
It all fits! if there is any fault at all it is that I didn't quite hit the right distance between the drillings but even so there's enough clearance in the holes in the shank to allow the cap screws to fit without forcing. I was going to put some Loctite 638 in the joint and tighten them down but I read the destructions first and found that part of the fine-tuning of the tool is to allow the shank to float and find its own centre while cutting and only then can the cap screws be tightened down. So at the moment they are verging on loose.
Now I have to make the cutter out of the 8mm silver steel rod supplied. I am told it must be 28mm long and faced very accurately with a mirror finish. I achieved that with a fine diamond hone,
Next I need a .5mm deep flat at a precise point on the cutter for the set screw to bite. I used a 5/16" end mill, a bit smaller than what is specified but it will be OK.
Here's where I finished up at knocking off time after two hours in the shed. The cutter is ready for shaping and hardening. I took the spindle out of the body and washed the interior and the bearings with brake cleaner and blew them off before charging everything with clean oil and reassembling it with the locking screw tightened fully. Ready for tomorrow. If you are wondering about the flange of the shank being slightly eccentric because of the one degree angle of the centre, don't worry. The last operation of all after adjusting the shank's fit to the body is to chuck the tool and finish turn the exterior to a polished parallel cylinder! By the way, when I cleaned out the body I had a careful look at the face where the thrust bearing bears. This was where my drilling and tapping finished up for the cap screws. There was a very small mark on one side showing that the drill had been less than a thou off the face. I think that's a good result for my advanced drill stop method using insulting tape! (and a bit of good luck, we all need that at times!)

If you're wondering what Snoopy is doing..... I bought this for ten pence many years ago. It was cheap because the key for the musical box is missing. In my head I thought that my first square hole could be to fit the spindle so that I can wind it up. I got him down this morning and bugger me! no square but a threaded end so what I need is a key threaded to fit on it and not a square. I'll do that later. Probably a good job because it will be easier to shape a slightly larger cutter.....
Stanley Challenger Graham
Stanley's View
scg1936 at talktalk.net
"Beware of certitude" (Jimmy Reid)
The floggings will continue until morale improves!
Stanley's View
scg1936 at talktalk.net
"Beware of certitude" (Jimmy Reid)
The floggings will continue until morale improves!
-
Stanley
- Global Moderator
- Posts: 90295
- Joined: 23 Jan 2012, 12:01
- Location: Barnoldswick. Nearer to Heaven than Gloria.
Re: SHED MATTERS 2
I won't be in the shed this morning. It's all right for those who have a good woman slaving for them but I have to support my own sky and this morning is a housework morning. The washer is loaded, the pans are full of veggies and meat waiting to be cooked, all on free leccy.
Mind you I have done a bit.... I've decided that the 8mm silver steel is just big enough to make a 1/4" cutter. (6.35mm) I am going to ignore all the destructions on how to make the shape. They don't have a T&C grinder! I think I have worked out a set up that will allow me to grind the square while managing to measure with reasonable accuracy the one degree back off angle that is called for. I might have to make an adapter to hold the 8mm cutter but that's easy enough. I'll have a stab at it tomorrow, I am nearing the magic hour of 9AM and can plunge into industrial scale cooking and washing.
See you tomorrow!
Stanley Challenger Graham
Stanley's View
scg1936 at talktalk.net
"Beware of certitude" (Jimmy Reid)
The floggings will continue until morale improves!
Stanley's View
scg1936 at talktalk.net
"Beware of certitude" (Jimmy Reid)
The floggings will continue until morale improves!

-
Stanley
- Global Moderator
- Posts: 90295
- Joined: 23 Jan 2012, 12:01
- Location: Barnoldswick. Nearer to Heaven than Gloria.
Re: SHED MATTERS 2
I found a sleeve that fitted the 8mm shank so it can be mounted in the T&C grinder. I altered the settings so that I was set up to grind the tool with the required taper. There's a scale on the table that lets me measure the angle.
I marked an index on the back of the holder to take the guesswork out of making a square.
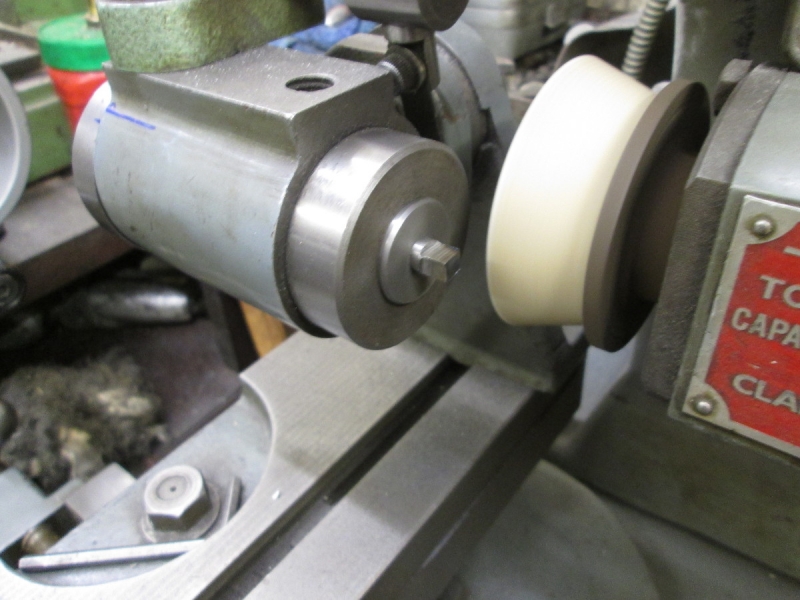
Once I had a square I set the tool parallel with the wheel so I could give it a ground face. I took it back far enough to give me sharp corners.
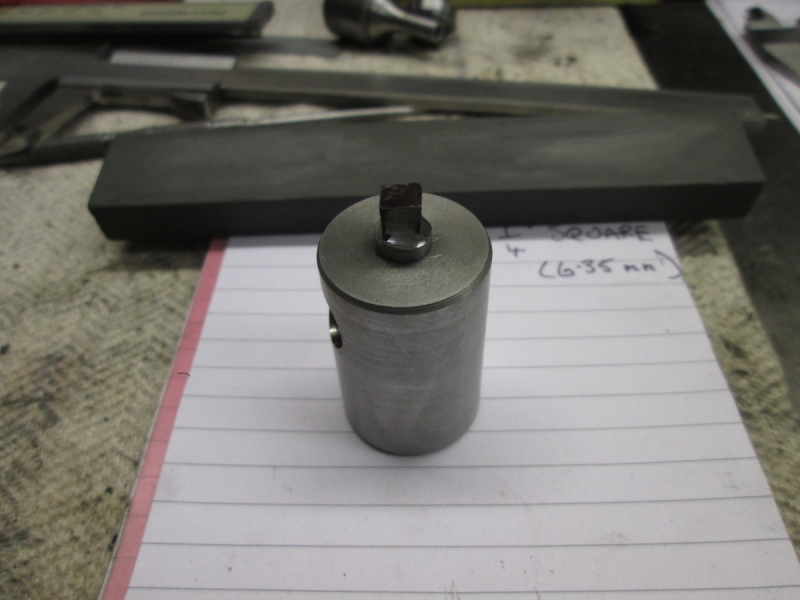
Next job was a light hone of the faces and a measure up. Not sure how it has happened but I have made it slightly triangular but that doesn't bother me at the moment, I could always make another cutter or adjust it but at the moment all I am interested in is seeing if it cuts!
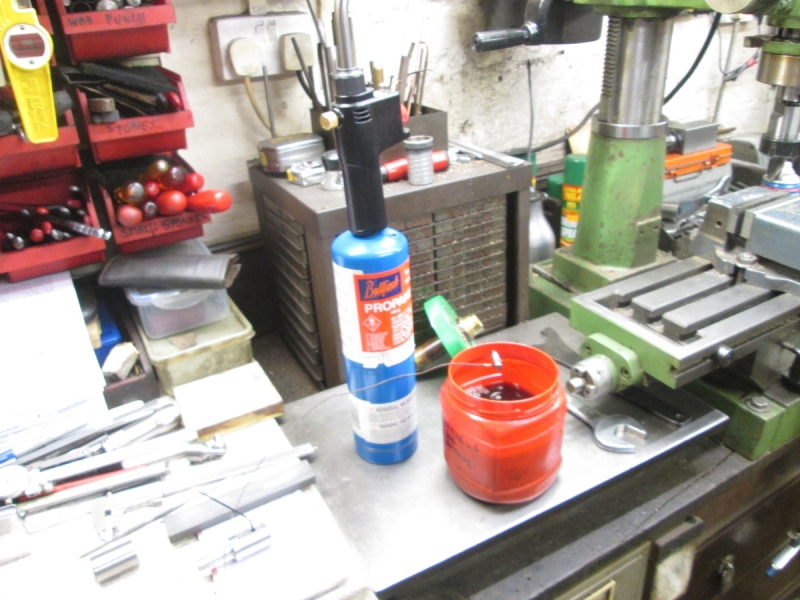
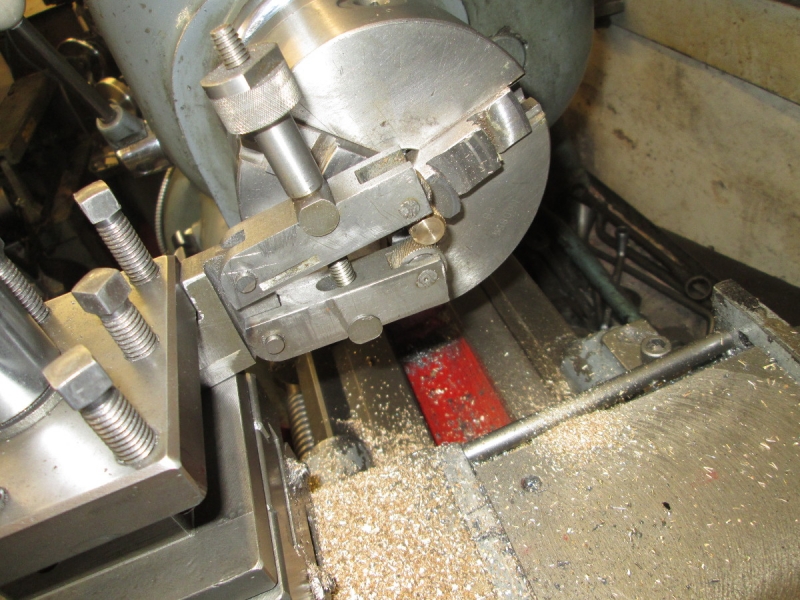
Next job was hardening the cutter. I think the propane torch is going to get it hot enough. In the event I got a bright red heat and quenched it in oil, water can produce cracks.

Here it is. I tested it with a file and it's pot hard. No need to temper it because there is no great stress on the cutting edges, they will be plunging straight in. The black colour is a product of the cutting oil.
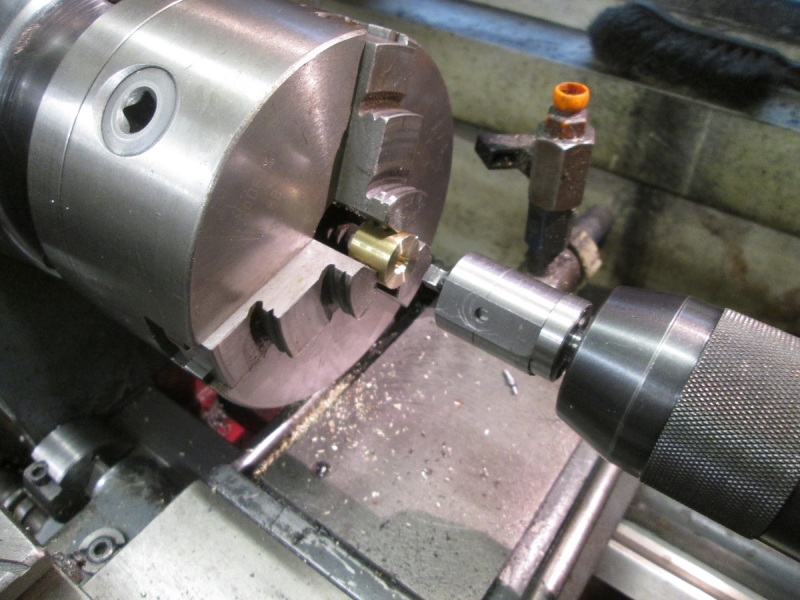
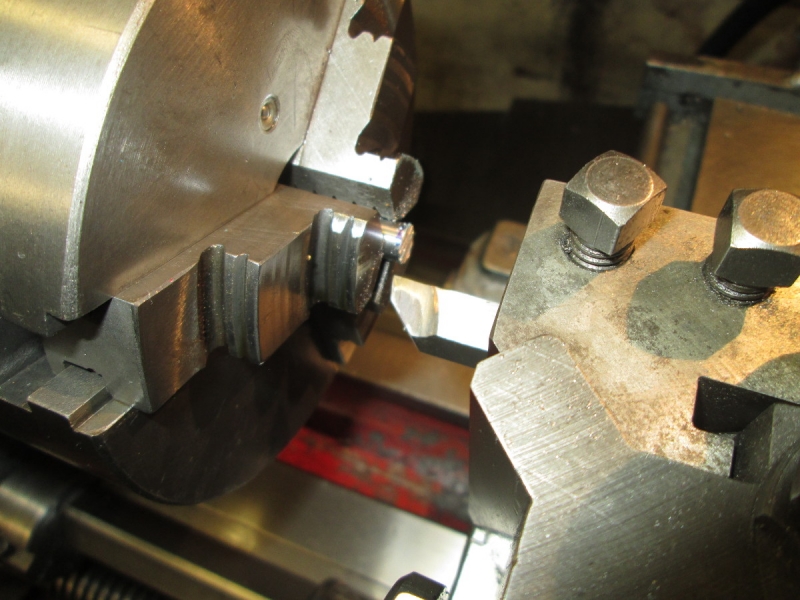
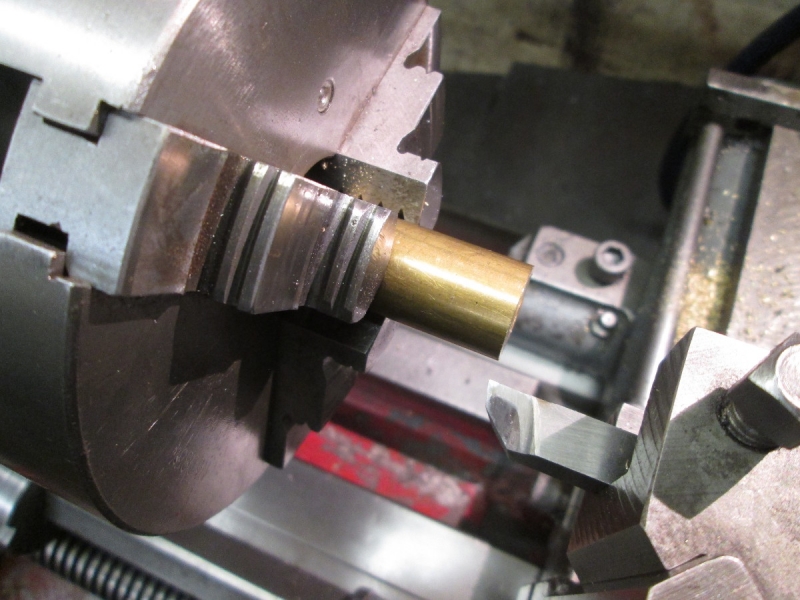
I'm set up for trying it out but with the shank loose on the body. I fed it in until I was sure it was cutting and used a very slow speed. Once I was in enough to see I was cutting I pulled out, took the tool out of the chuck and tightened the cap screws tight down in the body. Then I put it back in the lathe, found my cut and set on again at a higher speed. It was cutting and I gradually increased the speed until I was cutting freely and had it down to full depth. The main thing is that it is cutting!
I don't know whether you can see but I have a 'square' cut 7mm deep. As I said before it's actually slightly out of square but that isn't worrying me. The main thing is that we have made a hole that isn't round. It's a matter now of making individual cutters.
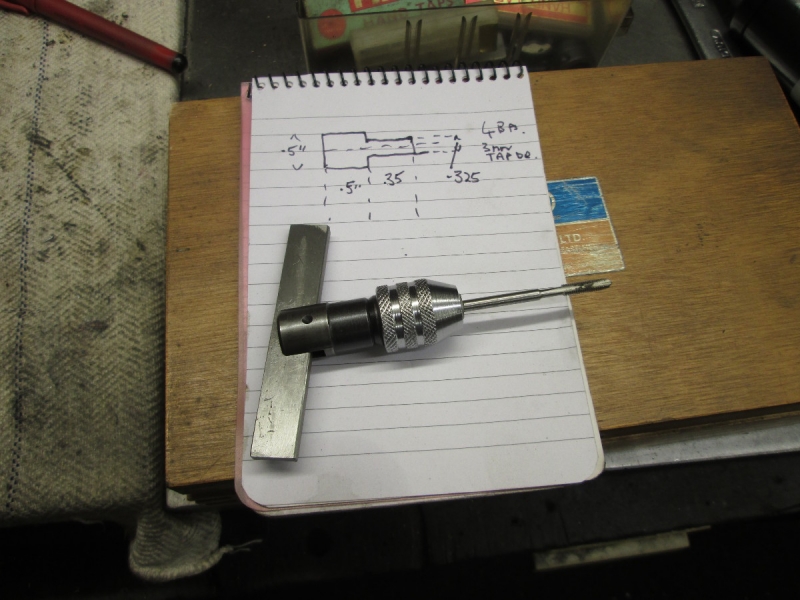
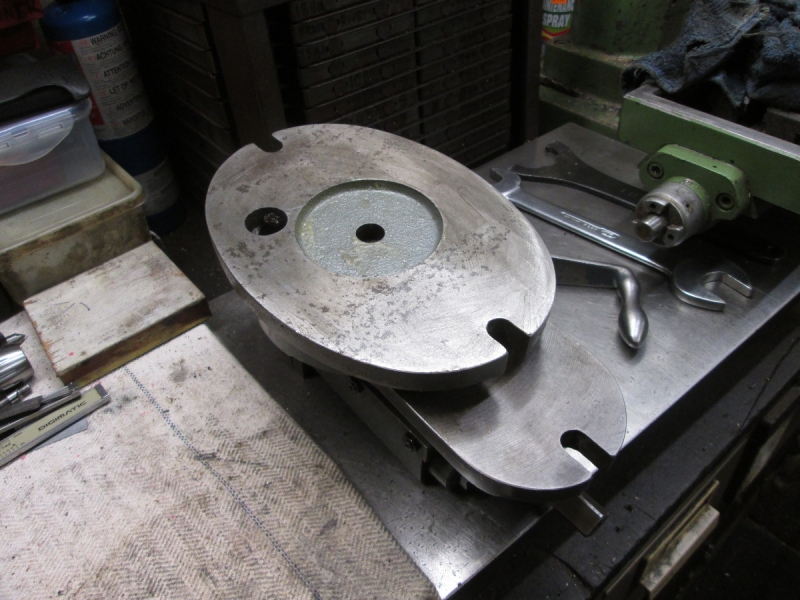
Then I put the tool in the chuck and made it look pretty! It looks better now the body is concentric with the shank. This will do for me. A good turning exercise.
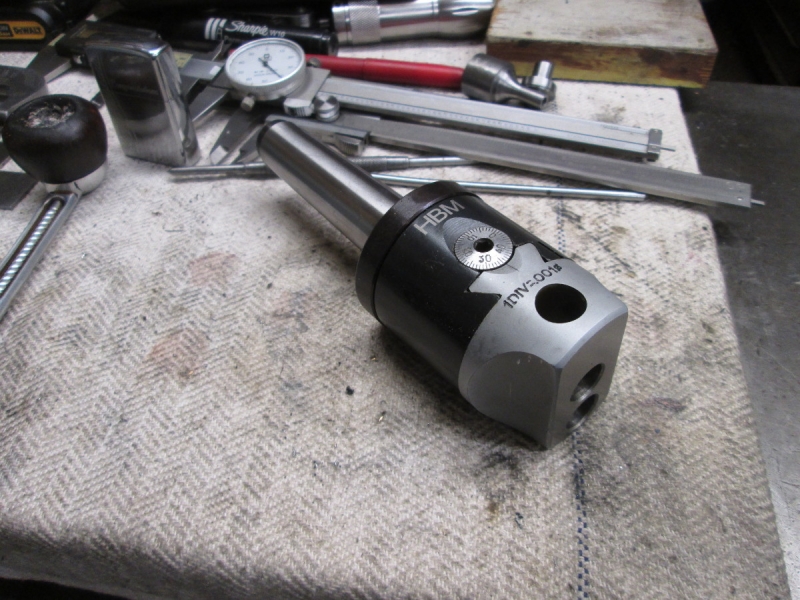
Now for something entirely different. Here's my El Cheapo boring head. I've never been totally satisfied with it. Basically it's OK but small things niggle me like the fact that the small socket head set screws seem to have very bad heads. I want to address this and improve it.
So, a good morning. Not 100% perfect but a serviceable wobble broach! I'm satisfied.....
Stanley Challenger Graham
Stanley's View
scg1936 at talktalk.net
"Beware of certitude" (Jimmy Reid)
The floggings will continue until morale improves!
Stanley's View
scg1936 at talktalk.net
"Beware of certitude" (Jimmy Reid)
The floggings will continue until morale improves!
-
Stanley
- Global Moderator
- Posts: 90295
- Joined: 23 Jan 2012, 12:01
- Location: Barnoldswick. Nearer to Heaven than Gloria.
Re: SHED MATTERS 2
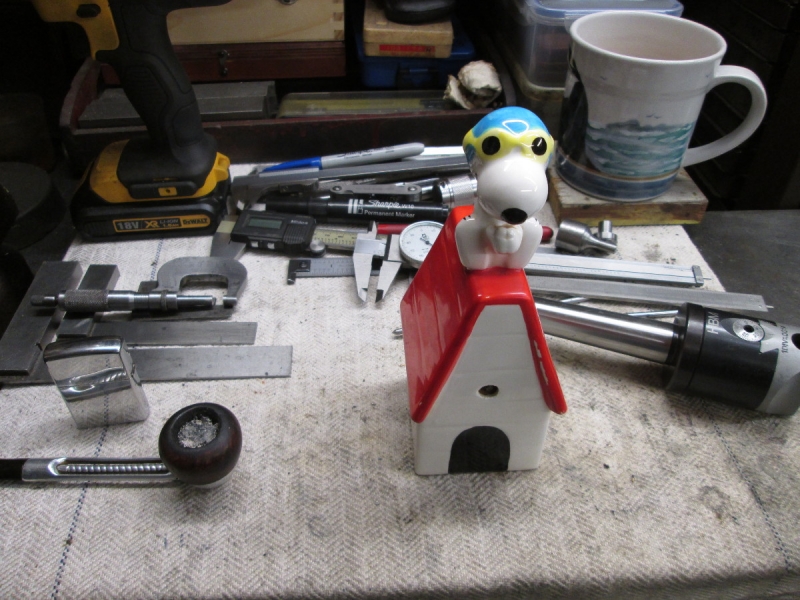
I remembered Snoopy and decided I would play out and get his musical box going.
I did an investigation and decided that the driving spindle of the musical box was 4BA. So I gathered my tackle together and settled on some dimensions. Then into the drawing office!
Into the brass ends box and I found a nice piece of brass stock.
I'll not bore you with making the new winding knob. I was originally thinking about a piece of rod through the end but than changed my mind and knurled it instead. The centreless knurling tool is one of the best home made tools I ever made. It always functions perfectly and needs no setting up.
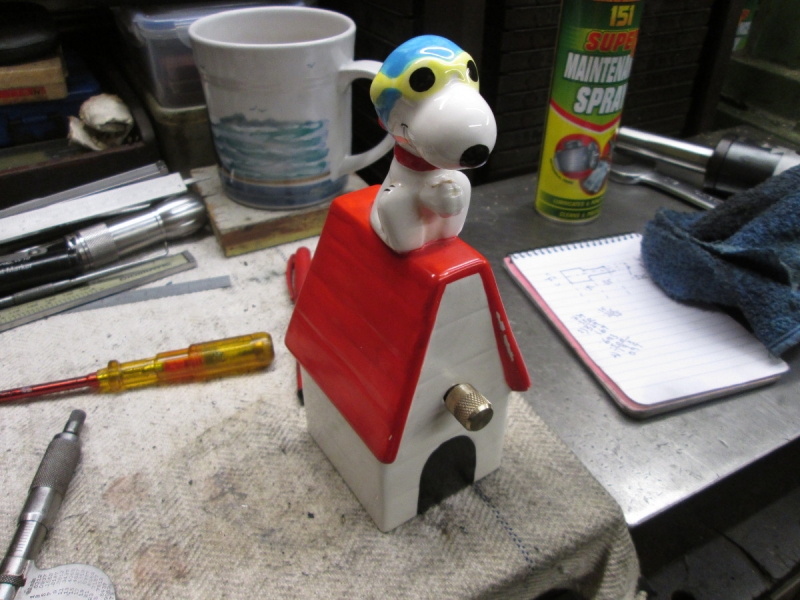
The finished job. A tidy solution I think... But there is one drawback! The mechanism of the music box isn't functioning well and it needs a bit of persuading to play but at least I got a tune out of it! 'It's a Long Way to Tipperary' or an abbreviated version of that. The least that can be said is that I've got Snoopy out of my system and who knows, as the light oil soaks into the mechanism it might improve.
Stanley Challenger Graham
Stanley's View
scg1936 at talktalk.net
"Beware of certitude" (Jimmy Reid)
The floggings will continue until morale improves!
Stanley's View
scg1936 at talktalk.net
"Beware of certitude" (Jimmy Reid)
The floggings will continue until morale improves!
-
Stanley
- Global Moderator
- Posts: 90295
- Joined: 23 Jan 2012, 12:01
- Location: Barnoldswick. Nearer to Heaven than Gloria.
Re: SHED MATTERS 2
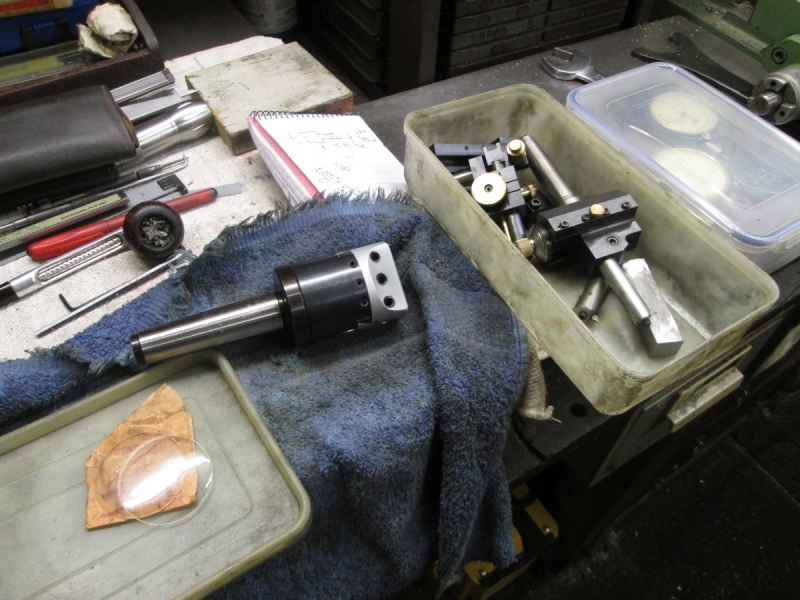
The only thing I had clearly in mind this morning was to make my El Cheapo boring head more user friendly. This turned out to be relatively easy. The problem was the stiffness of the adjustable slide and its mechanism. When I stripped it down the problem turned out to protective grease that had become very sticky. I washed all the parts off with brake cleaning fluid and lubricated them with very light oil and this cured it. The action is still tight but usable and that's what we need.
When I opened the box that has my specialised tools in I got a surprise. Can you remember me turning the place upside down looking for some watch glasses I knew I had? They were in there! The good thing is that I hadn't wasted my £8 on the new glass for the dial calliper, these are bigger, they fit my indicators. I put them in the indicator box, that should make them easier to find next time! Then a bit of a diversion cutting some block soap up into manageable sizes. Boring but necessary!
If you remember, I wasn't impressed with my cutter last time I used it so I gave it a good touch up after truing the wheel and making some slight adjustments to my angles....
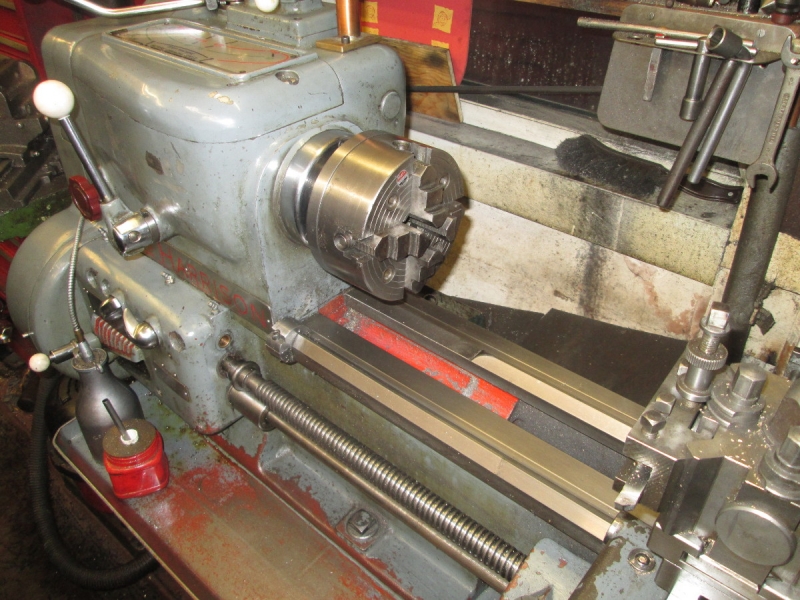
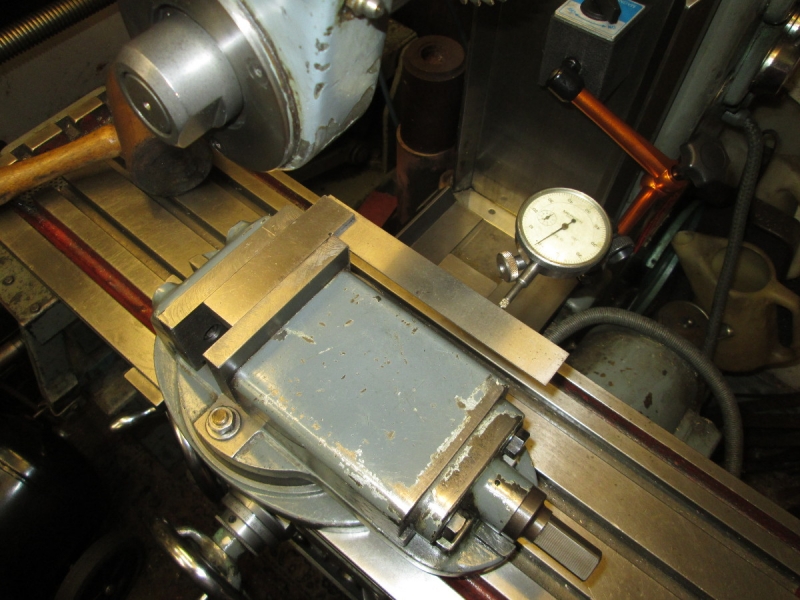
Next I cleaned Mrs Harrison, took the self-centring chuck off and restored the 4 jaw. I'm still on my learning curve with dialling stock in and the more I do it the better. Besides, the 4 jaw independent is the most accurate chuck you possess and I am always chasing accuracy. Funnily enough having dodgy eyesight is a great incentive! If I do the dialling in right I am more accurate than many lathe users who soldier on with the 3 jaw because it's easier. Then I knocked off early because I am expecting visitors this morning.....
Stanley Challenger Graham
Stanley's View
scg1936 at talktalk.net
"Beware of certitude" (Jimmy Reid)
The floggings will continue until morale improves!
Stanley's View
scg1936 at talktalk.net
"Beware of certitude" (Jimmy Reid)
The floggings will continue until morale improves!
-
Stanley
- Global Moderator
- Posts: 90295
- Joined: 23 Jan 2012, 12:01
- Location: Barnoldswick. Nearer to Heaven than Gloria.
Re: SHED MATTERS 2
I have nothing clear in my mind lads so I am going to write articles while I think......
Stanley Challenger Graham
Stanley's View
scg1936 at talktalk.net
"Beware of certitude" (Jimmy Reid)
The floggings will continue until morale improves!
Stanley's View
scg1936 at talktalk.net
"Beware of certitude" (Jimmy Reid)
The floggings will continue until morale improves!
-
Stanley
- Global Moderator
- Posts: 90295
- Joined: 23 Jan 2012, 12:01
- Location: Barnoldswick. Nearer to Heaven than Gloria.
Re: SHED MATTERS 2
Two articles yesterday and more today, sorry lads, talk amongst yourselves!
Stanley Challenger Graham
Stanley's View
scg1936 at talktalk.net
"Beware of certitude" (Jimmy Reid)
The floggings will continue until morale improves!
Stanley's View
scg1936 at talktalk.net
"Beware of certitude" (Jimmy Reid)
The floggings will continue until morale improves!
-
Stanley
- Global Moderator
- Posts: 90295
- Joined: 23 Jan 2012, 12:01
- Location: Barnoldswick. Nearer to Heaven than Gloria.
Re: SHED MATTERS 2
Sorry Lads but the same again. However I did allow my mind to start roaming round the next project. I'm fancying making a 'wobbler' out of bronze stock, I have plenty in the treasure chests. I was looking at the design in Elmer's Engines.....
Stanley Challenger Graham
Stanley's View
scg1936 at talktalk.net
"Beware of certitude" (Jimmy Reid)
The floggings will continue until morale improves!
Stanley's View
scg1936 at talktalk.net
"Beware of certitude" (Jimmy Reid)
The floggings will continue until morale improves!
-
Stanley
- Global Moderator
- Posts: 90295
- Joined: 23 Jan 2012, 12:01
- Location: Barnoldswick. Nearer to Heaven than Gloria.
Re: SHED MATTERS 2
I have been thinking about this morning's project for a while. As you all know, my shed is well-populated. The important thing is that with the exception of what I addressed this morning, nothing prevents the use of anything else. The layout works! That is with two exceptions, the big machine vise that Mick refurbished for me hardly ever gets used and the same applies to my prize, the Adept Shaper. I haven't touched either of them for over a year and they block access to full use of Johnny's big lathe and the Harrison HM both of which I want to use more. So I decided the vise and the shaper have to go! The worst weight was the vise, it nearly put my lights out and the last time I moved it I slipped, pulled my back and had six weeks of misery so you can understand I approached this lot very carefully! Especially because the new resting place is in long term secure storage in the bathroom and I had to carry them upstairs. I know.... I thought the same thing myself. But I split the shaper into 3 pieces which eased the job. I tried to split the vise in two but it was going to be a big job so I thought bugger it! And just did it....
Here they are, safe and warm in their new home. They aren't under anyone's feet here.

I like the result and now my mind is working round addressing several little jobs round the HM, like sharpening cutters and checking mandrels.... I'm pleased with this 45 minutes work and in case you are wondering, I think I have got away with it. We'll see but I was very, very careful!
Stanley Challenger Graham
Stanley's View
scg1936 at talktalk.net
"Beware of certitude" (Jimmy Reid)
The floggings will continue until morale improves!
Stanley's View
scg1936 at talktalk.net
"Beware of certitude" (Jimmy Reid)
The floggings will continue until morale improves!
Re: SHED MATTERS 2
Some people have strange things in their bathrooms! 
-
Stanley
- Global Moderator
- Posts: 90295
- Joined: 23 Jan 2012, 12:01
- Location: Barnoldswick. Nearer to Heaven than Gloria.
Re: SHED MATTERS 2
Not strange China, just unusual! No bad effects, it looks as though I got away with it!
Stanley Challenger Graham
Stanley's View
scg1936 at talktalk.net
"Beware of certitude" (Jimmy Reid)
The floggings will continue until morale improves!
Stanley's View
scg1936 at talktalk.net
"Beware of certitude" (Jimmy Reid)
The floggings will continue until morale improves!
-
Stanley
- Global Moderator
- Posts: 90295
- Joined: 23 Jan 2012, 12:01
- Location: Barnoldswick. Nearer to Heaven than Gloria.
Re: SHED MATTERS 2
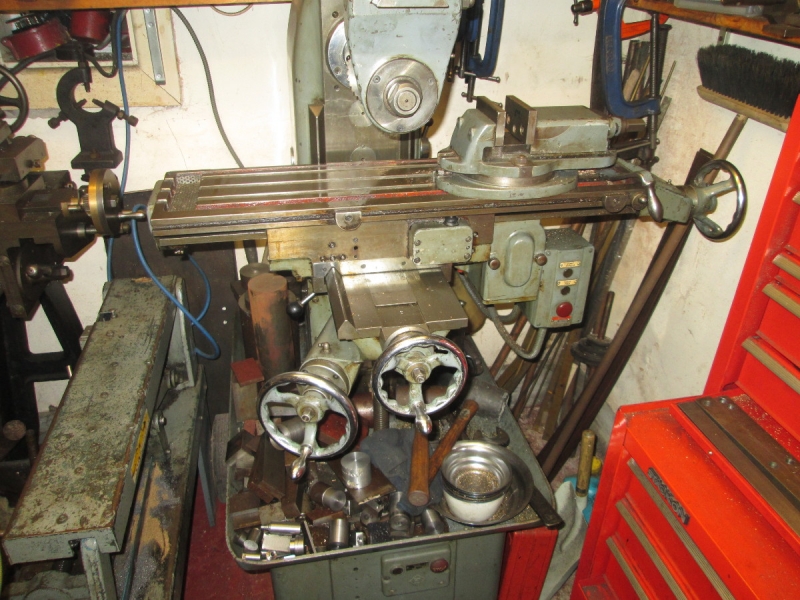
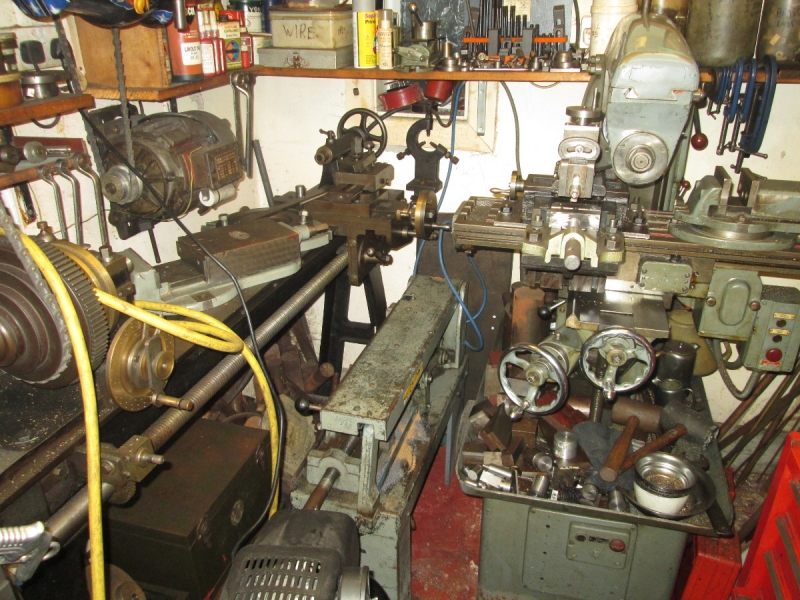
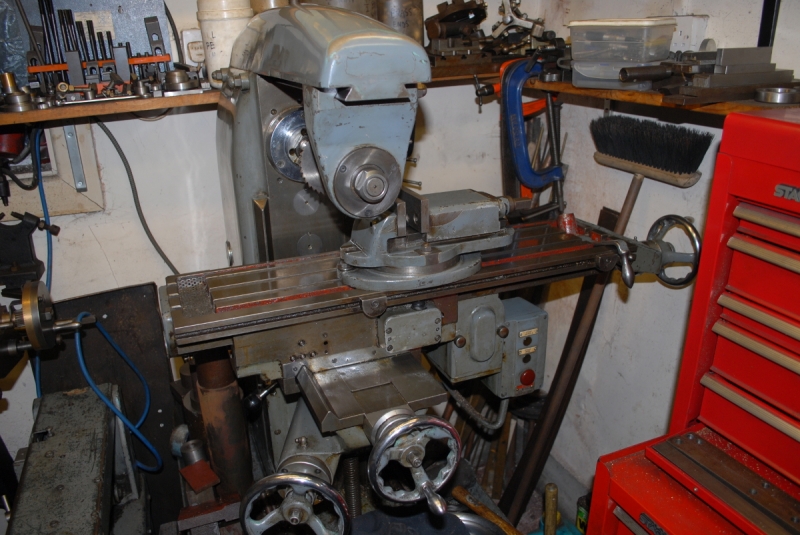
Over the last few years I have neglected the Harrison Horizontal Mill and I have always had a nagging feeling of guilt about this. 40 years ago an amateur with one of these in his shed would have been on it all the time. The vertical mill is handy and a good tool but there are some jobs that the HM does far better and I have made an executive decision that, rather like the 4 jaw chuck, I am going to force myself to use it more. We need internal discipline in the shed, all stragglers will be shot!
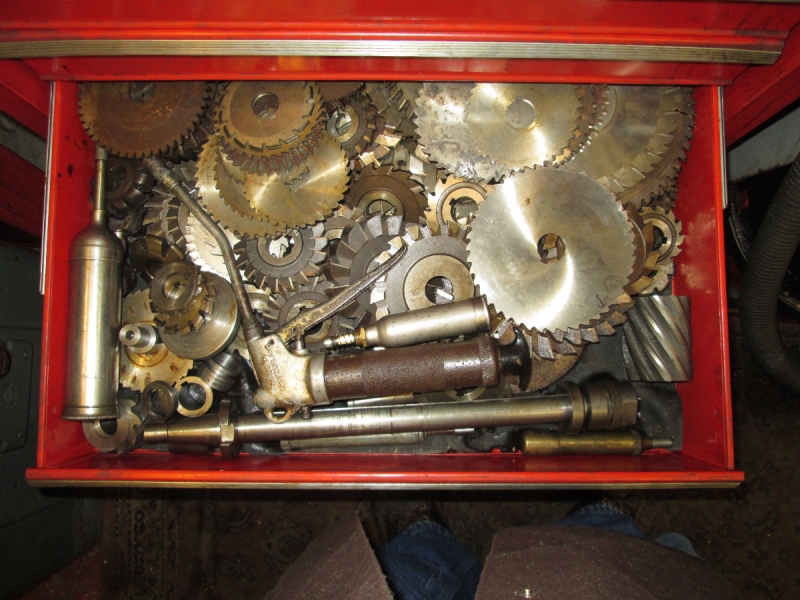
Right next to the mill, this drawer which has a good selection of cutters including some quite rare ones. No excuses here!
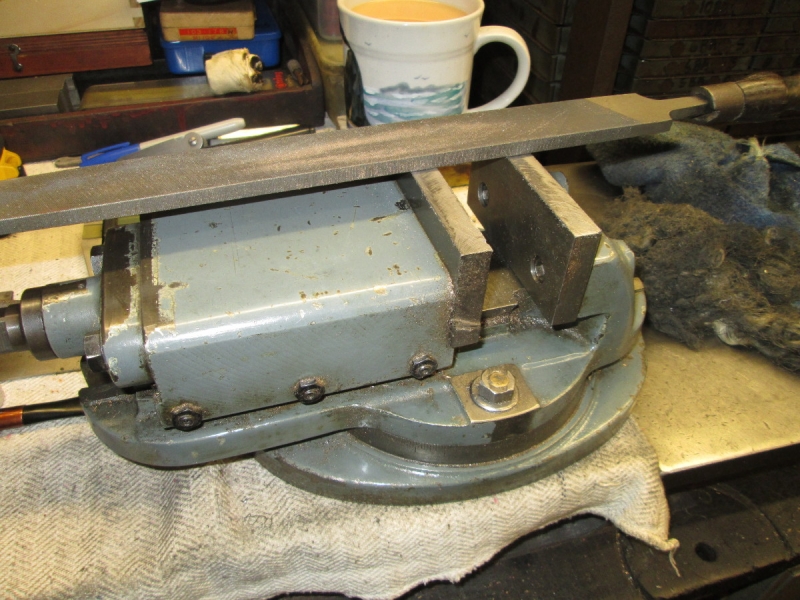
The first job was to take the vise off and give it a good clean. I stroked the jaws, which are in quite good nick, with a big file to remove the dings and small flaws. By the way it doesn't have a maker's name on it but it's a good vice, well made and accurate and has the benefit of a well calibrated turntable.
I didn't neglect the base. It's in good nick but a stroke over with a big flat file made sure there were no flaws. While I had it on the bench at eye level I checked that it was set at exactly 90 degrees on the turntable. If that's good it will be the same at 180 and I can rely on the scale.
Then I did a deep clean of the mill before re-mounting the vise on the bed in the centre. I just nipped the holding down bolts and trammed it in to within half a thou over 6" which should be good enough for a bum fitter. I checked it again after tightening the studs down and it didn't move at all.
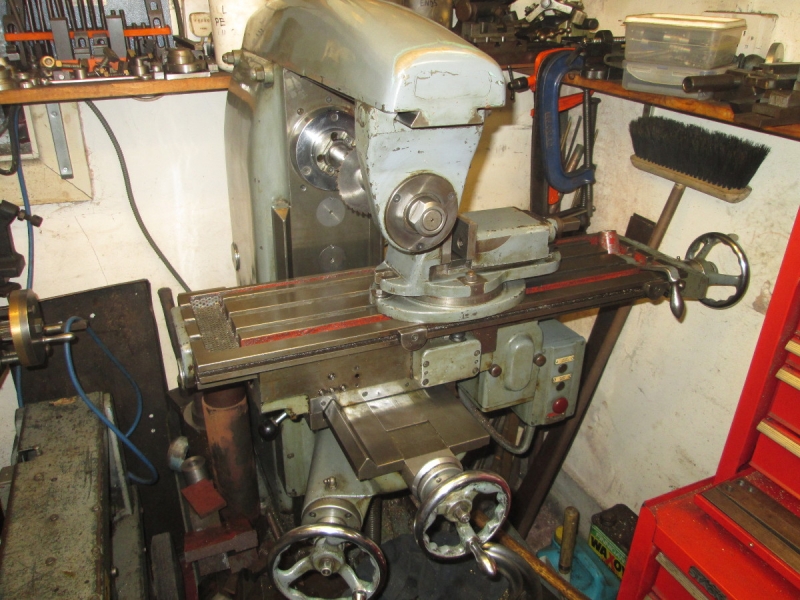
I did sensible things like check oil levels, oil all the nipples and give the ways a coat of oil. Here's where we finished up, the decks are cleared and we are ready for action.
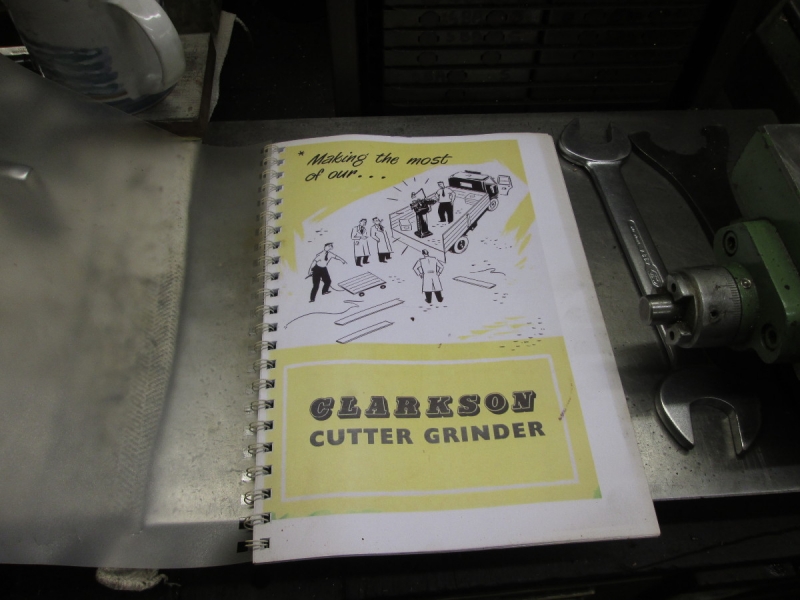
The next stage is to sharpen a selection of cutters. It was after 9AM so I knocked off and got my operator's handbook out! There is much I am not familiar with in sharpening HM cutters which are an entirely different kettle of fish to end mills etc. My next job is going to be a bit of studying but it won't happen immediately because Pluggy has just rung me and we are going to update the FM3 tomorrow so I have stuff to do! So expect me to be AWOL tomorrow.....
Stanley Challenger Graham
Stanley's View
scg1936 at talktalk.net
"Beware of certitude" (Jimmy Reid)
The floggings will continue until morale improves!
Stanley's View
scg1936 at talktalk.net
"Beware of certitude" (Jimmy Reid)
The floggings will continue until morale improves!
-
Stanley
- Global Moderator
- Posts: 90295
- Joined: 23 Jan 2012, 12:01
- Location: Barnoldswick. Nearer to Heaven than Gloria.
Re: SHED MATTERS 2
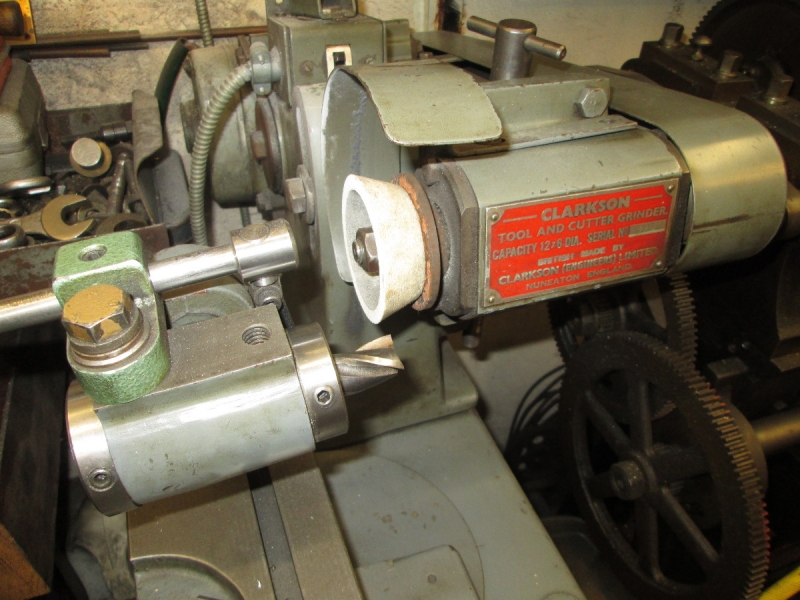
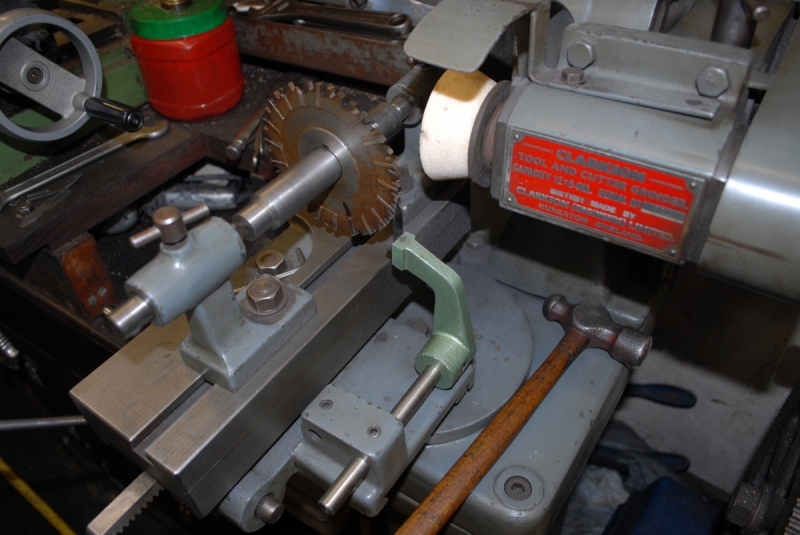
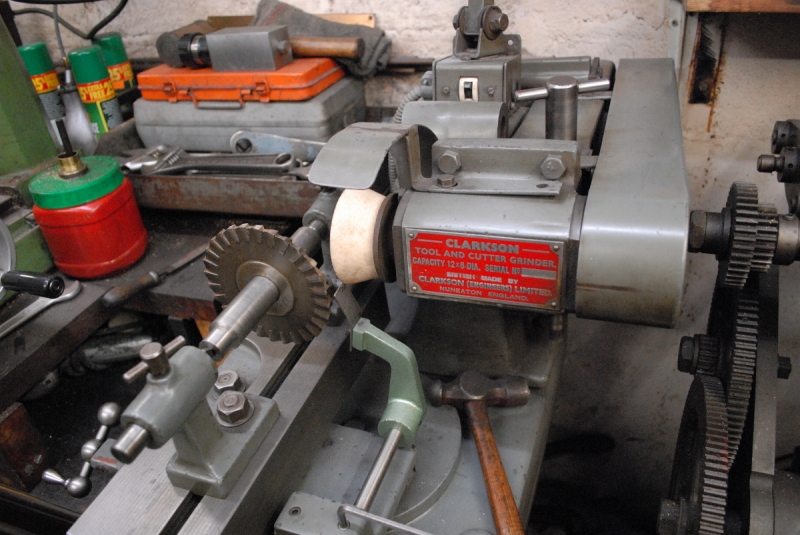
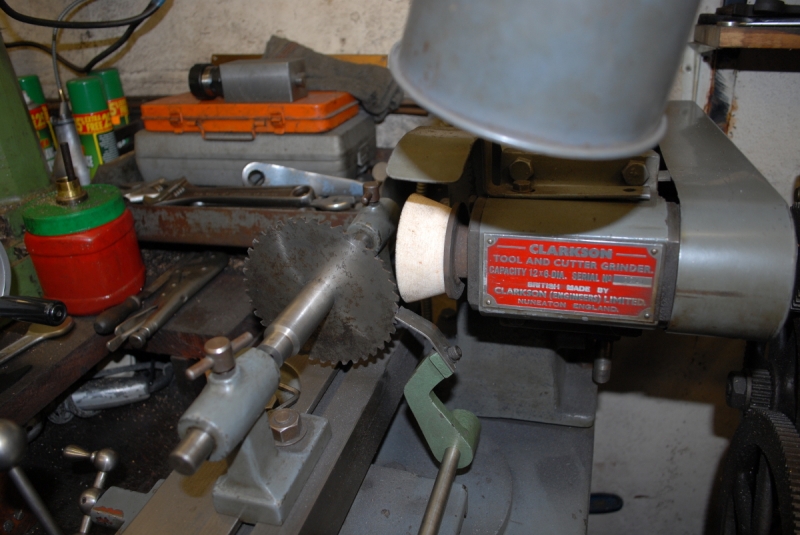
Only a quick trip into the shed this morning, I have to get ready for Pluggy! Another consideration was that it's far too long since Mrs Nikon had an outing so I have gone for quality pics which takes time, I had to waken her up from her slumbers! The first thing I did was get a selection of cutters out that have straight teeth because I made one or two discoveries yesterday when I read the destructions for the Tool and Cutter grinder and this is where I am going to start!

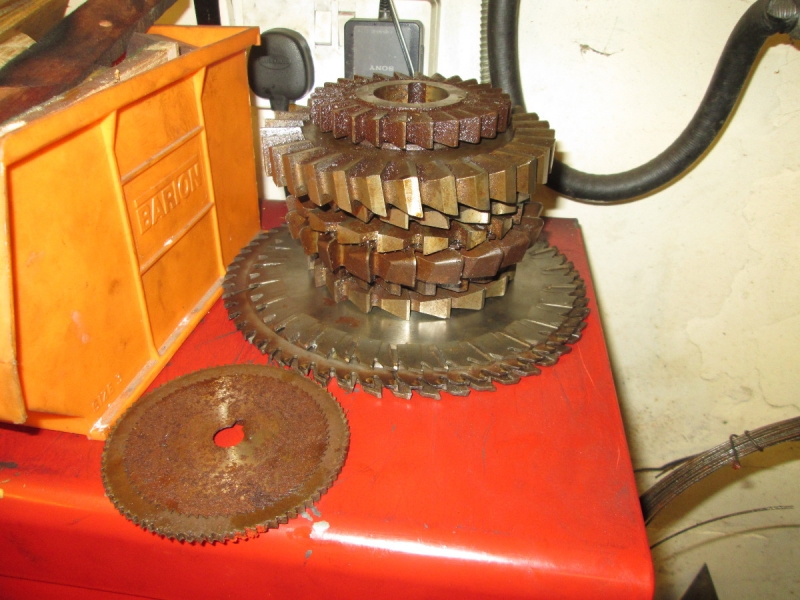
I have plenty of cutters to go at!
Mrs Harrison is spotless. I have to have my ducks in a row.
The mill is clean and ready for action! Now I need to stop enjoying myself and get down to getting ready for Pluggy at 10:00. See you tomorrow if all goes well!
Stanley Challenger Graham
Stanley's View
scg1936 at talktalk.net
"Beware of certitude" (Jimmy Reid)
The floggings will continue until morale improves!
Stanley's View
scg1936 at talktalk.net
"Beware of certitude" (Jimmy Reid)
The floggings will continue until morale improves!
-
Stanley
- Global Moderator
- Posts: 90295
- Joined: 23 Jan 2012, 12:01
- Location: Barnoldswick. Nearer to Heaven than Gloria.
Re: SHED MATTERS 2
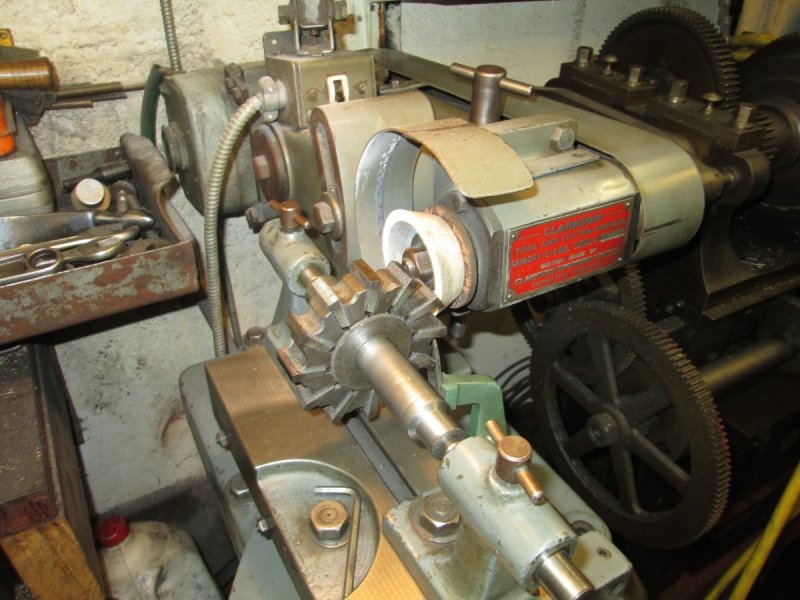
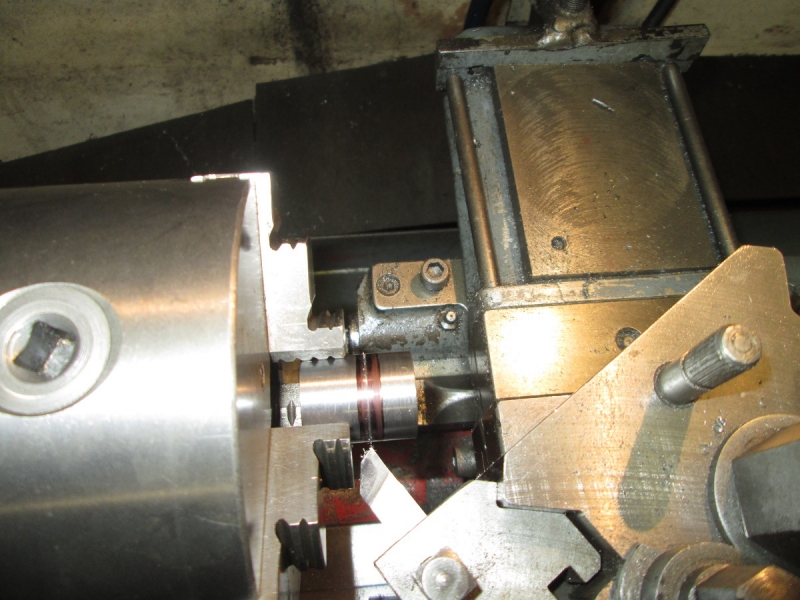
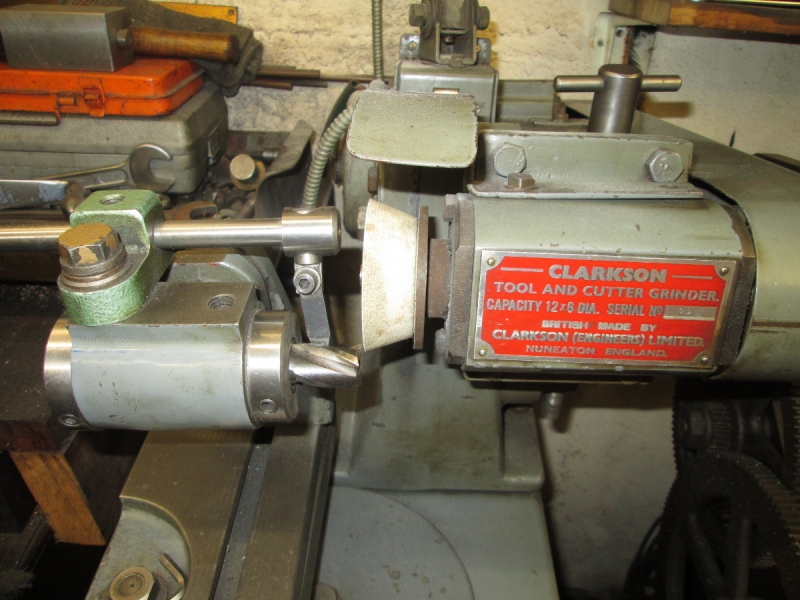
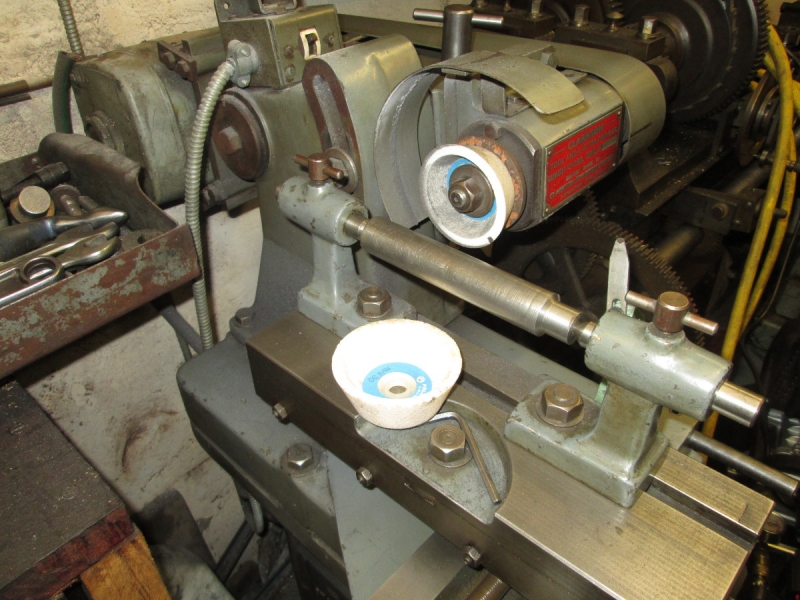
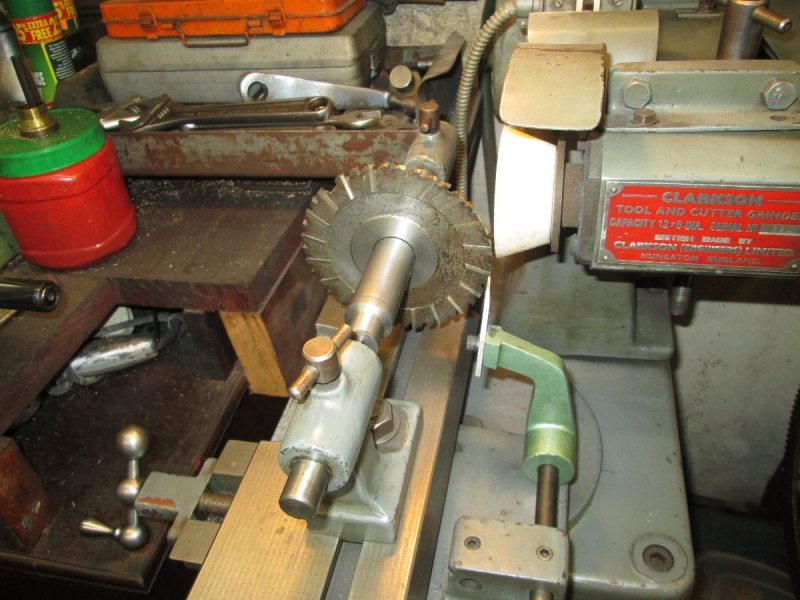
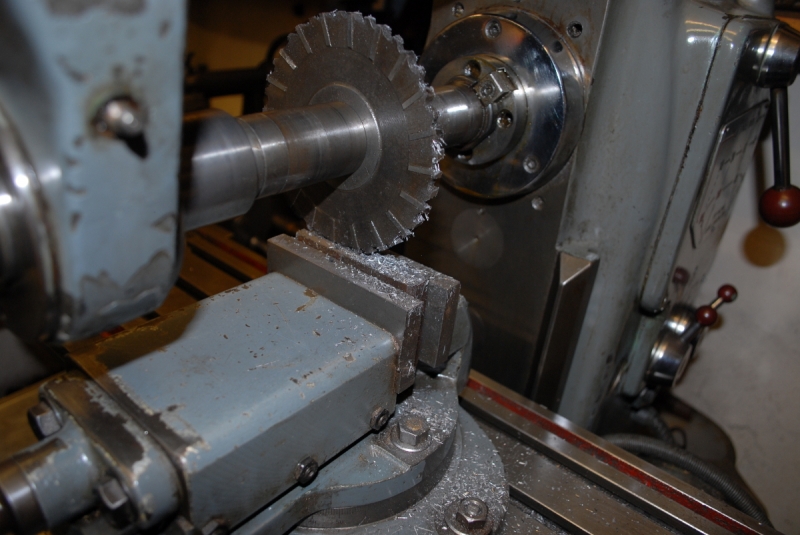
Straight into sharpening cutters for the horizontal mill. It's a completely different setup than sharpening end mills. The table has to be set dead square, both the main adjustment and the graduated adjustment on the top element. I made a one inch tapered mandrel a long time ago and it's perfect for this job. All you have to do is bump the cutter down on the taper and that's accurate and plenty of grip. Then I had to set the height of the grinding spindle, not for cutter centre but to make sure that the cutter clears the spindle. The fiddly bit is adjusting the tooth rest which sets the grinding height and hence the angle as the tooth slides over it. As for deciding the angle of the cutting edge, I couldn't think of an accurate way of measuring it to comply with the tables in the manual so I did it the old fashioned way, by eye and common sense.

I was a good lad and wore my face mask!

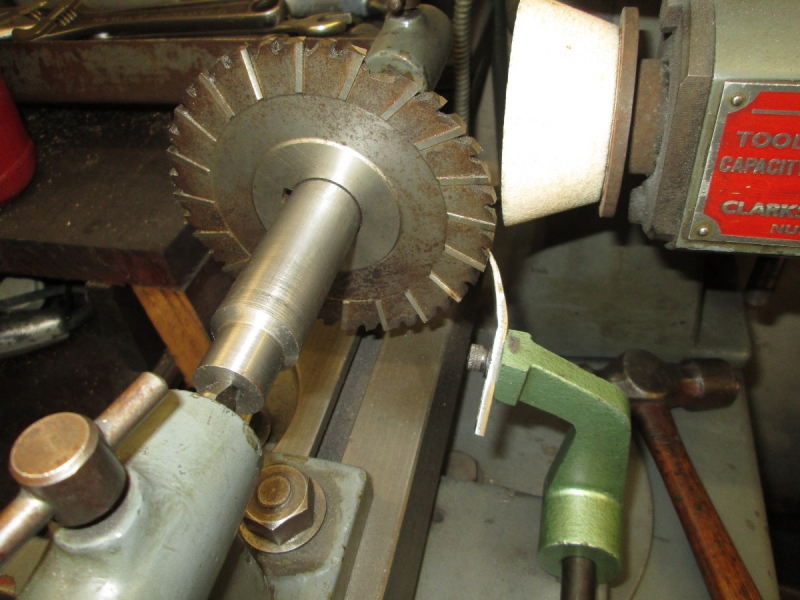
I adjusted the height until the result seemed to be OK. I have always used a straight wheel and ground on the periphery before but this way makes a lot more sense to me and is far less dangerous. This is because doing it on the straight wheel always has the danger of catching the cutter on the stone before or after it is located properly on the tooth rest. Hard to explain but believe me it's a bummer!
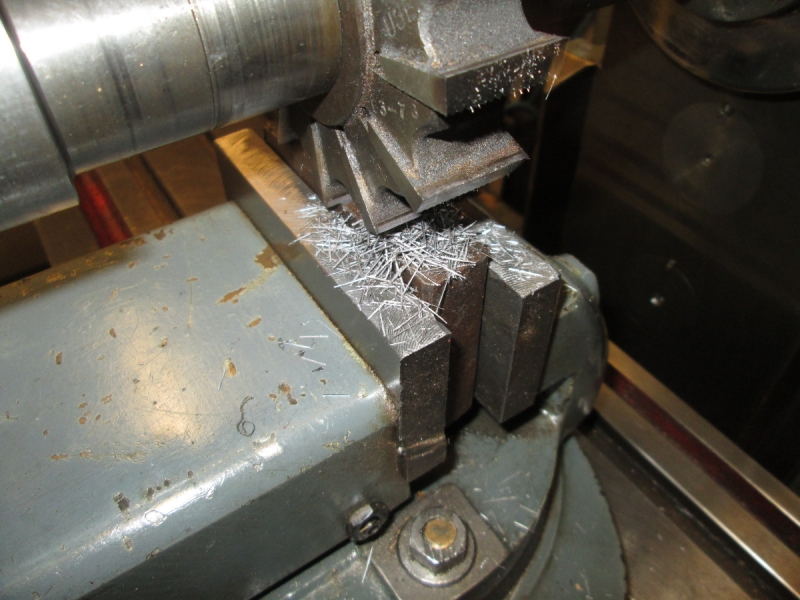
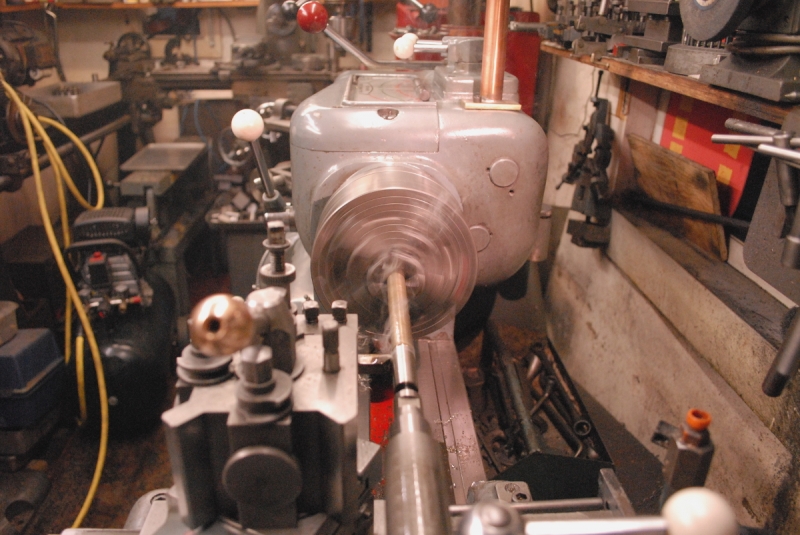
There's only one way to find out whether I have it right, get the cutter in the mill and take a cut. As soon as I started I knew it was OK because the milling chips are the right shape, like splinters and believe me they can penetrate your fingers very easily!
This is the cut, perfectly satisfactory. I'm sure I could do better but this is a vast improvement!
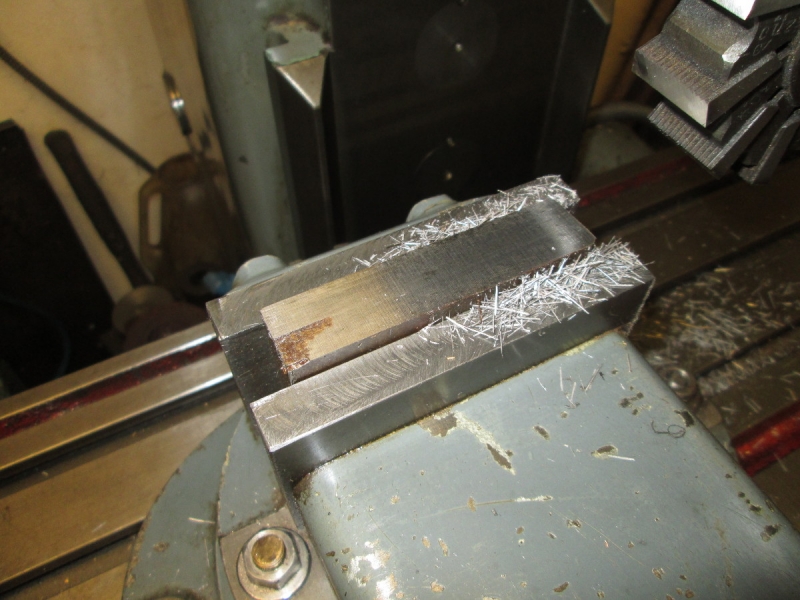
Next for shaving was a cutter with oblique teeth. No problem at all after a bit of adjustment for height, it was a different diameter. I did the same test and it was OK, cut nicely.
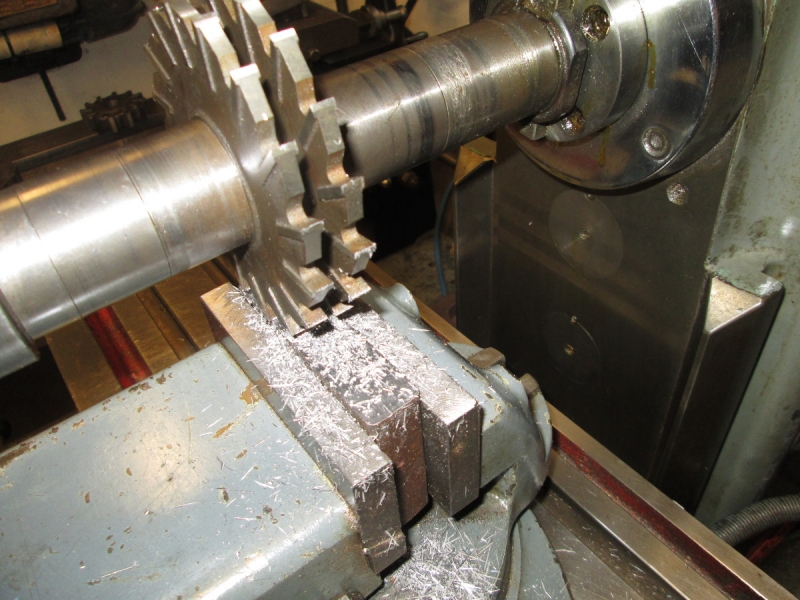
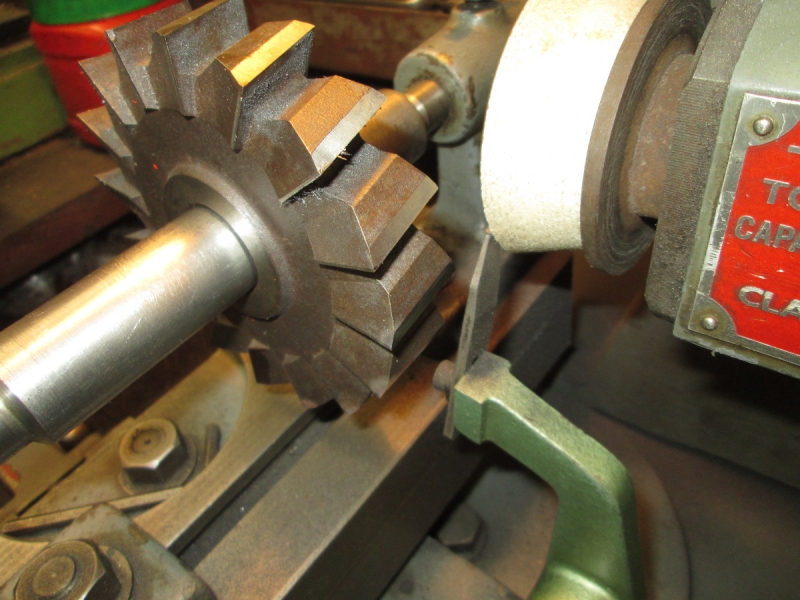
Two identical cutters, and here I am doing something that you can't do on a vertical mill, gang milling. A confession here, I didn't sharpen these two because they looked OK. I tested them and I was right, splinter chips again! I think I've cracked this so I am going to go on a cutter marathon and sharpen enough cutters to keep me happy. This is going to entail a good sorting out of my cutters because some are for a bigger mandrel than mine.
By the way, mention of mandrels.... I have never seen a mandrel that is perfectly straight! I know they must exist. The cutters always run slightly eccentric and curing that is a long term job!
Stanley Challenger Graham
Stanley's View
scg1936 at talktalk.net
"Beware of certitude" (Jimmy Reid)
The floggings will continue until morale improves!
Stanley's View
scg1936 at talktalk.net
"Beware of certitude" (Jimmy Reid)
The floggings will continue until morale improves!
-
Stanley
- Global Moderator
- Posts: 90295
- Joined: 23 Jan 2012, 12:01
- Location: Barnoldswick. Nearer to Heaven than Gloria.
Re: SHED MATTERS 2
You may remember that one thing I had to be careful about was catching the spindle end of the shaft that carries the grinding wheel with the cutter at the end of the sharpening stroke. It dawned on me yesterday in an idle moment that there was a simple cure, fit a new cup grinder stone, I had a new one about my person. So that was the first job. That's that problem blown away!
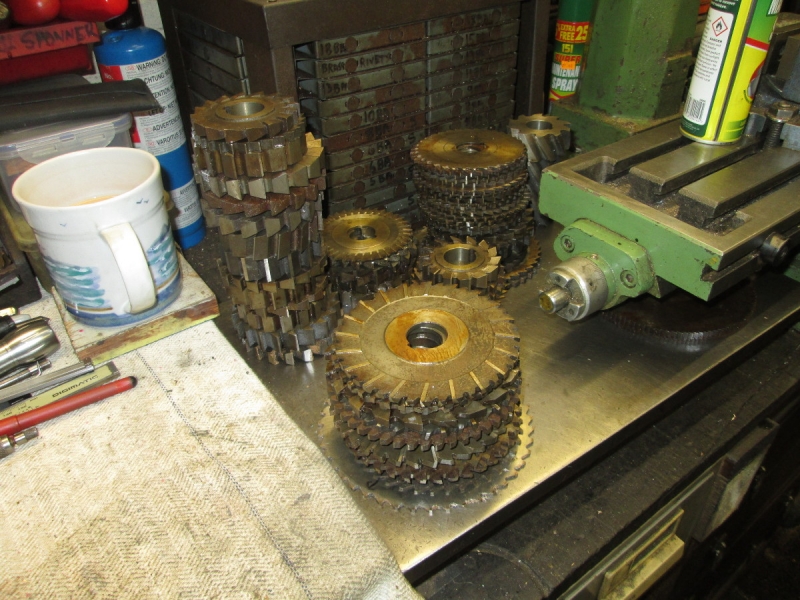
Then I set to to get a bit of order in what I'm doing. I sorted all the cutters and these are the simple ones that need sharpening. This will keep me out of mischief for a while!
I found a handy container that had file handles in it. Incidentally I have been wondering where these were for a while! There was room for them in one of the drawers so I had somewhere to put cutters that have been sharpened and tested.
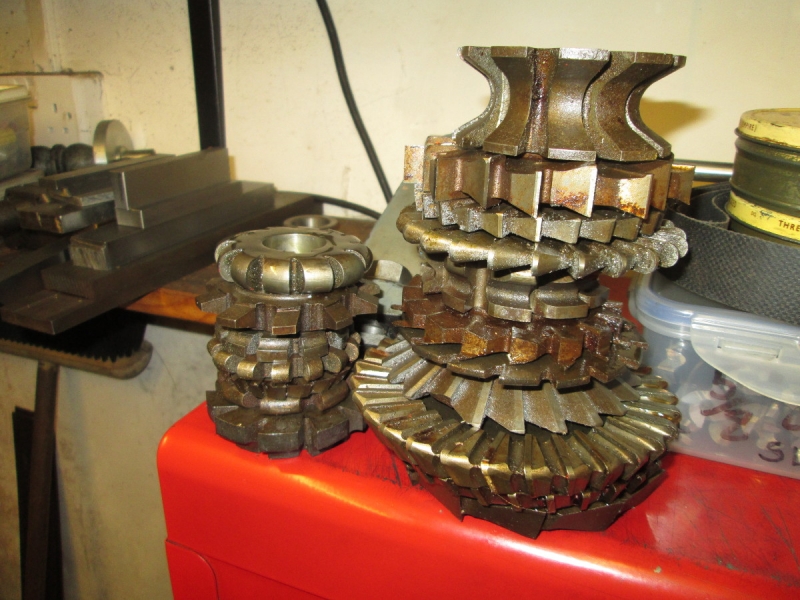
This pile is shaped cutters that fit my mandrel but at the moment are beyond my capabilities to sharpen.
This group is all the cutters that are the wrong bore size for my mandrel. I haven't made my mind up yet where they are going but it's going to be long-term storage!

I had a good clean up of the milling chips and the grinding dust and put the two cutters I had been gang milling with in the sharp cutters box. So the HM is ready for testing the next cutter.
I chose the next cutter in the pile (They are sorted roughly by diameter as that's the factor that demands a reset of the grinder) and installed this one on the mandrel. This was where my problems started! I couldn't get the setting of the tooth rest right.
This was an hour later..... You may notice that the shape of the tooth rest has changed, that's just one of the attempts I have made to get a result. All I can report at the moment is that it ain't easy! It was getting close to knocking off time so I did just that. I shall give it some thought but at the moment my instinct is to ditch the small tooth cutters at the moment and concentrate on the ones with the larger teeth! If nothing else I can see them better. That reminds me that in the middle of my troubles this morning I realised that one factor was the fact that I had the wrong glasses on! Ah well.... Onwards and upwards!
Stanley Challenger Graham
Stanley's View
scg1936 at talktalk.net
"Beware of certitude" (Jimmy Reid)
The floggings will continue until morale improves!
Stanley's View
scg1936 at talktalk.net
"Beware of certitude" (Jimmy Reid)
The floggings will continue until morale improves!
-
Stanley
- Global Moderator
- Posts: 90295
- Joined: 23 Jan 2012, 12:01
- Location: Barnoldswick. Nearer to Heaven than Gloria.
Re: SHED MATTERS 2

Lots to do this morning outside the shed including sewing a button on me padded shirt.... But I got in there by 9AM and resumed my attack on the difficult cutter I was attacking yesterday. There's quite a bit of rust in the gullets of the teeth on the one I had in yesterday so I tried an identical one that was in better nick (apart from one tooth being entirely broken out) Basically I went down the same path as yesterday looking for different tooth rest orientations and then a spring steel one. Still no joy and I realised that one thing that was hampering me is the position on the taper mandrel that the cutter finishes up in. I could put the mandrel in the lathe and adjust the taper so that the cutter is nearer the front of the machine but I decided that a better way was to make a longer 1/2" bar to support the tooth rest holder. That's what is going on in the pic. I have found a piece of stainless and I'm going to make a new rod out of that. By this time it was 10AM so I knocked off. Notice that I am still into masochism, it would have been easy to swap to a 3 jaw SC chuck but I am still making myself dial in. It's working, I am a lot quicker.
I was very tempted early this morning to ditch the small tooth cutters and go onto the easy ones, I have plenty to go at! But that's too easy and these cutters need sharpening so I shall persevere! I will crack it eventually and feel a lot better!
Stanley Challenger Graham
Stanley's View
scg1936 at talktalk.net
"Beware of certitude" (Jimmy Reid)
The floggings will continue until morale improves!
Stanley's View
scg1936 at talktalk.net
"Beware of certitude" (Jimmy Reid)
The floggings will continue until morale improves!
-
Stanley
- Global Moderator
- Posts: 90295
- Joined: 23 Jan 2012, 12:01
- Location: Barnoldswick. Nearer to Heaven than Gloria.
Re: SHED MATTERS 2
Straight into making the longer stainless steel rod to carry the toothrest bracket. Horrible stringy swarf but a nice finish.
That's better! I can get the toothrest in the right place now. Into fighting the cutters again!
Two things. First I decided that part of my problem was the fact that these are old worn cutters, I got them out of a scrap yard! In addition the ones I was working on were in exceptionally bad condition. So the first thing I did was ditch those and start on another cutter which was essentially the same but in much better nick. I also changed the toothrest for a flat topped one.

This is the test. It cuts freely and cool and makes the right shaped chips. I went straight into another identical cutter but slightly less worn and then tested that one as well. It cut fine, not the best finish I have ever seen but it chewed the metal out with no problem like the other. That got me to knocking off time. I think we have a viable method! These learning curves are great but my god, they're slow, frustrating at times and eat into your life. Never mind, we have progress and compared to these the ones with bigger teeth are a doddle. I'm glad I kept on with the smaller teeth.
Stanley Challenger Graham
Stanley's View
scg1936 at talktalk.net
"Beware of certitude" (Jimmy Reid)
The floggings will continue until morale improves!
Stanley's View
scg1936 at talktalk.net
"Beware of certitude" (Jimmy Reid)
The floggings will continue until morale improves!
-
Stanley
- Global Moderator
- Posts: 90295
- Joined: 23 Jan 2012, 12:01
- Location: Barnoldswick. Nearer to Heaven than Gloria.
Re: SHED MATTERS 2
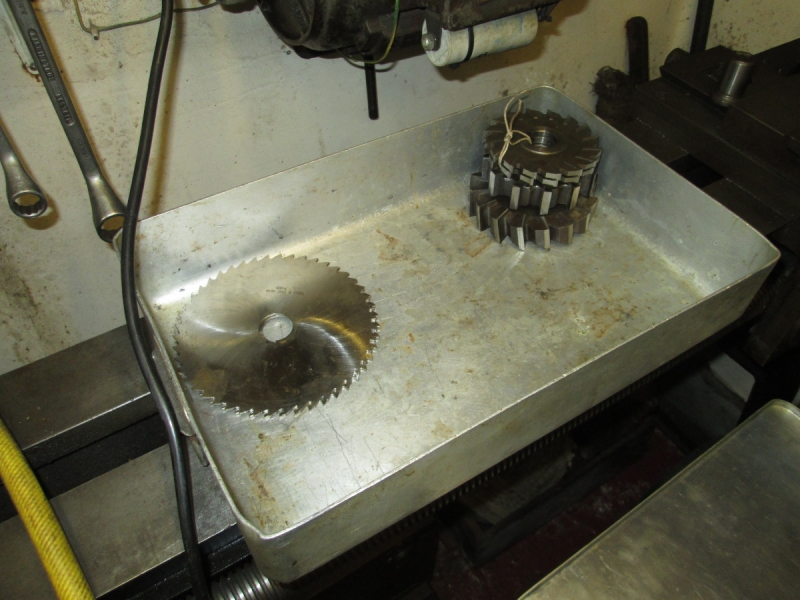
This cutter is identical to the last one I did yesterday and I'd left it set up ready in the T&C grinder. Here I am testing it and it's OK.
This was not the pic I wanted to end up with when I knocked off after an hour in the shed. I followed the cutter above with a slitting saw the same diameter. No dramas, I re-sharpened it and popped it the mill to test it. I immediately knew I had it wrong, it wasn't cutting and if I'd carried on it would have got red hot. So, back into the grinder, a re-set and start again. This is how I have left it. Hopefully I can come to it tomorrow and have better success. My problem is of course that I have to set the angle by eye and that carries its own difficulties! No sweat, If at first you don't succeed......
Stanley Challenger Graham
Stanley's View
scg1936 at talktalk.net
"Beware of certitude" (Jimmy Reid)
The floggings will continue until morale improves!
Stanley's View
scg1936 at talktalk.net
"Beware of certitude" (Jimmy Reid)
The floggings will continue until morale improves!
-
Stanley
- Global Moderator
- Posts: 90295
- Joined: 23 Jan 2012, 12:01
- Location: Barnoldswick. Nearer to Heaven than Gloria.
Re: SHED MATTERS 2
I sorted out the one I was on with yesterday and did five more so I suppose it was a good morning in that respect. None of them is what I'd call a good cutter, truth to tell I am working with old knackered cutters that have been ditched! But I've got them all to the stage where they cut, make decent chips and don't overheat. That's about as good as I can do with this lot.
That wasn't the main event..... I lost concentration for one second and the grinder turned on me whipping the cutter from between my fingers......
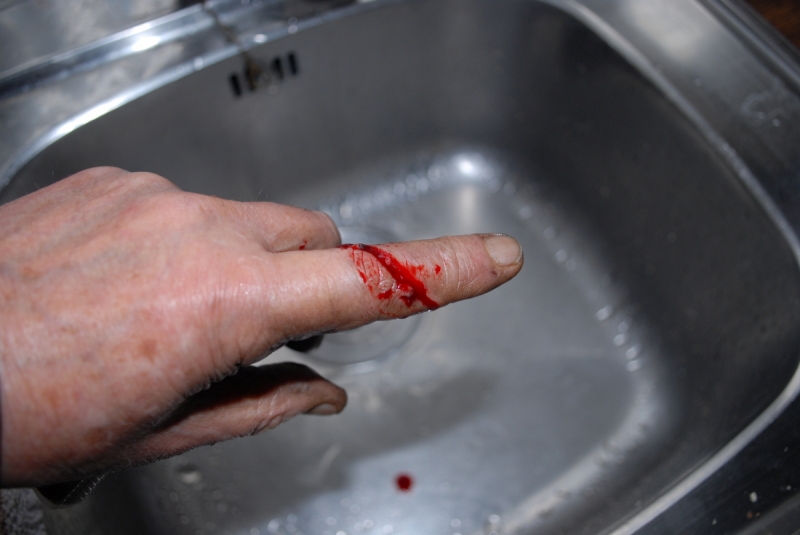

Not quite as bad as it looks even though it's down to the bone. It was bleeding freely and so after washing it in cold water I strapped it up in its own blood. Now I shall leave it alone and let my body deal with it! Onwards and Upwards!
That wasn't the main event..... I lost concentration for one second and the grinder turned on me whipping the cutter from between my fingers......
Not quite as bad as it looks even though it's down to the bone. It was bleeding freely and so after washing it in cold water I strapped it up in its own blood. Now I shall leave it alone and let my body deal with it! Onwards and Upwards!
Stanley Challenger Graham
Stanley's View
scg1936 at talktalk.net
"Beware of certitude" (Jimmy Reid)
The floggings will continue until morale improves!
Stanley's View
scg1936 at talktalk.net
"Beware of certitude" (Jimmy Reid)
The floggings will continue until morale improves!