SHED MATTERS 2
-
Stanley

- Global Moderator

- Posts: 90301
- Joined: 23 Jan 2012, 12:01
- Location: Barnoldswick. Nearer to Heaven than Gloria.
Re: SHED MATTERS 2
No shed today.... This weather is taking a lot out of me and there is some shopping to do. I am not going to drive myself too hard!
Stanley Challenger Graham
Stanley's View
scg1936 at talktalk.net
"Beware of certitude" (Jimmy Reid)
The floggings will continue until morale improves!
Stanley's View
scg1936 at talktalk.net
"Beware of certitude" (Jimmy Reid)
The floggings will continue until morale improves!
-
Stanley
- Global Moderator
- Posts: 90301
- Joined: 23 Jan 2012, 12:01
- Location: Barnoldswick. Nearer to Heaven than Gloria.
Re: SHED MATTERS 2
Same again today. We are seeing a slight improvement in the weather but I am still being careful and looking after myself! Keeping warm and reading will do me.....
Stanley Challenger Graham
Stanley's View
scg1936 at talktalk.net
"Beware of certitude" (Jimmy Reid)
The floggings will continue until morale improves!
Stanley's View
scg1936 at talktalk.net
"Beware of certitude" (Jimmy Reid)
The floggings will continue until morale improves!
-
Stanley
- Global Moderator
- Posts: 90301
- Joined: 23 Jan 2012, 12:01
- Location: Barnoldswick. Nearer to Heaven than Gloria.
Re: SHED MATTERS 2
Another day of no shed lads..... I am keeping warm and surviving!
Stanley Challenger Graham
Stanley's View
scg1936 at talktalk.net
"Beware of certitude" (Jimmy Reid)
The floggings will continue until morale improves!
Stanley's View
scg1936 at talktalk.net
"Beware of certitude" (Jimmy Reid)
The floggings will continue until morale improves!
-
Stanley
- Global Moderator
- Posts: 90301
- Joined: 23 Jan 2012, 12:01
- Location: Barnoldswick. Nearer to Heaven than Gloria.
Re: SHED MATTERS 2
We have a thaw..... I am feeling my shed mojo stirring but will resist it for at least one more day.
Stanley Challenger Graham
Stanley's View
scg1936 at talktalk.net
"Beware of certitude" (Jimmy Reid)
The floggings will continue until morale improves!
Stanley's View
scg1936 at talktalk.net
"Beware of certitude" (Jimmy Reid)
The floggings will continue until morale improves!
-
Stanley
- Global Moderator
- Posts: 90301
- Joined: 23 Jan 2012, 12:01
- Location: Barnoldswick. Nearer to Heaven than Gloria.
Re: SHED MATTERS 2
Back to normal! But it wasn't easy, not because I wasn't wanting to be in the shed but because I knew I was facing fiddly work and two 7BA tappings! I started by spending a lot of time getting some finish into the operating lever. I'm not as good at work like this as I used to be so I have to take care/go slower!
As I got finish in some faces I had to protect them with sheet lead.

Looking a bit better.... How long did it take? Couldn't say, I just kept working away slowly at it.

Then I had to get into the dangerous bit..... I won't bore you, I was just incredibly careful!
I got there without incident. I had to ditch the gloves, I couldn't manage the grub screw with them on. These bloody screws are TINY!!
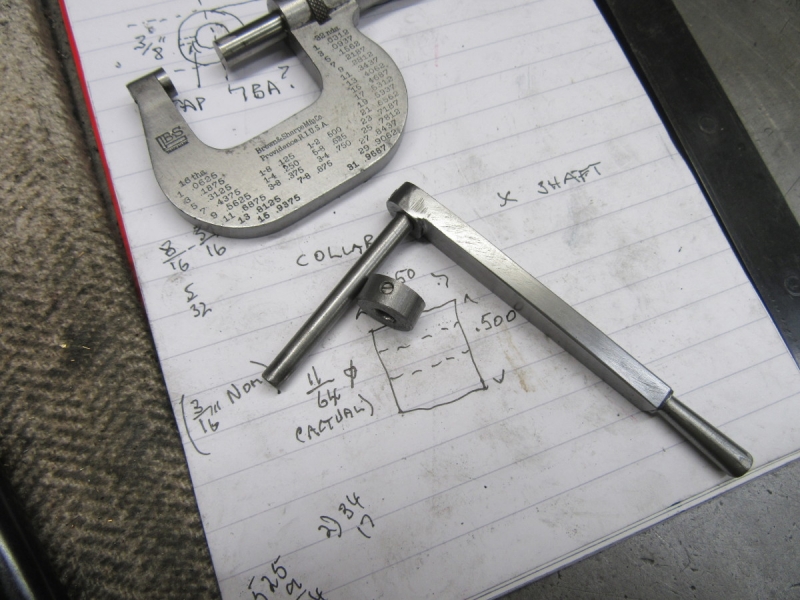
Next I put a flat on the end of the cross rod, fitted the lever to it and poked it through the bosses so I could get a measurement for the collar that retains it on the other side.
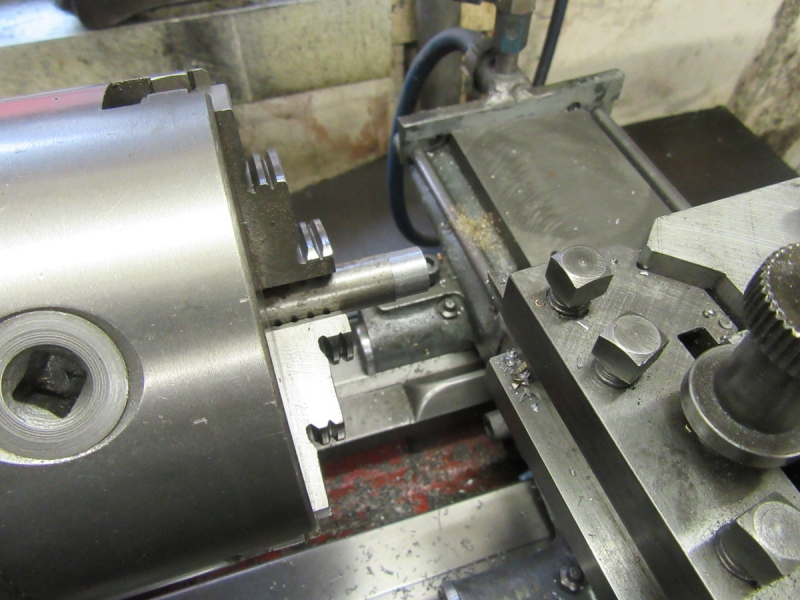
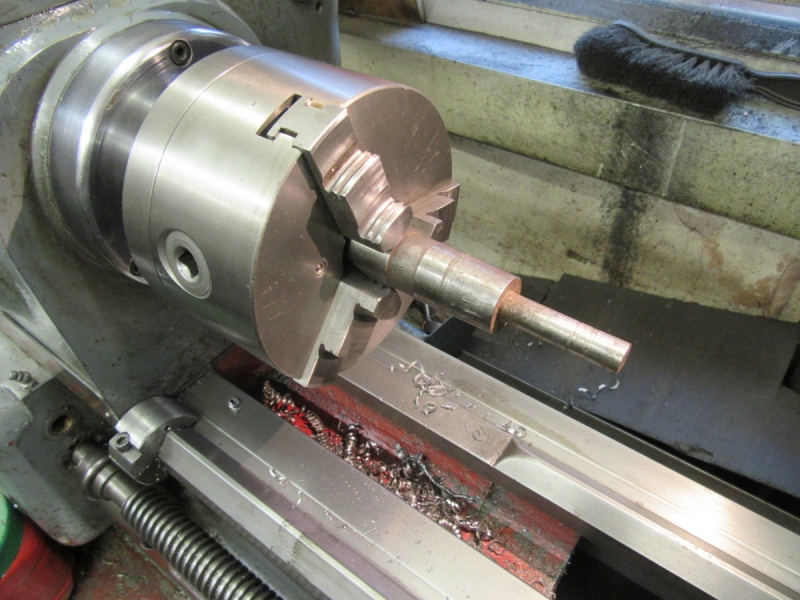
Nice to do a bit of plain turning for a change, very welcome!
Knocking off time, I'll spare the details but I did everything very carefully and got to the stage where I was ready for making the flat on the end of the cross rod. That'll do for today, we're getting into the swing again.
Stanley Challenger Graham
Stanley's View
scg1936 at talktalk.net
"Beware of certitude" (Jimmy Reid)
The floggings will continue until morale improves!
Stanley's View
scg1936 at talktalk.net
"Beware of certitude" (Jimmy Reid)
The floggings will continue until morale improves!
-
Stanley
- Global Moderator
- Posts: 90301
- Joined: 23 Jan 2012, 12:01
- Location: Barnoldswick. Nearer to Heaven than Gloria.
Re: SHED MATTERS 2
The first thing I did this morning was finish the collar and the flat on the end of the cross rod. Then I had a bit of a think.... The conclusion I came to was that what I need to do next is the final assembly of the cylinder and valve assembly on the standard so that I can finalise the operating lever and its linkage with the valve. This means a strip down of course and that raised the question of painting the castings. I haven't firmed that up yet, I'll make my decision as I am working on the assembly. Having decided that I made another decision, to have a good clean up before I go anywhere! so that's what I did, a really good clean up of the bench, the VM and Mrs Harrison. I want clean conditions for the strip down and reassembly.
A while later we have everything clean and tidy with a clean tablecloth and the dirty one soaking in boiling water and detergent.
I brought closing time forward because I am expecting company any minute but as you can see I have all my ducks in a row ready for some fiddly work tomorrow. Note the small plastic bags for keeping the various sets of fastenings separate and easily identifiable, it will save time.
I'm tending towards painting all the castings...... But I like the rough castings and the contrast between the machined surfaces and the cast finish. We'll see!
Stanley Challenger Graham
Stanley's View
scg1936 at talktalk.net
"Beware of certitude" (Jimmy Reid)
The floggings will continue until morale improves!
Stanley's View
scg1936 at talktalk.net
"Beware of certitude" (Jimmy Reid)
The floggings will continue until morale improves!
-
Stanley
- Global Moderator
- Posts: 90301
- Joined: 23 Jan 2012, 12:01
- Location: Barnoldswick. Nearer to Heaven than Gloria.
Re: SHED MATTERS 2
Sorry lads, small things like household matters and writing articles have to be addressed! I shall return!
Stanley Challenger Graham
Stanley's View
scg1936 at talktalk.net
"Beware of certitude" (Jimmy Reid)
The floggings will continue until morale improves!
Stanley's View
scg1936 at talktalk.net
"Beware of certitude" (Jimmy Reid)
The floggings will continue until morale improves!
-
Stanley
- Global Moderator
- Posts: 90301
- Joined: 23 Jan 2012, 12:01
- Location: Barnoldswick. Nearer to Heaven than Gloria.
Re: SHED MATTERS 2
All the housework done and we are back in the shed. Today I want to strip the assemblies down and prepare for final fitting because I need to do that in order to finish my valve operating linkage. But first I had a bit of a puzzle.... I found a small screw on the bench outside.... Problem is I don't know what it's fallen out of! No resolution, I have had to put it on one side and hope enlightenment comes to me.
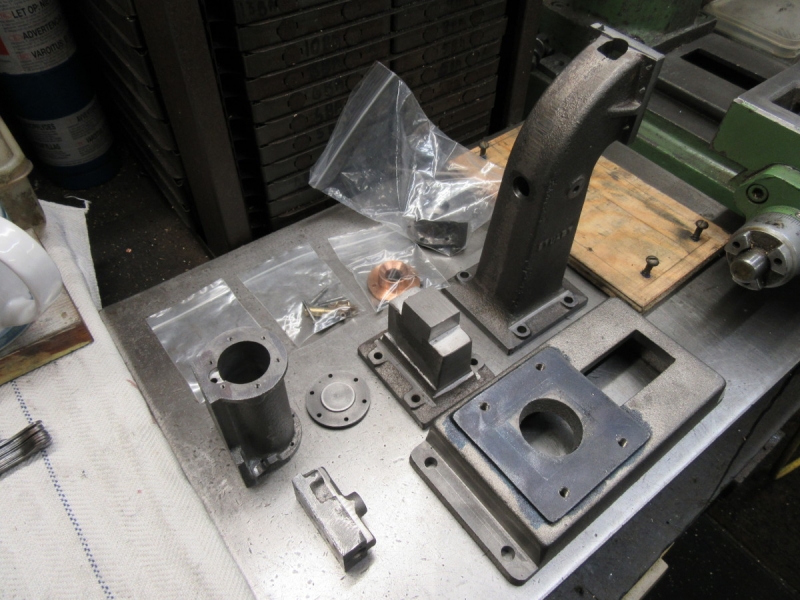
I've stripped everything down and put the associated studs and nuts etc. into individual zip bags, it'll save time when I come to put it all together again. Then I had a think about what comes next.....

Forgive the pun but I find I have painted myself into a corner. It's obvious that if I am going to paint the castings it has to be done now so I got the masking tape out and covered the parts I want to retain a plain machined finish on. Fiddly work and I had to take my gloves off to do it.
It's raining so I can't do my painting outside, we need a spray painting booth in the shed.....
So knocking off time came early..... I can't do anything now but wait for the paint to dry properly. As usual I have put too much on and somehow I think this might take a couple of days..... We'll see.
Stanley Challenger Graham
Stanley's View
scg1936 at talktalk.net
"Beware of certitude" (Jimmy Reid)
The floggings will continue until morale improves!
Stanley's View
scg1936 at talktalk.net
"Beware of certitude" (Jimmy Reid)
The floggings will continue until morale improves!
-
Stanley
- Global Moderator
- Posts: 90301
- Joined: 23 Jan 2012, 12:01
- Location: Barnoldswick. Nearer to Heaven than Gloria.
Re: SHED MATTERS 2
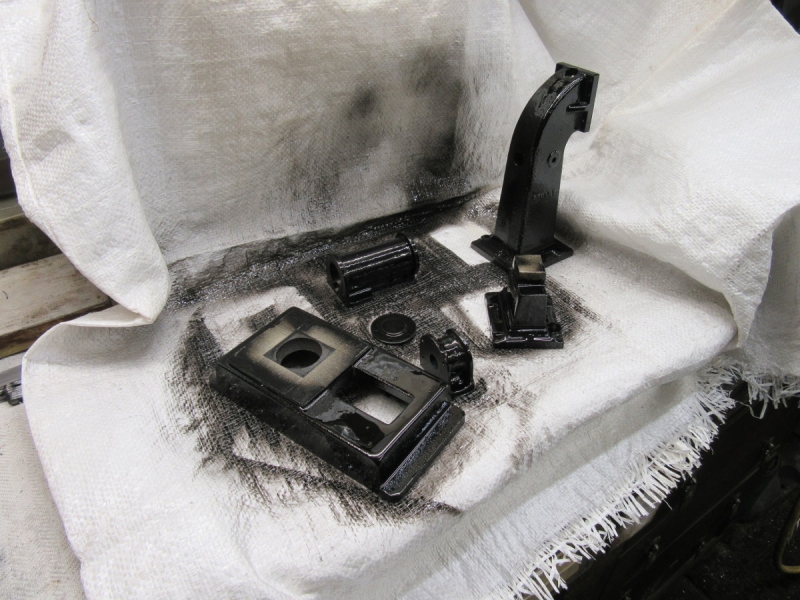
If you're looking at the time of posting, you're right! I am out of the shed earlier than usual but I was in their early and have done almost two hours. Two things.... first as you can see there's always one soldier out of step! The valve block was hidden under a fold of the spray booth and I missed it! Second, the paint has dried but not completely set. So the first thing I did was get the smooth Hammerite out and paint the offending valve block.
I've put it on top of the warm radiator on a piece of steel so it will have the best chance of drying.
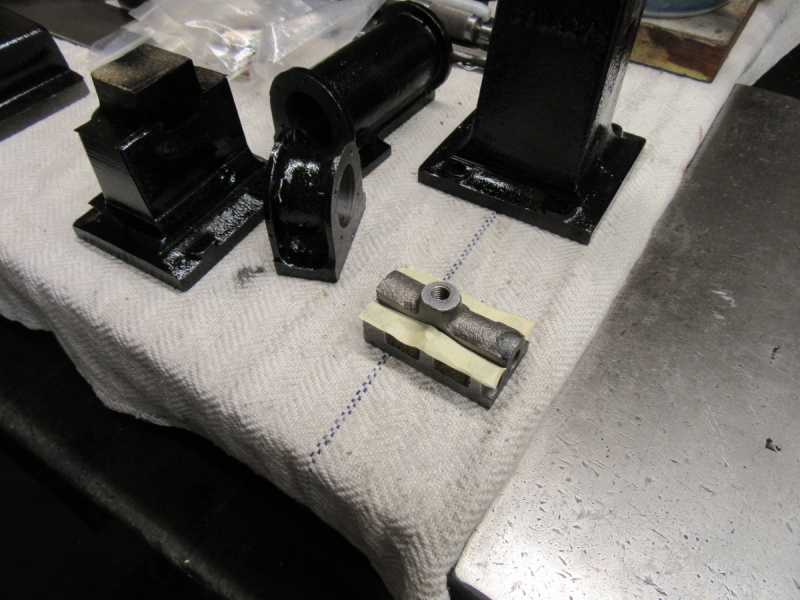
Almost two hours later this is where I am up to. I decided that the paint had set enough for some careful handling and set to to clean and polish all the faces that would be machined on the full size article be treated like that. I include in this the mating surfaces that will eventually have to accept liquid gasket because that is what I will be using.
I've said this before but I'll repeat it. I have been criticised in the past for not being 'authentic' and omitting the usual paper gaskets. It's a mistake to think that a separate gasket was always used. For instance, on the railways after several bad scalding accidents on the footplate, it became standard practice to pay particular attention to the finish on mating surfaces and use a liquid red lead compound as a sealing medium. This was safer because in the case of a blow out, the leak wasn't big enough to be a catastrophic and dangerous event.
Hopefully, tomorrow the paint will have set. It will still be vulnerable but the end result will be a black painted surface on un-machined surfaces which is exactly what happened in original practice. If any improvement was needed after erection it was left to the operator.
Stanley Challenger Graham
Stanley's View
scg1936 at talktalk.net
"Beware of certitude" (Jimmy Reid)
The floggings will continue until morale improves!
Stanley's View
scg1936 at talktalk.net
"Beware of certitude" (Jimmy Reid)
The floggings will continue until morale improves!
-
Stanley
- Global Moderator
- Posts: 90301
- Joined: 23 Jan 2012, 12:01
- Location: Barnoldswick. Nearer to Heaven than Gloria.
Re: SHED MATTERS 2
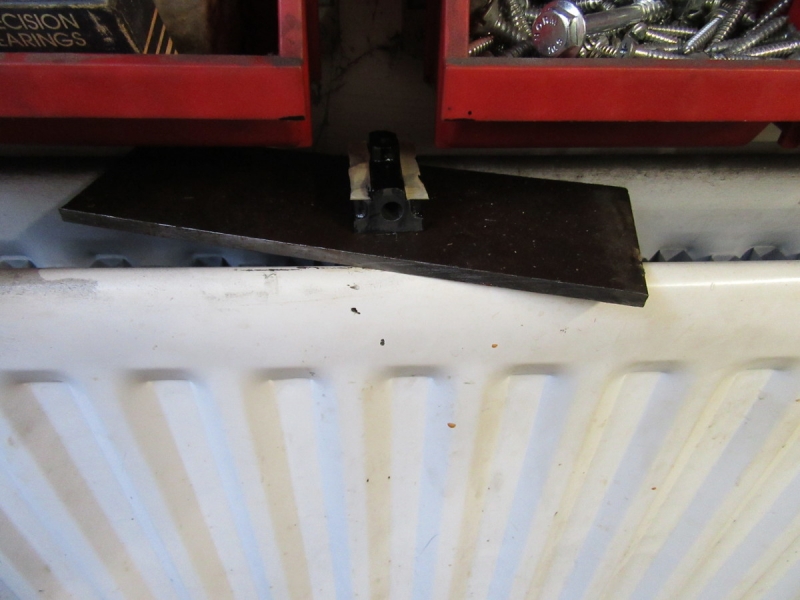
First job this morning was to attend to the valve block, it has dried nicely overnight.
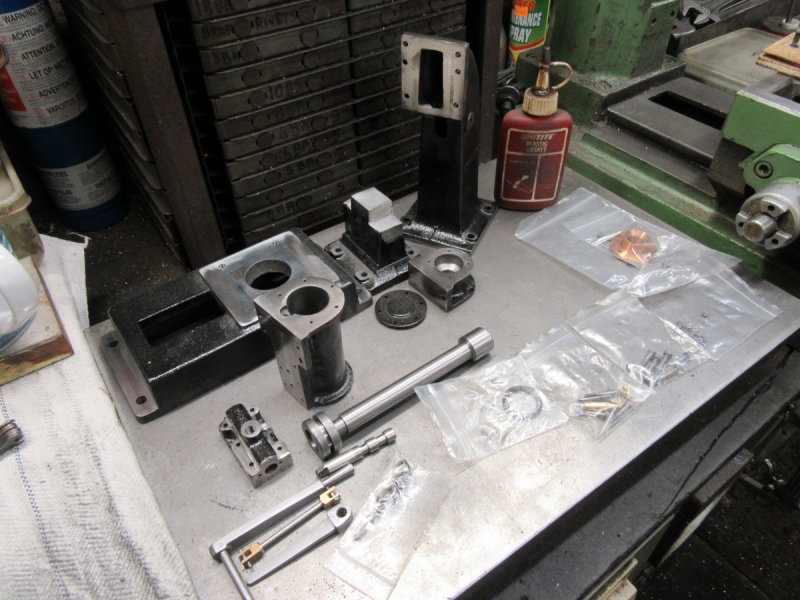
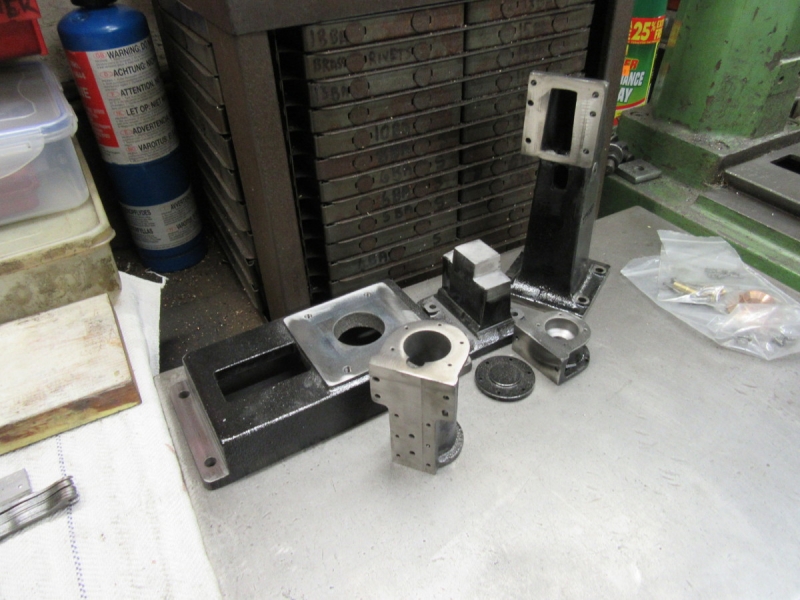
Next I got all my parts together. My aim this morning is to start the final build-up of the cylinder and valve assembly.
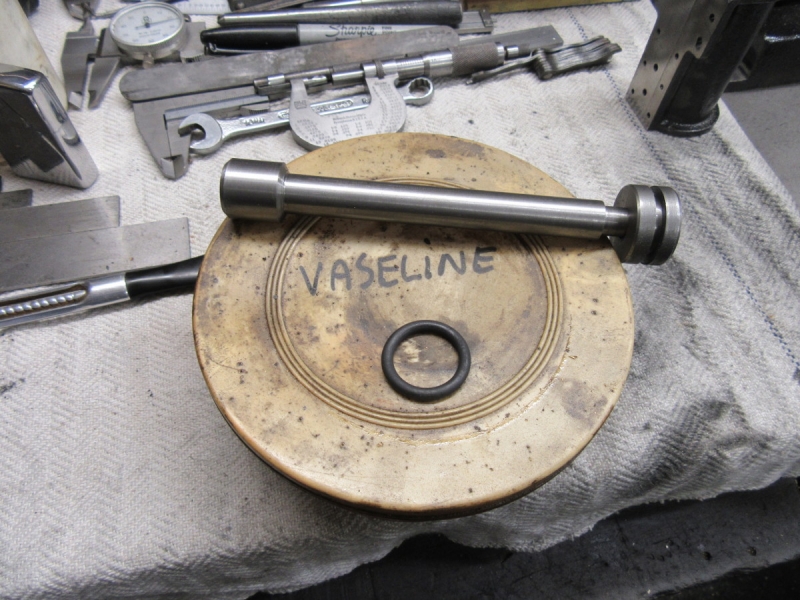
This being the final build-up I need to assemble the piston and rod and install it in the bore before I fit the big gland under the cylinder. I did this pic really because of the fact that I have had this container of Vaseline for almost 50 years and it only comes out occasionally. It's just one example of how stocks of something are never wasted! (And there is enough to see me out!)
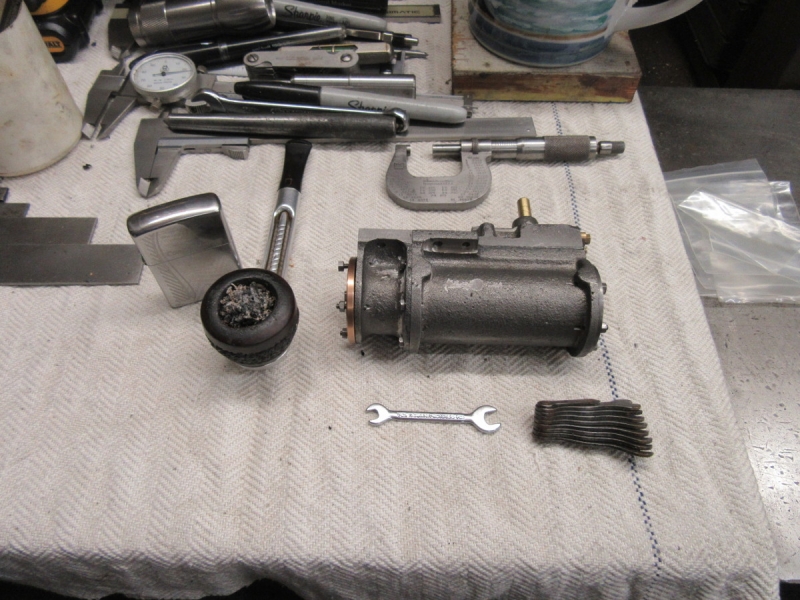
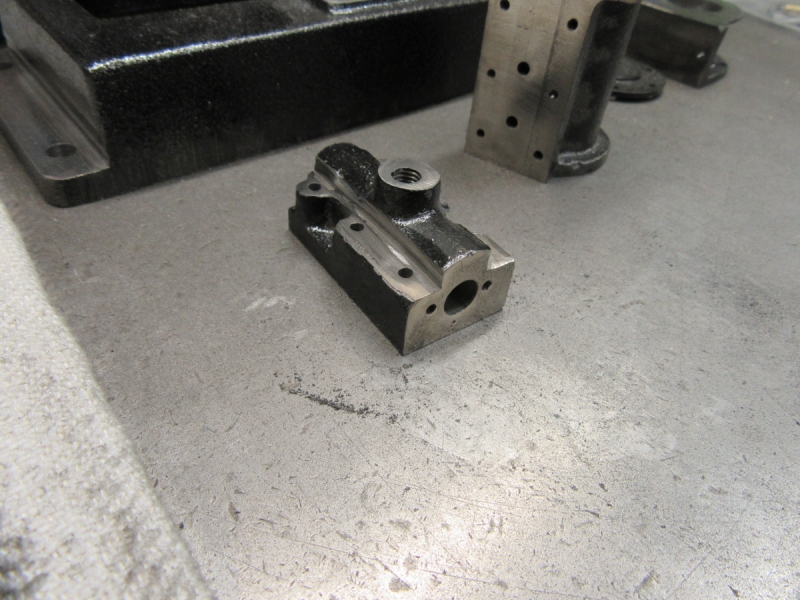
Sometimes I wonder why I bother! I've got the valve block in place complete with plastic gasket and now I have installed the piston and I am attaching the big gland block to to the base of the cylinder. The problem here is that now the piston rod is in place it is affecting the fit. Of course I have already had a trial fitting and so I know that if the gland is in the right place the 7BA set screws will fit. That's the theory anyway but the practice is a different kettle of fish. I have the first three entered here and am ready to do the bad ones in each corner. You wouldn't believe how frustrating this is or how long it was taking. By the way, I had to take my gloves off, no way I can do this with them on. I had just got these first three in place when the phone rang. Stephen is coming round to fit the new solid state disk to the FM3 for the data so I have things to do to prepare for this. To be quite honest I was pleased I could come out of the torture chamber! I shall return......
I've just reviewed what I have posted and realised that I have made a mistake! I haven't fitted the gland itself! A cold chill went down my spine, my first thought was I will have to take these three set screws out but then I realised that there is a way round it, leaving the piston in the bore, I can separate it from the rod and withdraw the rod so I can fit the gland. Then it struck me that there is another advantage to this, taking the rod out will get rid of its influence on the fit of the gland block which can only be a good thing. I shall meet the problem of getting the rod back in when I come to it! A nasty moment! As I say, why the hell do we bother!!
Stanley Challenger Graham
Stanley's View
scg1936 at talktalk.net
"Beware of certitude" (Jimmy Reid)
The floggings will continue until morale improves!
Stanley's View
scg1936 at talktalk.net
"Beware of certitude" (Jimmy Reid)
The floggings will continue until morale improves!
-
Stanley
- Global Moderator
- Posts: 90301
- Joined: 23 Jan 2012, 12:01
- Location: Barnoldswick. Nearer to Heaven than Gloria.
Re: SHED MATTERS 2
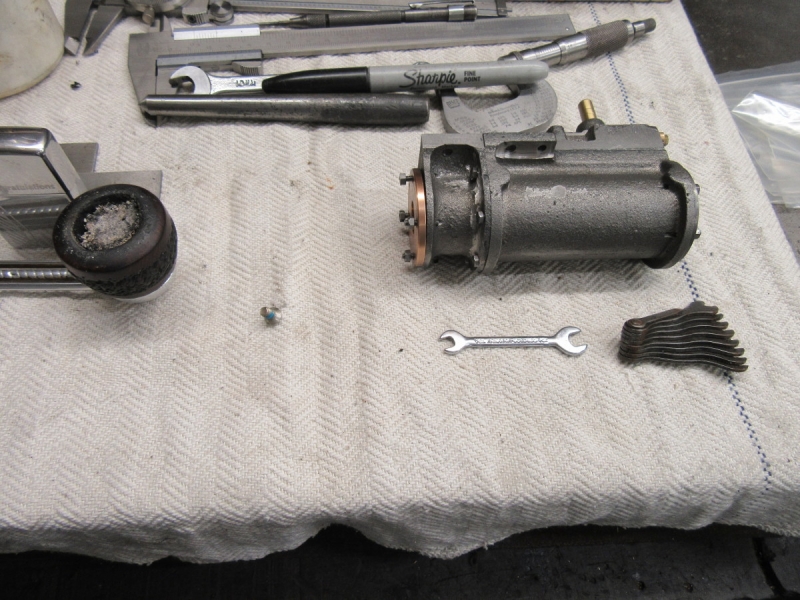
I went back into the torture chamber and after taking the piston rod out I finished the difficult bolts, it was not easy and a prolonged fiddle. Then I installed the gland and packing with the piston rod in place. Only one little glitch, I broke one of the 7BA bolts off when I was giving it its final nip. My fault, too ham-fisted but nothing could be done about it and they'll never see it off the Ribble!
Then another fiddle getting the piston rod installed in the piston. My usual fault, fitted too tight, no clearances. This is best in the long run because the initial running soon slackens things off and if it's sloppy on fitting you have a sloppy fit when run in. But it wasn't too bad. The piston ring is tight in the bore but that'll soon slacken off.
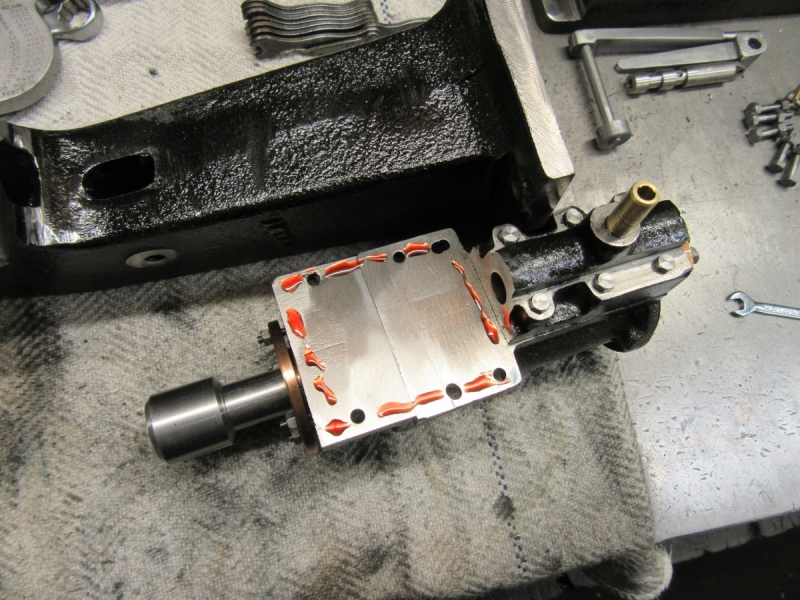
Then a nice simple job! Fitting the cylinder lid with it's liquid gasket.
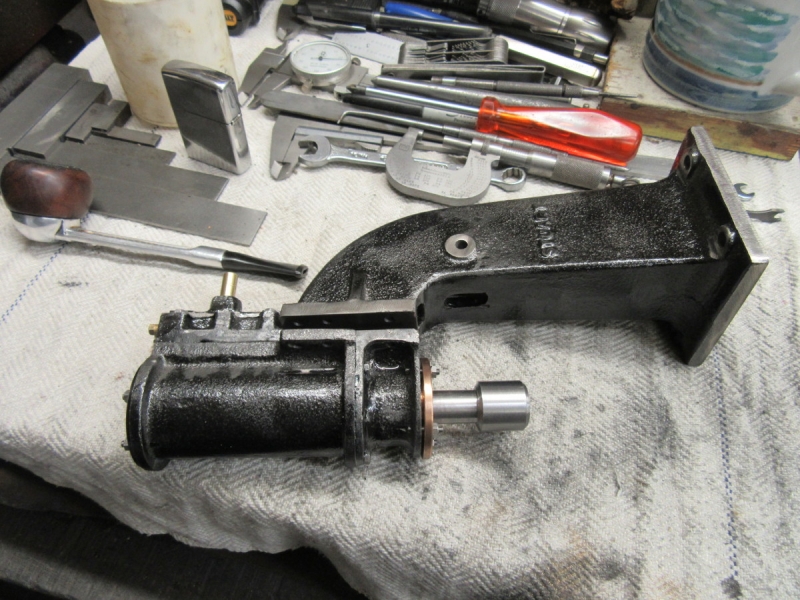
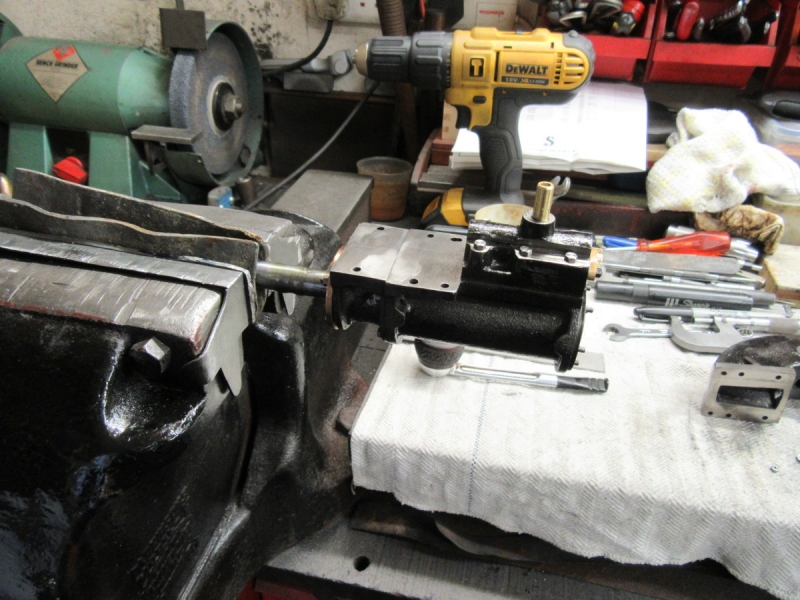
Here's where we are up to, I'm ready to bolt the cylinder and valve assembly on to the standard.

The bolts supplied are too long. I could have simply lopped a bit off the ends of them but I decided to do it properly. I made a little fixture so I could put each bolt in the lathe and turn the end down to exactly the same length for each of them and with a good thread start. Seems a lot of trouble I know but they are in full view and will look a lot better if they are accurate.

This is where I was at at 09:30, knocking off time. They look good and are all good thread starts. They will look well.
Not a bad morning apart from the finishing of the mating of the gland body but that was only the first half hour. It's going to look all right and once I have the assembly mounted I can get some good measurements for the operating linkage.....
Stanley Challenger Graham
Stanley's View
scg1936 at talktalk.net
"Beware of certitude" (Jimmy Reid)
The floggings will continue until morale improves!
Stanley's View
scg1936 at talktalk.net
"Beware of certitude" (Jimmy Reid)
The floggings will continue until morale improves!
-
Stanley
- Global Moderator
- Posts: 90301
- Joined: 23 Jan 2012, 12:01
- Location: Barnoldswick. Nearer to Heaven than Gloria.
Re: SHED MATTERS 2
Sorry lads but this morning has deteriorated into 'get all the shopping done before the bad weather hits us' and I am not going to get into the shed.....
Stanley Challenger Graham
Stanley's View
scg1936 at talktalk.net
"Beware of certitude" (Jimmy Reid)
The floggings will continue until morale improves!
Stanley's View
scg1936 at talktalk.net
"Beware of certitude" (Jimmy Reid)
The floggings will continue until morale improves!
-
Stanley
- Global Moderator
- Posts: 90301
- Joined: 23 Jan 2012, 12:01
- Location: Barnoldswick. Nearer to Heaven than Gloria.
Re: SHED MATTERS 2
No shed again, I have to write for the paper..... Sorry lads, talk amongst yourselves!
By the way, have you been watching Adam Booth with his new shaper?
By the way, have you been watching Adam Booth with his new shaper?
Stanley Challenger Graham
Stanley's View
scg1936 at talktalk.net
"Beware of certitude" (Jimmy Reid)
The floggings will continue until morale improves!
Stanley's View
scg1936 at talktalk.net
"Beware of certitude" (Jimmy Reid)
The floggings will continue until morale improves!
-
Stanley
- Global Moderator
- Posts: 90301
- Joined: 23 Jan 2012, 12:01
- Location: Barnoldswick. Nearer to Heaven than Gloria.
Re: SHED MATTERS 2
Still got articles to write........
Stanley Challenger Graham
Stanley's View
scg1936 at talktalk.net
"Beware of certitude" (Jimmy Reid)
The floggings will continue until morale improves!
Stanley's View
scg1936 at talktalk.net
"Beware of certitude" (Jimmy Reid)
The floggings will continue until morale improves!
-
Stanley
- Global Moderator
- Posts: 90301
- Joined: 23 Jan 2012, 12:01
- Location: Barnoldswick. Nearer to Heaven than Gloria.
Re: SHED MATTERS 2
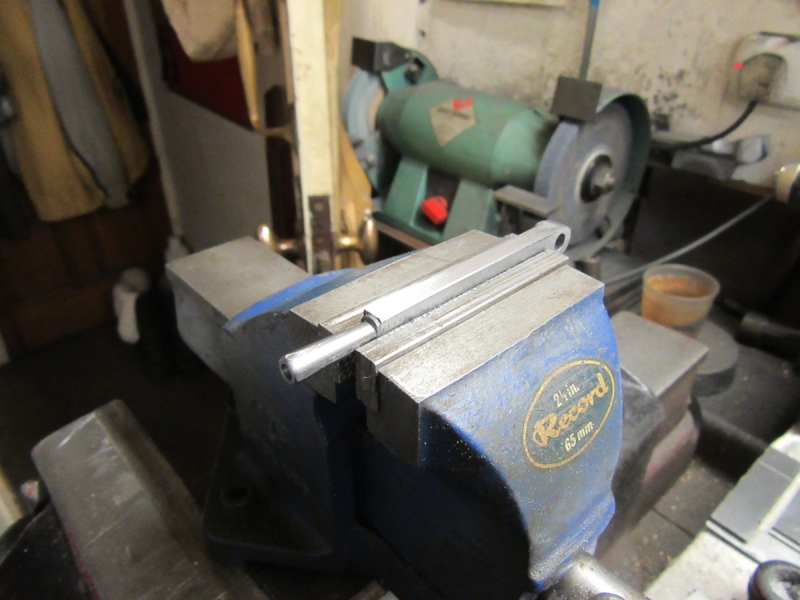
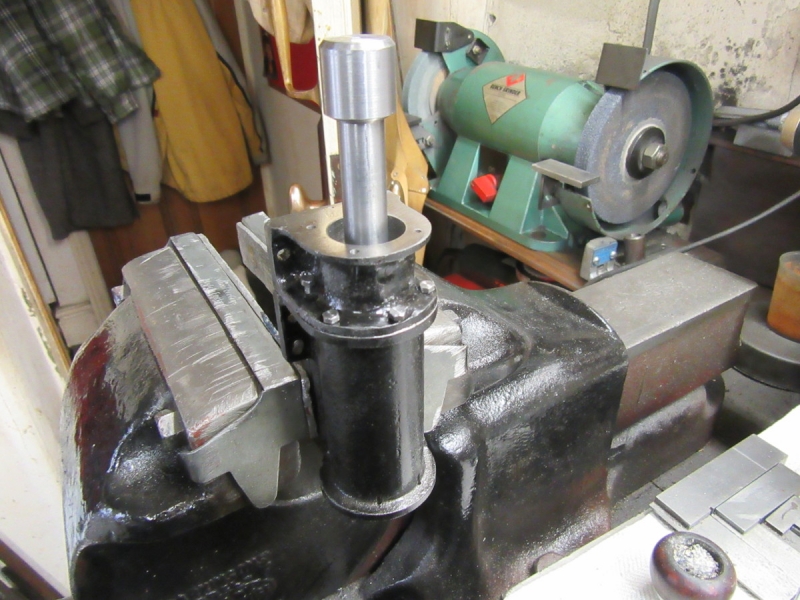
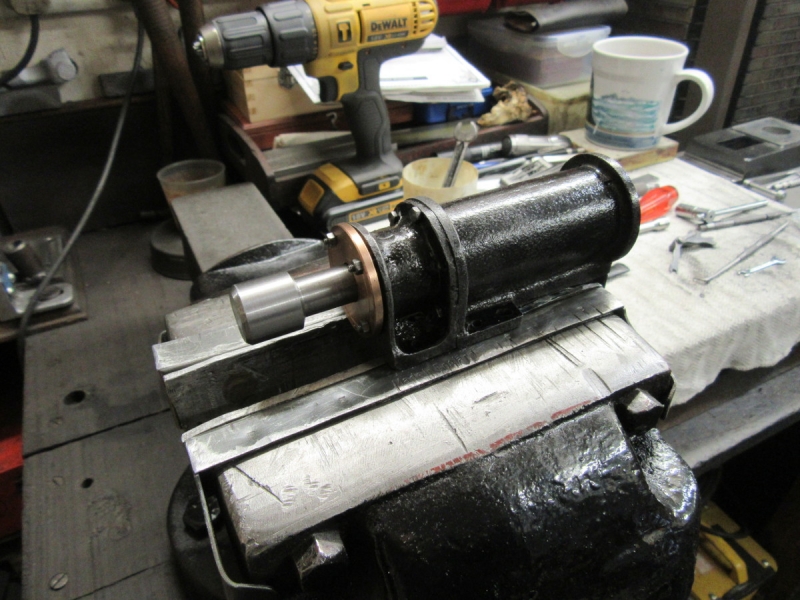
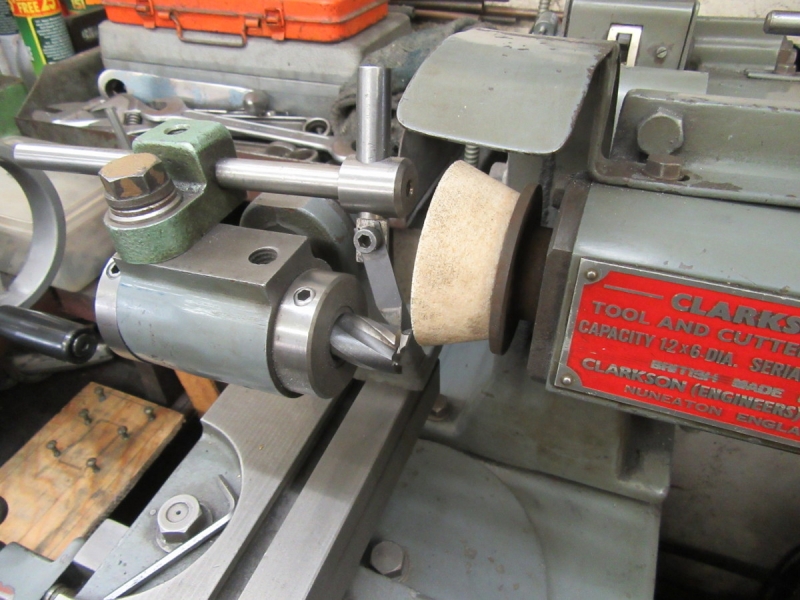
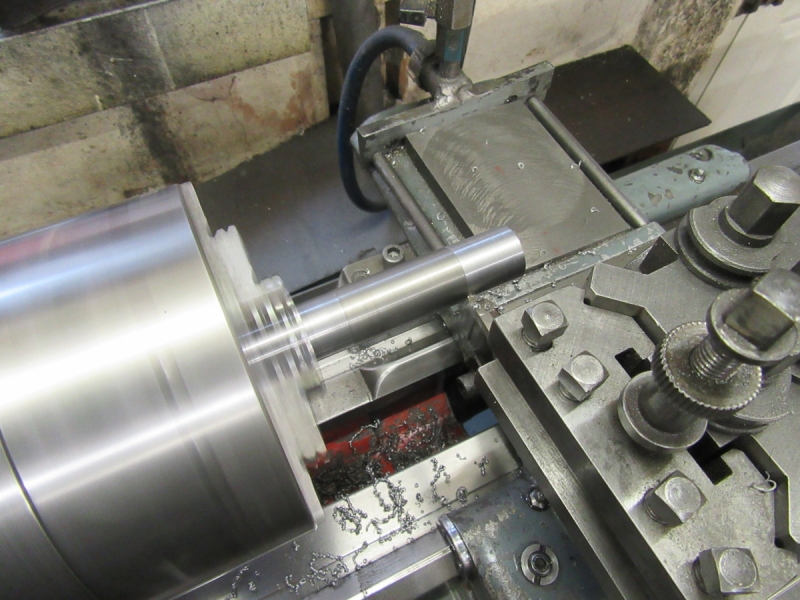
You'll be pleased to hear I am written up until the end of April! So this morning back in the shed despite the fact I knew I was going to end up in the frustration mode again! However, the first thing I did was grab the ram in the vise shielded by lead and worked it until I had it reasonably free over the stroke.... One of these days I'll fit a bit easier but the problem is that I know it will be fine and a better seal in the end because the piston actually fits!
Next job is to fit the cylinder and valve assembly onto the standard. I have already made sure I have a clean face and whilst I don't need a seal, a bit of liquid gasket will ensure the most solid fit. So a little bit of Loctite liquid gasket.
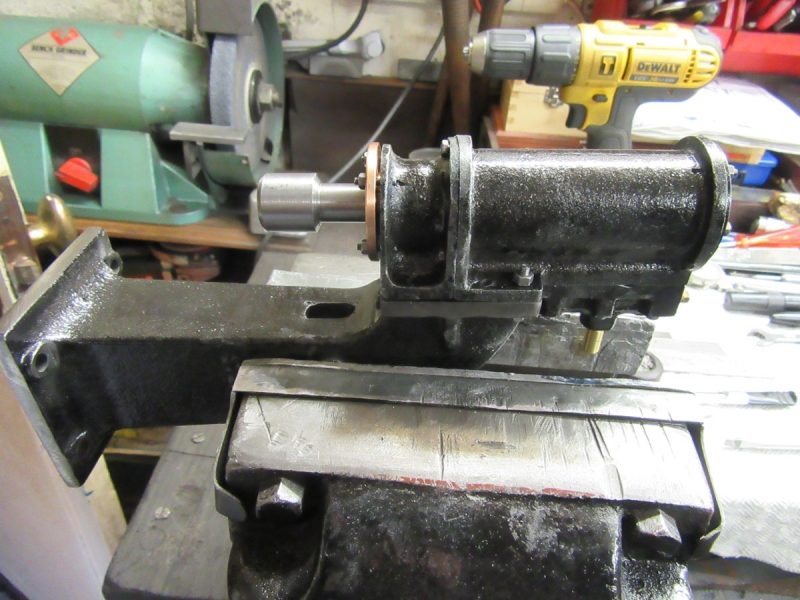
Then into the torture chamber! I fitted the six prepared bolts and while I didn't hit any particular problems because it has already been trial fitted, it was fiddly, frustrating and time consuming, it took me nearly an hour.... That included dropping one nut and having to search for it. (They are like jumping beans when they hit the floor.....)
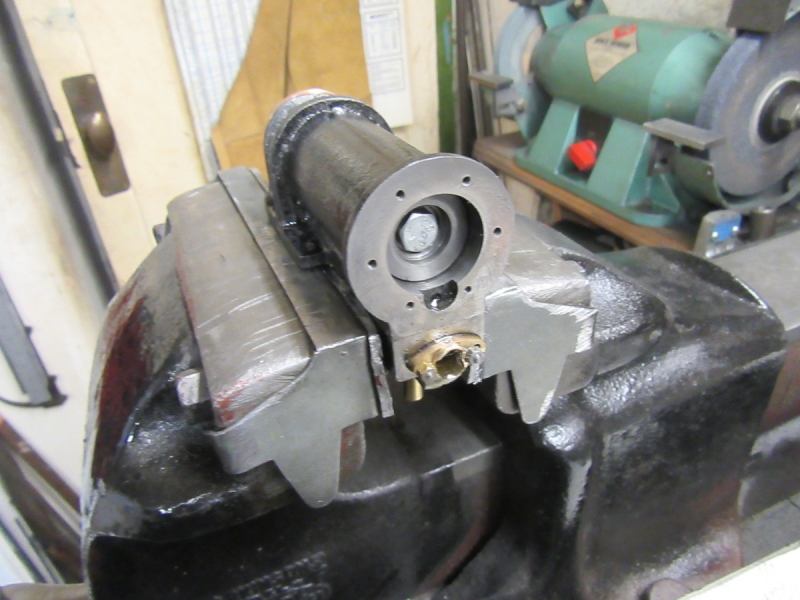
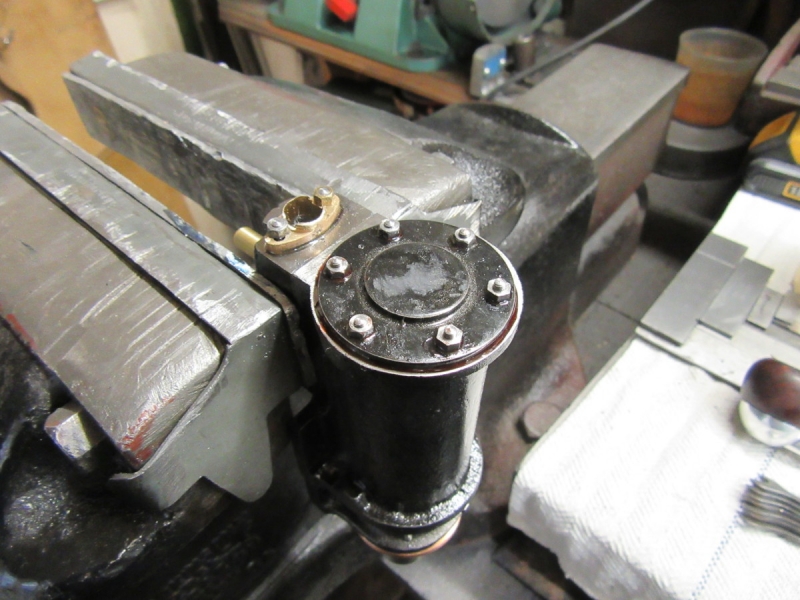
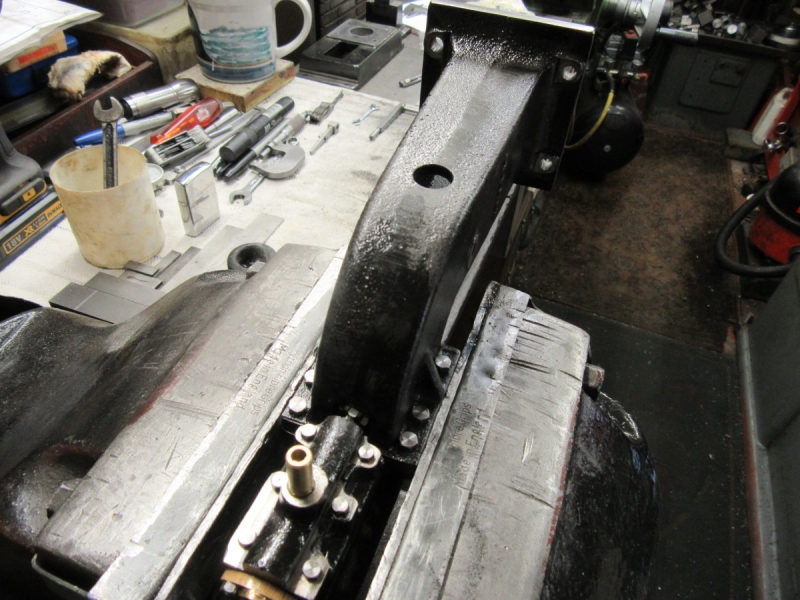
Later..... Here it is mounted on the standard. I can assure you that it won't be stripped down again unless there's something I have missed!
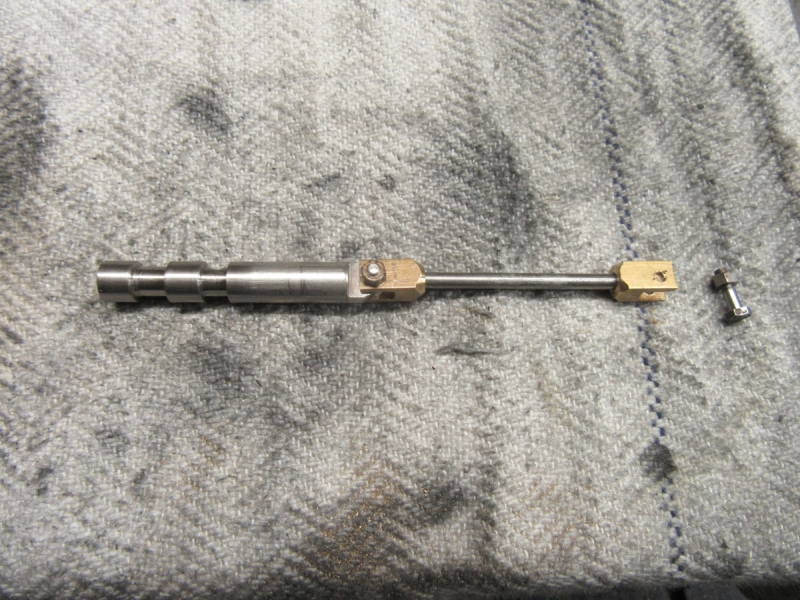
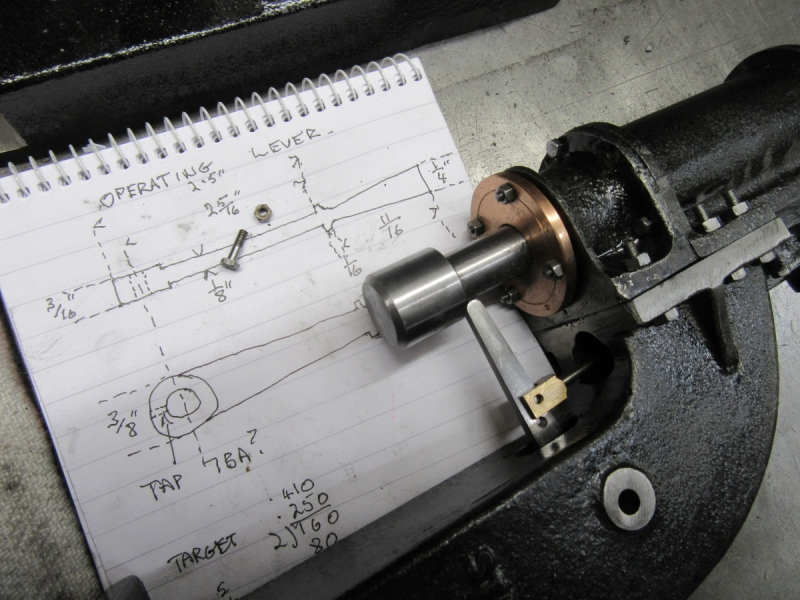
Next stage is to start the fitting of the piston valve and its control rod.
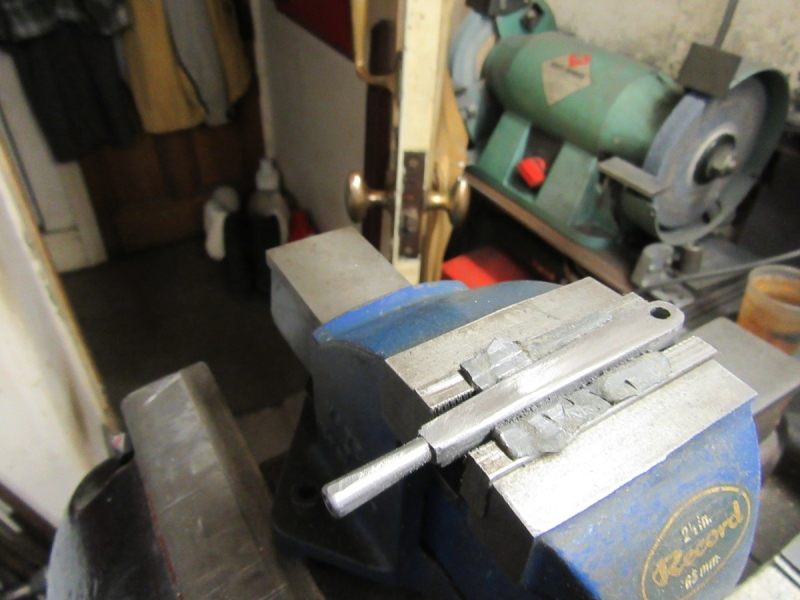
A bit of a fiddle and I'm not sure that the clevis isn't fouling so tomorrow I shall have to address that. It might mean filing a bit off the corners of the clevis but I have an idea that it won't be necessary so I'm not jumping the gun.
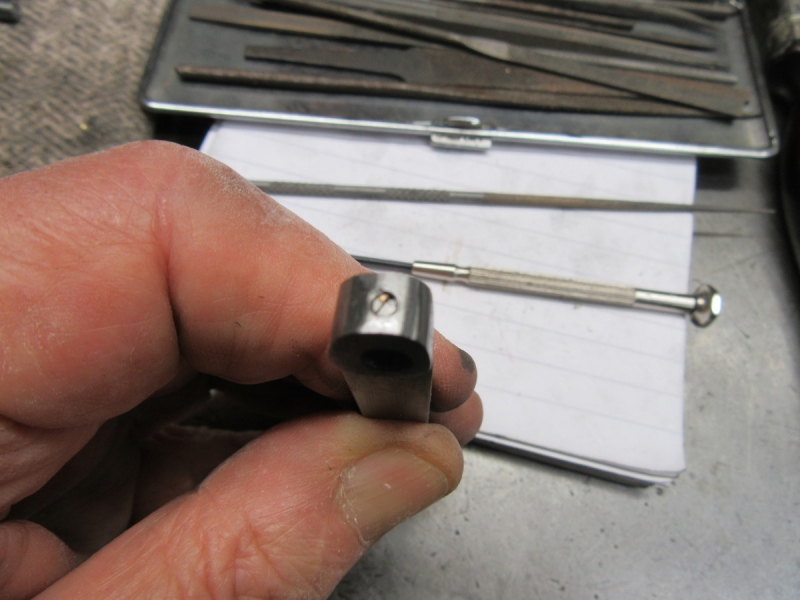
Next I spent some time drilling the 7BA clearance hole in the operating arm and putting some finish on it. Here it is with the clevis pin fitted.
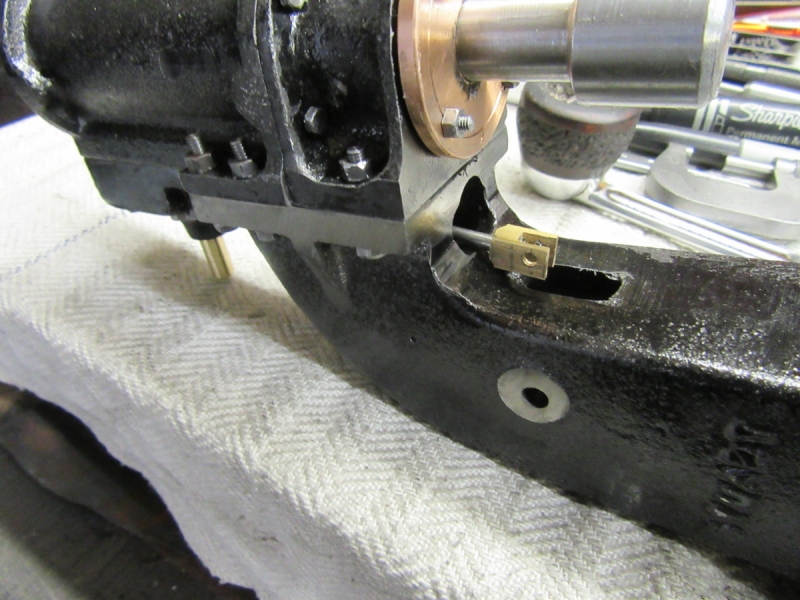
I had a bad moment when I realised that it was impossible to fit the operating arm from the front! But then I realised that it could be installed from the back. Problem here is that the access hole isn't big enough for the boss. First thought was reduce the boss a bit but then I decided to go the other way and enlarge the access hole because I know I am going to need all the room I can get to tighten the grub screw that locks it onto the cross shaft. Not looking forward to that but sufficient until the day.......
Stanley Challenger Graham
Stanley's View
scg1936 at talktalk.net
"Beware of certitude" (Jimmy Reid)
The floggings will continue until morale improves!
Stanley's View
scg1936 at talktalk.net
"Beware of certitude" (Jimmy Reid)
The floggings will continue until morale improves!
-
Stanley
- Global Moderator
- Posts: 90301
- Joined: 23 Jan 2012, 12:01
- Location: Barnoldswick. Nearer to Heaven than Gloria.
Re: SHED MATTERS 2
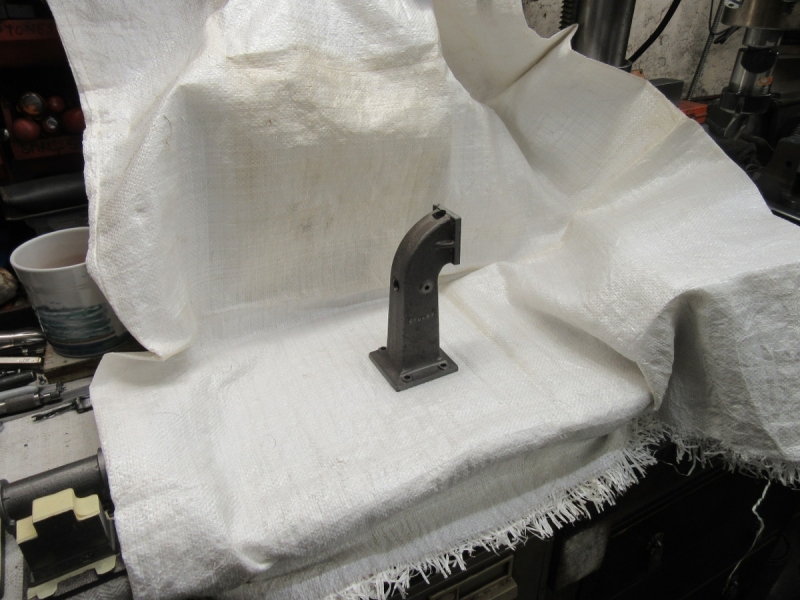
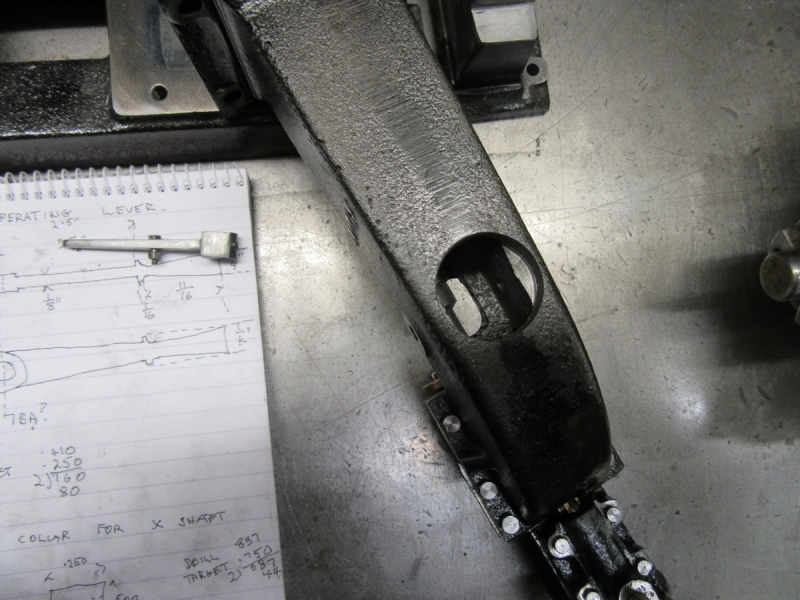
First thing to do this morning was decide what I could get away with in terms of enlarging the access hole in the standard. I decided that 1" would do the trick. Question is how to do it.....
I had a root in my drills and found this 1" drill that someone has converted to a 'blacksmith drill', very badly and the stem is roped because it was too small. I sawed the stem off, faced the end and turned the end down to 3/4", mainly because that's the collet I have in the VM at the moment! But it's a good size.... Then I gave the drill a good sharpening.
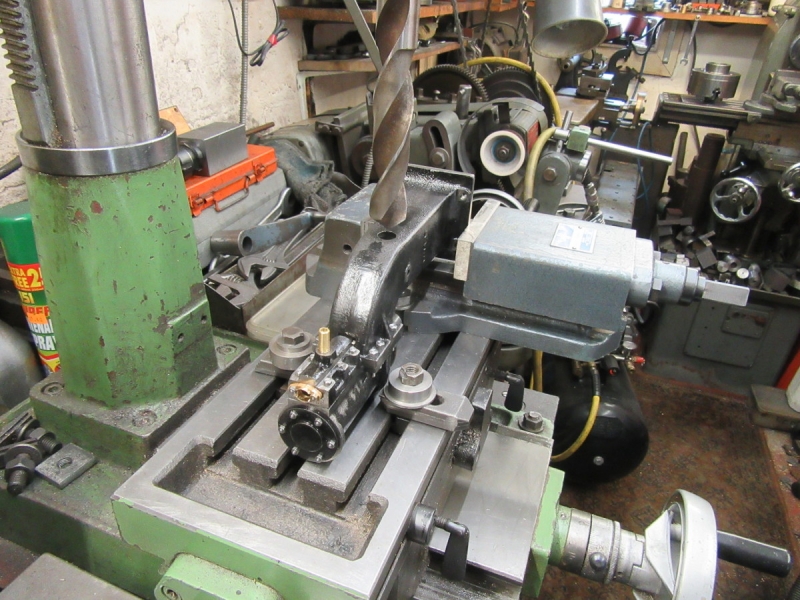
Then I got set up under the mill,not a lot to get hold of but enough and I made sure that I did all I could to hold it solid because I'm working at the limits of the mill here! I confess I started without altering the speed but soon realised this was a bad idea and altered the belt drive to give me the lowest speed, 140rpm, and that did the trick. It was sharp and all I had to do was go carefully.
Here's the result.
It won't surprise you to learn that as I had the cutter out of the mill I took the opportunity to touch the edge up and I mean touch! Then I put it back in the mill, put the belts back to the proper speed and dropped the head to a more normal position.

Then I gave the piston valve a coat of looking over. I only made one change, the drawings don't call for a retaining nut on the clevis pin but I have given it one. The nut was a bit proud so I filed it down because I think that was one thing that was fouling. Hard to see when it's in place. That improved the travel enough for me to decide that it will do.
I had a trial fit of the operating lever and I think I might have done enough. At this point I considered a bit more fitting but there was something that has been bugging me......
You may well wonder what the bloody hell is he doing now! A couple of days ago I dropped my tiny bottle of Loctite thread lock and it hid itself somewhere in the depths of the scrap box under Johnny's big lathe. I didn't worry too much because I was sure I had a spare bottle somewhere but if I have a I can't find it. Nothing for it! I had to shift the compressor and Mrs McMaster and get on my knees. I found it and I'll take care not to drop it again! It's still half full after about twenty years so what there is will probably see me out. Not a biggie but I feel a lot happier now I have that out of my system. Then I put the shed back together. That'll do for today, I've finished the morning feeling satisfied, that's all that matters.
Stanley Challenger Graham
Stanley's View
scg1936 at talktalk.net
"Beware of certitude" (Jimmy Reid)
The floggings will continue until morale improves!
Stanley's View
scg1936 at talktalk.net
"Beware of certitude" (Jimmy Reid)
The floggings will continue until morale improves!
-
Stanley
- Global Moderator
- Posts: 90301
- Joined: 23 Jan 2012, 12:01
- Location: Barnoldswick. Nearer to Heaven than Gloria.
Re: SHED MATTERS 2
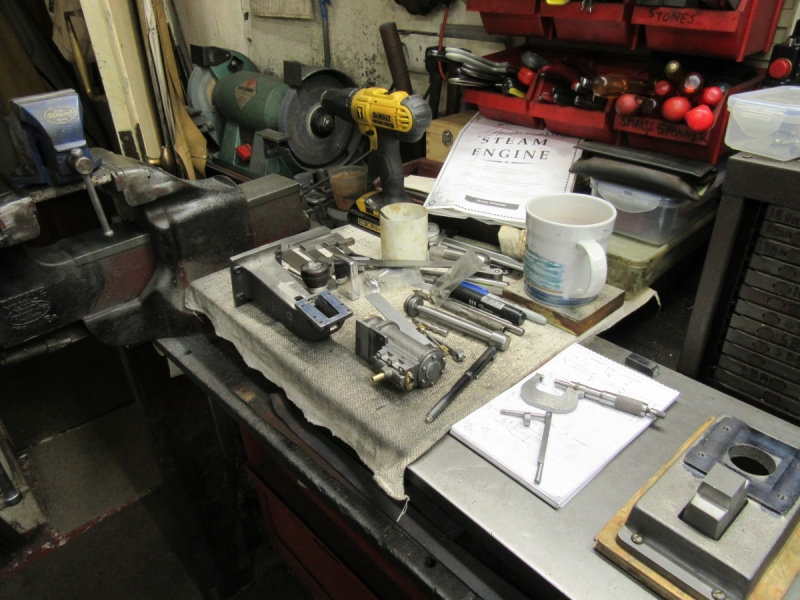
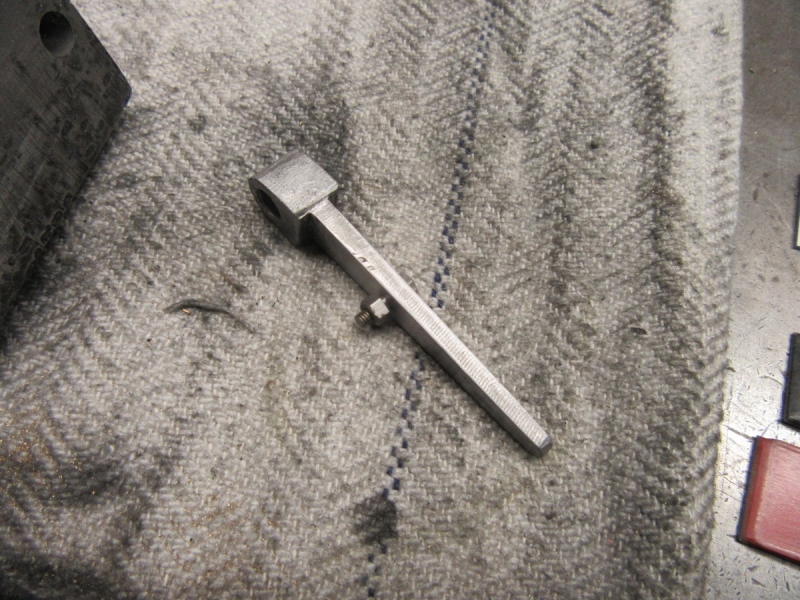
This morning the job was to fit the operating linkage. I can't hide the fact that this morning has been a bugger! I got wind of how things were going when I realised that the lever from the cross shaft to the clevis had nothing right about it, and I mean nothing! So the first part of the morning was shortening it and making it possible to attach it to the clevis. Eventually I got there but then had to attack the job of getting the flat on the cross shaft cut in the right place to ensure that the operating lever is at the right angle. That in itself was a tricky job but was nothing compared with the misery I ran into making sure that I could actually attach the lever firmly to the cross shaft..... For a kick off I had to re-cut the thread of the tiny 7BA set screw so that it would actually tighten. I only have one 7BA tap left and that's the starter so I had to shorten it to get it to cut at all. I have no confidence in these tiny grub screws at all so I decided to Loctite the joint as well as use the grub screw. Then I realised that before I did that I had to make sure that the operating lever was firmly attached to the cross shaft so I Loctited it and fastened the grub screw as tight as I dare. Then I realised that in order to minimise the chance of it coming loose while I was fitting the lever it would be best to leave it to cure properly. This was almost a relief because it gave me an excuse to come out of the shed an hour early.
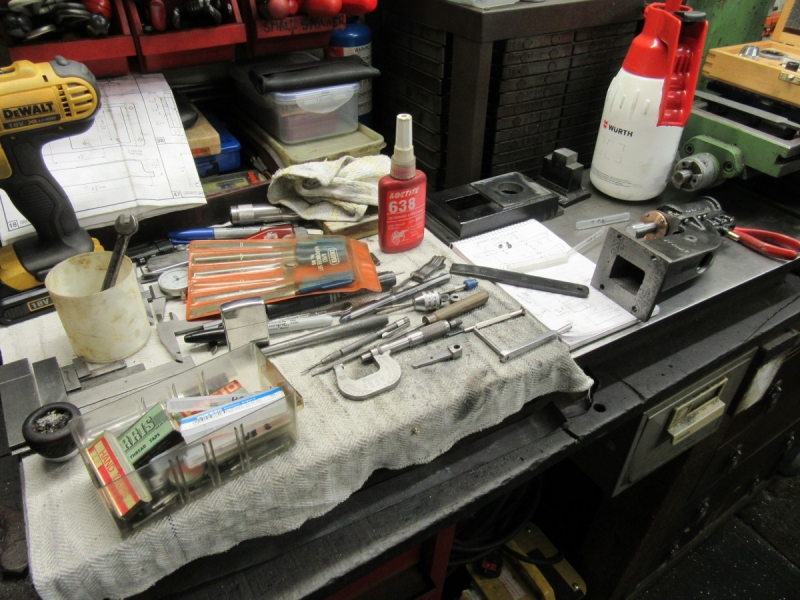
I've always said that you can get a good idea of how thronged I have been by the amount of tackle on the bench. I think this pic speaks for itself. I haven't enjoyed this morning and I'll be glad when I have finished..... It will all be OK in the end of course but at the moment I am a bit depressed!
Stanley Challenger Graham
Stanley's View
scg1936 at talktalk.net
"Beware of certitude" (Jimmy Reid)
The floggings will continue until morale improves!
Stanley's View
scg1936 at talktalk.net
"Beware of certitude" (Jimmy Reid)
The floggings will continue until morale improves!
-
Stanley
- Global Moderator
- Posts: 90301
- Joined: 23 Jan 2012, 12:01
- Location: Barnoldswick. Nearer to Heaven than Gloria.
Re: SHED MATTERS 2
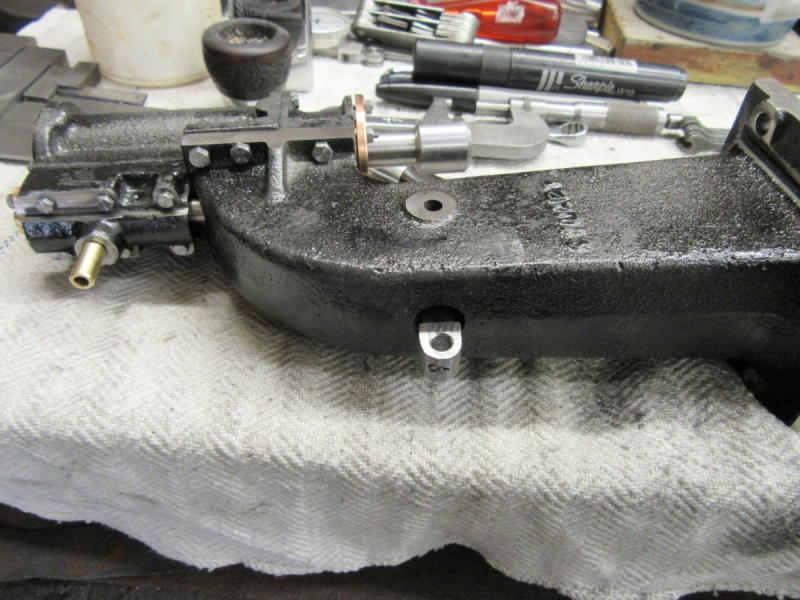
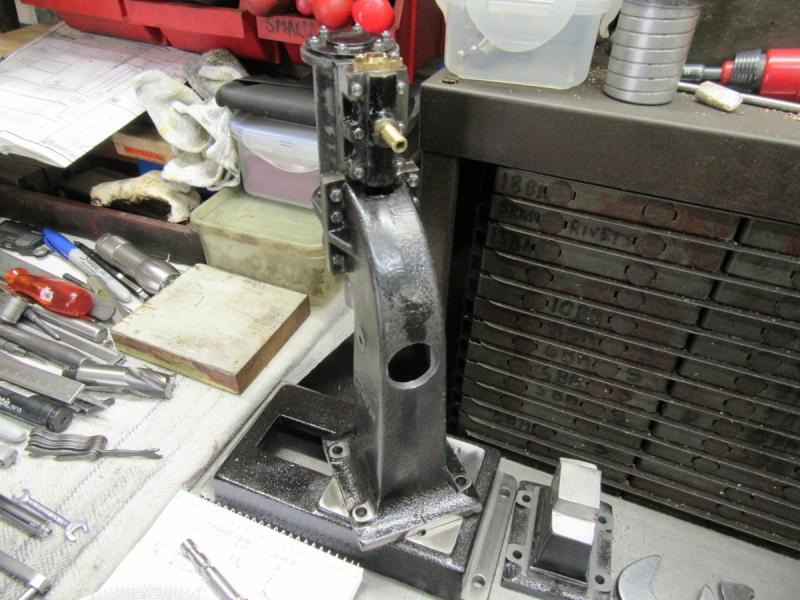
It was a good call letting the Loctite reinforcing the fit of the lever time to cure overnight. I didn't test it to destruction obviously but it feels really solid now. I greased the piston valve and set to to get all the linkage in place. Once again, I reinforced the fit of the lever on the cross shaft with Loctite and found that opening the access hole up had been a good move, it was perfect and I had no trouble with it at all.
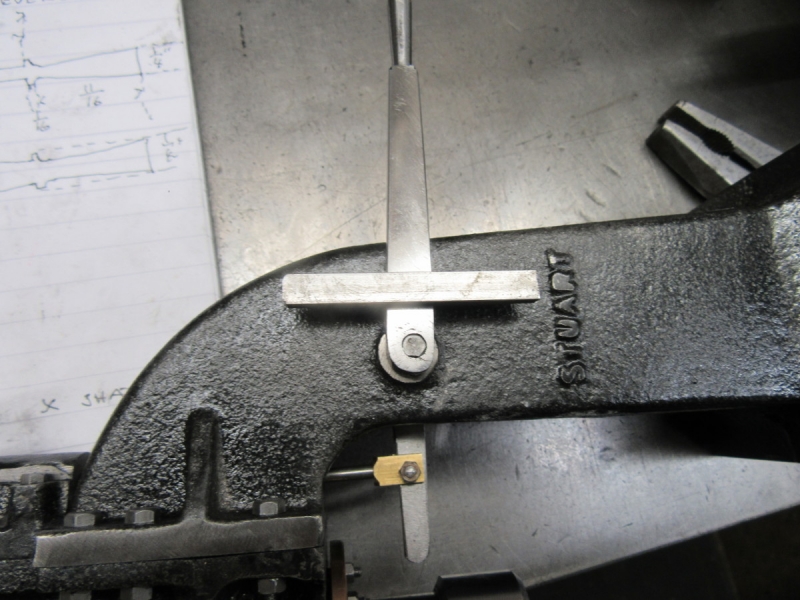
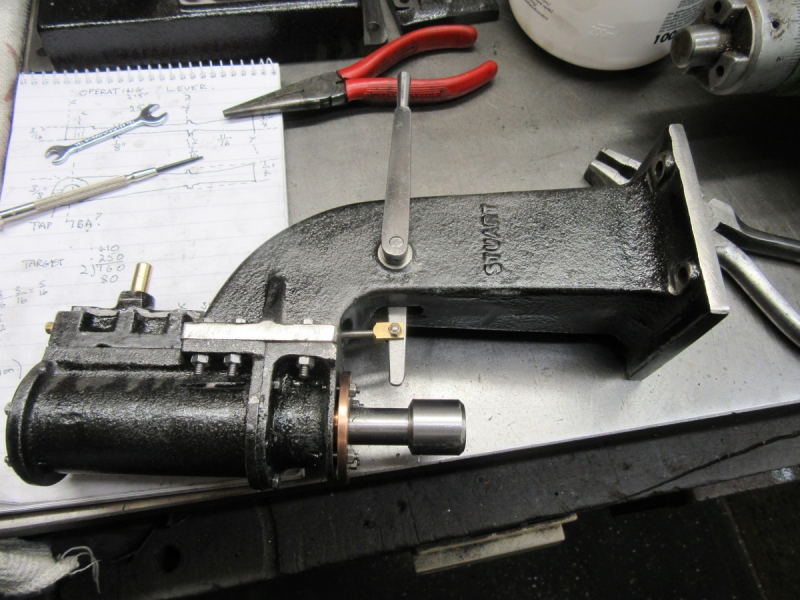
The next thing I have to do is make and fit the guard on the operating lever.
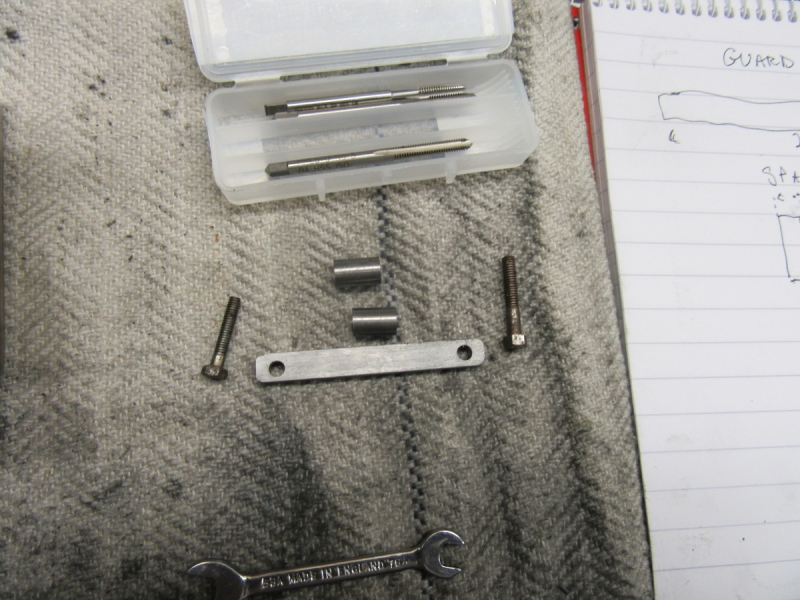
A bit of light turning and some metal shaping and I have all the bits I need (or so I thought.....). The drawings call for two 7BA studs but sod that, I decided to use 5BA to give me a bit better chance.
I drilled the tapping holes freehand using a piston ring to ensure that I was level. Once I had the first hole tapped I fixed the guard in place and used the hole in the other end as a guide for drilling the second hole. Then all I had to do was fit the second bolt but then I found that the one I had for it was too short. No matter, I have thousands of BA nuts and bolts. Big laugh! I couldn't find one and I had to go through every drawer before I found one long enough. The eagle eyed amongst you will realise it has a slotted head. At this stage that's a minor detail so a bit of Loctite in the holes and I fixed the guard on.
Here's the result. I have a finished steam hammer! I can't say I am sorry, it hasn't been a happy job for many reasons. One of these of course has been my fight with the 7BA fastenings. I told you that I was doing this guard 5BA and if you remember I got a set of 5BA Presto taps in high speed steel. You can see them on the bench. My point is that I had absolutely no problem with the 5BA tapping because I had good taps. That's been my self inflicted injury, when I got the new 7BA taps I got the El Cheapo cast steel ones, dirt cheap and bloody useless. This could have some bearing why I have broken them all! I shall order a set of Presto 7BA taps which will cost about £30 for the three. Ridiculous but I'll bet it cures my problem.
Here's where I was at closing time. I have found a good piece of oak faced marine ply and I'm going to use it for a better base. I shall use the temporary one as a template for drilling the fixing holes for the brass round head woodscrews. That is going to be a nice stress-free job for tomorrow!
Stanley Challenger Graham
Stanley's View
scg1936 at talktalk.net
"Beware of certitude" (Jimmy Reid)
The floggings will continue until morale improves!
Stanley's View
scg1936 at talktalk.net
"Beware of certitude" (Jimmy Reid)
The floggings will continue until morale improves!

-
Stanley
- Global Moderator
- Posts: 90301
- Joined: 23 Jan 2012, 12:01
- Location: Barnoldswick. Nearer to Heaven than Gloria.
Re: SHED MATTERS 2
N China, I'll 'forge' a lump of lead when I have the base on it and it's all bolted together.
Stanley Challenger Graham
Stanley's View
scg1936 at talktalk.net
"Beware of certitude" (Jimmy Reid)
The floggings will continue until morale improves!
Stanley's View
scg1936 at talktalk.net
"Beware of certitude" (Jimmy Reid)
The floggings will continue until morale improves!
-
Stanley
- Global Moderator
- Posts: 90301
- Joined: 23 Jan 2012, 12:01
- Location: Barnoldswick. Nearer to Heaven than Gloria.
Re: SHED MATTERS 2

Finishing touches. I shortened the brass screws slightly so they don't break through the bottom of the base board and then cleaned the heads with a freshly sharpened wire brush.
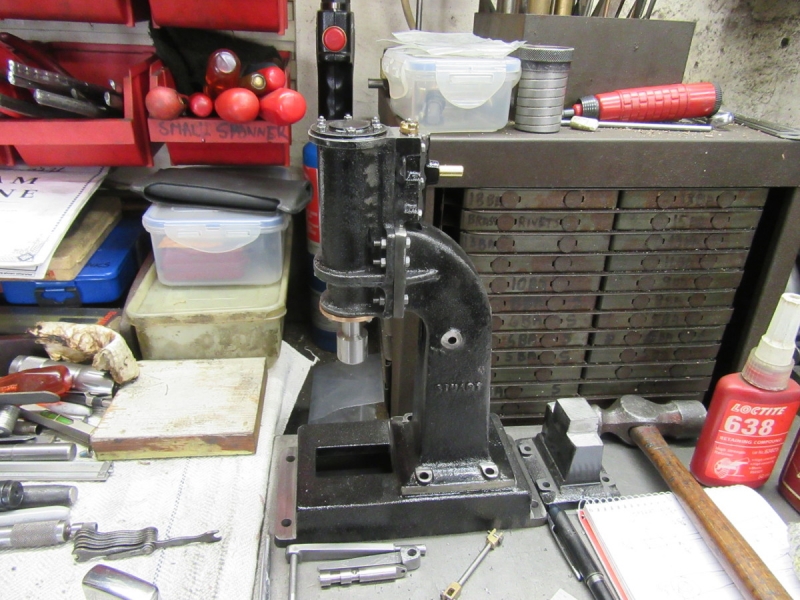
The anvil and base casting fixed down and we are ready for the standard. I put a drop of liquid gasket in, not for the seal but to ensure a perfect bed. Then I put some air on it and 'forged a piece of lead wire. You wouldn't want your finger in there!
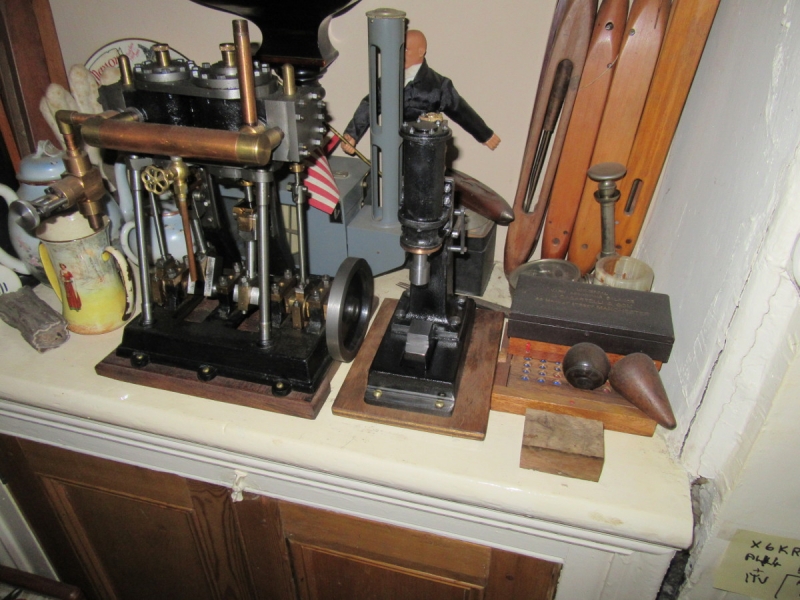
The front room museum is complete once more! I'm not sorry, whatever the next project is I can assure you that it will not have any 7BA tapping involved in it!
I finished the morning by tiding up, putting tools away, giving Mrs Harrison a deep clean and lubricating it as well. Then one final blow, nothing to do with the shed, I swept the path outside the front door after getting rid of all the dead mint stems yesterday. I feel as though I have a straight edge! Onward and upward!
Stanley Challenger Graham
Stanley's View
scg1936 at talktalk.net
"Beware of certitude" (Jimmy Reid)
The floggings will continue until morale improves!
Stanley's View
scg1936 at talktalk.net
"Beware of certitude" (Jimmy Reid)
The floggings will continue until morale improves!
-
Stanley
- Global Moderator
- Posts: 90301
- Joined: 23 Jan 2012, 12:01
- Location: Barnoldswick. Nearer to Heaven than Gloria.
Re: SHED MATTERS 2
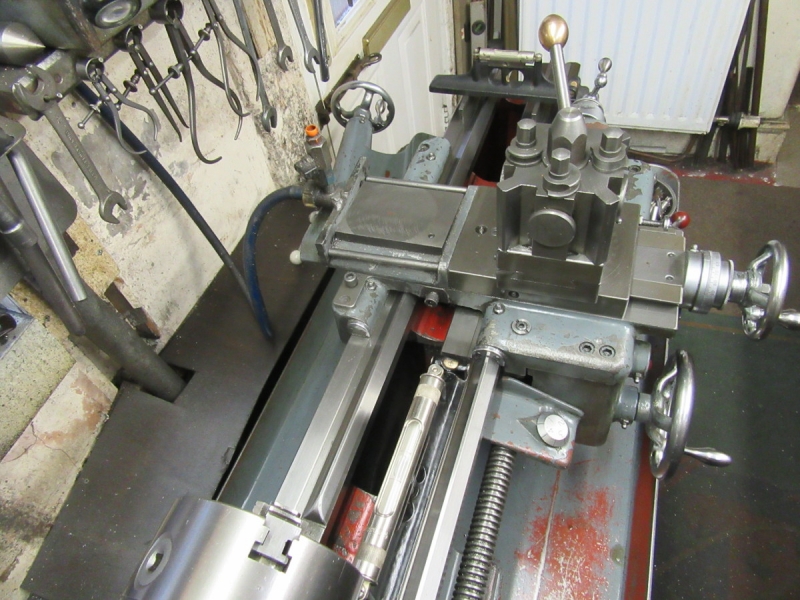
For many of you this morning's work will be bleeding obvious but remember there are some who may learn something. I have a nice tidy shed and a clean lathe and no project in hand. You may remember that a while since I addressed the levelling of Mrs Harrison and because my concrete floor is so soft I made pads for the levelling screws in the base to seat in. I decided to do a check and make sure everything was OK. First job was to get my precision levels out and check that the lathe hadn't settled on the pads. You'll see here that I have one on the ways checking for longitudinal level and the other at the end of the bad mounted on two parallels to get a true reading of the lateral level. Both of them spot on, the lathe hasn't shifted since I installed the pads.

Next I decided to do my other checks even though I doubt if there will be any surprises. For the first check I need an accurate centre in the 3 jaw. All 3 jaws have run out so the way to make sure you have a good centre is to turn one (or in this case true one) in the chuck. Set the top slide at 30 degrees and put as good a finish as you can on it. If you want to have a laugh, take it out of the chuck and put it in again and you'll be surprised how much run out there is!
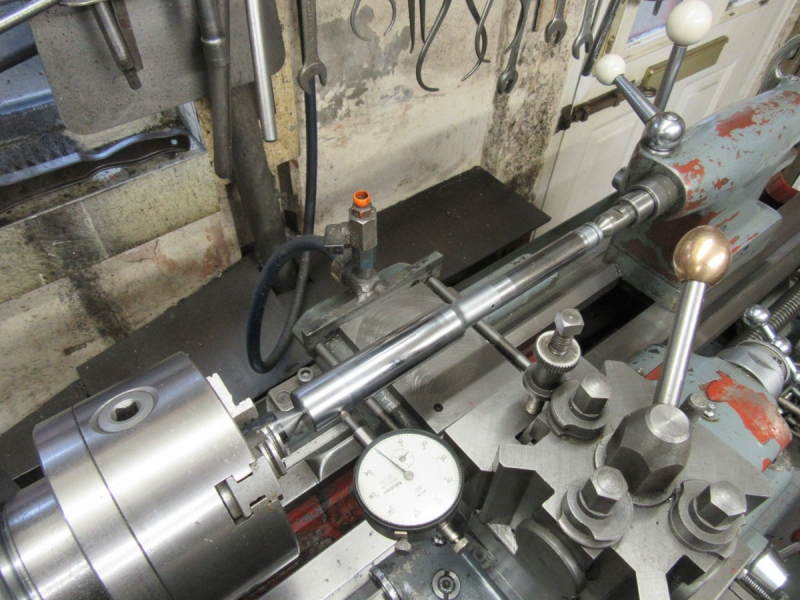
Next you need a test bar that is accurately centred and turned so you know it is parallel. I'm lucky enough to have this one that John Mills gave me, if you haven't got one, make one! Set it up between centres and then use a dial indicator to find out if it is parallel to the lathe or not. This checked out OK but if you find it isn't, find out what the adjustment is on the tailstock and adjust the centre to suit. I didn't do it but you can also check the top side of the bar to check on centre height. adjusting that by shimming or other alteration is more difficult but you will find a way!
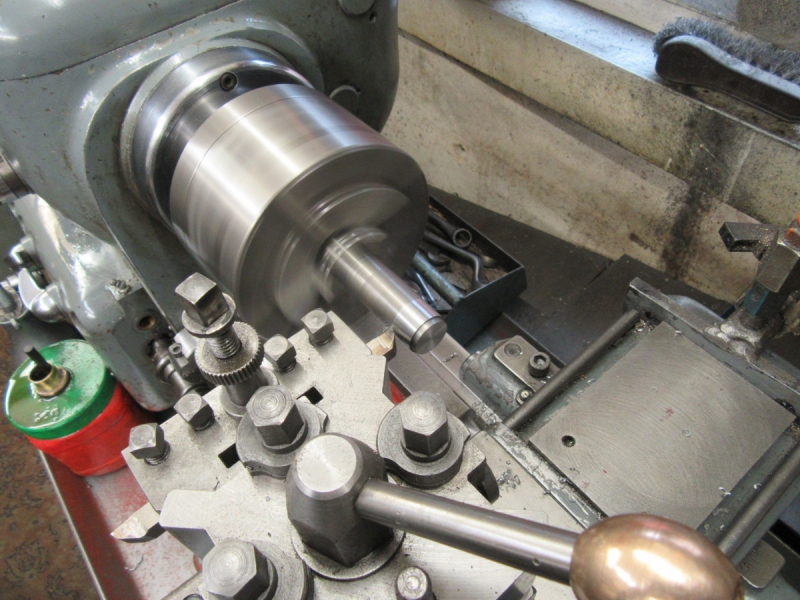
Recognise that your lathe can pass the first two tests and still have a misaligned headstock or other fault. The check for this is to sharpen and hone your tools, pop a piece of scrap bar in the chuck and turn it parallel, as good a finish as you can get. I turned this end down first before reversing it and re-chucking to do the next cut.
Here's the last cut going on the test piece. You don't need much more than this (3.5") as most of your turning is done in this area.
Then without disturbing it, check that it has a parallel face. Mine was within two tenths of a thou over the 3.5", plenty good enough for a lathe this age. Recognise that all sorts of things can affect this, wear in the ways, sloppiness in the gibs on the cross slide and top slide and even whether you are feeding by hand or via the power feed. For what we are doing this is accurate enough!
That's it. I cleaned Mrs Harrison again, put all the tackle away and came out of the shed satisfied. You could say I had wasted my time as I found nothing wrong but that's OK. When I do my next bit of turning I shall have confidence in the lathe and know where my accuracy limits are. You'll be lucky if you can get better results than this with a brand new lathe, in fact they could be much worse. Mrs Harrison is a class act!
Stanley Challenger Graham
Stanley's View
scg1936 at talktalk.net
"Beware of certitude" (Jimmy Reid)
The floggings will continue until morale improves!
Stanley's View
scg1936 at talktalk.net
"Beware of certitude" (Jimmy Reid)
The floggings will continue until morale improves!
-
Stanley
- Global Moderator
- Posts: 90301
- Joined: 23 Jan 2012, 12:01
- Location: Barnoldswick. Nearer to Heaven than Gloria.
Re: SHED MATTERS 2
I don't think so China! That man is barking!
Stanley Challenger Graham
Stanley's View
scg1936 at talktalk.net
"Beware of certitude" (Jimmy Reid)
The floggings will continue until morale improves!
Stanley's View
scg1936 at talktalk.net
"Beware of certitude" (Jimmy Reid)
The floggings will continue until morale improves!
-
Stanley
- Global Moderator
- Posts: 90301
- Joined: 23 Jan 2012, 12:01
- Location: Barnoldswick. Nearer to Heaven than Gloria.
Re: SHED MATTERS 2

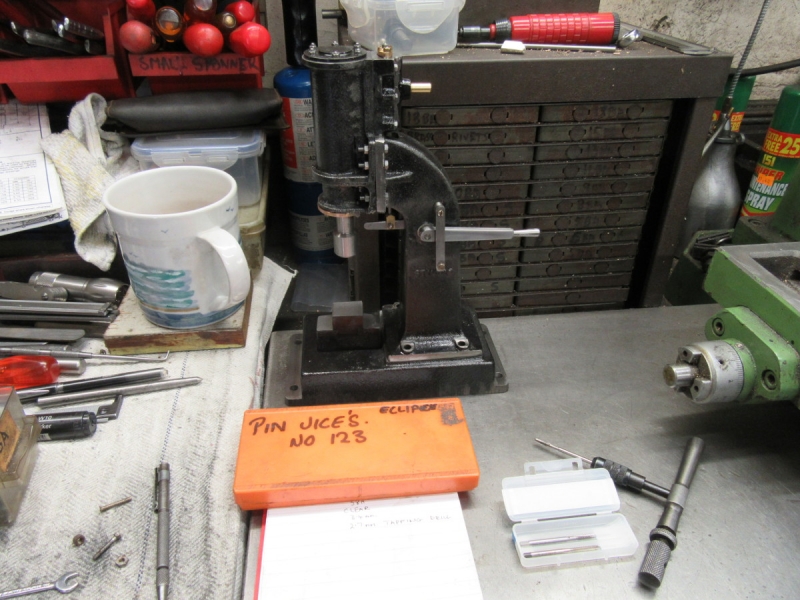
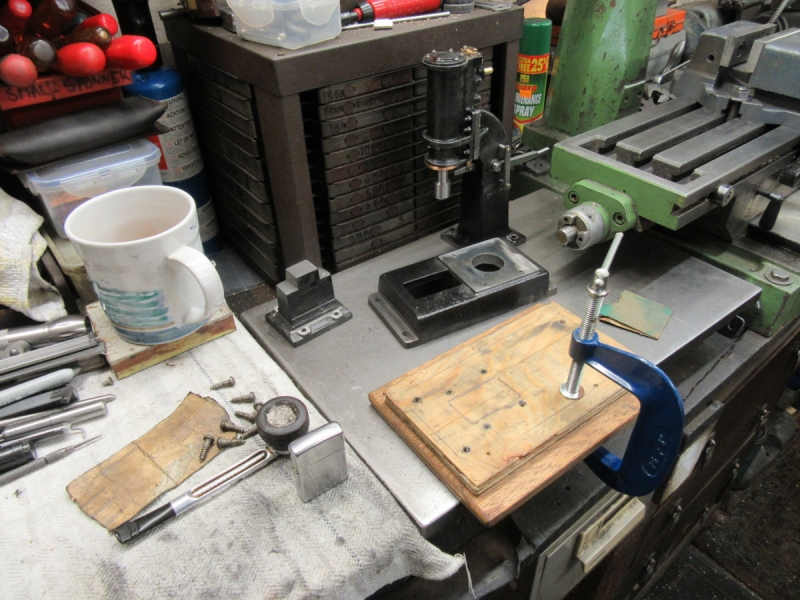
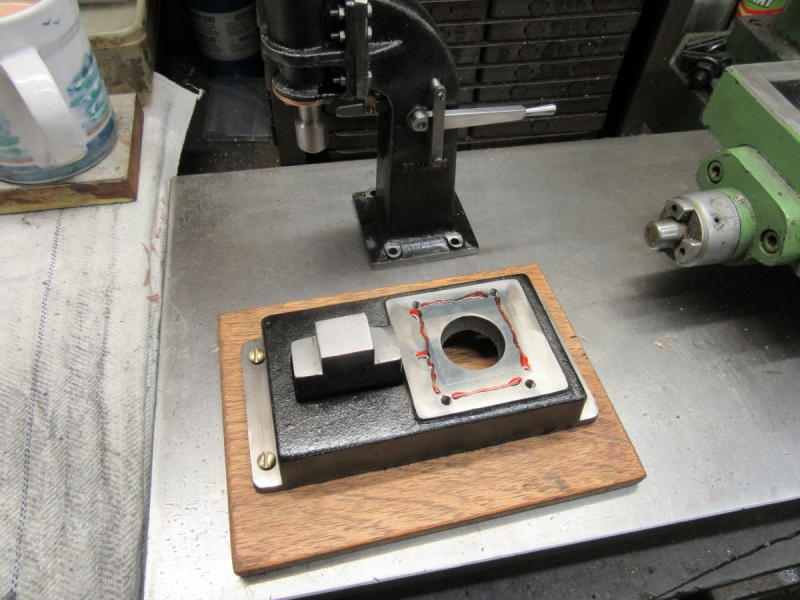
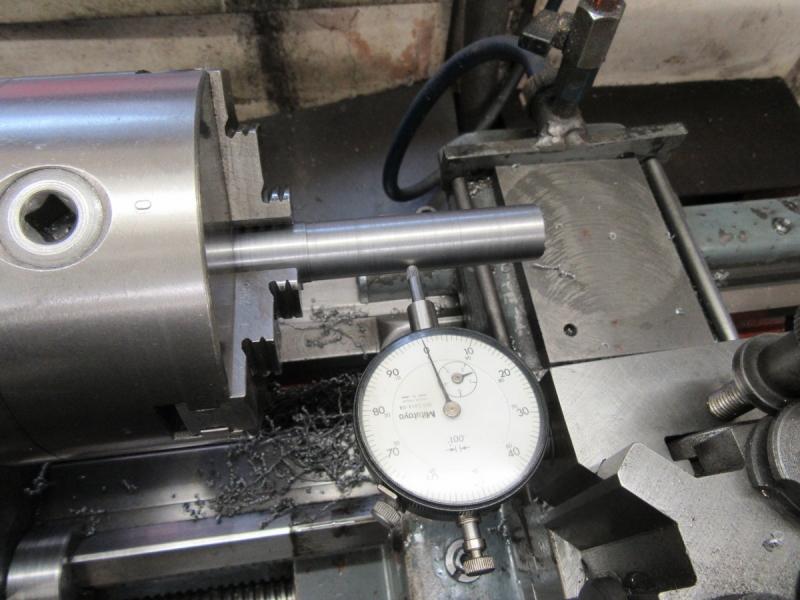
I started the day with the intention of finishing with a small fixture for mounting a dial indicator in the chuck of the mill. I had an idea I had one somewhere and had a furtle. I didn't find it but in the process found this Jacobs No. 18 Super Chuck lurking at the back of a shelf. It's 1/8" to 3/4" capacity but heavy duty with a ball bearing thrust race in it. A new one of these would cost you about £200 today. I need to keep it handy so it gets used. Then I looked for some stock, I am going to have to make a holder from scratch.
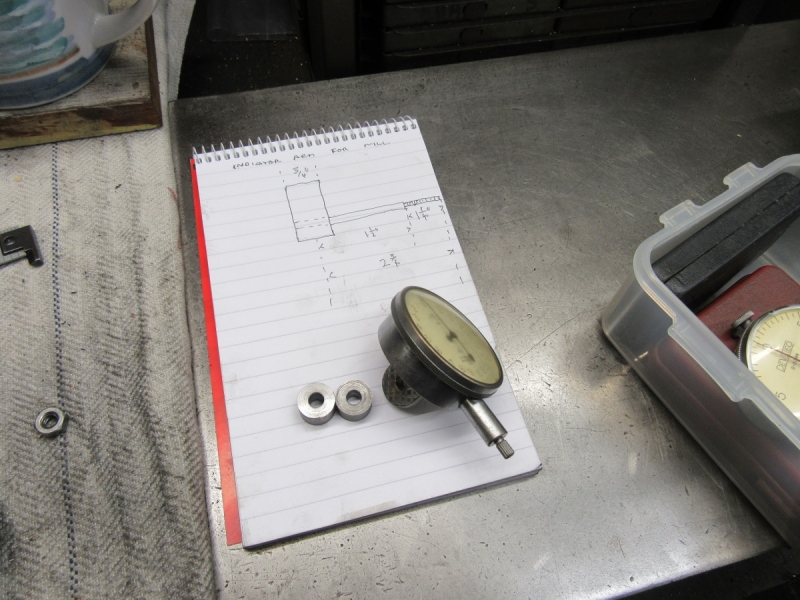
Here's a start, two spacers and a suitable indicator. I went into the drawing office and made a fag packet drawing.
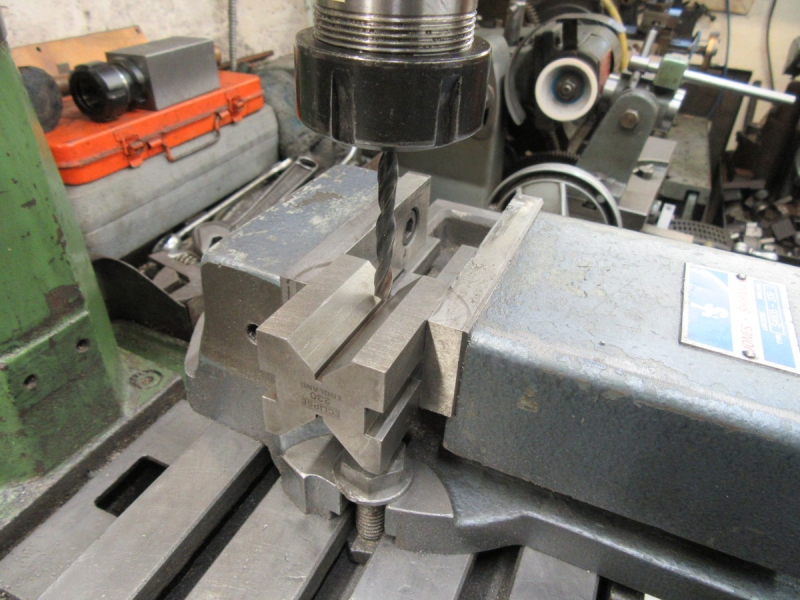
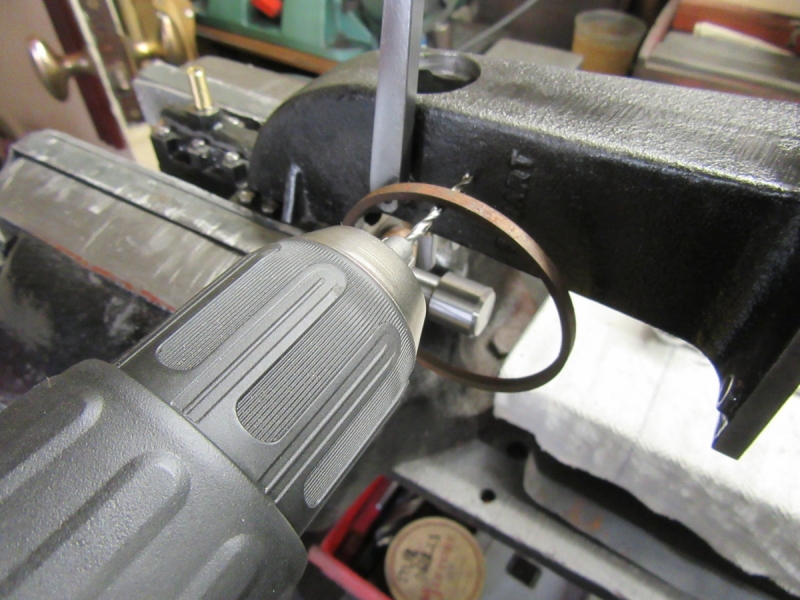
I have to drill a 1/4" hole through the end of this 3/4" shank. I've picked that size because most of the cutters I use are that size and it makes it easier to mount the indicator if I want to. This pic is one of my bleeding obvious tips, if you want to centre a drill bit on a piece of round stock, set it up in the vee block before you mount the stock.
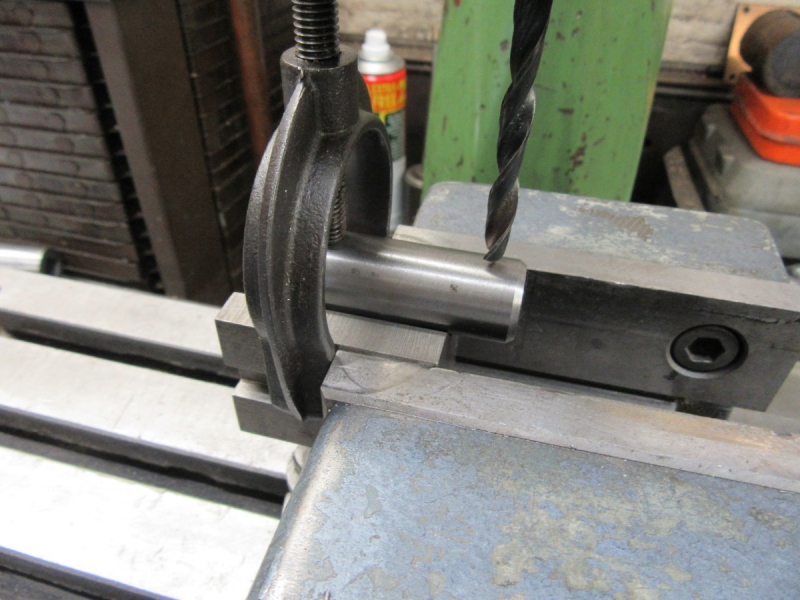
Set up for drilling.....
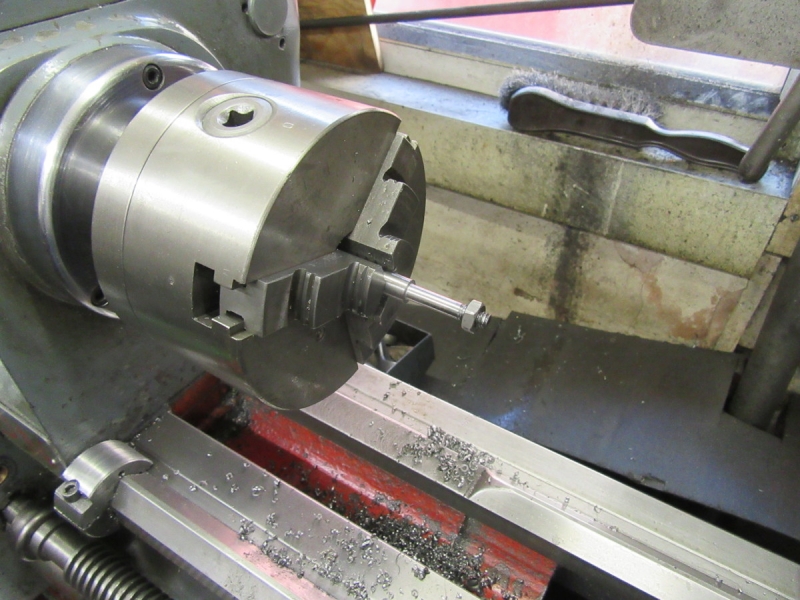
I've got the 3/4" shank made and ready. Now I have to work on the arm for the indicator. I'm making it out of 3/8" rod. This end is finished. I have to knock off here because I have a doctor's appointment but I know exactly where I am and what to do tomorrow.
Stanley Challenger Graham
Stanley's View
scg1936 at talktalk.net
"Beware of certitude" (Jimmy Reid)
The floggings will continue until morale improves!
Stanley's View
scg1936 at talktalk.net
"Beware of certitude" (Jimmy Reid)
The floggings will continue until morale improves!