SHED MATTERS 2
-
Stanley

- Global Moderator

- Posts: 91045
- Joined: 23 Jan 2012, 12:01
- Location: Barnoldswick. Nearer to Heaven than Gloria.
Re: SHED MATTERS 2
It's been too long since I was in the shed making a mess. For some reason I have my mojo back and am determined to get back in there. First job as always will be a tidy up and then I want to convert a cast iron steak pan I have but never use into a smooth bottomed casserole. Perhaps I should finish the name plates first. We'll see but I am definitely ready for re-entry!
Stanley Challenger Graham
Stanley's View
scg1936 at talktalk.net
"Beware of certitude" (Jimmy Reid)
The floggings will continue until morale improves!
Stanley's View
scg1936 at talktalk.net
"Beware of certitude" (Jimmy Reid)
The floggings will continue until morale improves!
-
Stanley
- Global Moderator
- Posts: 91045
- Joined: 23 Jan 2012, 12:01
- Location: Barnoldswick. Nearer to Heaven than Gloria.
Re: SHED MATTERS 2
Cold enough this morning to trigger the heating so the shed got a bit of heat during the night. I left the door between the kitchen and the shed open when we went out for our walk. This has dropped the kitchen temperature to 18C (just over 60F) and the shed is a shade over 50F so I am going in there. Not sure what I shall be doing but at least I'm trying!
Stanley Challenger Graham
Stanley's View
scg1936 at talktalk.net
"Beware of certitude" (Jimmy Reid)
The floggings will continue until morale improves!
Stanley's View
scg1936 at talktalk.net
"Beware of certitude" (Jimmy Reid)
The floggings will continue until morale improves!
Re: SHED MATTERS 2
Hi Stanley , I hope you made it in that shed 
Well I have FINALLY got back to doing the Harrison, the painting was putting me off and after spending two full days sanding , scraping and bodging I was right to be put off lol .
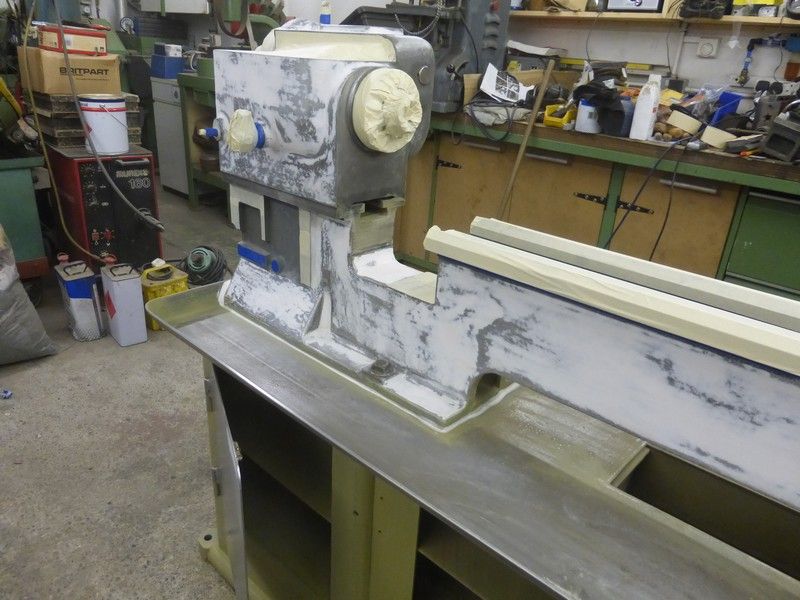
This is the stage the lathe was at from last time, I had to jog my memory what was and was not done.
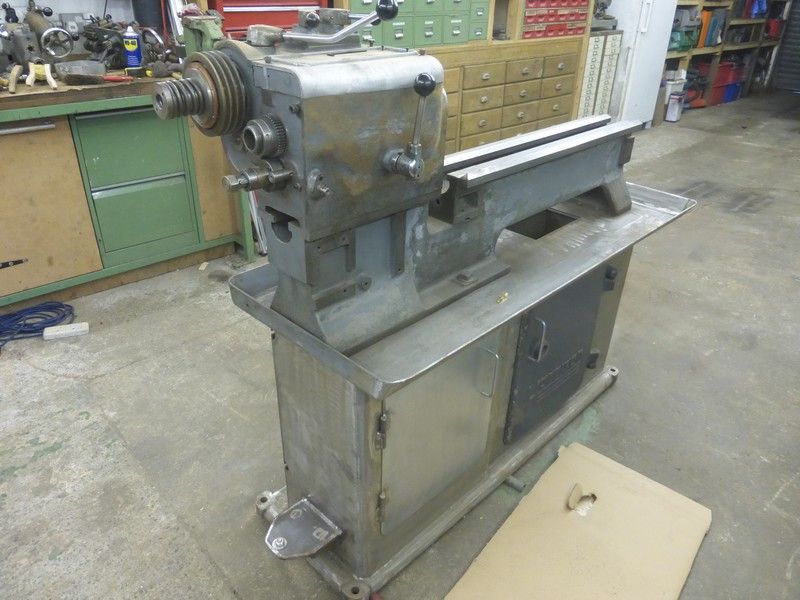
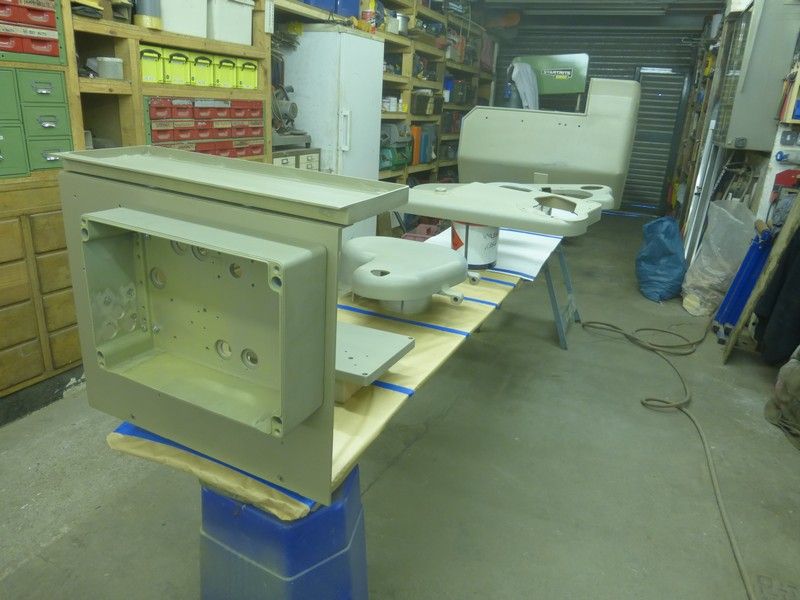
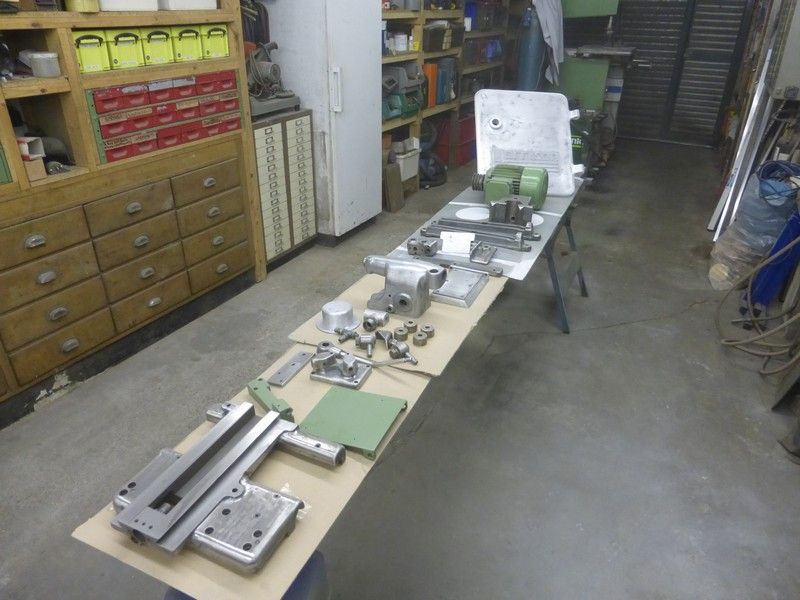
I then had to strip some bits off to make the prep for paint easier , which seemed like the wrong thing to do after its took so long to get back to ! Its the only way to get into things really though. This is after some parts removed and the bits that are still on have been masked up. You can not tell on the photos really but the castings are all back to bare metal so all the factory filler is off so quite a bit of filler needed, all horrible places to sand down too edges to stub fingers on etc. All inside the webs on the bed casting needed sanding and inside the cabinet.
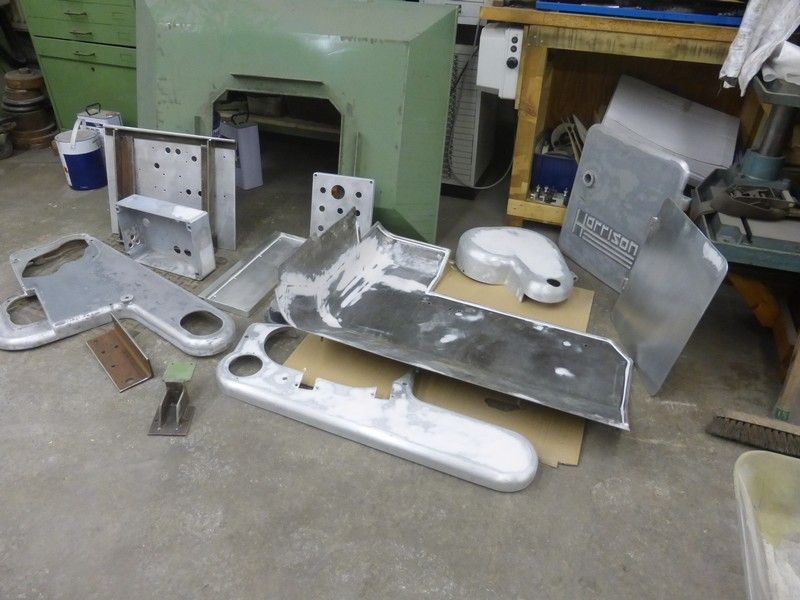
Not to mention this little lot and a few more brackets etc that are not in the photo, every bit needs filler and sanding , all the stuff with gray paint on, had been painted by some naughty school boy as a punishment at some point so all has to be removed as its old caoch paint and scratched and battered and will probably react with the new paint, this is inside most of the covers too so lots of elbow grease involved in getting it al off or to a stage where its sound and smooth.

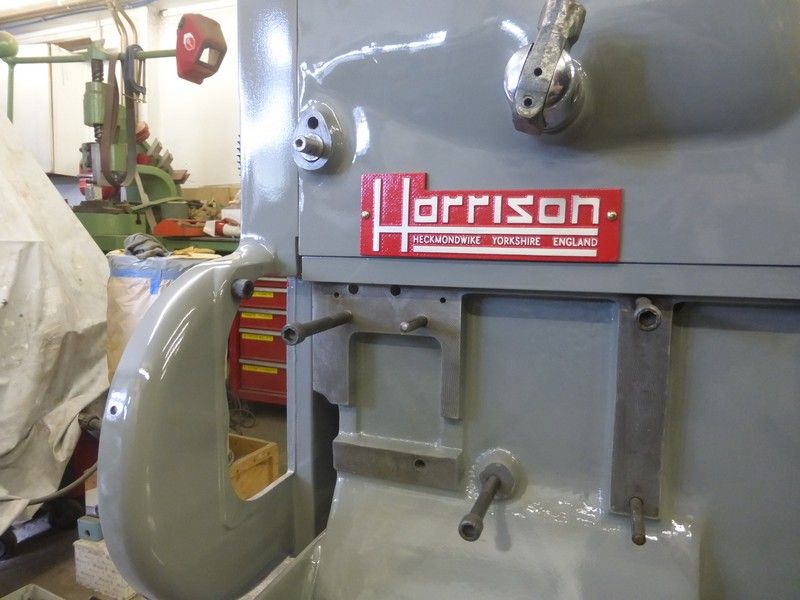
This is the pile of bits after the process, all dents and scratches etc filled and all the old paint gone or sanded to a decent lower layer, The cabinet door with Harrison cast into it still needs more work as it has horrible old paint around the raised letters , this will be pain to get off but the base layer of grey is not bad so I dont want to strip the paint right off as the casting will no doubt be rough and full of filler. I am going to etch prime the lot , check if any more filler is needed then high build primer the lot and the lathe too and do the apron, saddle , gearbox and tailstock as seperate job after...oh and the light the suds tank and frame....... oh and the motor and mounts ....oh and the steadies
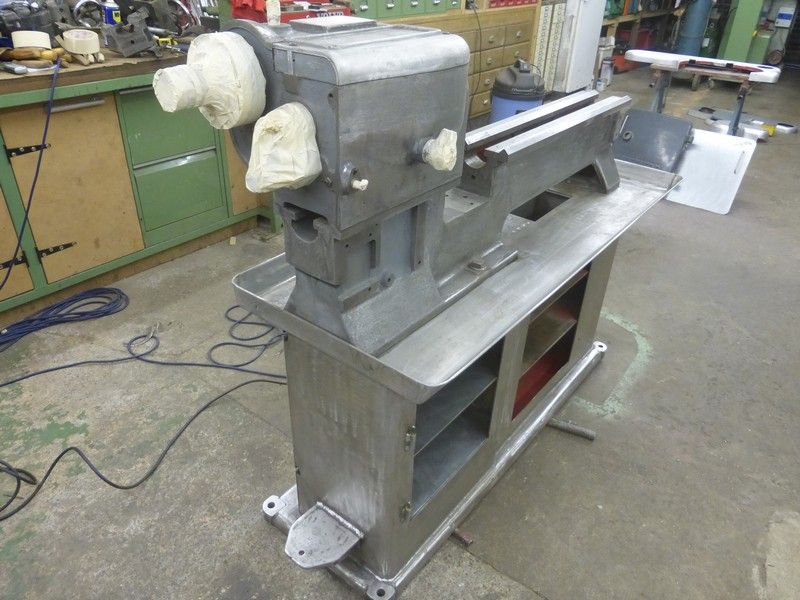
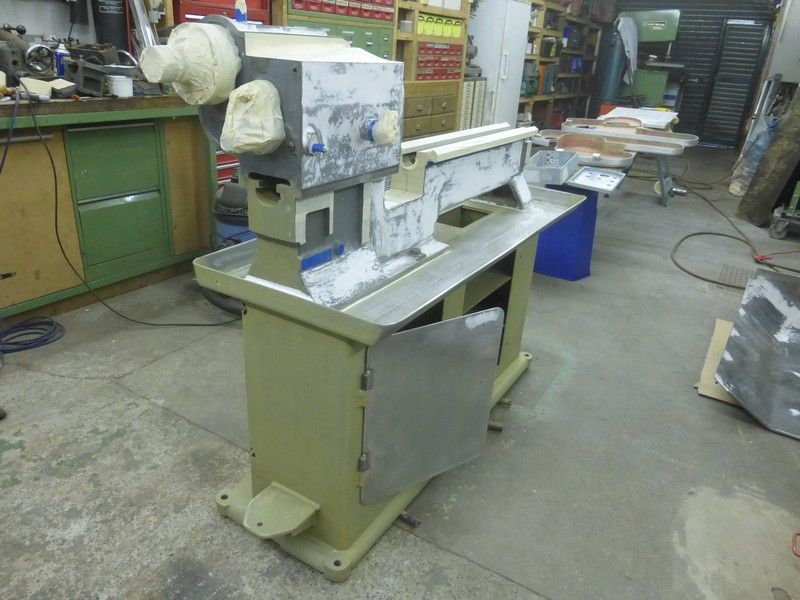
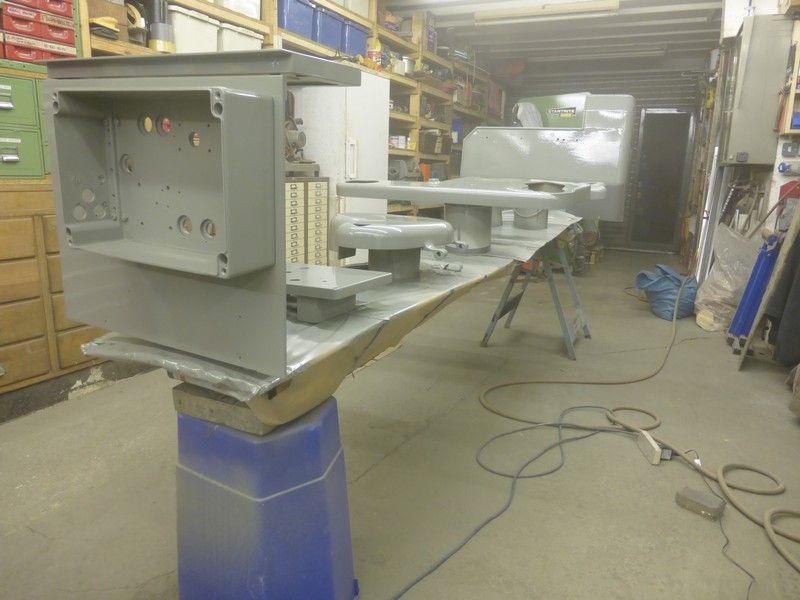
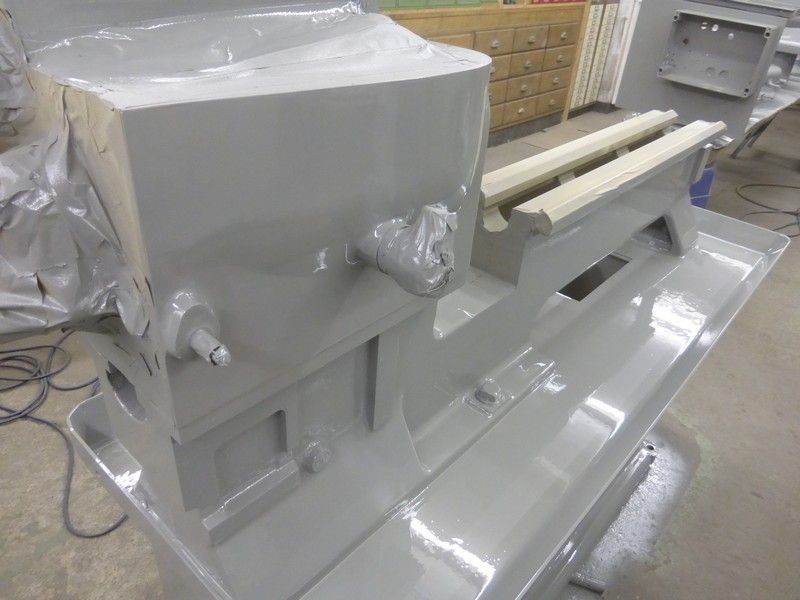
This is the lathe after a few sessions of filler and sanding , I have brush painted etch primer inside the cabinet and on the lower section I will give this a light sand and spray another coat over it when I spray the lathe, I have also sealed around the usual edges that trap oil and crap and done the same around seams on the splash guard. I am hoping to get it etch primed and primed tomorrow, Then a final rub down and grey paint which will be next week now. The plan is to get all this lot painted and then I can assemble the belt guards , motor , electrics box , cabinet doors etc then prep and paint all the other parts the other parts.
Cheers Mick.
Well I have FINALLY got back to doing the Harrison, the painting was putting me off and after spending two full days sanding , scraping and bodging I was right to be put off lol .
This is the stage the lathe was at from last time, I had to jog my memory what was and was not done.

I then had to strip some bits off to make the prep for paint easier , which seemed like the wrong thing to do after its took so long to get back to ! Its the only way to get into things really though. This is after some parts removed and the bits that are still on have been masked up. You can not tell on the photos really but the castings are all back to bare metal so all the factory filler is off so quite a bit of filler needed, all horrible places to sand down too edges to stub fingers on etc. All inside the webs on the bed casting needed sanding and inside the cabinet.

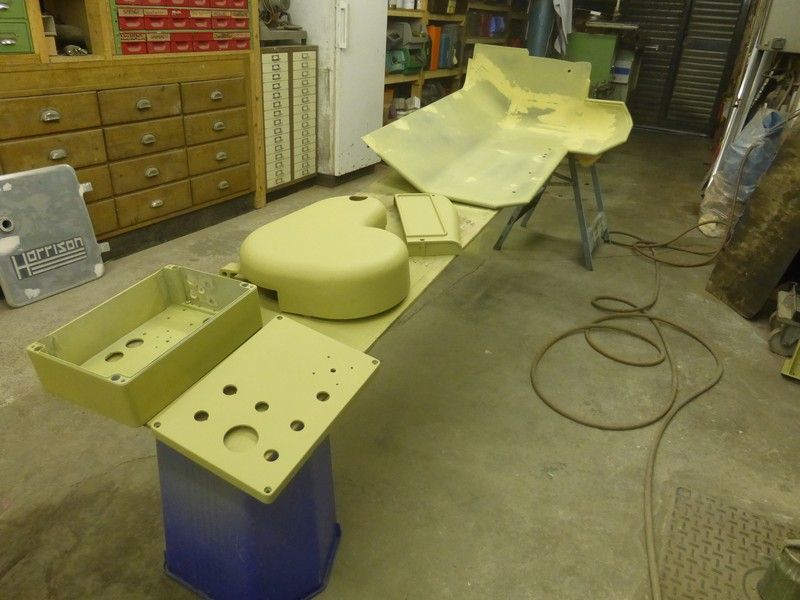
Not to mention this little lot and a few more brackets etc that are not in the photo, every bit needs filler and sanding , all the stuff with gray paint on, had been painted by some naughty school boy as a punishment at some point so all has to be removed as its old caoch paint and scratched and battered and will probably react with the new paint, this is inside most of the covers too so lots of elbow grease involved in getting it al off or to a stage where its sound and smooth.

This is the pile of bits after the process, all dents and scratches etc filled and all the old paint gone or sanded to a decent lower layer, The cabinet door with Harrison cast into it still needs more work as it has horrible old paint around the raised letters , this will be pain to get off but the base layer of grey is not bad so I dont want to strip the paint right off as the casting will no doubt be rough and full of filler. I am going to etch prime the lot , check if any more filler is needed then high build primer the lot and the lathe too and do the apron, saddle , gearbox and tailstock as seperate job after...oh and the light the suds tank and frame....... oh and the motor and mounts ....oh and the steadies

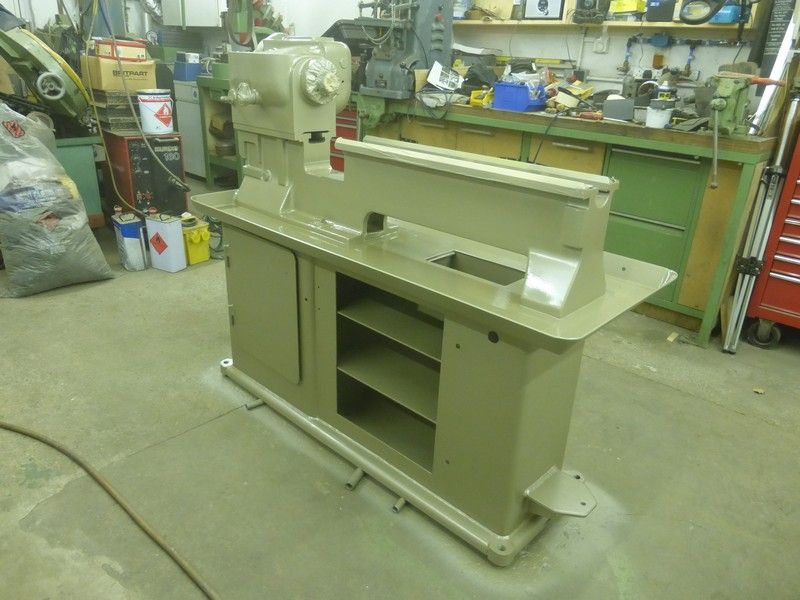
This is the lathe after a few sessions of filler and sanding , I have brush painted etch primer inside the cabinet and on the lower section I will give this a light sand and spray another coat over it when I spray the lathe, I have also sealed around the usual edges that trap oil and crap and done the same around seams on the splash guard. I am hoping to get it etch primed and primed tomorrow, Then a final rub down and grey paint which will be next week now. The plan is to get all this lot painted and then I can assemble the belt guards , motor , electrics box , cabinet doors etc then prep and paint all the other parts the other parts.

Cheers Mick.
-
Stanley
- Global Moderator
- Posts: 91045
- Joined: 23 Jan 2012, 12:01
- Location: Barnoldswick. Nearer to Heaven than Gloria.
Re: SHED MATTERS 2
It's going to look better than when it came out of the works at Heckmondwyke! He had a bit of a tidy in shed. LTP revision is almost finished and I'm running out of excuses for not being in the shed!
Stanley Challenger Graham
Stanley's View
scg1936 at talktalk.net
"Beware of certitude" (Jimmy Reid)
The floggings will continue until morale improves!
Stanley's View
scg1936 at talktalk.net
"Beware of certitude" (Jimmy Reid)
The floggings will continue until morale improves!
Re: SHED MATTERS 2
Hi Stanley , glad to see you got in the shed and at last have the hankering to get your hands dirty again , I have been reading the LTP, very interesting and some real good photos in there too, keep up the good work on both fronts.
Well after another day of none stop masking last minute rubbing down and general cleaning spray guns etc etc , I have made some more progress.
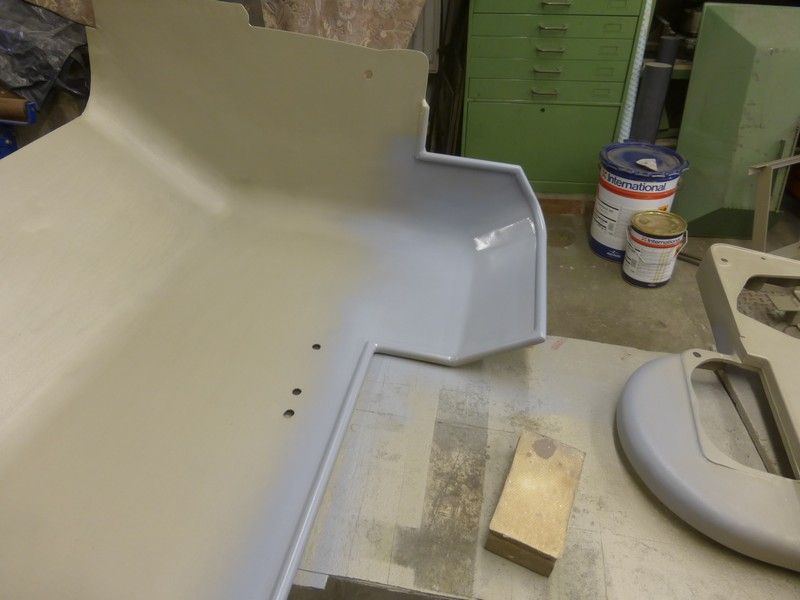
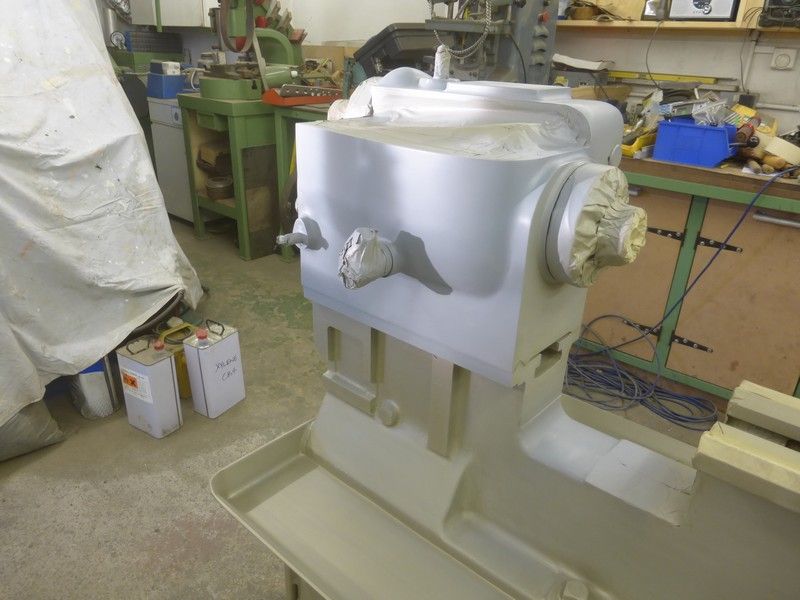
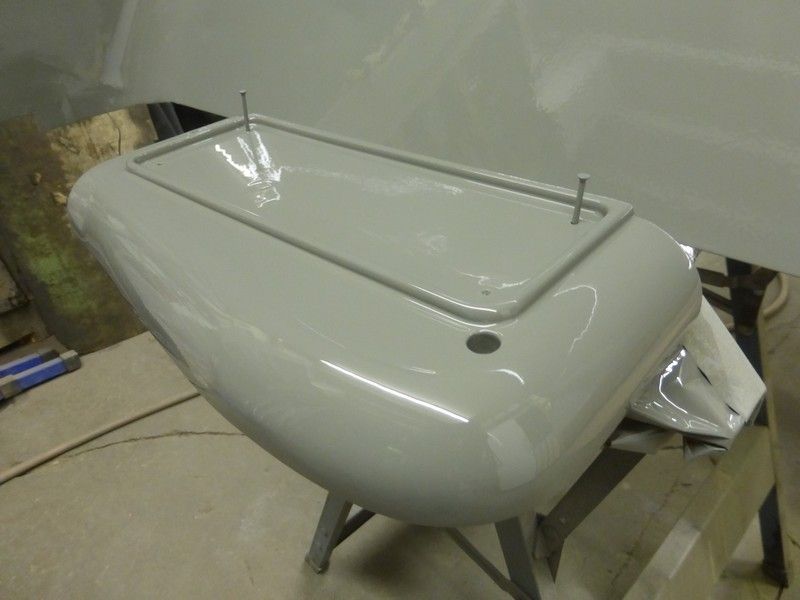
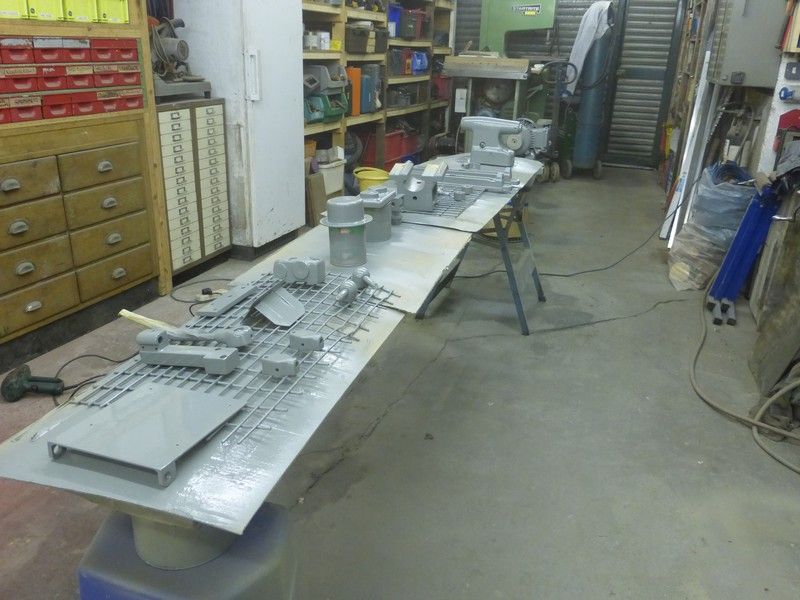
A bit more masking off of machined surfaces and a general sort out and sweep up, panels arranged upside down to do the etch primer underside then once dry turn them over and do the side that matters.
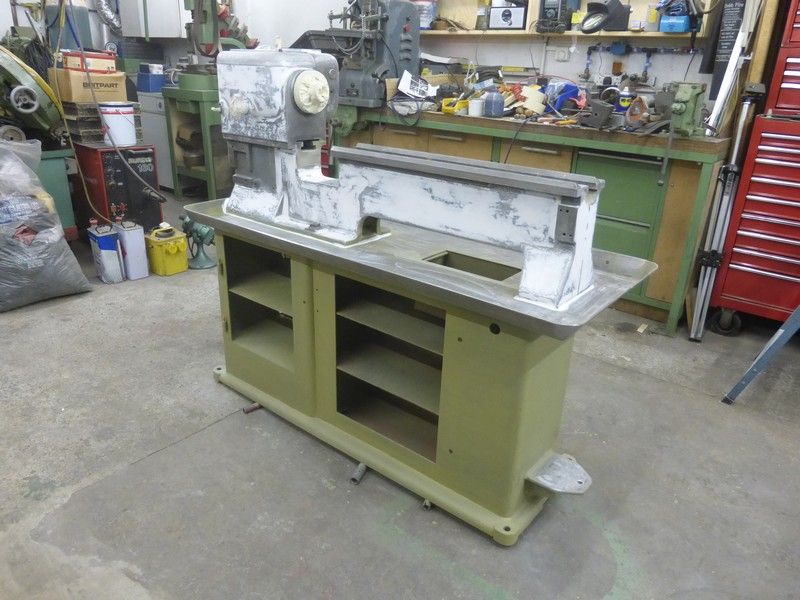
All coated in self etch primer , no nasty surprises and it always looks better when things become one colour , you fell like you are finally getting somewhere. I fitted the one door back onto the cabinet but the other needs a good go over so the primer would not have got done today if I had got the cast door ready too so will do that in with the next batch of parts. It took a bit of messing about to do one side then the other then move some parts so there was room for the other bits but got there in the end.
As I was doing the etch primer I could hear screaching from the compressor belt and the rate at which the pump going was varied, as the etch was drying I truied to tighten up the belt but the motor was already as far as it would go so I had to drill four holes in about 10mm plate where the motor mounts and file them into slots joining the exhisting holes , the compressor if in a cupboard so not an easy task took about two hours but did the job. I then sprayed three coates of high build two pack primer, the castings etc got a bit more so they will flat down nice and smooth, all went well and no reactions of paint so as long as its dried without a hitch its almost ready for the gray top coat. These last shots were taken with the primer still wet.
Cheers Mick
Well after another day of none stop masking last minute rubbing down and general cleaning spray guns etc etc , I have made some more progress.
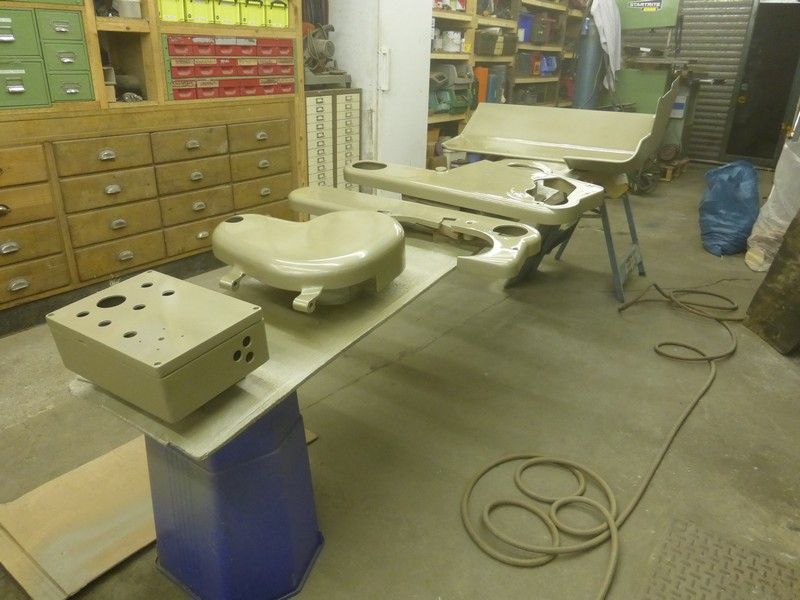
A bit more masking off of machined surfaces and a general sort out and sweep up, panels arranged upside down to do the etch primer underside then once dry turn them over and do the side that matters.


All coated in self etch primer , no nasty surprises and it always looks better when things become one colour , you fell like you are finally getting somewhere. I fitted the one door back onto the cabinet but the other needs a good go over so the primer would not have got done today if I had got the cast door ready too so will do that in with the next batch of parts. It took a bit of messing about to do one side then the other then move some parts so there was room for the other bits but got there in the end.


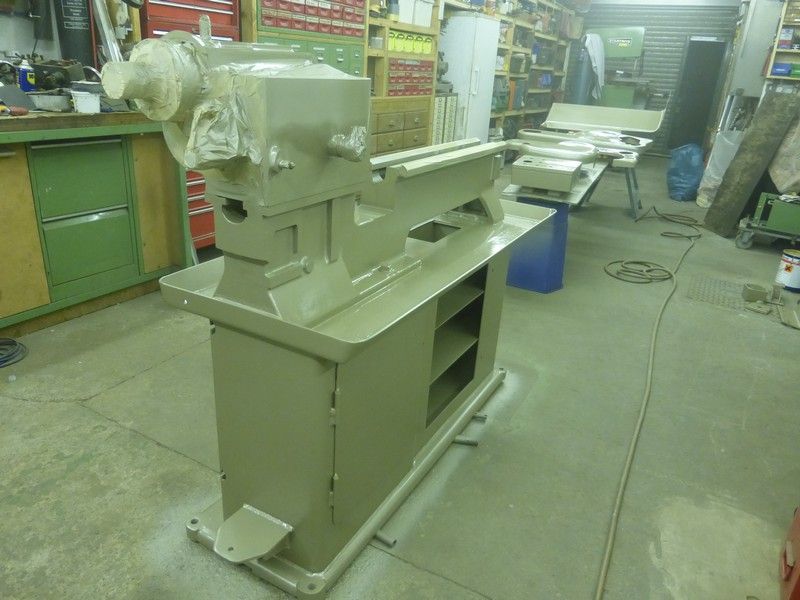
As I was doing the etch primer I could hear screaching from the compressor belt and the rate at which the pump going was varied, as the etch was drying I truied to tighten up the belt but the motor was already as far as it would go so I had to drill four holes in about 10mm plate where the motor mounts and file them into slots joining the exhisting holes , the compressor if in a cupboard so not an easy task took about two hours but did the job. I then sprayed three coates of high build two pack primer, the castings etc got a bit more so they will flat down nice and smooth, all went well and no reactions of paint so as long as its dried without a hitch its almost ready for the gray top coat. These last shots were taken with the primer still wet.


Cheers Mick
-
Stanley
- Global Moderator
- Posts: 91045
- Joined: 23 Jan 2012, 12:01
- Location: Barnoldswick. Nearer to Heaven than Gloria.
Re: SHED MATTERS 2
Concourse standard!
Stanley Challenger Graham
Stanley's View
scg1936 at talktalk.net
"Beware of certitude" (Jimmy Reid)
The floggings will continue until morale improves!
Stanley's View
scg1936 at talktalk.net
"Beware of certitude" (Jimmy Reid)
The floggings will continue until morale improves!
Re: SHED MATTERS 2
Cheers Stanley I am hoping for better than new paint finish
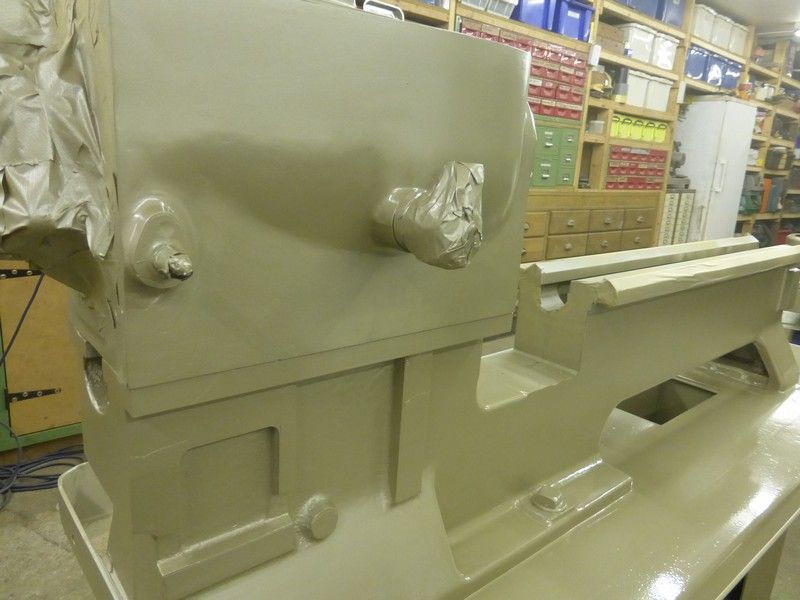
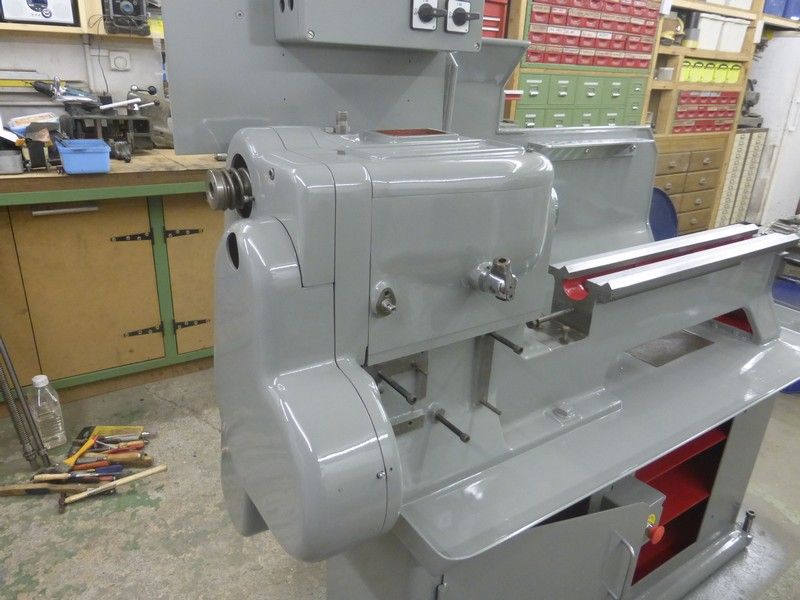
Well I am glad to say things have moved on a bit over the weekend and the main parts of the lathe are now covered in three coats of grey paint. There was the usual messing about trying to sort out how to spread out all the parts to be done and still be able to get around them to paint them, I had to make a couple of brackets and mounts but managed in the end, once spraying I used a hand held lamp to move about and keep the reflection in the right place , this is to see where the paint is covering wet and where the edge of the new wet coat is so you dont get dry areas with no shine or areas getting hit twice and then runs, three of these old scrappy desk lamps packed in on me as I was trying to keep going and get around the bits, I ended up using one of the Ikea LED lamps Doubleboost gave me and it worked spot on.
After rubbing down all the primed bits there is always the odd bit that needs touched up where the primer has flatted through, I did this with rattle can primer as it dries in minutes and needs only very light flat off as its so thin. The grey areas are the rattle can, on the second photo you can see the sun ( that has not been shining for weeks) casting light and shadow right across the headstock , this is a disaster lighting situation for spraying as you have not got a clue where you are hitting , I had to wait like a vampire for the sun to go down as I could not blank off the window easy and it was getting dark soon anyway.
This was the final set up for painting , some bits have been assembled to lessen the area taken up spraying, I would rather stand things up like this than hang them , partly it seems easier and also its amazing how much things can sway about when getting sprayed. The top shelf on the electric box panel is fitted the wrong way around as it will let the paint hit all the areas that will be seen unlike if ifway fitted in its final position
First coat of grey on
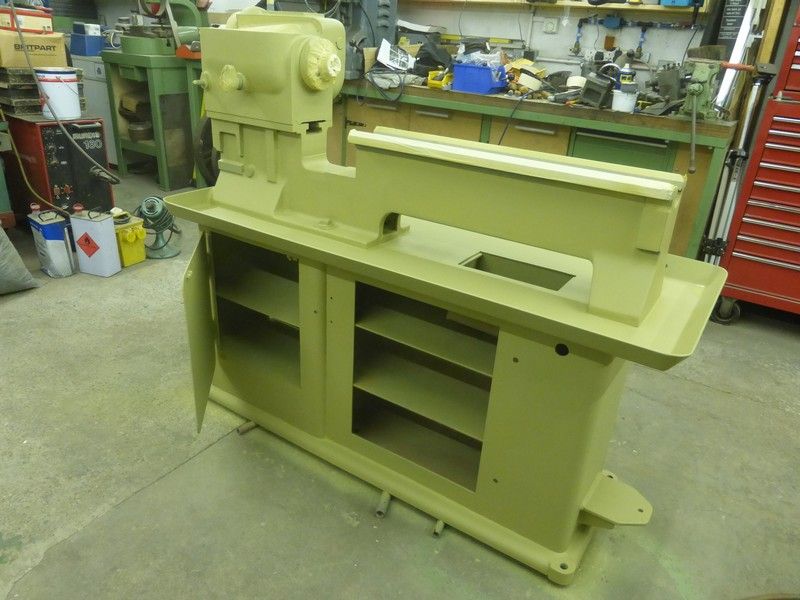
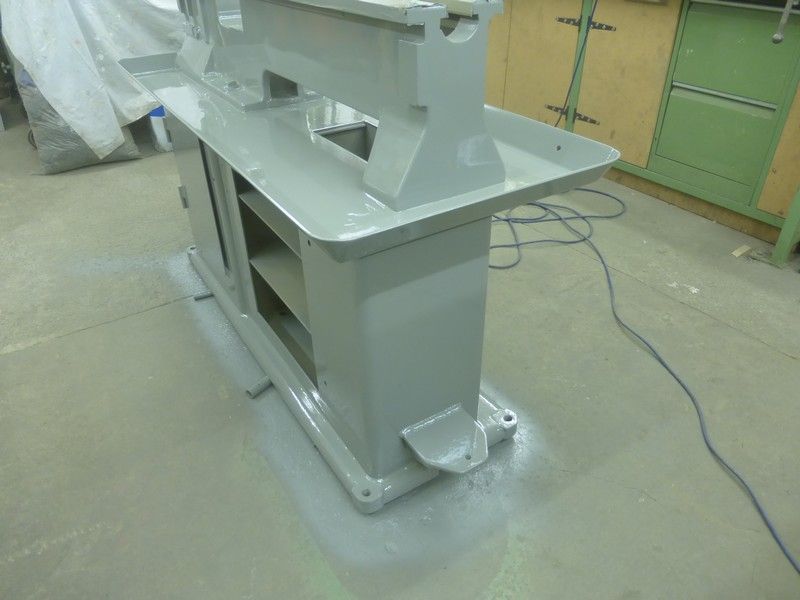
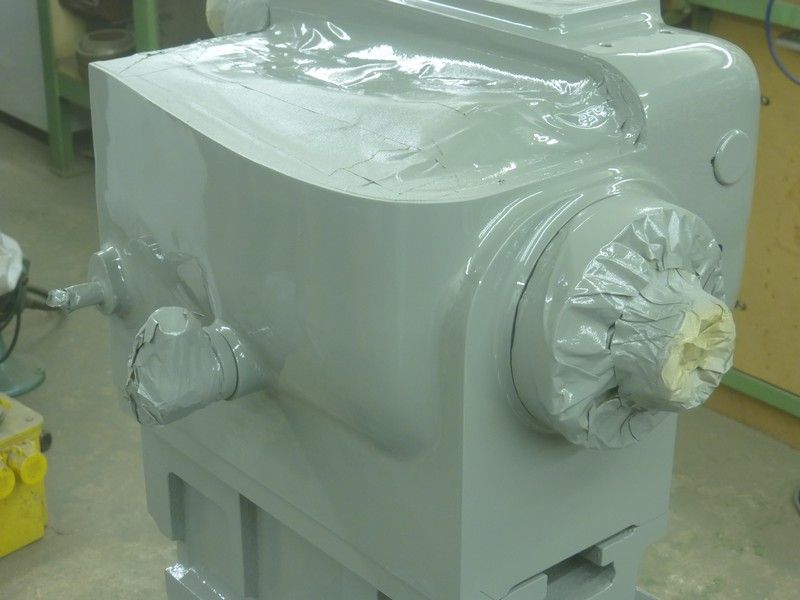
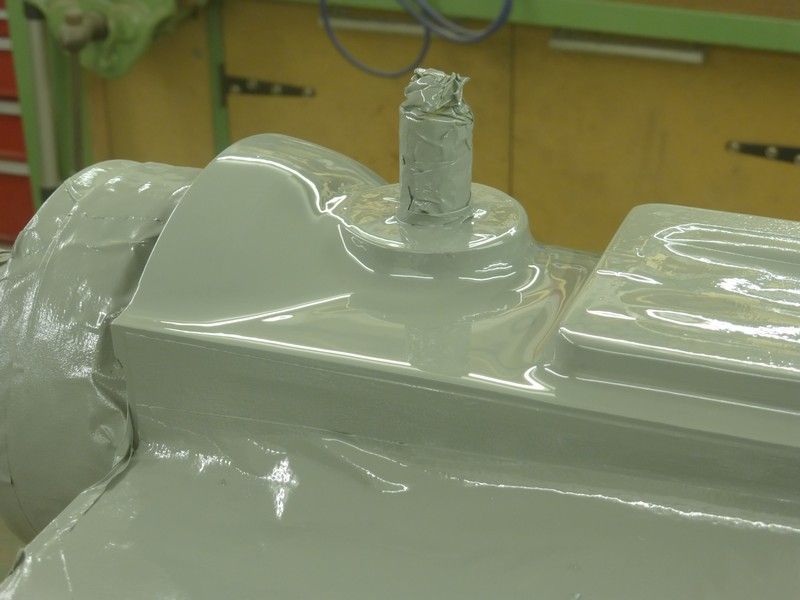
This is the finished job after three coats of gloss, I have pushed it to the limit for not running but I hate dry areas and nice glossy paint is easier to wipe down too. The paint is still sort of wet here so a bit mist in the air still and I also had left the camera on the wrong setting for some of them hence the variation in colour on some photos, its the right colour of the original layer of paint anyway.


I am glad to report that it all dried fine apart from the odd small areas that had a fault or too that would piss you off if on your new Rolls Royce but livable with on a 1959 lathe !
I can start to put some bits back on now and start on batch two of parts that need painting..........more to come soon.
Cheers Mick.
Well I am glad to say things have moved on a bit over the weekend and the main parts of the lathe are now covered in three coats of grey paint. There was the usual messing about trying to sort out how to spread out all the parts to be done and still be able to get around them to paint them, I had to make a couple of brackets and mounts but managed in the end, once spraying I used a hand held lamp to move about and keep the reflection in the right place , this is to see where the paint is covering wet and where the edge of the new wet coat is so you dont get dry areas with no shine or areas getting hit twice and then runs, three of these old scrappy desk lamps packed in on me as I was trying to keep going and get around the bits, I ended up using one of the Ikea LED lamps Doubleboost gave me and it worked spot on.
After rubbing down all the primed bits there is always the odd bit that needs touched up where the primer has flatted through, I did this with rattle can primer as it dries in minutes and needs only very light flat off as its so thin. The grey areas are the rattle can, on the second photo you can see the sun ( that has not been shining for weeks) casting light and shadow right across the headstock , this is a disaster lighting situation for spraying as you have not got a clue where you are hitting , I had to wait like a vampire for the sun to go down as I could not blank off the window easy and it was getting dark soon anyway.


This was the final set up for painting , some bits have been assembled to lessen the area taken up spraying, I would rather stand things up like this than hang them , partly it seems easier and also its amazing how much things can sway about when getting sprayed. The top shelf on the electric box panel is fitted the wrong way around as it will let the paint hit all the areas that will be seen unlike if ifway fitted in its final position

First coat of grey on

This is the finished job after three coats of gloss, I have pushed it to the limit for not running but I hate dry areas and nice glossy paint is easier to wipe down too. The paint is still sort of wet here so a bit mist in the air still and I also had left the camera on the wrong setting for some of them hence the variation in colour on some photos, its the right colour of the original layer of paint anyway.


I am glad to report that it all dried fine apart from the odd small areas that had a fault or too that would piss you off if on your new Rolls Royce but livable with on a 1959 lathe !
I can start to put some bits back on now and start on batch two of parts that need painting..........more to come soon.
Cheers Mick.
Re: SHED MATTERS 2
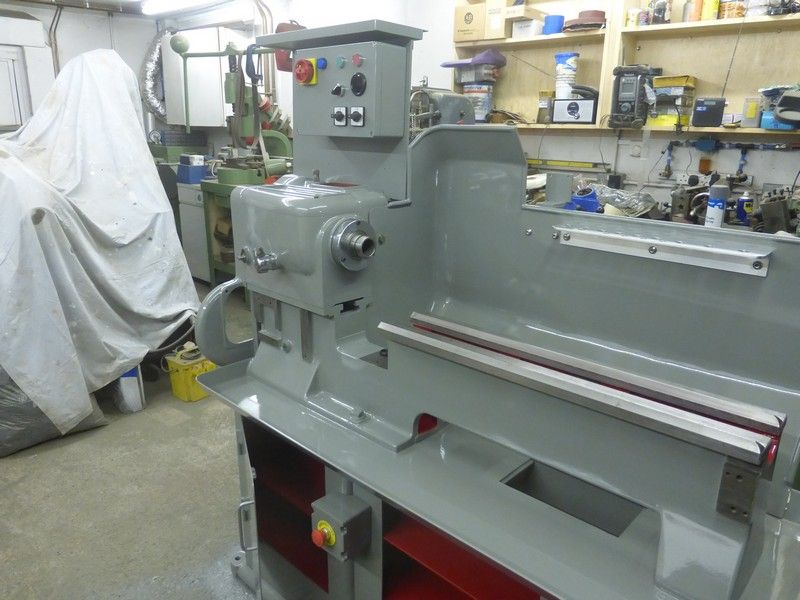
Well there is nowt like putting a few parts back on to make you feel as if you are getting somewhere
I had heating in the garage to keep things warm so it was dry enough to start putting some parts on again today, its dry but still a bit delicate so have to be a bit gentle as I go but so far so good, I need some red paint now to do inside the belt covers before I can really put much more on. The electric boxes are just assembled nothing is wired up yet , I have done these as much to get stuff that is lying about in its final place and make some space.
This is it so far.
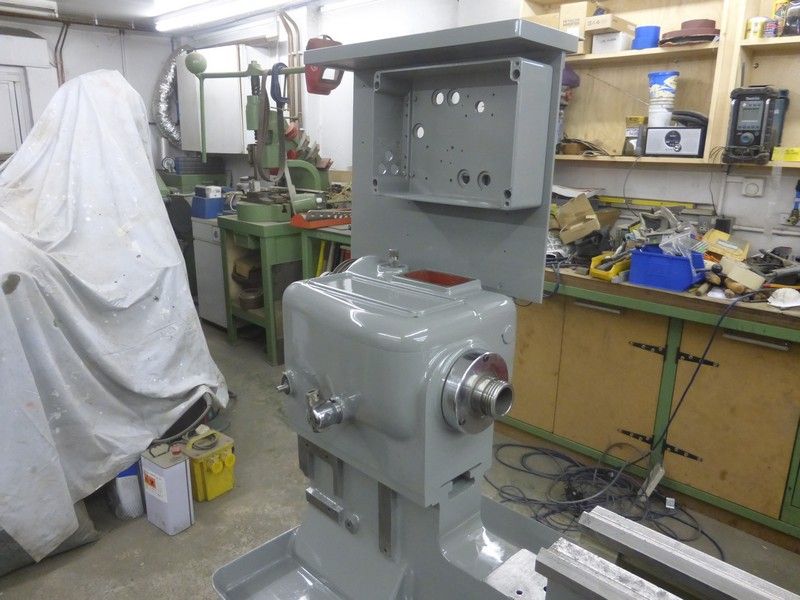
Hoping to get a bit more done tomorrow.
Cheers Mick.
I had heating in the garage to keep things warm so it was dry enough to start putting some parts on again today, its dry but still a bit delicate so have to be a bit gentle as I go but so far so good, I need some red paint now to do inside the belt covers before I can really put much more on. The electric boxes are just assembled nothing is wired up yet , I have done these as much to get stuff that is lying about in its final place and make some space.
This is it so far.


Hoping to get a bit more done tomorrow.
Cheers Mick.
-
Stanley
- Global Moderator
- Posts: 91045
- Joined: 23 Jan 2012, 12:01
- Location: Barnoldswick. Nearer to Heaven than Gloria.
Re: SHED MATTERS 2
What do you do when you get the first scratch Mick. Do it all over again?
Stanley Challenger Graham
Stanley's View
scg1936 at talktalk.net
"Beware of certitude" (Jimmy Reid)
The floggings will continue until morale improves!
Stanley's View
scg1936 at talktalk.net
"Beware of certitude" (Jimmy Reid)
The floggings will continue until morale improves!
Re: SHED MATTERS 2
Hi Stanley , I will never paint anything ever again once this is done ha ha , I will just say a scratch or just gives it character
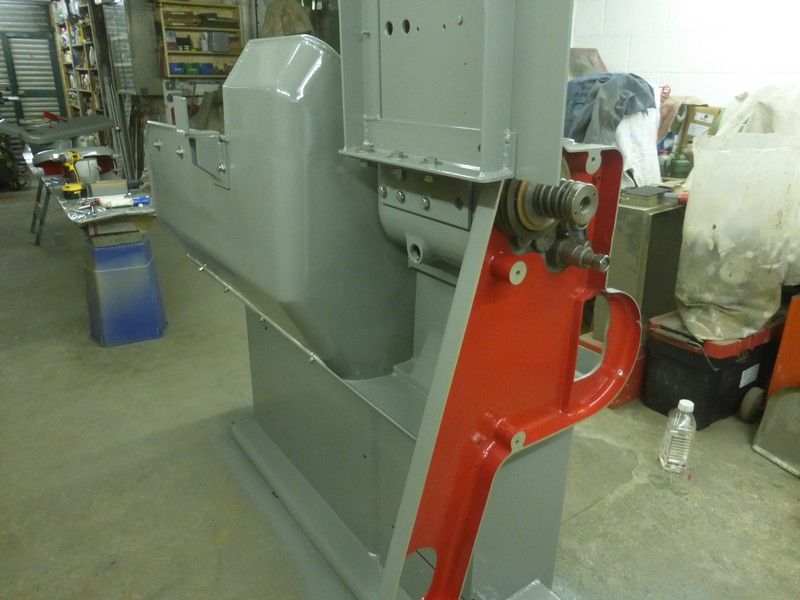
Started putting a few more bits on but first had to paint various parts red inside the webs on the bed to cabinet cupboards and inside belt guards etc. Thanks to John Doubleboost who has some nice proper old fashioned stinky oil based red paint that went on lovely with a soft brush and roller.
This is what it looks like now, I will be to cover over with a sheet and have the room again to prepare the other parts for round two of the painting.


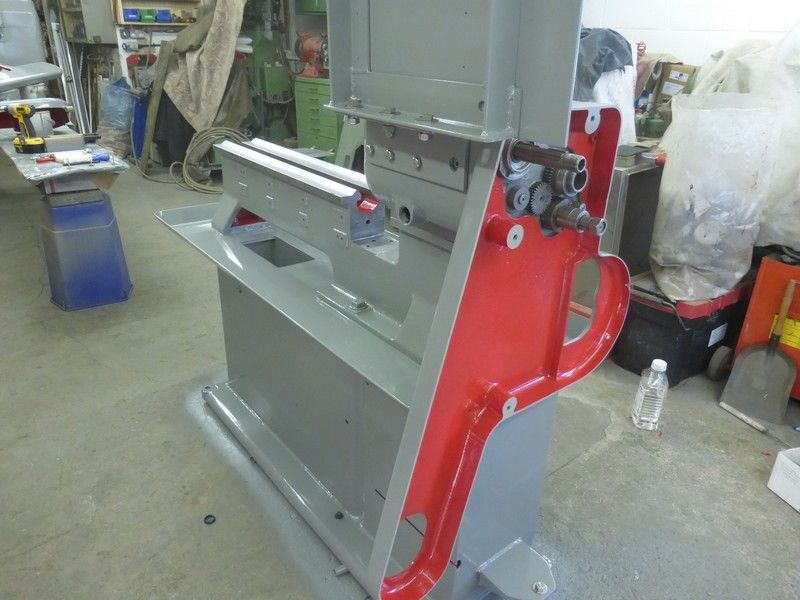
More to come soon .
Cheers Mick.
Started putting a few more bits on but first had to paint various parts red inside the webs on the bed to cabinet cupboards and inside belt guards etc. Thanks to John Doubleboost who has some nice proper old fashioned stinky oil based red paint that went on lovely with a soft brush and roller.
This is what it looks like now, I will be to cover over with a sheet and have the room again to prepare the other parts for round two of the painting.


More to come soon .
Cheers Mick.
-
Stanley
- Global Moderator
- Posts: 91045
- Joined: 23 Jan 2012, 12:01
- Location: Barnoldswick. Nearer to Heaven than Gloria.
Re: SHED MATTERS 2
Yes that's right! My mojo got me in there! The name plates look good on Mick's piece of bar top. Cheated with the screws, simply threaded the wood 1/4" Whit and used these old brass screws. If you want a bit of a shock, look up the price of one and a half inch round headed brass Whitworth thread screws.... Needless to say I have a box full. I would have got it up on the wall but it took me an hour to find the large mirror brackets I had stowed safely away. That's the trouble with being a pack rat!
Stanley Challenger Graham
Stanley's View
scg1936 at talktalk.net
"Beware of certitude" (Jimmy Reid)
The floggings will continue until morale improves!
Stanley's View
scg1936 at talktalk.net
"Beware of certitude" (Jimmy Reid)
The floggings will continue until morale improves!
Re: SHED MATTERS 2
Whey Hey ......................Looks like you are back in business Stanley  .................... I for one am glad to see it and hope you wont be having winter shut down soon as your back in there ha ha.
The Name plates look splendid on their new mount, where are you going to hang them ?
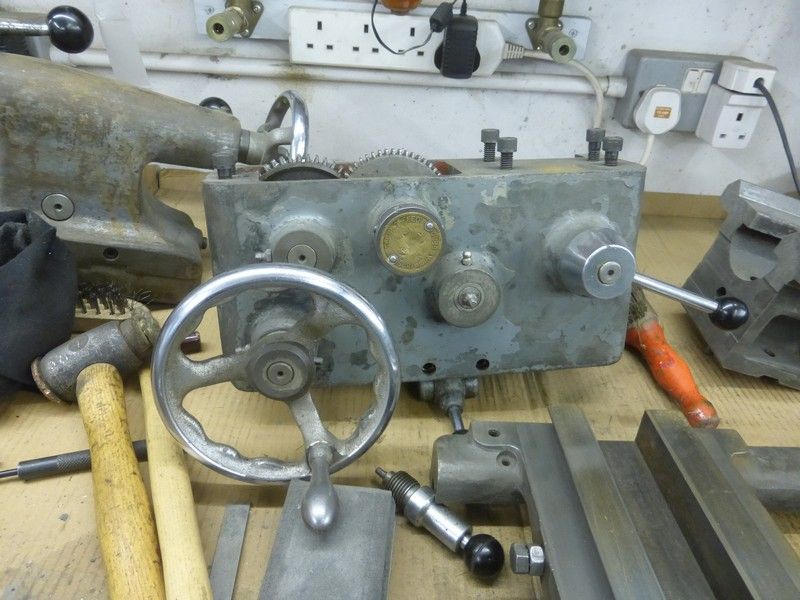
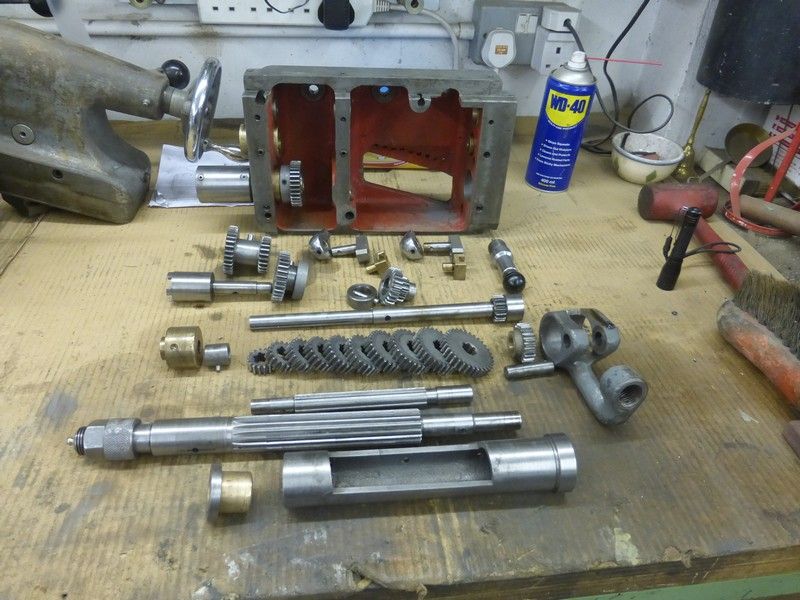
Good to see you back in the shed Stanley , I have stripped the Norton screwcutting gearbox to inspect and fettle it , I had been going to just clean it up and paint it but just can help myself stripping things to the bare bone ha ha.
More phots to follow soon .
Cheers Mick.
The Name plates look splendid on their new mount, where are you going to hang them ?
Good to see you back in the shed Stanley , I have stripped the Norton screwcutting gearbox to inspect and fettle it , I had been going to just clean it up and paint it but just can help myself stripping things to the bare bone ha ha.
More phots to follow soon .
Cheers Mick.
Re: SHED MATTERS 2
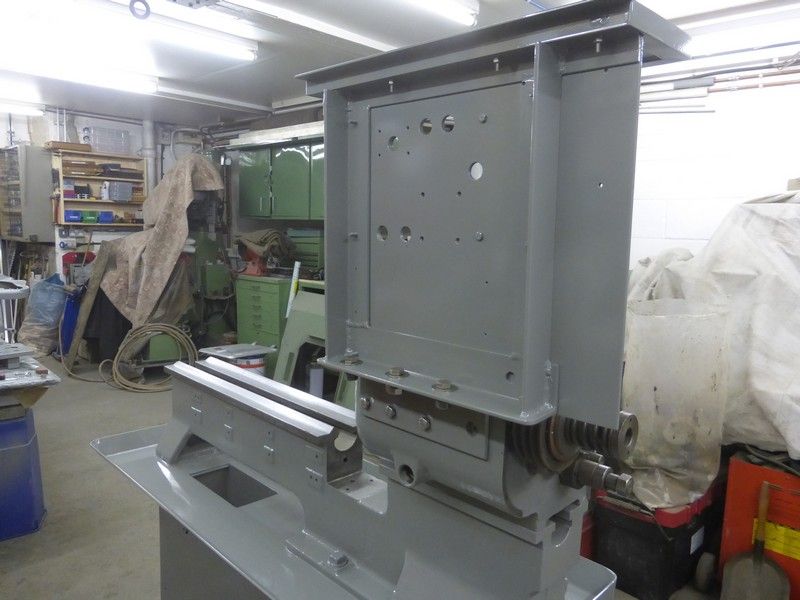
I have started on the other 'bits' of the lathe and decided to do the oily dirty parts first, everything has had a general clean and most of the old paint scraped off ages ago but not clean enough for paint. The main lumps are , The Norton Gearbox, The Apron/saddle/Topslide and the tailstock. As you can see they are all rough looking compared to the lathe now ! . I intend to strip and inspect all these bits and repair/replace anything that is found to be not right, then anything missed will have to be discovered once the lathe is up and running and then go from there, hopefully most things should get fixed before its up and running this way.
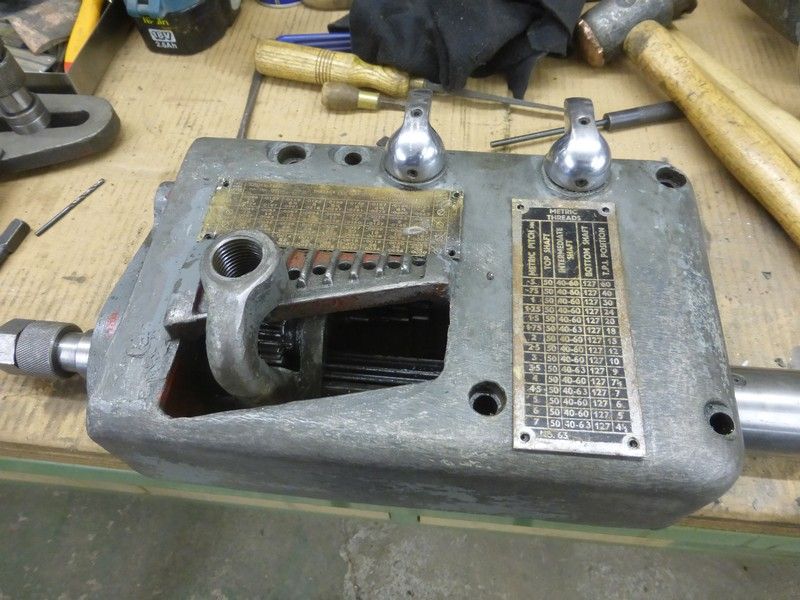
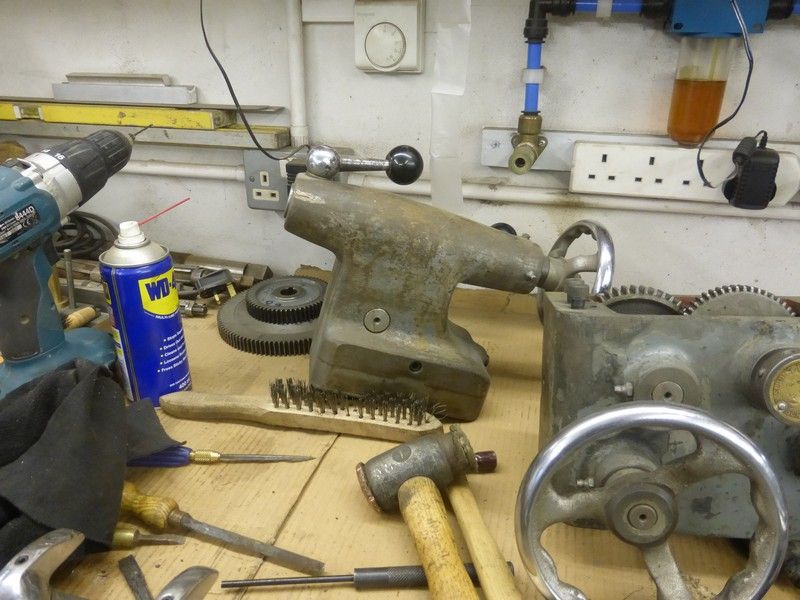
This is what the Norton box looked like after it was 'cleaned' , I have found the two front bronze bushes are worn where the lead screw and feed screw go into the box, I have just de burred all the cogs and generally cleaned up everything, oilways had grease in them as usual. The screw cutting charts will need a cunning plan or they are going to let the job down, there was some new ones on Ebay but the wrong charts.
I have also got the belt covers back on so its looking more like a lathe and less parts lying about too.
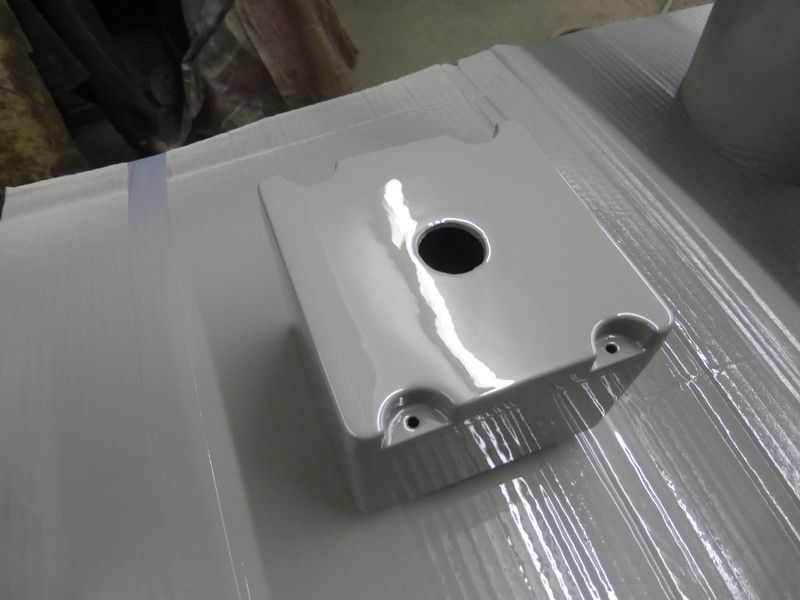
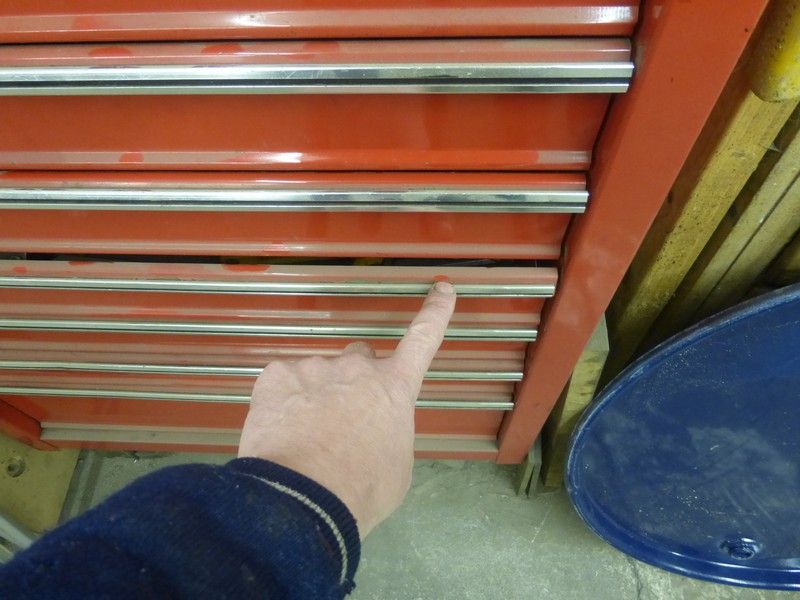
These photos are to show the tool box that was say three feet from the back of the lathe only had grey dust not paint overspray land on it, first shot finger ready to wipe off , second shot same bit wiped clean with finger and paint still red and shiny under the dust, this is a main bonus of this paint.

Cheers Mick


This is what the Norton box looked like after it was 'cleaned' , I have found the two front bronze bushes are worn where the lead screw and feed screw go into the box, I have just de burred all the cogs and generally cleaned up everything, oilways had grease in them as usual. The screw cutting charts will need a cunning plan or they are going to let the job down, there was some new ones on Ebay but the wrong charts.

I have also got the belt covers back on so its looking more like a lathe and less parts lying about too.

These photos are to show the tool box that was say three feet from the back of the lathe only had grey dust not paint overspray land on it, first shot finger ready to wipe off , second shot same bit wiped clean with finger and paint still red and shiny under the dust, this is a main bonus of this paint.


Cheers Mick
-
Stanley
- Global Moderator
- Posts: 91045
- Joined: 23 Jan 2012, 12:01
- Location: Barnoldswick. Nearer to Heaven than Gloria.
Re: SHED MATTERS 2
Ah, where to put it. I have the mirror brackets on but can't make up my mind where to put it. I'll have to have a bit of a think.....
Stanley Challenger Graham
Stanley's View
scg1936 at talktalk.net
"Beware of certitude" (Jimmy Reid)
The floggings will continue until morale improves!
Stanley's View
scg1936 at talktalk.net
"Beware of certitude" (Jimmy Reid)
The floggings will continue until morale improves!
Re: SHED MATTERS 2
I hope you have decided where them plates are going by now Stanley .................and I hope no more posts does not mean its the Shed's winter shut down already ! 
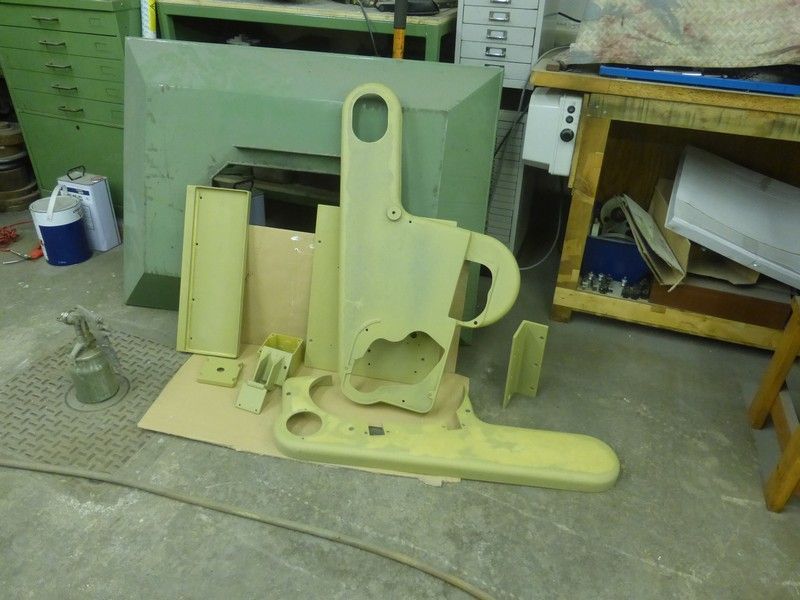
Well I have been grinding all the castings and filling in defects with filler and getting them as good as I can before primer, this batch of stuff was all fiddly ackward bits to do and also ackward to position to paint as both sides needed doing on lots of bits etc, anyway here are the photos.
All prepared
Primed with etch primer , then primer filler.

Grey at last !
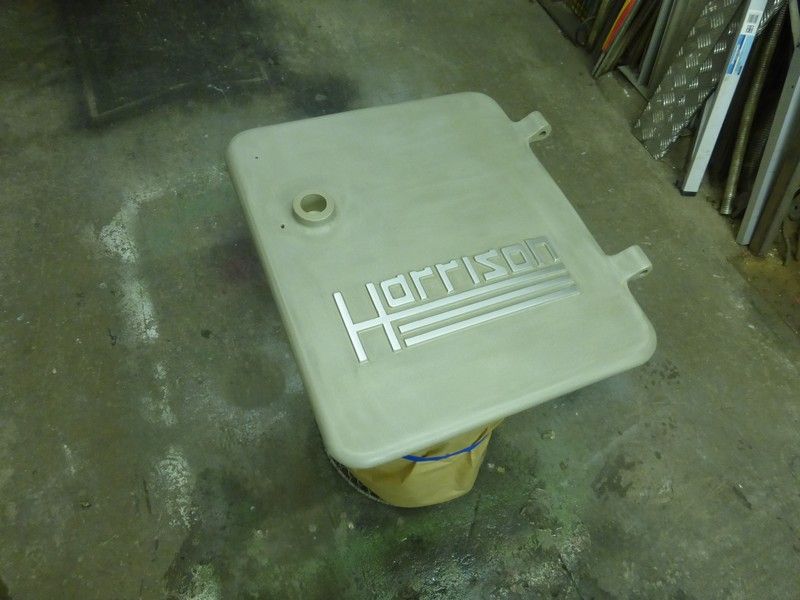
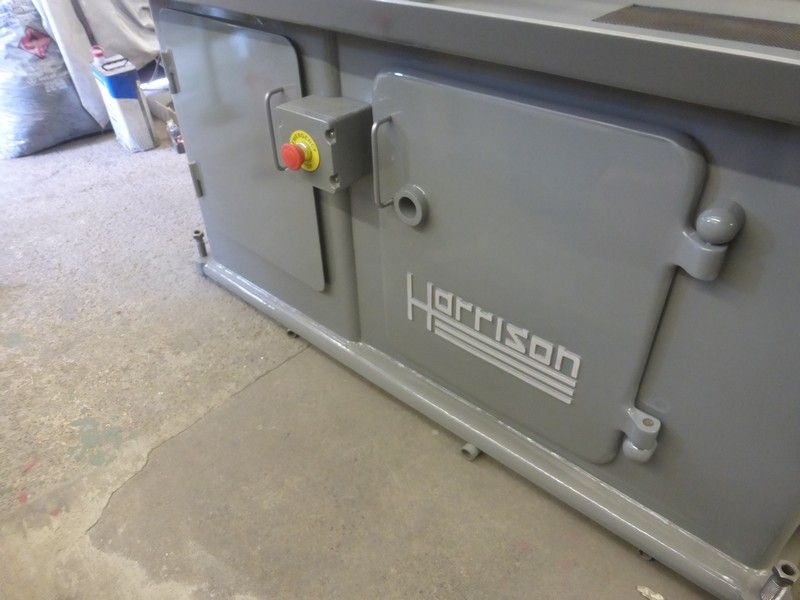
This cast alloy door has been a right pain, it had loads of old primer filler and many layers of horrible old paint on it , that would have reacted to the new paint so I have sanded it back to bare alloy cast and shot blasted around the Harrison lettering then cleaned this up with riffler files etc as I plan on painting the door and having the lettering sanded back to bare alloy.
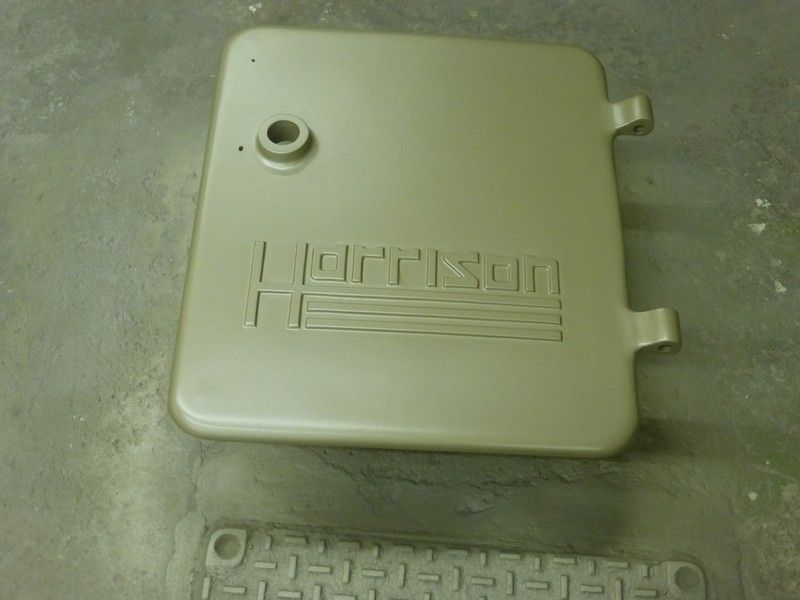
With this in mind I have sanded away the primer on the lettering so it wont have an edge when I sand the grey back to alloy.
The Harrison headstock badge and the gear speed plate badge are getting the same sort of treatment.
As they were

Blasted off
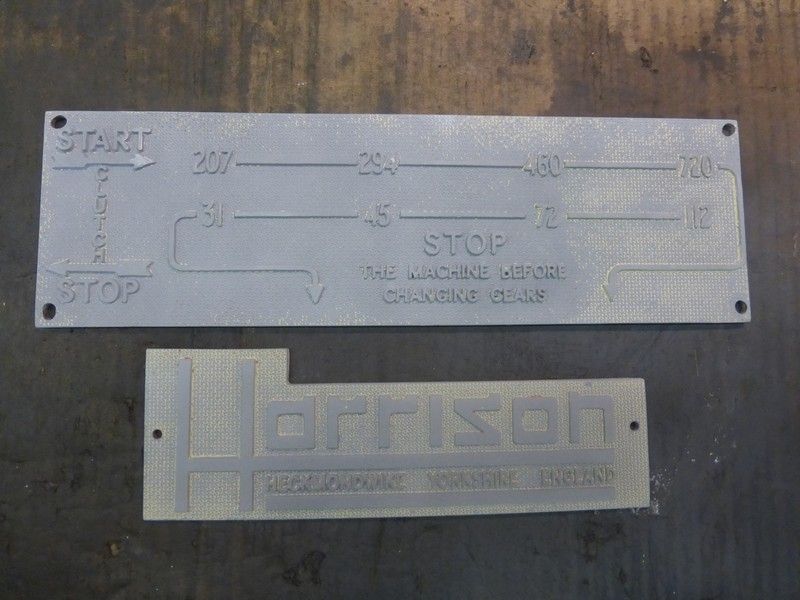
Primed
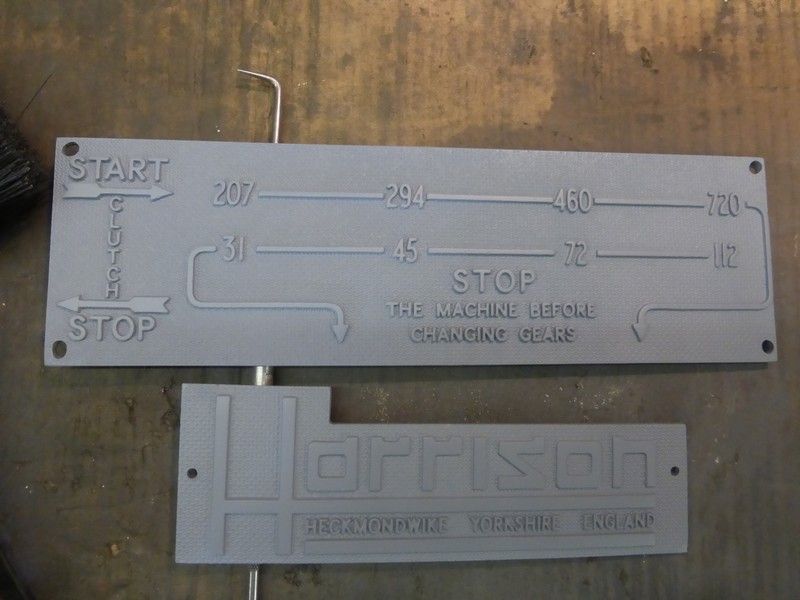
Sanded back to shiny alloy letters

Painted red
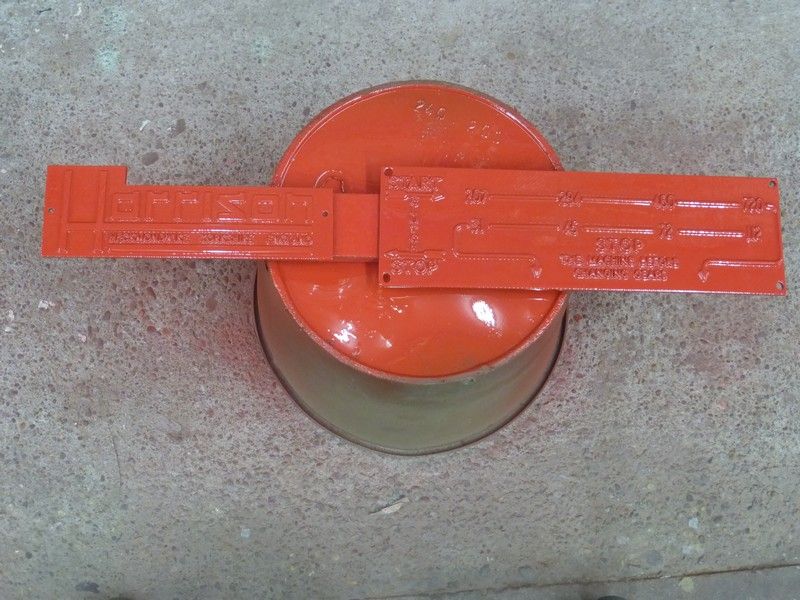
Sanded back to alloy on the writing
I should have been happy at that but thought , why not laquer them. The Laquer melted the red and spoilt the job so I will try going over with red again, if it does not work it will be back to metal and start again !
At least I can start to put some more bits back on again now .
Cheers Mick.
Well I have been grinding all the castings and filling in defects with filler and getting them as good as I can before primer, this batch of stuff was all fiddly ackward bits to do and also ackward to position to paint as both sides needed doing on lots of bits etc, anyway here are the photos.
All prepared

Primed with etch primer , then primer filler.

Grey at last !

This cast alloy door has been a right pain, it had loads of old primer filler and many layers of horrible old paint on it , that would have reacted to the new paint so I have sanded it back to bare alloy cast and shot blasted around the Harrison lettering then cleaned this up with riffler files etc as I plan on painting the door and having the lettering sanded back to bare alloy.

With this in mind I have sanded away the primer on the lettering so it wont have an edge when I sand the grey back to alloy.

The Harrison headstock badge and the gear speed plate badge are getting the same sort of treatment.
As they were

Blasted off

Primed

Sanded back to shiny alloy letters

Painted red

Sanded back to alloy on the writing

I should have been happy at that but thought , why not laquer them. The Laquer melted the red and spoilt the job so I will try going over with red again, if it does not work it will be back to metal and start again !
At least I can start to put some more bits back on again now .
Cheers Mick.
-
Stanley
- Global Moderator
- Posts: 91045
- Joined: 23 Jan 2012, 12:01
- Location: Barnoldswick. Nearer to Heaven than Gloria.
Re: SHED MATTERS 2
Mick, your OCD is poking through!
Stanley Challenger Graham
Stanley's View
scg1936 at talktalk.net
"Beware of certitude" (Jimmy Reid)
The floggings will continue until morale improves!
Stanley's View
scg1936 at talktalk.net
"Beware of certitude" (Jimmy Reid)
The floggings will continue until morale improves!
Re: SHED MATTERS 2
Hi all, a bit more done on the lathe. You are probably right about the OCD Stanley but you know the old saying , " if a jobs worth doing , its worth doing right "
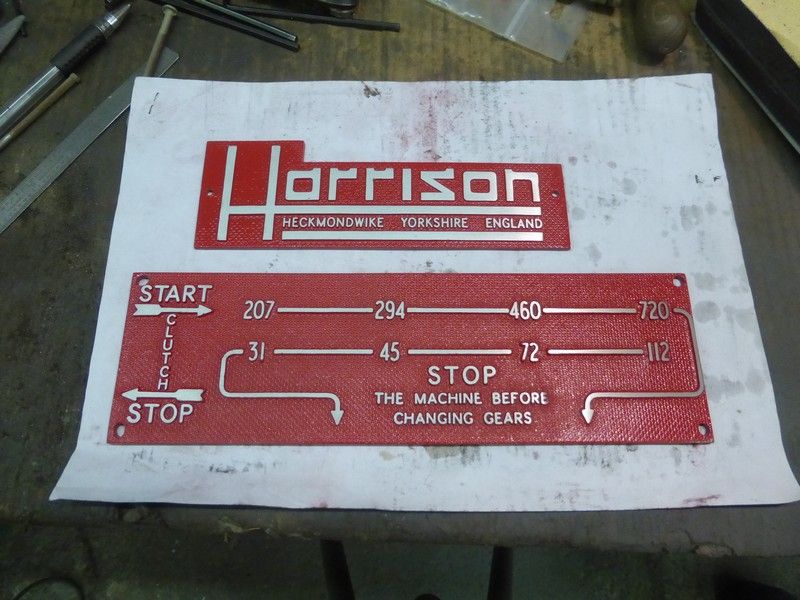
I have ended up re sanding the badges and just re spraying red , then sanding back to alloy leaving a sort of fine brushed finish on the alloy and not laquering them this time, the headstock badge is attached with correct twist screw type rivets kindly donated by Bob KRV3000. The cabinet door was given the same treatment and looks ok , I was going to mask off a square around the Harrison letters and spray red then sand back to alloy again but I think the red might wrinkle the grey and the paint is not hard enough to mask onto yet anyway.

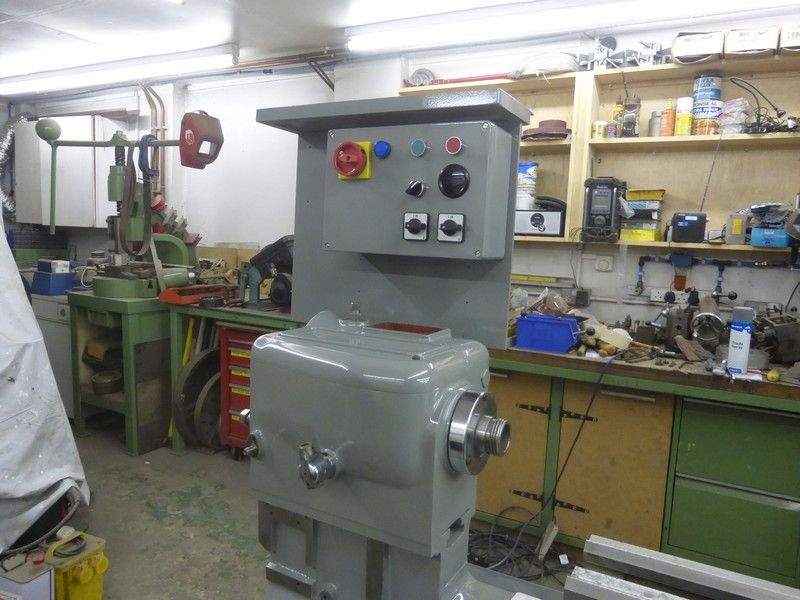
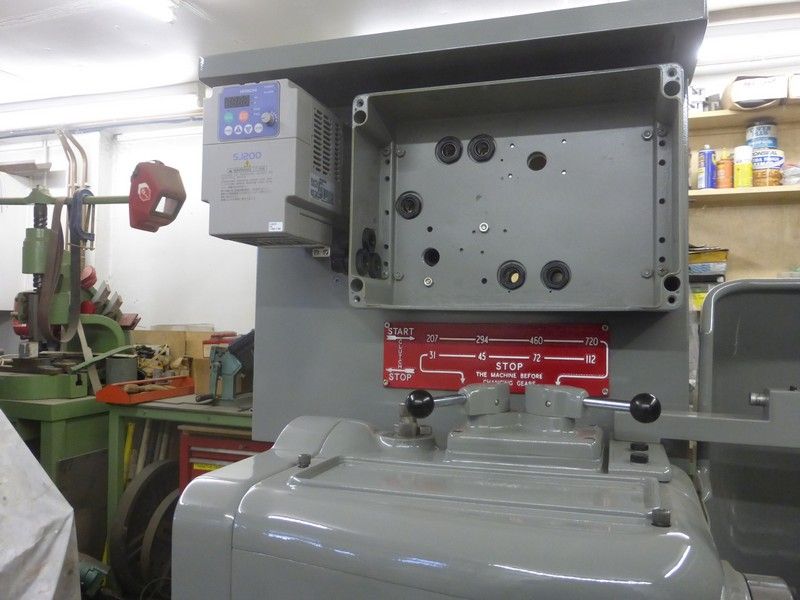
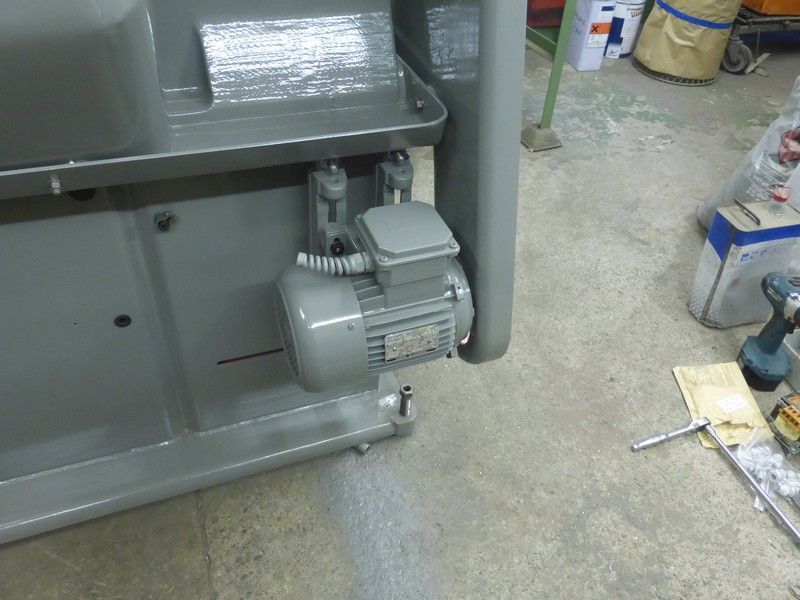
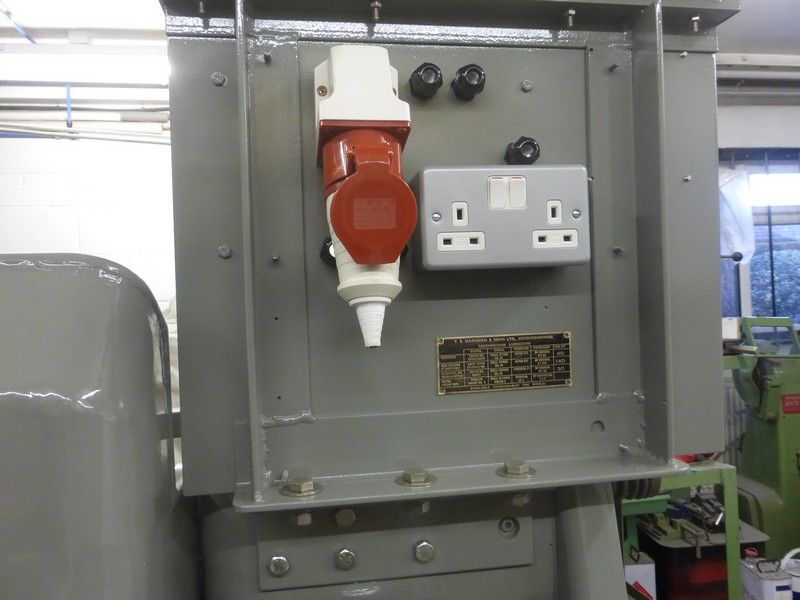
The other jobs I have got done dont look much but all been fiddly as the paint is not really hard for manhandling yet, I have fitted motor and brackets , the gear selectors and started with the wiring grommets etc. I have attached the inverter and also a double socket to the rear of the electrics panel, I have decided not to fit the old bulky work lamp and instead fit two Ikea flexi stalk type LED lights as Doubleboost uses, these need one socket each hence double socket, I think two should cancell out the situation of the shadow cast by one being right where you want to see. The red 3 phase type plug is so I can unplug the motor to run/ test other motors using the lath inverter and controls.
Cheers Mick.
I have ended up re sanding the badges and just re spraying red , then sanding back to alloy leaving a sort of fine brushed finish on the alloy and not laquering them this time, the headstock badge is attached with correct twist screw type rivets kindly donated by Bob KRV3000. The cabinet door was given the same treatment and looks ok , I was going to mask off a square around the Harrison letters and spray red then sand back to alloy again but I think the red might wrinkle the grey and the paint is not hard enough to mask onto yet anyway.


The other jobs I have got done dont look much but all been fiddly as the paint is not really hard for manhandling yet, I have fitted motor and brackets , the gear selectors and started with the wiring grommets etc. I have attached the inverter and also a double socket to the rear of the electrics panel, I have decided not to fit the old bulky work lamp and instead fit two Ikea flexi stalk type LED lights as Doubleboost uses, these need one socket each hence double socket, I think two should cancell out the situation of the shadow cast by one being right where you want to see. The red 3 phase type plug is so I can unplug the motor to run/ test other motors using the lath inverter and controls.


Cheers Mick.
-
Stanley
- Global Moderator
- Posts: 91045
- Joined: 23 Jan 2012, 12:01
- Location: Barnoldswick. Nearer to Heaven than Gloria.
Re: SHED MATTERS 2
It will need dusting every day.....
Stanley Challenger Graham
Stanley's View
scg1936 at talktalk.net
"Beware of certitude" (Jimmy Reid)
The floggings will continue until morale improves!
Stanley's View
scg1936 at talktalk.net
"Beware of certitude" (Jimmy Reid)
The floggings will continue until morale improves!
-
Stanley
- Global Moderator
- Posts: 91045
- Joined: 23 Jan 2012, 12:01
- Location: Barnoldswick. Nearer to Heaven than Gloria.
Re: SHED MATTERS 2
I'm happy to report that there was movement in the shed yesterday! My grand daughter and her young man Mo called round so I got Mo to hold the plaque and nameplates on the wall while I marked the holes up. Two holes, two plugs and two brass screws and I have my plaque on the wall in line with the door to the front room. This is the view I get from my chair. Thanks to Mick for the mahogany.....
Moh is a highly qualified and inquisitive young engineer, a lovely combination. He came round for a crash course on old fashioned lathes and turning so I showed him the two Pickles Lathes and all the other goodies and then popped a piece of steel in the Harrison and got him to turn it down a bit and then face it. He was fascinated because as he said, his training had all been on CNC machines, nobody had ever brought old-fashioned plain manual turning to his attention. I told him to go into the tool room where he worked, find the oldest bloke in there and get him to show him more.
I think I may have infected him with the bug, he took to it like a duck to water! He told me that he wants to set up his own forge as well because blacksmith work fascinates him. This young man is going to be OK! He's thinking on the right lines.
Stanley Challenger Graham
Stanley's View
scg1936 at talktalk.net
"Beware of certitude" (Jimmy Reid)
The floggings will continue until morale improves!
Stanley's View
scg1936 at talktalk.net
"Beware of certitude" (Jimmy Reid)
The floggings will continue until morale improves!
-
Stanley
- Global Moderator
- Posts: 91045
- Joined: 23 Jan 2012, 12:01
- Location: Barnoldswick. Nearer to Heaven than Gloria.
Re: SHED MATTERS 2
Trouble in the front garden. If you look carefully the anchor bolts for the top bracket of the hanging post have let go for some reason, probably some fool swinging on the gate. Problem is of course that it isn't as easy as it looks to get at the anchors and anyway they are all rusted up internally. I've had a hunt in the Treasures and have found four 10mm expanding anchors and using a bit of heat and some penetrating oil have got the hinge nuts free so I'm ready today to pull it to bits and hopefully get the new anchors to grip in the enlarged holes....
Stanley Challenger Graham
Stanley's View
scg1936 at talktalk.net
"Beware of certitude" (Jimmy Reid)
The floggings will continue until morale improves!
Stanley's View
scg1936 at talktalk.net
"Beware of certitude" (Jimmy Reid)
The floggings will continue until morale improves!
-
Stanley
- Global Moderator
- Posts: 91045
- Joined: 23 Jan 2012, 12:01
- Location: Barnoldswick. Nearer to Heaven than Gloria.
Re: SHED MATTERS 2
Funny how a simple job takes over and becomes a major project! I went out to my front gate and everything went well. I found that the anchors for the bottom part of the post were OK and what's more were not rusted up so I could withdraw the bolts without loosening the anchors. Once they were out it was possible to draw the top ones out even though they were siezed and get the gatepost off. So far so good! Things got better when I found I had better anchor bolts the same size as the originals and could simply replace them. The bottom ones would be OK because of course there is no pull on them, the weight of the gate is pushing the post towards the masonry. Even better!
So I set to but found that I couldn't get the top anchors to grip even though they were a good fit in the holes. Something wrong somewhere. A good coat of looking over and I found the problem, the original anchors had come loose because the joint in the masonry had given way and in effect the top of the pillar is cracked and almost loose.
So, I am having a rethink. Not much point doing anything without putting the pillar right so the plan has changed. I shall get my men in to take the pillar back down and when they rebuild it we'll put a couple of long bolts in right through the pillar and anchored to a plate at the back to spread the load. That way the top anchor will be restrained by the whole weight of the top of the pillar and it will be stronger because it has been rebuilt. All I have to do now is make the bolts and the plate and find my men!
Stanley Challenger Graham
Stanley's View
scg1936 at talktalk.net
"Beware of certitude" (Jimmy Reid)
The floggings will continue until morale improves!
Stanley's View
scg1936 at talktalk.net
"Beware of certitude" (Jimmy Reid)
The floggings will continue until morale improves!
-
PanBiker

- Site Administrator

- Posts: 16581
- Joined: 23 Jan 2012, 13:07
- Location: Barnoldswick - In the West Riding of Yorkshire, always was, always will be.
Re: SHED MATTERS 2
I would say this was bound to fail at some point as the load bearing top anchors were set in a joint rather then directly into the masonry. Can you not raise the gate slightly so that the anchors are in solid material?
Ian
-
Stanley
- Global Moderator
- Posts: 91045
- Joined: 23 Jan 2012, 12:01
- Location: Barnoldswick. Nearer to Heaven than Gloria.
Re: SHED MATTERS 2
No point Ian, the course is cracked anyway, it would simply pull the stone out. I am going to bed the new anchors in the mortar when it is relaid as the pillar needs sorting anyway.
You're going to like this one... You know how it is when you are searching the shed for that elusive nut that you know fine you have somewhere. I found some 10mm x 1.5 pitch threaded rod amongst me treasures. Now as you know I don't do metric but usually have some odd bits and nuts around. I started looking for a couple of nuts and found one straight away. An hour later I still hadn't found its mate so I gave up and took Jack for a walk and a couple of meat pies for dinner as I fancied pie and peas. A bit glum because as you know Barlick isn't full of shops selling engineer's supplies. Whilst I was crossing the car park I remembered something and on the way back went round by the fire station where some blokes were fitting new roller shutters. I made the appropriate old engineer noises, pleaded poverty stricken pensioner and came away with 4 brand new 10mm nuts. Problem solved..... Thanks lads!
You're going to like this one... You know how it is when you are searching the shed for that elusive nut that you know fine you have somewhere. I found some 10mm x 1.5 pitch threaded rod amongst me treasures. Now as you know I don't do metric but usually have some odd bits and nuts around. I started looking for a couple of nuts and found one straight away. An hour later I still hadn't found its mate so I gave up and took Jack for a walk and a couple of meat pies for dinner as I fancied pie and peas. A bit glum because as you know Barlick isn't full of shops selling engineer's supplies. Whilst I was crossing the car park I remembered something and on the way back went round by the fire station where some blokes were fitting new roller shutters. I made the appropriate old engineer noises, pleaded poverty stricken pensioner and came away with 4 brand new 10mm nuts. Problem solved..... Thanks lads!
Stanley Challenger Graham
Stanley's View
scg1936 at talktalk.net
"Beware of certitude" (Jimmy Reid)
The floggings will continue until morale improves!
Stanley's View
scg1936 at talktalk.net
"Beware of certitude" (Jimmy Reid)
The floggings will continue until morale improves!
-
PanBiker
- Site Administrator
- Posts: 16581
- Joined: 23 Jan 2012, 13:07
- Location: Barnoldswick - In the West Riding of Yorkshire, always was, always will be.
Re: SHED MATTERS 2
Winner Stanley, always a bonus when a bit of free providence come your way. Like you say, how times change, Pilkingtons, Elmers and Wolstenholmes all within a spit at one time, any one of them would have been able to supply. You would also have been able to get the paraffin that you mentioned in another thread as well.
Ian