Shed Matters 3

User avatar
Stanley
Global Moderator
Global Moderator
Posts: 90857
Joined: 23 Jan 2012, 12:01
Location: Barnoldswick. Nearer to Heaven than Gloria.

Re: Shed Matters 3

Post by Stanley »

Image

Image

Image

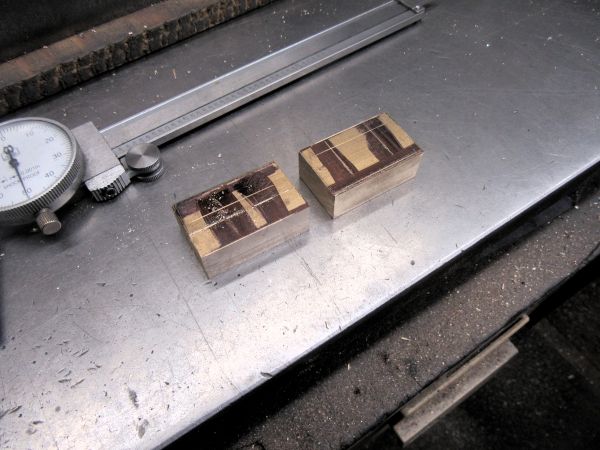
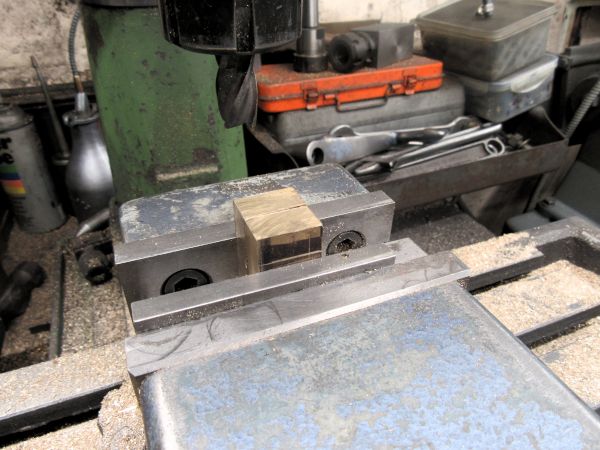
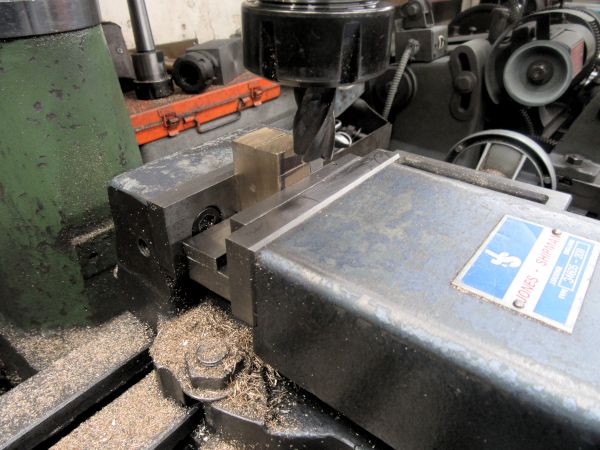
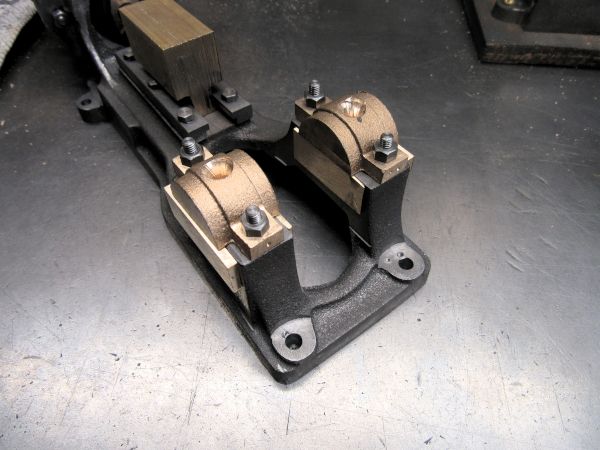
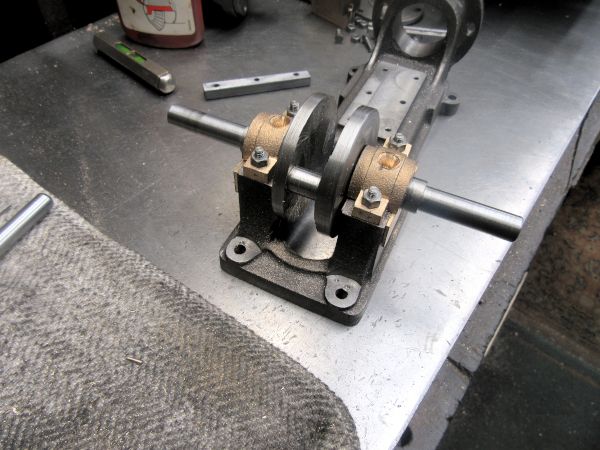
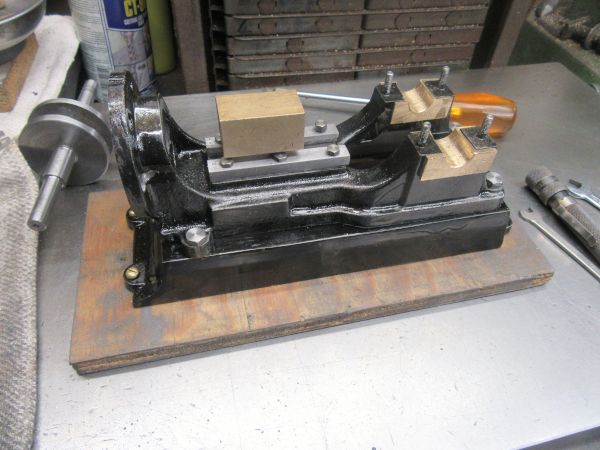
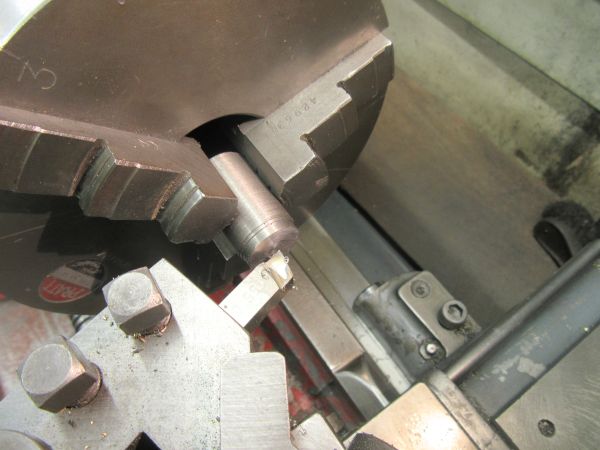
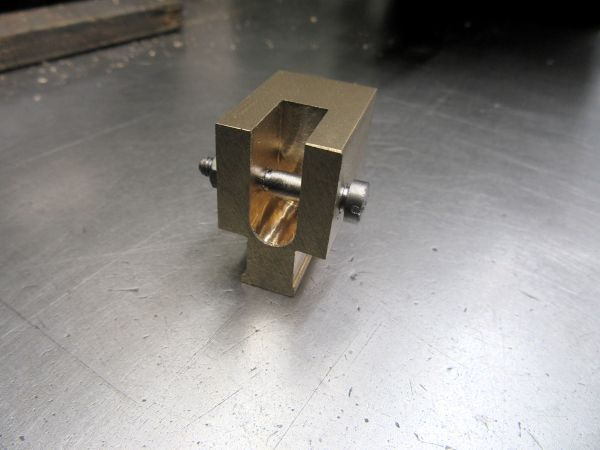
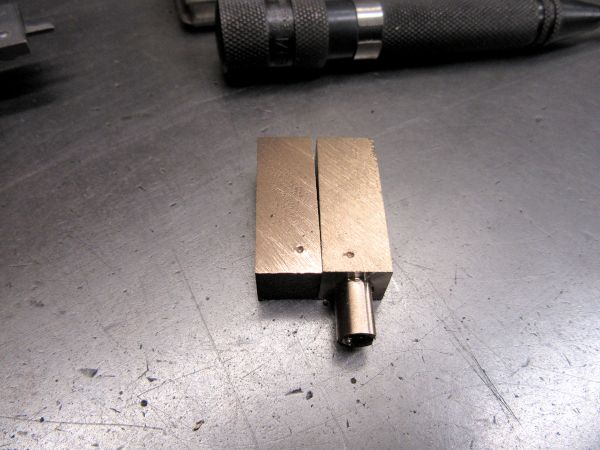
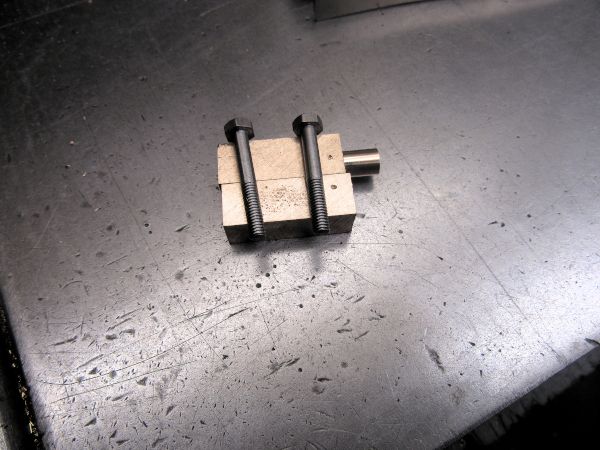
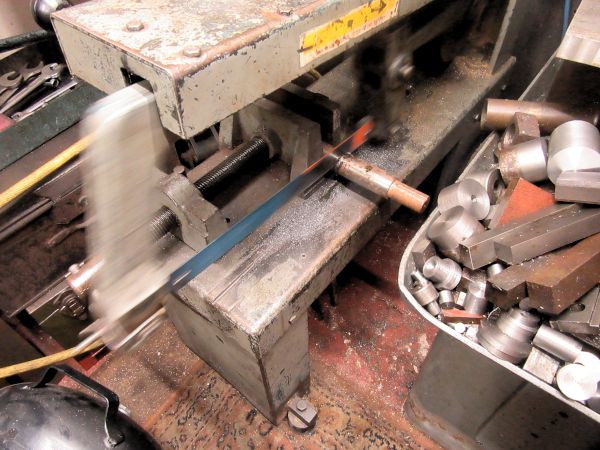
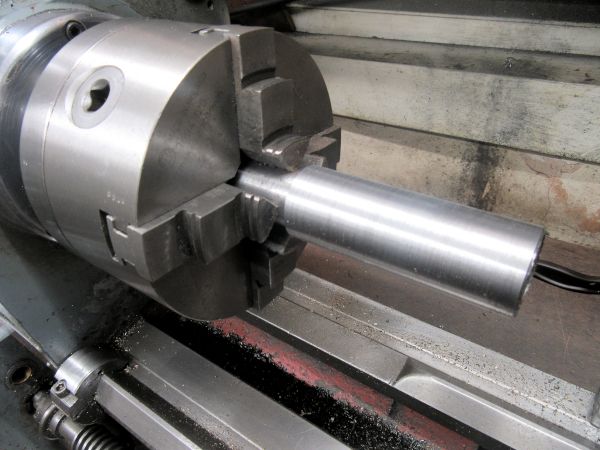
First job I finished drilling, tapping and installing the bolts that hold the crosshead guides down onto the bed. Then I could do some accurate measurements and mark the block of bronze that will become the crosshead for the cuts that enable it to fit in the guides. I finished the first cut down one side and set up for doing the other side. That will be where I start tomorrow. Again, a nice quiet hour and as far as I can see an error-free outcome. More of the same tomorrow.....
Stanley Challenger Graham
Stanley's View
scg1936 at talktalk.net

"Beware of certitude" (Jimmy Reid)
The floggings will continue until morale improves!
User avatar
Stanley
Global Moderator
Global Moderator
Posts: 90857
Joined: 23 Jan 2012, 12:01
Location: Barnoldswick. Nearer to Heaven than Gloria.

Re: Shed Matters 3

Post by Stanley »

Image

Only one image this morning. I spent the whole hour cutting and adjusting the profile of the crosshead. I just have two small cuts to make now before it fits the guides. I could have pressed on and done some overtime this morning but decided not to. I am doing this for pleasure, not because I have to!
Stanley Challenger Graham
Stanley's View
scg1936 at talktalk.net

"Beware of certitude" (Jimmy Reid)
The floggings will continue until morale improves!
User avatar
Stanley
Global Moderator
Global Moderator
Posts: 90857
Joined: 23 Jan 2012, 12:01
Location: Barnoldswick. Nearer to Heaven than Gloria.

Re: Shed Matters 3

Post by Stanley »

Image

Image

Image

Pure fitting this morning. First the small refinements that resulted in the crosshead being a close sliding fit in the crosshead guides. The next task is to mark the end of the crosshead and drill and tap 2BA for the piston rod but before I do that I have to make sure the piston and rod are a go9od sliding fit and that the cylinder is correctly oriented with the valve face perpendicular ro the base and the bed. This entails filing the stud holes in the target end until I have the cylinder right. It took half an hour to get the crosshead to the correct fit and another half an hour to get the Cylinder right. I have taken the 1/4" end mill out of the mill and am ready to fit the normal cutter. I am also ready to fit the cylinder and piston and mark the crosshead with the piston rod. I know where I am starting tomorrow!
Stanley Challenger Graham
Stanley's View
scg1936 at talktalk.net

"Beware of certitude" (Jimmy Reid)
The floggings will continue until morale improves!
User avatar
Stanley
Global Moderator
Global Moderator
Posts: 90857
Joined: 23 Jan 2012, 12:01
Location: Barnoldswick. Nearer to Heaven than Gloria.

Re: Shed Matters 3

Post by Stanley »

Image

I started the morning by making sure the cylinder was sitting on the target face of the bed with the valve face perpendicular to the bed. Then I fitted the piston after packing it with soft packing. When I had that in place I put the soft packing in the piston rod gland and then mounted the cylinder on the bed. Once that was done I used the piston rod to mark the end face of the crosshead, drilled and tapped that 2BA and then fitted it with the piston rod engaged. As expected it is a tight fit but that was to be expected and can be adjusted in subsequent fitting operations. Lastly I refitted the normal everyday cutter in the vertical mill.
Once again, steady progress and no mistakes..... I shall take a view tomorrow when I start.
Stanley Challenger Graham
Stanley's View
scg1936 at talktalk.net

"Beware of certitude" (Jimmy Reid)
The floggings will continue until morale improves!
User avatar
Stanley
Global Moderator
Global Moderator
Posts: 90857
Joined: 23 Jan 2012, 12:01
Location: Barnoldswick. Nearer to Heaven than Gloria.

Re: Shed Matters 3

Post by Stanley »

Image

Image

Image

I can't go any further with the crosshead until I am ready for making and installing the connecting rod and before I do that I have to install the crankshaft in the pedestal bearings. So this morning has been a lot of milling to get the brass stock square and the right size. That included touching up the cutter to ensure it was sharp and a lot of careful thinking, measuring and marking and yes I know I am slow but I know my limitations and have to make absolutely sure I am right before doing any cutting. I'm ready for the rest of the cutting now.....
Stanley Challenger Graham
Stanley's View
scg1936 at talktalk.net

"Beware of certitude" (Jimmy Reid)
The floggings will continue until morale improves!
User avatar
Stanley
Global Moderator
Global Moderator
Posts: 90857
Joined: 23 Jan 2012, 12:01
Location: Barnoldswick. Nearer to Heaven than Gloria.

Re: Shed Matters 3

Post by Stanley »

Image

Image

Image

The morning started with a small problem, the 5/8" end mill was nowhere near sharp and so I had to get into the Clarkson Too and Cutter grinder an rectify that. That was half an hour gone by the time I had got everything to my liking. I cut one side of the two bronze bearings and will cut the other tomorrow. Time spent sharpening tools is never wasted particularly if it's a milling cutter!
Stanley Challenger Graham
Stanley's View
scg1936 at talktalk.net

"Beware of certitude" (Jimmy Reid)
The floggings will continue until morale improves!
User avatar
Stanley
Global Moderator
Global Moderator
Posts: 90857
Joined: 23 Jan 2012, 12:01
Location: Barnoldswick. Nearer to Heaven than Gloria.

Re: Shed Matters 3

Post by Stanley »

Image

Image

Image

Today was more work on the complicated little job of fitting the bottom brasses to the sockets in the bed where the pedestal bearings live. This included putting the witness marks in for identifying which brass goes where and refining the sockets in the bed so they are deep0 enough to accept the full bearing. I am at the stage now where I can fit the top brasses and then we can finish this job but there is more to do yet!
Stanley Challenger Graham
Stanley's View
scg1936 at talktalk.net

"Beware of certitude" (Jimmy Reid)
The floggings will continue until morale improves!
User avatar
Stanley
Global Moderator
Global Moderator
Posts: 90857
Joined: 23 Jan 2012, 12:01
Location: Barnoldswick. Nearer to Heaven than Gloria.

Re: Shed Matters 3

Post by Stanley »

Image

Image

More work on the pedestal bearings.... I have ensured there is room to install the crankshaft..... Refined the bottom bearings so that they have witness marks and Match the top brasses. Then Do the same with the top brasses and end up at the stage where I am ready to drill the top brasses for hold down bolts and Oil hole and then mark the bed for the studs and drill and tap for them tomorrow. Lots of small fitting jobs and cleaning up and changing milling cutters on the way. Nice straight edge and no mistakes!
Stanley Challenger Graham
Stanley's View
scg1936 at talktalk.net

"Beware of certitude" (Jimmy Reid)
The floggings will continue until morale improves!
User avatar
Stanley
Global Moderator
Global Moderator
Posts: 90857
Joined: 23 Jan 2012, 12:01
Location: Barnoldswick. Nearer to Heaven than Gloria.

Re: Shed Matters 3

Post by Stanley »

Image

Image

Image

The task this morning was to install the holding down studs for the top brasses. First I drilled the brasses 4BA clearance and then drilled for the oil hole and put a cup in the top side. Then mark, drill and tap the horns of the bed to take the studs. Lastly fit the studs and fasten the brasses down. I'm ready now to bore the bearings but that is for tomorrow.
Stanley Challenger Graham
Stanley's View
scg1936 at talktalk.net

"Beware of certitude" (Jimmy Reid)
The floggings will continue until morale improves!
User avatar
Stanley
Global Moderator
Global Moderator
Posts: 90857
Joined: 23 Jan 2012, 12:01
Location: Barnoldswick. Nearer to Heaven than Gloria.

Re: Shed Matters 3

Post by Stanley »

Image

Image

The target this morning was to bore the brasses for the pedestal bearings but other matters had to be addressed before I got to that. The bed of the crosshead guide had to be refined, the size of the piston and the outside finish on the pedestal brasses. What this meant was that the bed had to be stripped down in order to do these things and I ended up after an hour and a quarter ready to do the final half inch bore of the brasses. All very edgy stuff and any mistakes at this stage would of course be disastrous. I think we are OK so far!
Stanley Challenger Graham
Stanley's View
scg1936 at talktalk.net

"Beware of certitude" (Jimmy Reid)
The floggings will continue until morale improves!
User avatar
Stanley
Global Moderator
Global Moderator
Posts: 90857
Joined: 23 Jan 2012, 12:01
Location: Barnoldswick. Nearer to Heaven than Gloria.

Re: Shed Matters 3

Post by Stanley »

Image

Image

This morning I finished line boring the bearing brasses, then adjusted the thread length on all 4 studs and installed them in the bed using Loctite. Next I reamed the bearings and fitted the crankshaft. It is oiled and will run in to a nice fit. It's a bit tight at the moment but that's to be expected.
Stanley Challenger Graham
Stanley's View
scg1936 at talktalk.net

"Beware of certitude" (Jimmy Reid)
The floggings will continue until morale improves!
User avatar
Stanley
Global Moderator
Global Moderator
Posts: 90857
Joined: 23 Jan 2012, 12:01
Location: Barnoldswick. Nearer to Heaven than Gloria.

Re: Shed Matters 3

Post by Stanley »

Image

Image

I started the morning by stripping the crankshaft out of the bearings because I need it for boring the flywheel to suit it. Then I set up in Mrs Harrison to rough turn the flywheel preparatory to painting it. I have decided that painting the castings is the next task and doing the first turning of the flywheel is essential to that job.
I finished up with one side done and ready for boring.
Stanley Challenger Graham
Stanley's View
scg1936 at talktalk.net

"Beware of certitude" (Jimmy Reid)
The floggings will continue until morale improves!
User avatar
Stanley
Global Moderator
Global Moderator
Posts: 90857
Joined: 23 Jan 2012, 12:01
Location: Barnoldswick. Nearer to Heaven than Gloria.

Re: Shed Matters 3

Post by Stanley »

Image

Image

Image

This morning the task was to finish turning the flywheel and boring it ready for painting and then fitting it on the crankshaft, a very close fit which meant it took more finishing. Finally I put the inside jaws back on the big SC chuck.
Stanley Challenger Graham
Stanley's View
scg1936 at talktalk.net

"Beware of certitude" (Jimmy Reid)
The floggings will continue until morale improves!
User avatar
Stanley
Global Moderator
Global Moderator
Posts: 90857
Joined: 23 Jan 2012, 12:01
Location: Barnoldswick. Nearer to Heaven than Gloria.

Re: Shed Matters 3

Post by Stanley »

Image

Image

My first action in the shed this morning was to have a deep chip chase on the lathe, VM and drill and then a really good clean of Mrs Harrison. I considered oiling it as well but decided I had done enough housekeeping. Next I stripped the castings down and cleaned them ready for painting. I finished after three quarters of an hour, I could have started painting but there is no rush and I have left that for tomorrow....
Stanley Challenger Graham
Stanley's View
scg1936 at talktalk.net

"Beware of certitude" (Jimmy Reid)
The floggings will continue until morale improves!
User avatar
Stanley
Global Moderator
Global Moderator
Posts: 90857
Joined: 23 Jan 2012, 12:01
Location: Barnoldswick. Nearer to Heaven than Gloria.

Re: Shed Matters 3

Post by Stanley »

Image

Image

I allowed myself one small diversion, I cleaned up the vintage carpenter's square and oiled it. We are responsible for the condition of our tools even if, like this square, it's doubtful if I will ever use it.
Then I turned to brush painting my castings.... If you're thinking what a lousy painter I am you're right! However, doing them at this stage means that much of my overpaint is cleaned up during final finishing and fitting and the end result is what I am aiming for which is not concourse condition but a workmanlike protecting of the castings. Just the way the old engine builders used to work.....
Stanley Challenger Graham
Stanley's View
scg1936 at talktalk.net

"Beware of certitude" (Jimmy Reid)
The floggings will continue until morale improves!
User avatar
Stanley
Global Moderator
Global Moderator
Posts: 90857
Joined: 23 Jan 2012, 12:01
Location: Barnoldswick. Nearer to Heaven than Gloria.

Re: Shed Matters 3

Post by Stanley »

Image

Image

Image

The first job t6his morning was to use emery paper to clean all the excess paint off mating surfaces where it would interfere with the fit. Then I set to to refit all the parts mounted on the baseboard and get the engine ready for the next round of fitting which is the crank pin bearing and connecting rod and the valve train. The flywheel will be refinished and polished but for the moment is just slipped on the end of the crankshaft to show where we are. A good hour and a quarter. I enjoyed that!
Stanley Challenger Graham
Stanley's View
scg1936 at talktalk.net

"Beware of certitude" (Jimmy Reid)
The floggings will continue until morale improves!
User avatar
Stanley
Global Moderator
Global Moderator
Posts: 90857
Joined: 23 Jan 2012, 12:01
Location: Barnoldswick. Nearer to Heaven than Gloria.

Re: Shed Matters 3

Post by Stanley »

Image

Image

I gave the shed 45 minutes this morning because that was all I needed to do what was on my agenda, clean up the bench and the tools and do the same with the vertical mill and the lathe, both of which were thoroughly oiled and then wiped down again. Every now and then you have to stop and do some maintenance! I'm ready now to go forward and I'll decide what that is by the time I'm in there tomorrow morning. But now breakfast and second sleep is the project.
Stanley Challenger Graham
Stanley's View
scg1936 at talktalk.net

"Beware of certitude" (Jimmy Reid)
The floggings will continue until morale improves!
User avatar
Stanley
Global Moderator
Global Moderator
Posts: 90857
Joined: 23 Jan 2012, 12:01
Location: Barnoldswick. Nearer to Heaven than Gloria.

Re: Shed Matters 3

Post by Stanley »

Image

Image

Image

First job this morning was to refine the fitting of the crankshaft to make sure it was free running when the top brasses were tightly bolted down. Then I took a view and decided that the place to work next was in the fitting and finishing of the crosshead. Careful measuring and marking and I have cut it to the correct length. That's a start, now I need to do the necessary cutting to accept the connecting rod the making of which will be the next task. Quietly away we have more error-free progress. That makes it a good morning and now I can treat myself to breakfast. The chicken is in the oven and cooking.....
Stanley Challenger Graham
Stanley's View
scg1936 at talktalk.net

"Beware of certitude" (Jimmy Reid)
The floggings will continue until morale improves!
User avatar
Stanley
Global Moderator
Global Moderator
Posts: 90857
Joined: 23 Jan 2012, 12:01
Location: Barnoldswick. Nearer to Heaven than Gloria.

Re: Shed Matters 3

Post by Stanley »

Image

Image

Image

More work refining the crosshead. As usual the start was some careful measuring and marking and then cutting the slot in the crosshead that will accept the small end of the connecting rod. Then drill and tap it for the pin that will be the fulcrum for the rod. Lots of thought about this because the drawing is wrong, it calls for 3.7mm clearance on one side when it has to be 3/16" to accommodate the size of the pin I have to make. That's the next job, a bit of fine turning but that's for tomorrow....
Stanley Challenger Graham
Stanley's View
scg1936 at talktalk.net

"Beware of certitude" (Jimmy Reid)
The floggings will continue until morale improves!
User avatar
Stanley
Global Moderator
Global Moderator
Posts: 90857
Joined: 23 Jan 2012, 12:01
Location: Barnoldswick. Nearer to Heaven than Gloria.

Re: Shed Matters 3

Post by Stanley »

Image

Image

Today's task was to make the tiny pivot pin for the small end of the connecting rod and fit it into the crosshead. I started by resharpening my HSS cutter and checking it was on centre by facing a piece of scrap steel. Then a very careful bit of fine turning and fitting. I made no mistakes and ended up with the pin installed in the crosshead and ready to accept the con-rod.That made it a nice morning and now I deserve some breakfast!
Stanley Challenger Graham
Stanley's View
scg1936 at talktalk.net

"Beware of certitude" (Jimmy Reid)
The floggings will continue until morale improves!
User avatar
Stanley
Global Moderator
Global Moderator
Posts: 90857
Joined: 23 Jan 2012, 12:01
Location: Barnoldswick. Nearer to Heaven than Gloria.

Re: Shed Matters 3

Post by Stanley »

Image

Image

Image

Following on from my work on the crosshead, I now want to make and fit the connecting rod but before I do that I have to make the crank pin bearing because the design of the con-rod end depends on the exact measurements of the bearing so I got the castings out and started working on them, at the moment all I want is a good fit on the crank pin. Once I have that I can make my con-rod to fit. Because I make my crank shaft differently from the Stuart way, the brasses, as cast, are nothing like the shape I eventually want them to be. So and hour of careful measuring, thought and milling. That included re-sharpening the milling cutter.
(I'm at the stage where I should really ditch this cutter.... it is so short I am into an area where the steel is not tempered. I think I have had my moneys worth out of what was always a scrap cutter retrieved from a scrap yard!)
Stanley Challenger Graham
Stanley's View
scg1936 at talktalk.net

"Beware of certitude" (Jimmy Reid)
The floggings will continue until morale improves!
User avatar
Stanley
Global Moderator
Global Moderator
Posts: 90857
Joined: 23 Jan 2012, 12:01
Location: Barnoldswick. Nearer to Heaven than Gloria.

Re: Shed Matters 3

Post by Stanley »

Image

Image

Image

Image

I started the morning by ditching the old cutter in the mill and sharpening a new one to replace it. Then I tested it by milling a surface on a piece of scrap brass. The old cutter is in the recycling, it owes me nothing! Next I replaced the big 3 jaw SC chuck with the smaller and newer 4 jaw SC chuck. That enabled the holding of one half of the brass that forms the bearing for the crank pin. I turned the top of that to size, 1/4" diameter, and then drilled and tapped it 3/16" X 40TPI for the plug that will stop the oil hole off. One last job, I found the 4BA bolts that will hold the two halves of the bearing together as that needs to be done before I can bore the bearing 3/8" to fit the crank pin. Another good morning, no mistakes and tomorrow I'll make the plug for the oil hole before fitting the bolts to the brasses. It's a good day!
Stanley Challenger Graham
Stanley's View
scg1936 at talktalk.net

"Beware of certitude" (Jimmy Reid)
The floggings will continue until morale improves!
User avatar
Stanley
Global Moderator
Global Moderator
Posts: 90857
Joined: 23 Jan 2012, 12:01
Location: Barnoldswick. Nearer to Heaven than Gloria.

Re: Shed Matters 3

Post by Stanley »

Image

Image

Image

Image

First job was to measure and mark the brasses and then drill for the bolts which hold the bearing together and are used to fasten it to the foot of the Connecting Rod. In order to make them long enough the back side o0f the bearing had spot-faces cut for the bolts. Next I made the threaded plug for the oil reservoir and this included David's favourite operation, knurling the head. I made and fitted this small item and then tidied up and put tools away. I am ready now to bore the bearing and start making the con-rod. Another nice morning with good error-free progress, now for a well-deserved breakfast.....
Stanley Challenger Graham
Stanley's View
scg1936 at talktalk.net

"Beware of certitude" (Jimmy Reid)
The floggings will continue until morale improves!
User avatar
Stanley
Global Moderator
Global Moderator
Posts: 90857
Joined: 23 Jan 2012, 12:01
Location: Barnoldswick. Nearer to Heaven than Gloria.

Re: Shed Matters 3

Post by Stanley »

Image

Image

Image

Image

Two tasks this morning, finish the crank bearing by Boring it 3/8" for the pin and then start on making the con-rod. Stuarts supply a piece of rectangular bar to make the con-rod out of but due to the fact that my design is slightly different than theirs it isn't big enough to provide a footprint big enough to make the foot that the bearing attaches to so I had to find a piece of scrap and cut a piece to make the rod out of using Mrs McMaster. by the time I had measured, marked and cut that it was knocking off time so my last image is of the original stock from Stuarts, the piece of scrap I shall use and the finished crank pin bearing. Now for breakfast!
Stanley Challenger Graham
Stanley's View
scg1936 at talktalk.net

"Beware of certitude" (Jimmy Reid)
The floggings will continue until morale improves!
User avatar
Stanley
Global Moderator
Global Moderator
Posts: 90857
Joined: 23 Jan 2012, 12:01
Location: Barnoldswick. Nearer to Heaven than Gloria.

Re: Shed Matters 3

Post by Stanley »

Image

Image

This morning the task was to convert this piece of rusty scrap into a connecting rod.... I hit the usual problems with scrap, you never know what you are getting. With this sample it was that it is harder than I would have liked. So I had to resort to indexed carbide and that in itself was a problem because the tool I selected had a blunt tip. By the time I had found that out and corrected it it was knocking off time. I have got the shaft to it's major diameter. Tomorrow I have to reduce the shaft to the minor diameter....
Yes, I could have ditched this scrap but I decided to persevere. I like making something useful out of what others have thrown away! Now for breakfast and second sleep.
Stanley Challenger Graham
Stanley's View
scg1936 at talktalk.net

"Beware of certitude" (Jimmy Reid)
The floggings will continue until morale improves!
Post Reply

Return to “Crafts”